FlutterからネイティブAPIを呼びたい
MethodChannelを使って、FlutterからJava(Android)とObjective-C(iOS)のネイティブコード呼び出しを試してみました。
Writing custom platform-specific codeに記載のサンプルコードを動かしてみたので、実際の流れをメモしておきます。
Kotlin/Swift版はこちら
FlutterからKotlin/Swiftのネイティブコードを呼んでみた - Qiita
サンプルソースはこちら
https://github.com/unsolublesugar/flutter-sample-custom-platform-specific-code-java-objc
サンプルプロジェクトの作成
まずはサンプルプロジェクトを作成します。サンプルアプリでは、バッテリー残量を取得するネイティブコードを実装します。
Flutter v1.9.1では、デフォルトのネイティブ言語がKotlinとSwiftになっていたので、オプション指定でJava/Objective-Cでプロジェクト作成します。
$ flutter create -i objc -a java batterylevel
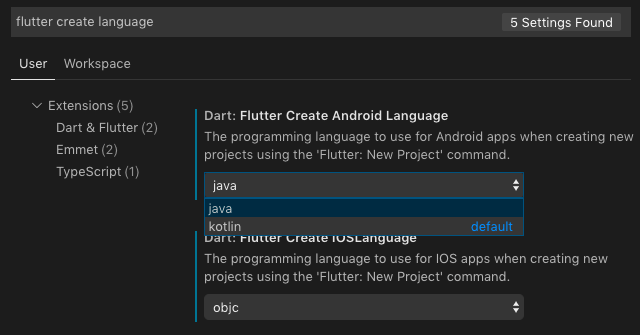
VSCodeでプロジェクト作成している場合は、設定の [Extensions] -> [Dart & Flutter] にて使用言語の切り替えが可能です。「flutter create language」で検索すると一発で設定にアクセスできます。
Flutter側の呼び出しコード
サンプル画面のWidgetとバッテリー残量取得メソッドの実装を加えます。以下、_MyHomePageStateのみ抜粋したmain.dartファイルです。
import 'dart:async';

import 'package:flutter/material.dart';
import 'package:flutter/services.dart';
...
class _MyHomePageState extends State<MyHomePage> {
  static const platform = const MethodChannel('samples.flutter.dev/battery');

  String _batteryLevel = 'Unknown battery level.';

  Future<void> _getBatteryLevel() async {
    // Get battery level.
    String batteryLevel;
    try {
      final int result = await platform.invokeMethod('getBatteryLevel');
      batteryLevel = 'Battery level at $result % .';
    } on PlatformException catch (e) {
      batteryLevel = "Failed to get battery level: '${e.message}'.";
    }

    setState(() {
      _batteryLevel = batteryLevel;
    });
  }

  @override
  Widget build(BuildContext context) {
    return Material(
      child: Center(
        child: Column(
          mainAxisAlignment: MainAxisAlignment.spaceEvenly,
          children: [
            RaisedButton(
              child: Text('Get Battery Level'),
              onPressed: _getBatteryLevel,
            ),
            Text(_batteryLevel),
          ],
        ),
      ),
    );
  }
}
MethodChannelで呼び出すバッテリー残量取得メソッドgetBatteryLevelは、JavaとObjective-C側でそれぞれ定義していきます。
Java側のネイティブコード(Android)
それではJava(Android)のコードを書いていきましょう。
必要なimportの追加
MainActivity.javaにimportを追加。
import android.os.Bundle;
import android.content.ContextWrapper;
import android.content.Intent;
import android.content.IntentFilter;
import android.os.BatteryManager;
import android.os.Build.VERSION;
import android.os.Build.VERSION_CODES;

import io.flutter.app.FlutterActivity;
import io.flutter.plugins.GeneratedPluginRegistrant;
import io.flutter.plugin.common.MethodCall;
import io.flutter.plugin.common.MethodChannel;
import io.flutter.plugin.common.MethodChannel.MethodCallHandler;
import io.flutter.plugin.common.MethodChannel.Result;
getBatteryLevelを実装
MainActivityのonCreateメソッド内でMethodChannelを定義し、setMethodCallHandlerを呼び出します。
public class MainActivity extends FlutterActivity {
    private static final String CHANNEL = "samples.flutter.dev/battery";

    @Override
    public void onCreate(Bundle savedInstanceState) {

        super.onCreate(savedInstanceState);
        GeneratedPluginRegistrant.registerWith(this);

        new MethodChannel(getFlutterView(), CHANNEL).setMethodCallHandler(
                new MethodCallHandler() {
                    @Override
                    public void onMethodCall(MethodCall call, Result result) {
                    }
                });
    }
}
ここで定義したチャンネル名samples.flutter.dev/batteryを、Flutter側の呼び出しで使用します。
Android端末のバッテリーレベルを取得するコードを追加します。
  private int getBatteryLevel() {
    int batteryLevel = -1;
    if (VERSION.SDK_INT >= VERSION_CODES.LOLLIPOP) {
      BatteryManager batteryManager = (BatteryManager) getSystemService(BATTERY_SERVICE);
      batteryLevel = batteryManager.getIntProperty(BatteryManager.BATTERY_PROPERTY_CAPACITY);
    } else {
      Intent intent = new ContextWrapper(getApplicationContext()).
          registerReceiver(null, new IntentFilter(Intent.ACTION_BATTERY_CHANGED));
      batteryLevel = (intent.getIntExtra(BatteryManager.EXTRA_LEVEL, -1) * 100) /
          intent.getIntExtra(BatteryManager.EXTRA_SCALE, -1);
    }

    return batteryLevel;
  }
getBatteryLevel()をMethodChannel で呼び出すコードを追加。
@Override
public void onMethodCall(MethodCall call, Result result) {
    // Note: this method is invoked on the main thread.
    if (call.method.equals("getBatteryLevel")) {
        int batteryLevel = getBatteryLevel();

        if (batteryLevel != -1) {
            result.success(batteryLevel);
        } else {
            result.error("UNAVAILABLE", "Battery level not available.", null);
        }
    } else {
        result.notImplemented();
    }
}
これでAndroid用Javaネイティブコードの呼び出し準備は完了です。
エミュレーター上で実行
上記コードをエミュレーター上でbuild runすると「Get Battery Level」ボタンと「Unknown battery level.」テキストが表示されます。
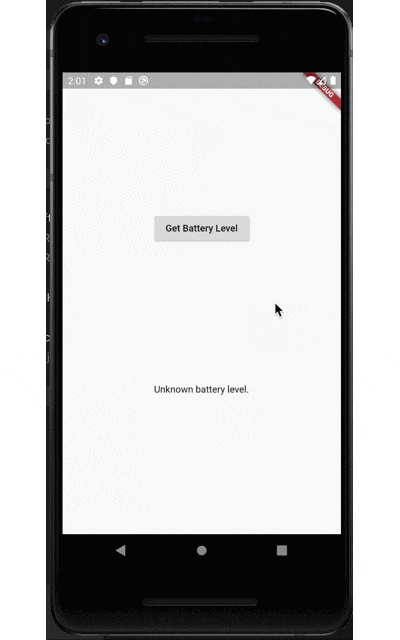
ボタンタップで、端末のバッテリー残量を取得。テキスト表示が切り替わります。
Objective-C側のネイティブコード(iOS)
続いてObjective-C(iOS)のコードを書いていきます。
対象プロジェクト内のiosフォルダを開き、Runnerフォルダ配下にあるAppDelegate.mを開きます。
getBatteryLevelを実装
Androidと同じくMethodChannelの実装を定義します。
# include "AppDelegate.h"
# include "GeneratedPluginRegistrant.h"

@implementation AppDelegate

- (BOOL)application:(UIApplication *)application
    didFinishLaunchingWithOptions:(NSDictionary *)launchOptions {
  FlutterViewController* controller = (FlutterViewController*)self.window.rootViewController;

  FlutterMethodChannel* batteryChannel = [FlutterMethodChannel
                                          methodChannelWithName:@"samples.flutter.dev/battery"
                                          binaryMessenger:controller];

  [batteryChannel setMethodCallHandler:^(FlutterMethodCall* call, FlutterResult result) {
  }];


  [GeneratedPluginRegistrant registerWithRegistry:self];
  // Override point for customization after application launch.
  return [super application:application didFinishLaunchingWithOptions:launchOptions];
}

@end
@endの手前にバッテリーレベルの取得メソッドgetBatteryLevelを追加。
- (int)getBatteryLevel {
  UIDevice* device = UIDevice.currentDevice;
  device.batteryMonitoringEnabled = YES;
  if (device.batteryState == UIDeviceBatteryStateUnknown) {
    return -1;
  } else {
    return (int)(device.batteryLevel * 100);
  }
}
setMethodCallHandlerでgetBatteryLevelを呼び出します。
__weak typeof(self) weakSelf = self;
  [batteryChannel setMethodCallHandler:^(FlutterMethodCall* call, FlutterResult result) {
    if ([@"getBatteryLevel" isEqualToString:call.method]) {
      int batteryLevel = [weakSelf getBatteryLevel];

      if (batteryLevel == -1) {
        result([FlutterError errorWithCode:@"UNAVAILABLE"
                                  message:@"Battery info unavailable"
                                  details:nil]);
      } else {
        result(@(batteryLevel));
      }
    } else {
      result(FlutterMethodNotImplemented);
    }
  }];
iOS Simulatorを起動すると、Android同様にボタンとテキストが表示されます。ボタンをタップするとMethodChannel経由でgetBatteryLevel()が呼び出されテキストが更新されます。
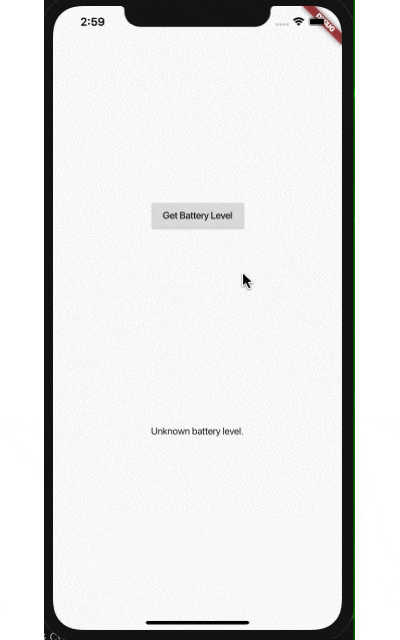
iOS Simulator上ではバッテリーAPIがサポートされていないため「Battery info unavailable」という表示が出ます。これでObjective-C側で書いたコードが動いていることがわかりますね。
Flutterは公式ドキュメントが恐ろしく充実してて最高。