PythonとTkinterで作るDICOMビューア開発レポート
はじめに
こんにちは。
業務トレーニングの一環で、医用画像フォーマット「DICOM」を閲覧・操作するためのGUIアプリケーションをPythonで作成しました。
本稿は、その成果物であるDICOMビューアdicomviewer.pyについて、研修で求められた要件と、それに対する実装内容を報告するドキュメントです。
1. 医用画像の基礎知識
まず、本プログラムが扱う医用画像と、その共通フォーマットであるDICOMについて概説します。
1.1. 医用画像の種類、bit深度、容量
医用画像には様々な種類(モダリティ)が存在します。代表的なものと、その特徴は以下の通りです。
| 種類 | 日本語名 | bit深度 (一般的) | 1枚あたりの容量感 |
|---|---|---|---|
| CT | コンピュータ断層撮影 | 12-bit or 16-bit | 512x512px で約0.5MB |
| MRI | 磁気共鳴画像 | 12-bit or 16-bit | 256x256px で約0.125MB |
| CR/DR | X線撮影 | 10-bit or 12-bit | 2048x2048px で約8MB |
| US | 超音波検査 | 8-bit | 640x480px で約0.3MB |
- bit深度: 1ピクセルが表現できる色の深さを示します。例えば12-bit深度の場合、$2^{12}=4096$段階の階調を表現できます。これは一般的な8-bit(256段階)の画像よりも遥かに多くの情報を含んでいます。
- 容量感: 1枚(1スライス)あたりの容量は上記の通りですが、CTのように数百枚の断層画像を1セット(1シリーズ)として扱う場合、シリーズ全体の容量は数百MBから数GBに達することもあります。
1.2. DICOMの基本データ構造
DICOMファイルは、一見すると単一のファイルですが、その内部はデータ要素 (Data Element) と呼ばれる情報の最小単位が数多く集まった構造をしています。
各データ要素は、それ自体が持つ情報の「種類」「データ型」「長さ」「実際の値」をすべて内包しており、基本的には以下の4つの部品で構成されます。
+-------------+----+--------------+----------------+
|    Tag      | VR | Value Length |     Value      |
| (gggg,eeee) |    |  (2 or 4 B)  | (可変長)       |
+-------------+----+--------------+----------------+
-
Tag (タグ):
(gggg,eeee)という2つの16進数のペアで表され、そのデータ要素がどんな情報なのか(例: 患者名、撮影日など)を一意に識別します。グループ番号(g)と要素番号(e)から成ります。- 例:
(0010,0010)は「患者名」を意味します。
- 例:
-
VR (Value Representation): 値のデータ型を定義する2文字のコードです。
PN(Person Name),DA(Date),DS(Decimal String) など、多数の種類が定義されています。 - Value Length (値長): 続く「値」が何バイトのデータなのかを示します。
- Value (値): このデータ要素が持つ実際のデータです。(例: "TARO YAMADA", "20250926"など)
DICOMファイル全体は、これらのデータ要素のリストと考えることができます。ファイルヘッダ情報も、ピクセルデータそのものも、すべてこのデータ要素の形式で格納されています。
1.3. Pythonライブラリの活用
前述の通り、DICOMは非常に構造化されたフォーマットですが、バイナリデータを自力で読み解き、タグを一つ一つ解釈していくのは大変な労力を要します。
そこで、Pythonにはpydicomという強力なライブラリが存在します。pydicomは、この複雑なデータ構造を自動的に解析し、オブジェクトの属性にアクセスするような形で、直感的にDICOMの各データ要素を扱えるようにしてくれます。
import pydicom

# DICOMファイルを読み込むだけで、自動的にデータ構造が解析される
ds = pydicom.dcmread("path/to/your/dicomfile.dcm")

# タグを意識せず、属性名で簡単に値にアクセスできる
print(f"患者名: {ds.PatientName}")
print(f"撮影日: {ds.StudyDate}")

# ピクセルデータもNumpy配列として簡単に取得可能
pixel_data = ds.pixel_array
本プログラムでは、このpydicomを全面的に採用することで、DICOMの複雑な仕様に直接向き合うことなく、アプリケーションのロジック開発に集中しています。
2. プログラムと実行方法
プログラムと実行方法について説明します。
2.1. プログラム
import tkinter as tk
from tkinter import filedialog, messagebox, Menu, Scale, Toplevel, Text, Scrollbar, PanedWindow, Frame, Label
import pydicom
import os
from PIL import Image, ImageTk
import numpy as np

# Try to import tkinterdnd2, but make it optional
try:
    from tkinterdnd2 import DND_FILES, TkinterDND
    DND_SUPPORT = True
except ImportError:
    DND_SUPPORT = False

class DICOMViewer:
    def __init__(self, root):
        self.root = root
        self.root.title("Advanced DICOM Viewer v1.2")
        self.root.geometry("1200x800")

        self.files, self.ds = [], None
        self.index = 0
        self.pixel_min, self.pixel_max = 0, 4095

        self.ww = tk.DoubleVar(value=400)
        self.wl = tk.DoubleVar(value=40)
        self._last_x, self._last_y = 0, 0

        self.zoom_factor, self.pan_x, self.pan_y = 1.0, 0, 0

        self.create_menu()
        self.setup_ui()

        if DND_SUPPORT:
            self.root.drop_target_register(DND_FILES)
            self.root.dnd_bind('<<Drop>>', self.handle_drop)
        else:
            print("Notice: tkinterdnd2 not found. Drag and drop will be disabled.")

    def setup_ui(self):
        m = PanedWindow(self.root, sashrelief=tk.RAISED)
        m.pack(fill=tk.BOTH, expand=1)

        # --- Left Pane ---
        left_pane = Frame(m, width=350)
        m.add(left_pane, stretch="never")

        tk.Label(left_pane, text="Advanced DICOM Viewer", font=("Arial", 14, "bold")).pack(pady=10)

        info_frame = Frame(left_pane, height=200)
        info_frame.pack(fill=tk.X, padx=5, pady=5)
        info_frame.pack_propagate(False)
        self.info_text = Text(info_frame, wrap=tk.NONE, font=("Arial", 9))
        v_scroll = Scrollbar(info_frame, orient=tk.VERTICAL, command=self.info_text.yview)
        self.info_text.configure(yscrollcommand=v_scroll.set)
        v_scroll.pack(side=tk.RIGHT, fill=tk.Y)
        self.info_text.pack(expand=True, fill=tk.BOTH)
        self.info_text.config(state=tk.DISABLED)

        control_frame = Frame(left_pane)
        control_frame.pack(fill=tk.X, padx=5, pady=10)
        tk.Button(control_frame, text="自動輝度調整", command=self.auto_adjust_wwl).pack(fill=tk.X, pady=5)

        Label(control_frame, text="ウィンドウ幅 (WW)").pack()
        self.ww_slider = Scale(control_frame, from_=1, to=4095, orient=tk.HORIZONTAL, variable=self.ww, command=self.on_wwl_change)
        self.ww_slider.pack(fill=tk.X)

        Label(control_frame, text="ウィンドウレベル (WL)").pack()
        self.wl_slider = Scale(control_frame, from_=-1024, to=3071, orient=tk.HORIZONTAL, variable=self.wl, command=self.on_wwl_change)
        self.wl_slider.pack(fill=tk.X)

        # --- Right Pane ---
        right_pane = Frame(m)
        m.add(right_pane)

        self.image_label = tk.Label(right_pane)
        self.image_label.pack(pady=5, expand=True, fill=tk.BOTH)
        self.image_label.bind("<ButtonPress-1>", self.start_drag_wwl)
        self.image_label.bind("<B1-Motion>", self.drag_image_wwl)
        self.image_label.bind("<ButtonPress-3>", self.start_drag_pan)
        self.image_label.bind("<B3-Motion>", self.drag_image_pan)
        self.image_label.bind("<MouseWheel>", self.zoom_image)
        self.image_label.bind("<Configure>", lambda e: self.update_image())

        self.slice_slider = Scale(right_pane, from_=0, to=0, orient=tk.HORIZONTAL, command=self.on_slider_change, showvalue=0)
        self.slice_slider.pack(fill=tk.X, padx=10, pady=2)
        self.create_buttons(right_pane)

        self.root.bind("<Left>", lambda e: self.prev_image())
        self.root.bind("<Right>", lambda e: self.next_image())

    def create_menu(self):
        menubar = Menu(self.root)
        filemenu = Menu(menubar, tearoff=0)
        filemenu.add_command(label="フォルダを開く...", command=self.load_dicom_folder_dialog)
        filemenu.add_separator()
        filemenu.add_command(label="終了", command=self.root.quit)
        menubar.add_cascade(label="ファイル", menu=filemenu)
        viewmenu = Menu(menubar, tearoff=0)
        viewmenu.add_command(label="DICOMヘッダ全体を表示", command=self.show_full_dicom_header)
        menubar.add_cascade(label="表示", menu=viewmenu)
        self.root.config(menu=menubar)

    def create_buttons(self, parent):
        button_frame = Frame(parent)
        button_frame.pack(pady=5)
        tk.Button(button_frame, text="← 前へ", command=self.prev_image).pack(side=tk.LEFT, padx=5)
        tk.Button(button_frame, text="次へ →", command=self.next_image).pack(side=tk.LEFT, padx=5)

    def handle_drop(self, event):
        if not DND_SUPPORT: return
        path = event.data.strip("{} ")
        if os.path.isdir(path):
            self.load_dicom_folder(path)
        else:
            messagebox.showwarning("ドラッグ&ドロップ", "フォルダをドロップしてください。")

    def load_dicom_folder_dialog(self):
        folder_path = filedialog.askdirectory(initialdir=".")
        if folder_path:
            self.load_dicom_folder(folder_path)

    def load_dicom_folder(self, folder_path):
        self.files = sorted([os.path.join(folder_path, f) for f in os.listdir(folder_path) if f.lower().endswith('.dcm')])
        if not self.files:
            return messagebox.showerror("エラー", "DICOMファイルが見つかりませんでした。")
        self.index = 0
        self.slice_slider.config(from_=0, to=len(self.files) - 1)
        self.load_image(is_new_series=True)

    def load_image(self, is_new_series=False):
        if not self.files: return
        try:
            self.ds = pydicom.dcmread(self.files[self.index])
            pixel_array = self.ds.pixel_array.astype(float)
            if "RescaleSlope" in self.ds and "RescaleIntercept" in self.ds:
                pixel_array = pixel_array * self.ds.RescaleSlope + self.ds.RescaleIntercept

            if is_new_series:
                self.pixel_min = int(pixel_array.min())
                self.pixel_max = int(pixel_array.max())
                self.wl_slider.config(from_=self.pixel_min, to=self.pixel_max)
                self.ww_slider.config(to=self.pixel_max - self.pixel_min)
                self.auto_adjust_wwl()
            else:
                self.on_wwl_change()

            self.zoom_factor, self.pan_x, self.pan_y = 1.0, 0, 0
            self.slice_slider.set(self.index)
        except Exception as e:
            messagebox.showerror("読み込みエラー", f"ファイル '{os.path.basename(self.files[self.index])}' の読み込みエラー: {e}")

    def auto_adjust_wwl(self):
        if self.ds is None: return
        pixel_array = self.ds.pixel_array.astype(float)
        if "RescaleSlope" in self.ds and "RescaleIntercept" in self.ds:
            pixel_array = pixel_array * self.ds.RescaleSlope + self.ds.RescaleIntercept

        p1 = np.percentile(pixel_array, 1)
        p99 = np.percentile(pixel_array, 99)

        self.ww.set(p99 - p1)
        self.wl.set((p99 + p1) / 2)
        self.on_wwl_change()

    def on_wwl_change(self, _=None):
        self.update_image()
        self.update_info_panel()

    def update_image(self):
        if self.ds is None or self.image_label.winfo_width() <= 1: return
        try:
            pixel_array = self.ds.pixel_array.astype(float)
            if "RescaleSlope" in self.ds and "RescaleIntercept" in self.ds:
                pixel_array = pixel_array * self.ds.RescaleSlope + self.ds.RescaleIntercept

            ww, wl = self.ww.get(), self.wl.get()
            lower, upper = wl - ww / 2, wl + ww / 2

            np.clip(pixel_array, lower, upper, out=pixel_array)
            if upper > lower:
                pixel_array = (pixel_array - lower) / (upper - lower) * 255
            else:
                pixel_array.fill(0)
            img_data = pixel_array.astype(np.uint8)
            pil_img = Image.fromarray(img_data)

            container_w, container_h = self.image_label.winfo_width(), self.image_label.winfo_height()
            img_w, img_h = pil_img.size
            scale = min(container_w / img_w, container_h / img_h) if img_w > 0 and img_h > 0 else 1
            new_w, new_h = int(img_w * scale * self.zoom_factor), int(img_h * scale * self.zoom_factor)

            if new_w <= 0 or new_h <= 0: return
            resized_img = pil_img.resize((new_w, new_h), Image.LANCZOS)
            display_img = Image.new("L", (container_w, container_h), 0)
            paste_x = (container_w - new_w) // 2 + self.pan_x
            paste_y = (container_h - new_h) // 2 + self.pan_y
            display_img.paste(resized_img, (paste_x, paste_y))

            imgtk = ImageTk.PhotoImage(image=display_img)
            self.image_label.config(image=imgtk)
            self.image_label.image = imgtk
        except Exception:
            pass

    def update_info_panel(self):
        if self.ds is None: return
        self.info_text.config(state=tk.NORMAL)
        self.info_text.delete(1.0, tk.END)
        info = {
            "ファイル名": os.path.basename(self.files[self.index]),
            "スライス": f"{self.index + 1}/{len(self.files)}",
            "患者名": getattr(self.ds, 'PatientName', 'N/A'),
            "患者ID": getattr(self.ds, 'PatientID', 'N/A'),
            "撮影日": getattr(self.ds, 'StudyDate', 'N/A'),
            "WW/WL": f"{int(self.ww.get())}/{int(self.wl.get())}",
            "ズーム": f"{self.zoom_factor:.2f}"
        }
        for key, value in info.items():
            self.info_text.insert(tk.END, f"{key}: {value}\n")
        self.info_text.config(state=tk.DISABLED)

    def show_full_dicom_header(self):
        if self.ds is None: return messagebox.showinfo("情報", "DICOMファイルが読み込まれていません。")
        header_window = Toplevel(self.root)
        header_window.title(f"DICOMヘッダ全体 - {os.path.basename(self.files[self.index])}")
        header_window.geometry("600x800")
        text_widget = Text(header_window, wrap=tk.NONE)
        v_scroll = Scrollbar(header_window, orient=tk.VERTICAL, command=text_widget.yview)
        text_widget.configure(yscrollcommand=v_scroll.set)
        v_scroll.pack(side=tk.RIGHT, fill=tk.Y)
        text_widget.pack(expand=True, fill=tk.BOTH)
        text_widget.insert(tk.END, str(self.ds))
        text_widget.config(state=tk.DISABLED)

    def on_slider_change(self, value):
        new_index = int(value)
        if new_index != self.index:
            self.index = new_index
            self.load_image()

    def start_drag_wwl(self, event): self._last_x, self._last_y = event.x, event.y
    def drag_image_wwl(self, event):
        dx, dy = event.x - self._last_x, event.y - self._last_y
        self.ww.set(self.ww.get() + dx)
        self.wl.set(self.wl.get() - dy)
        self._last_x, self._last_y = event.x, event.y
        self.on_wwl_change()

    def start_drag_pan(self, event): self._last_x, self._last_y = event.x, event.y
    def drag_image_pan(self, event):
        dx, dy = event.x - self._last_x, event.y - self._last_y
        self.pan_x += dx
        self.pan_y += dy
        self._last_x, self._last_y = event.x, event.y
        self.update_image()

    def zoom_image(self, event):
        if event.delta > 0: self.zoom_factor *= 1.1
        else: self.zoom_factor /= 1.1
        self.update_image()
        self.update_info_panel()

    def next_image(self):
        if self.index < len(self.files) - 1:
            self.index += 1
            self.load_image()

    def prev_image(self):
        if self.index > 0:
            self.index -= 1
            self.load_image()

if __name__ == "__main__":
    # Use regular Tk if DND is not supported
    root = TkinterDND.Tk() if DND_SUPPORT else tk.Tk()
    app = DICOMViewer(root)
    root.mainloop()
2.2. 実行方法
本プログラムdicomviewer.pyを実行し、DICOM画像を表示するまでの手順を解説します。
Step 1: Python環境の準備
PCにPythonがインストールされていない場合は、公式サイトから最新版をインストールしてください。
Step 2: 必要なライブラリのインストール
コマンドプロンプトまたはターミナルを開き、以下のコマンドを実行して、プログラムの動作に必要なライブラリをインストールします。
pip install pydicom numpy pillow tkinterdnd2
Step 3: プログラムの実行
dicomviewer.pyが保存されているディレクトリで、以下のコマンドを実行します。
python dicomviewer.py
Step 4: DICOMフォルダの読み込み
プログラムが起動したら、メニューバーのファイル > フォルダを開く...を選択し、DICOMファイルが格納されているフォルダを指定します。
(または、フォルダをウィンドウに直接ドラッグ&ドロップすることでも読み込めます)
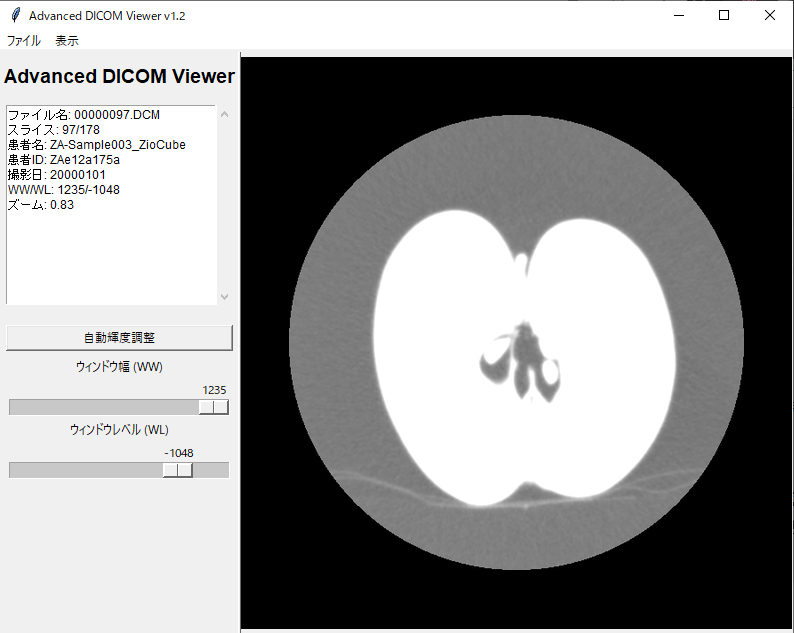
3. GUIの各部位と機能解説
以下は本ビューアのUIです。各部位の名称と機能、そして具体的な操作方法を解説します。

-
メニューバー
- 目的: ファイル操作や付加機能へのアクセスを提供します。
-
操作方法:
-
ファイル > フォルダを開く...: クリックするとフォルダ選択ダイアログが表示されます。DICOMファイル群が保存されたフォルダを選択すると、画像が読み込まれます。 -
ファイル > 終了: アプリケーションを安全に終了します。 -
表示 > DICOMヘッダ全体を表示: 現在表示中の画像のDICOMヘッダ情報(タグ、VR、値など)の一覧を、新しいウィンドウで表示します。詳細な撮影情報を確認したい場合に使用します。
-
-
情報パネル
- 目的: 表示中の画像がどの画像なのかを識別するための、基本的な属性情報を常時表示します。
- 解説: DICOM画像を読み込むと、このエリアに患者名、患者ID、撮影日、現在のWW/WL値、ズーム率などが自動的に表示されます。多数の画像を扱う際に、現在どの画像を見ているのかを素早く確認できます。
-
コントロールパネル
- 目的: 画像の「見え方」を調整するための機能を提供します。
-
操作方法:
-
自動輝度調整ボタン: クリックすると、画像の輝度分布をプログラムが自動で解析し、最も一般的で見やすいと思われるWW/WL値を設定します。手動調整の起点として便利です。 -
ウィンドウ幅 (WW) / レベル (WL) スライダー: スライダーのつまみをマウスでドラッグすることで、WWとWLの値を変更できます。スライダーを動かすと、リアルタイムで画像表示キャンバスの表示が更新されます。
-
-
画像表示キャンバス
- 目的: DICOM画像そのものを表示し、直感的なマウス操作で画像の見た目をインタラクティブに変更するメインエリアです。
-
操作方法:
- マウス左ドラッグ: WW/WLを調整します。左右のドラッグでWW(コントラスト)、上下のドラッグでWL(明るさ)が変わるように割り当てられており、スライダーよりも感覚的な調整が可能です。
- マウス右ドラッグ: 画像を掴んで上下左右に移動(パン)させます。拡大表示時に、見たい部分へ移動する際に使用します。
- マウスホイール回転: 画像を拡大・縮小(ズーム)します。手前への回転で拡大、奥への回転で縮小します。
-
スライススライダーとナビゲーションボタン
- 目的: CTやMRIのような連続した断層画像(シリーズ)の中から、表示したいスライスを選択します。
-
操作方法:
- スライダー: つまみをドラッグすることで、シリーズ内の任意のスライス位置へ素早く移動できます。
-
← 前へ/次へ →ボタン: 1枚ずつスライスを前後に送ります。精密な確認に便利です。 - キーボードの左右矢印キー: ボタンと同様に、1枚ずつスライスを移動できます。
4. DICOM仕様書からの抜粋と実装
本プログラムの中核機能であるWW/WLによる輝度調整は、DICOM規格で定められたRescale InterceptとRescale Slopeという2つのタグ値を利用して実現しています。
4.1. 公式ドキュメントからの抜粋
以下は、DICOM規格の公式ドキュメント「NEMA PS3.3 2024a - Information Object Definitions」の C.11.1.1.1節 "Pixel Intensity Relationship" からの抜粋です。
The pixel values in the image are not necessarily in a unit meaningful to a human observer. The DICOM Standard provides a mechanism to transform the pixel values to a space that has meaning. The output of the transformation is specified by the Rescale Type (0028,1054). For CT images, the Rescale Type is Hounsfield Units (HU). The transformation is specified by the Rescale Intercept (0028,1052) and Rescale Slope (0028,1053).
The relationship is:
Output Units = m * SV + bWhere
mis the Rescale Slope (0028,1053) andbis the Rescale Intercept (0028,1052) and SV is the stored value in Pixel Data (7FE0,0010).
これは、「DICOMに保存されているピクセル値(SV)は、Rescale Slope (m) と Rescale Intercept (b) を用いて m * SV + b という式で意味のある単位(CTならHU値)に変換される」ということを示しています。
4.2. 実装への反映
この仕様に基づき、本プログラムではpydicomで読み込んだピクセル配列に対し、以下のコードで正規化処理を行っています。
# dicomviewer.pyより抜粋
pixel_array = self.ds.pixel_array.astype(float)

# DICOM仕様書に基づき、Rescale SlopeとInterceptを適用
if "RescaleSlope" in self.ds and "RescaleIntercept" in self.ds:
    pixel_array = pixel_array * self.ds.RescaleSlope + self.ds.RescaleIntercept
この正規化された値に対してWW/WL処理を適用することで、初めて意図した通りの画像表示が可能になります。
5. まとめ
本研修課題を通して、医用画像の基礎知識からDICOM規格の読解、そしてPythonによる実践的なGUIアプリケーション開発まで、一連のプロセスを経験することができました。
特に、DICOM仕様書という公式ドキュメントから、必要な情報を抜き出し、それを正確にプログラムに実装する作業は、非常に学びの多いものでした。
作成したプログラムは、研修要件で求められた機能をすべて満たし、さらにマウス操作による直感的なUIなど、ユーザビリティを高める工夫も加えることができました。
参考
本プログラムの開発および検証にあたり、以下のサイトで公開されているサンプルDICOMデータを使用させていただきました。
- ZioCube サンプルデータ: https://www.zio.co.jp/ziocube/support/
- DICOM Standard: https://www.dicomstandard.org/current