はじめに
- AWS Fargateが東京リージョンに対応しましたね。
- 別件ですが、本日Amazon EFSが東京リージョンに対応しましたね。
- もろもろ胸熱です。(因みに、現時点ではFargateからEFSのmountは行なえません。
- 本記事では、
一生懸命作ったECS向けのCloudFormationテンプレートが割と簡単にFargateに対応できたので手順を書いておきます。
概要
- ベースとなるテンプレートは、aws-samplesにあるecs-refarch-cloudformationです。
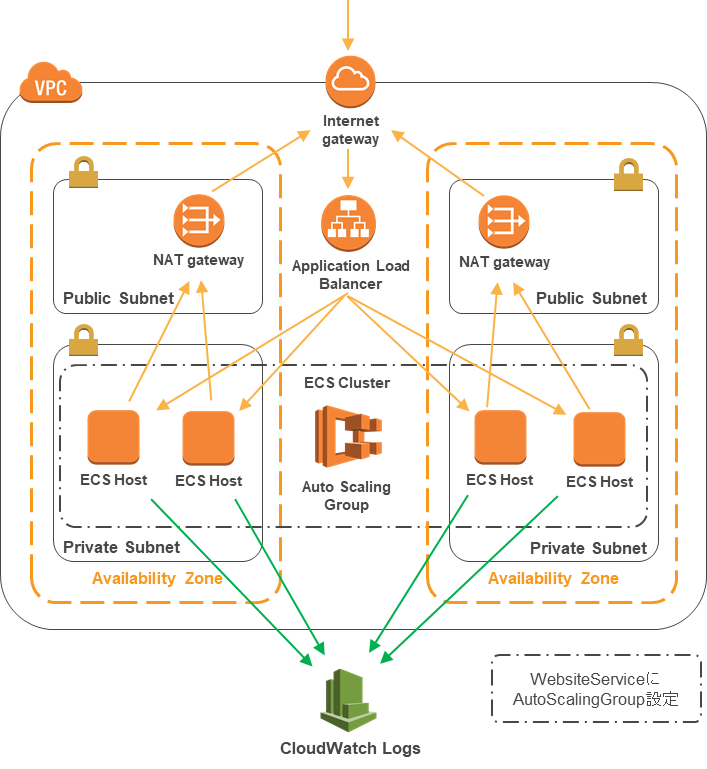
- 当該テンプレートでデプロイすると以下のような構成になります。

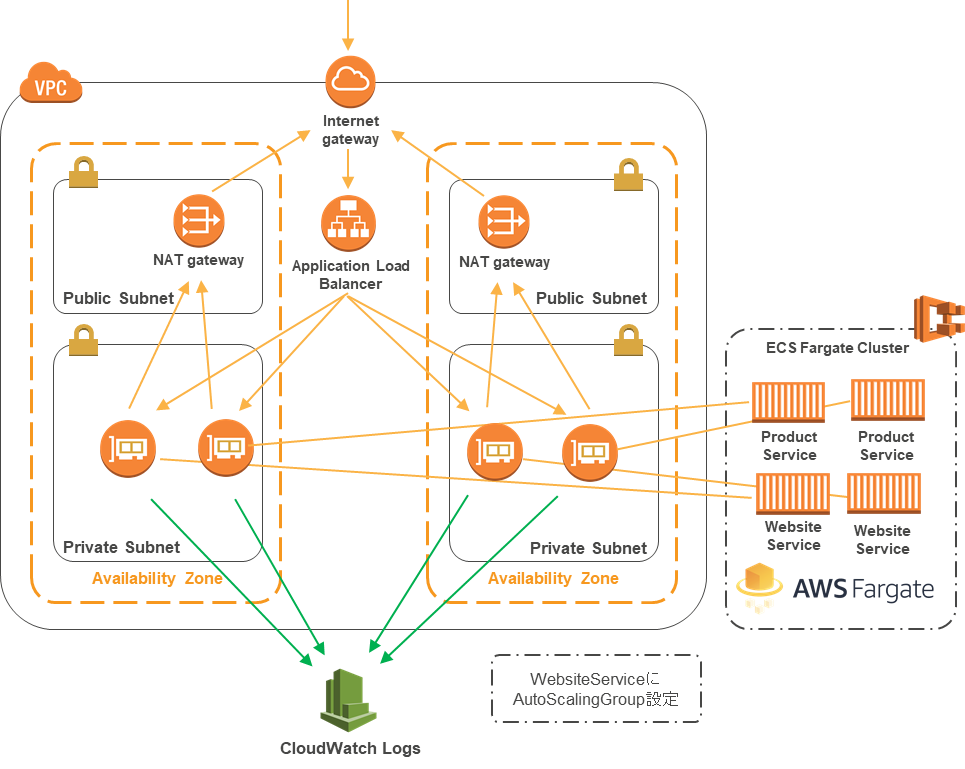
- 上記の構成をFargateに対応させるので、以下の構成になる想定です。

- 対応後のテンプレートは以下に雑に上げておきます。
https://github.com/ukitiyan/ecs-refarch-cloudformation/tree/future/support-fargate
対応手順
テンプレート取得
-
ベースとなるテンプレートをCloneします。
$ git clone git@github.com:aws-samples/ecs-refarch-cloudformation.git
$ cd ecs-refarch-cloudformation
$ code .
テンプレート修正
/service/product-service/service.yamlと/service/website-service/service.yamlの修正
AWS::ECS::Serviceセクション
修正後は以下の内容になります。
Service:
    Type: AWS::ECS::Service
    # Role: !Ref ServiceRole
    DependsOn: ListenerRule
    Properties:
        Cluster: !Ref Cluster
        DesiredCount: !Ref DesiredCount
        TaskDefinition: !Ref TaskDefinition
        LoadBalancers:
            - ContainerName: "product-service"
              ContainerPort: 8001
              TargetGroupArn: !Ref TargetGroup
        LaunchType: FARGATE
        NetworkConfiguration:
          AwsvpcConfiguration:
            AssignPublicIp: DISABLED
            SecurityGroups: !Ref ServiceSecurityGroup
            Subnets: !Ref Subnets
-
サービスのLaunchTypeにFARGATEの指定を追加します。
LaunchType: FARGATE -
Fargateタスクはawsvpcネットワーキングモードを利用することになるのでNetworkConfigurationの指定を追加します。ENIが付くのでサービス毎にセキュリティグループが指定出来ます。ここ重要ですね。
NetworkConfiguration: AwsvpcConfiguration: AssignPublicIp: DISABLED SecurityGroups: !Ref ServiceSecurityGroup Subnets: !Ref Subnets -
You cannot specify an IAM role for services that require a service linked role.と怒られるので、ServiceRoleの指定をコメントアウトします。# Role: !Ref ServiceRole
AWS::ECS::TaskDefinitionセクション
修正後は以下の内容になります。
TaskDefinition:
    Type: AWS::ECS::TaskDefinition
    Properties:
        Family: product-service
        Cpu: 256
        Memory: 512
        ContainerDefinitions:
            - Name: product-service
              Essential: true
              Image: 275396840892.dkr.ecr.us-east-1.amazonaws.com/ecs-refarch-cloudformation/product-service:1.0.0
              Cpu: 256
              Memory: 512
              PortMappings:
                - ContainerPort: 8001
              LogConfiguration:
                LogDriver: awslogs
                Options:
                    awslogs-group: !Ref AWS::StackName
                    awslogs-region: !Ref AWS::Region
                    awslogs-stream-prefix: product-service
        TaskRoleArn:
            Fn::If:
            - 'HasCustomTaskRole'
            - !Ref 'TaskRole'
            - !Ref "AWS::NoValue"
        ExecutionRoleArn: !Ref ExecutionRole
        NetworkMode: awsvpc
        RequiresCompatibilities:
            - FARGATE
-
起動タイプにFARGATEの指定を追加します。
RequiresCompatibilities: - FARGATE -
NetworkModeにawsvpcの指定を追加します。
NetworkMode: awsvpc -
必須ではないですが、TaskRoleとExecutionRoleの指定を追加します。
TaskRoleArn: Fn::If: - 'HasCustomTaskRole' - !Ref 'TaskRole' - !Ref "AWS::NoValue" ExecutionRoleArn: !Ref ExecutionRole -
Fargate requires log configuration options to include awslogs-stream-prefixと怒られるので 適当な値でawslogs-stream-prefixの指定を追加します。LogConfiguration: LogDriver: awslogs Options: awslogs-group: !Ref AWS::StackName awslogs-region: !Ref AWS::Region awslogs-stream-prefix: product-service -
Fargate requires that 'cpu' be defined at the task level.と怒られるので、以下のURLを参考にCPUとついでにメモリの指定を追加します。
https://docs.aws.amazon.com/AmazonECS/latest/developerguide/task-cpu-memory-error.htmlTaskDefinition: Type: AWS::ECS::TaskDefinition Properties: Family: product-service Cpu: 256 Memory: 512
AWS::ElasticLoadBalancingV2::TargetGroupセクション
修正後は以下の内容になります。
TargetGroup:
    Type: AWS::ElasticLoadBalancingV2::TargetGroup
    Properties:
        VpcId: !Ref VPC
        Port: 80
        Protocol: HTTP
        Matcher:
            HttpCode: 200-299
        HealthCheckIntervalSeconds: 10
        HealthCheckPath: /products
        HealthCheckProtocol: HTTP
        HealthCheckTimeoutSeconds: 5
        HealthyThresholdCount: 2
        TargetType: ip
-
awsvpc ネットワークモードを使用する場合、ターゲットグループのターゲットタイプとして ip を指定する必要があります。こちらを参照。そのため、TargetTypeに ip の指定を追加します。
TargetType: ip -
最後に必要なParameters、Conditionsの定義を追加します。
Parameters:
・・・
    ServiceSecurityGroup:
        Description: The ServiceSecurityGroup
        Type: List<AWS::EC2::SecurityGroup::Id>

    Subnets:
        Description: Choose which subnets this ECS cluster should be deployed to
        Type: List<AWS::EC2::Subnet::Id>

    TaskRole:
        Description: The ECS task role ARN
        Type: String
        Default: ""

    ExecutionRole:
        Description: The ECS Fargate Execution role ARN
        Type: String

Conditions:
    HasCustomTaskRole: !Not [ !Equals [!Ref 'TaskRole', ''] ]
/infrastructure/ecs-cluster-fargate.yamlの追加
ecs-cluster.yamlから大きく変わるのでecs-cluster-fargate.yamlという新しいファイルを作ります。修正後は、以下リンク先の内容になります。
-
ECSClusterを指定します。ecs-cluster.yamlと同じ内容です。
ECSCluster: Type: AWS::ECS::Cluster -
ECSServiceAutoScalingRoleを指定します。ecs-cluster.yamlと同じ内容です。
ECSServiceAutoScalingRole: Type: AWS::IAM::Role -
タスク定義で設定するためのECSTaskExecutionRole、ECSProductTaskRole、ECSWebsiteTaskRoleを指定します。
ECSTaskExecutionRole:
    Type: AWS::IAM::Role

ECSProductTaskRole:
    Type: AWS::IAM::Role

ECSWebsiteTaskRole:
    Type: AWS::IAM::Role
/master.yamlの修正
修正後は、以下リンク先の内容になります。
-
ECSクラスター用のスタックのパスをecs-cluster-fargate.yamlに変更します。あと不要なParametersを削除します。
TemplateURL: https://s3.amazonaws.com/ecs-refarch-cloudformation/infrastructure/ecs-cluster-fargate.yaml -
ProductService、WebsiteService用のスタックに引き渡す必要のあるParametersを追加します。
ServiceSecurityGroup: !GetAtt SecurityGroups.Outputs.ECSHostSecurityGroup Subnets: !GetAtt VPC.Outputs.PrivateSubnets TaskRole: !GetAtt ECS.Outputs.ECSProductTaskRole ExecutionRole: !GetAtt ECS.Outputs.ECSTaskExecutionRole -
AutoScaleでホストのDrainingを気にする必要が無くなるので、そこら辺を設定しているLifecycleHookのスタックしていをコメントアウトします。
# LifecycleHook:
#     Type: AWS::CloudFormation::Stack
#     Properties:
#         TemplateURL: https://s3.amazonaws.com/ecs-refarch-cloudformation/infrastructure/lifecyclehook.yaml
#         Parameters:
#             Cluster: !GetAtt ECS.Outputs.Cluster
#             ECSAutoScalingGroupName: !GetAtt ECS.Outputs.ECSAutoScalingGroupName
ビルド&デプロイ
- CodeBuildで検証とビルドを行うためのbuildspec.ymlが用意されているので、CodeBuildします。
- ついでにCodeBuildの環境変数の
S3_BUCKETに当該テンプレートを配置するS3バケット名を指定して、ビルド実行すれば当該テンプレートがS3に配置されるよう対応しておきました。こちら - 上記で配置されたテンプレートのmaster.yamlのURLを指定して、CloudFoamationを実行すれば目的の環境が構成されます。
- 以下のようなURLがCloudFormationのOutputで確認できるので、アクセスして画面表示されることを確認します。
http://fargate-xxxxxxxxx.ap-northeast-1.elb.amazonaws.com/
http://fargate-xxxxxxxxx.ap-northeast-1.elb.amazonaws.com/products
まとめ
- 割と簡単にFargateに対応できたと思います。
- このテンプレートを拡張していけば良いわけです。