FlutterでiOS Web Pushを実装する
今回は、FlutterでiOS Web Pushを受け取れる簡単なWebアプリを実装する方法を紹介したいと思います。(記事作成に生成系AIを一部使用してます)
Web Pushについて
Web Pushとは、Webアプリケーションからユーザーに通知を送る仕組みのことです。Web Pushを使えば、ユーザーがWebアプリケーションを開いていなくても、ブラウザやOSの通知センターにメッセージを表示することができます。
Web Pushは、Service Workerというバックグラウンドで動作するスクリプトと、Push APIというブラウザが提供するAPIを使って実現されます。Service Workerは、Webアプリケーションがインストールされた時に登録され、Push APIは、ユーザーが通知の許可を与えた時に呼び出されます。Push APIは、Webアプリケーションに一意に紐づくPush Subscriptionというオブジェクトを生成し、その中に含まれるendpointというURLをサーバー側に送ります。サーバー側は、endpointに対してHTTP POSTリクエストを送ることで、通知を配信することができます。
Web Pushは、AndroidやWindowsなどの多くのプラットフォームでサポートされていますが、iOSでは長らくサポートされていませんでした。しかし、2023年3月にリリースされたiOS16.4から、SafariでWeb Pushがサポートされるようになりました。iOSアプリでPush通知を実装するには、年額$99(約11000〜14000円)のDeveloper Programに加入必要だったり、その後も証明書の発行などが面倒だったり何かと大変なわけです。。これは、FlutterでクロスプラットフォームなWebアプリケーションを開発する上でも大きな出来事です。
しかし、iOSでWeb Pushを実装するには、いくつかの注意点があります。例えば、iOSではFirebase Cloud Messaging (FCM)というGoogleが提供するサービスを使って通知を送ることができません。また、iOSではService Workerの登録やPush Subscriptionの生成などの処理が非同期に行われるため、タイミングによってはエラーが発生する可能性があります。
そこで、この記事では、iOSでも安定してWeb Pushを受け取れるようにするための工夫を紹介します。具体的には、以下のような手順で実装します。
- FlutterでWebアプリケーションを作成し、Service WorkerとPush Notificationの設定を行う
- firestore上に通知のToken(endpoint)を保存する。
- あるFirestoreのデータが追加されたら、firestore上に保存されたToken宛にFCMを使ってCloud Functionsから通知を送信
FlutterでWebアプリケーションを作成し、Service WorkerとPush Notificationの設定を行う
まずは、FlutterでWebアプリケーションを作成します。Flutterの環境構築後(手順は割愛)、flutter createコマンドでプロジェクトを作成する際に--platforms webオプションを指定することで、Webアプリケーション用のテンプレートが生成されます。
flutter create --platforms web web_push_demo
プロジェクトを作成したら、webフォルダの中にあるmanifest.jsonファイルを開きます。このファイルは、Webアプリケーションのメタデータを定義するファイルです。ここで、gcm_sender_idというキーを追加し、値に103953800507という数字を入力します。これは、FCMを使うために必要な設定です。今回アプリ名は"are_doko_web"としました。
{
  "name": "are_doko_web",
  "short_name": "are_doko_web",
  "start_url": ".",
  "display": "standalone",
  "background_color": "#0175C2",
  "theme_color": "#0175C2",
  "description": "A new Flutter project.",
  "orientation": "portrait-primary",
  "icons": [
    {
      "src": "icons/Icon-192.png",
      "sizes": "192x192",
      "type": "image/png"
    },
    {
      "src": "icons/Icon-512.png",
      "sizes": "512x512",
      "type": "image/png"
    }
  ],
}
次に、webフォルダの中にあるindex.htmlファイルを開きます。このファイルは、WebアプリケーションのエントリーポイントとなるHTMLファイルです。ここで、<head>タグの中に以下のコードを追加します。これは、Service Workerを登録するためのコードです。
<script>
  window.addEventListener('load', function (ev) {
  _flutter.loader.loadEntrypoint({
      serviceWorker: {
        serviceWorkerVersion: serviceWorkerVersion,
      },
      onEntrypointLoaded: function (engineInitializer) {
        engineInitializer.initializeEngine().then(function (appRunner) {
          appRunner.runApp();
        });
      }
    });
  });
</script>
<script>
  if ("serviceWorker" in navigator) {
    window.addEventListener("load", function () {
      navigator.serviceWorker.register("/firebase-messaging-sw.js");
    });
  }
</script>
また、画面に表示するFlutter Widgetの中に以下のコードを追加します。これは、Push Notificationの許可を求めるボタンを表示するためのコードです。
        return Scaffold(
          body: (省略),
          floatingActionButtonLocation: FloatingActionButtonLocation.endTop,
          floatingActionButton: FloatingActionButton(
            mini: true,
            onPressed: _registerNotification,
            child: const Icon(Icons.notification_add),
          ),
        );
さらに、そこから呼ばれる_registerNotificationメソッドの中に以下のコードを追加します。これは、ボタンがクリックされた時にPush Subscriptionを生成し、firestoreに保存するためのコードです。
  Future<void> _registerNotification() async {
    // パーミッションの設定
    final settings = await messaging.requestPermission();

    // トークン取得
    final token = (await messaging.getToken(
      vapidKey: dotenv.env['VAPID_KEY'],
    ))
        .toString();

    final firestore = FirebaseFirestore.instance;
    final data = {
      'token': token,
      'create_timestamp': FieldValue.serverTimestamp(),
    };
    await firestore.collection('notification').add(data);
  }
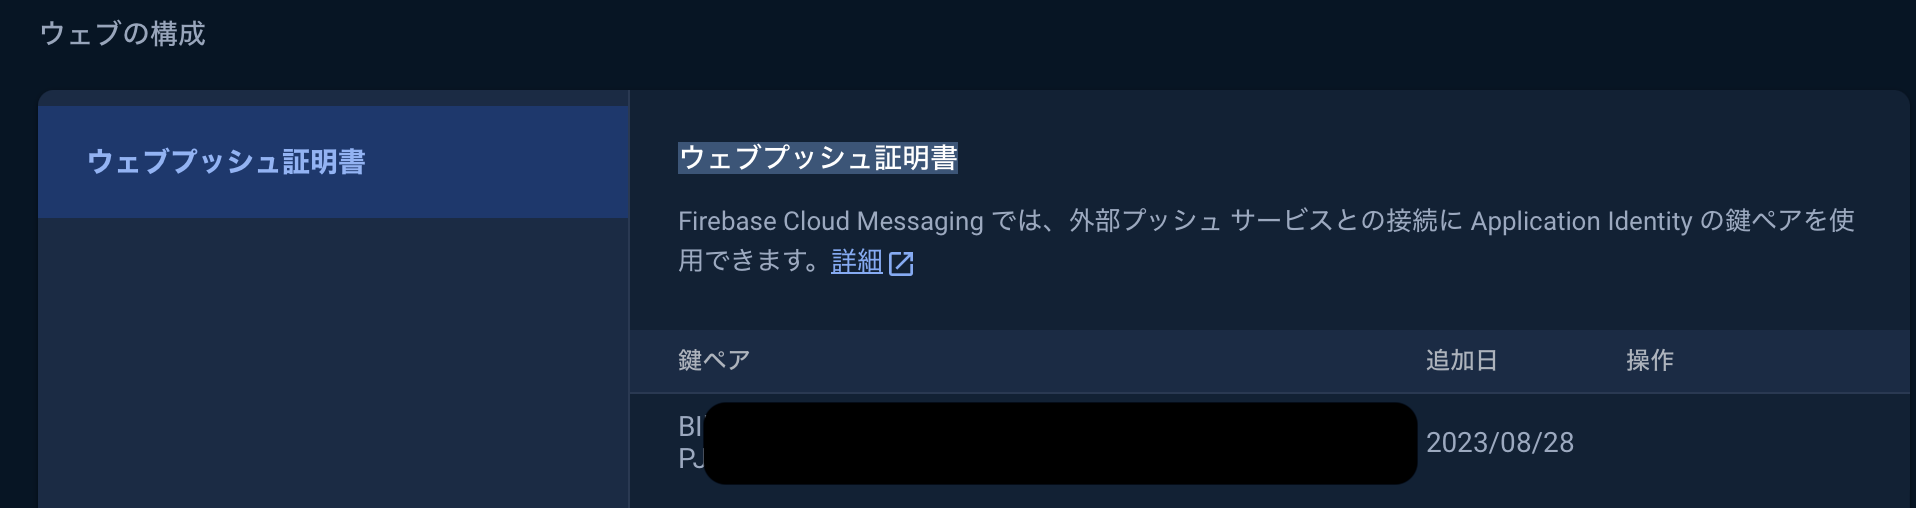
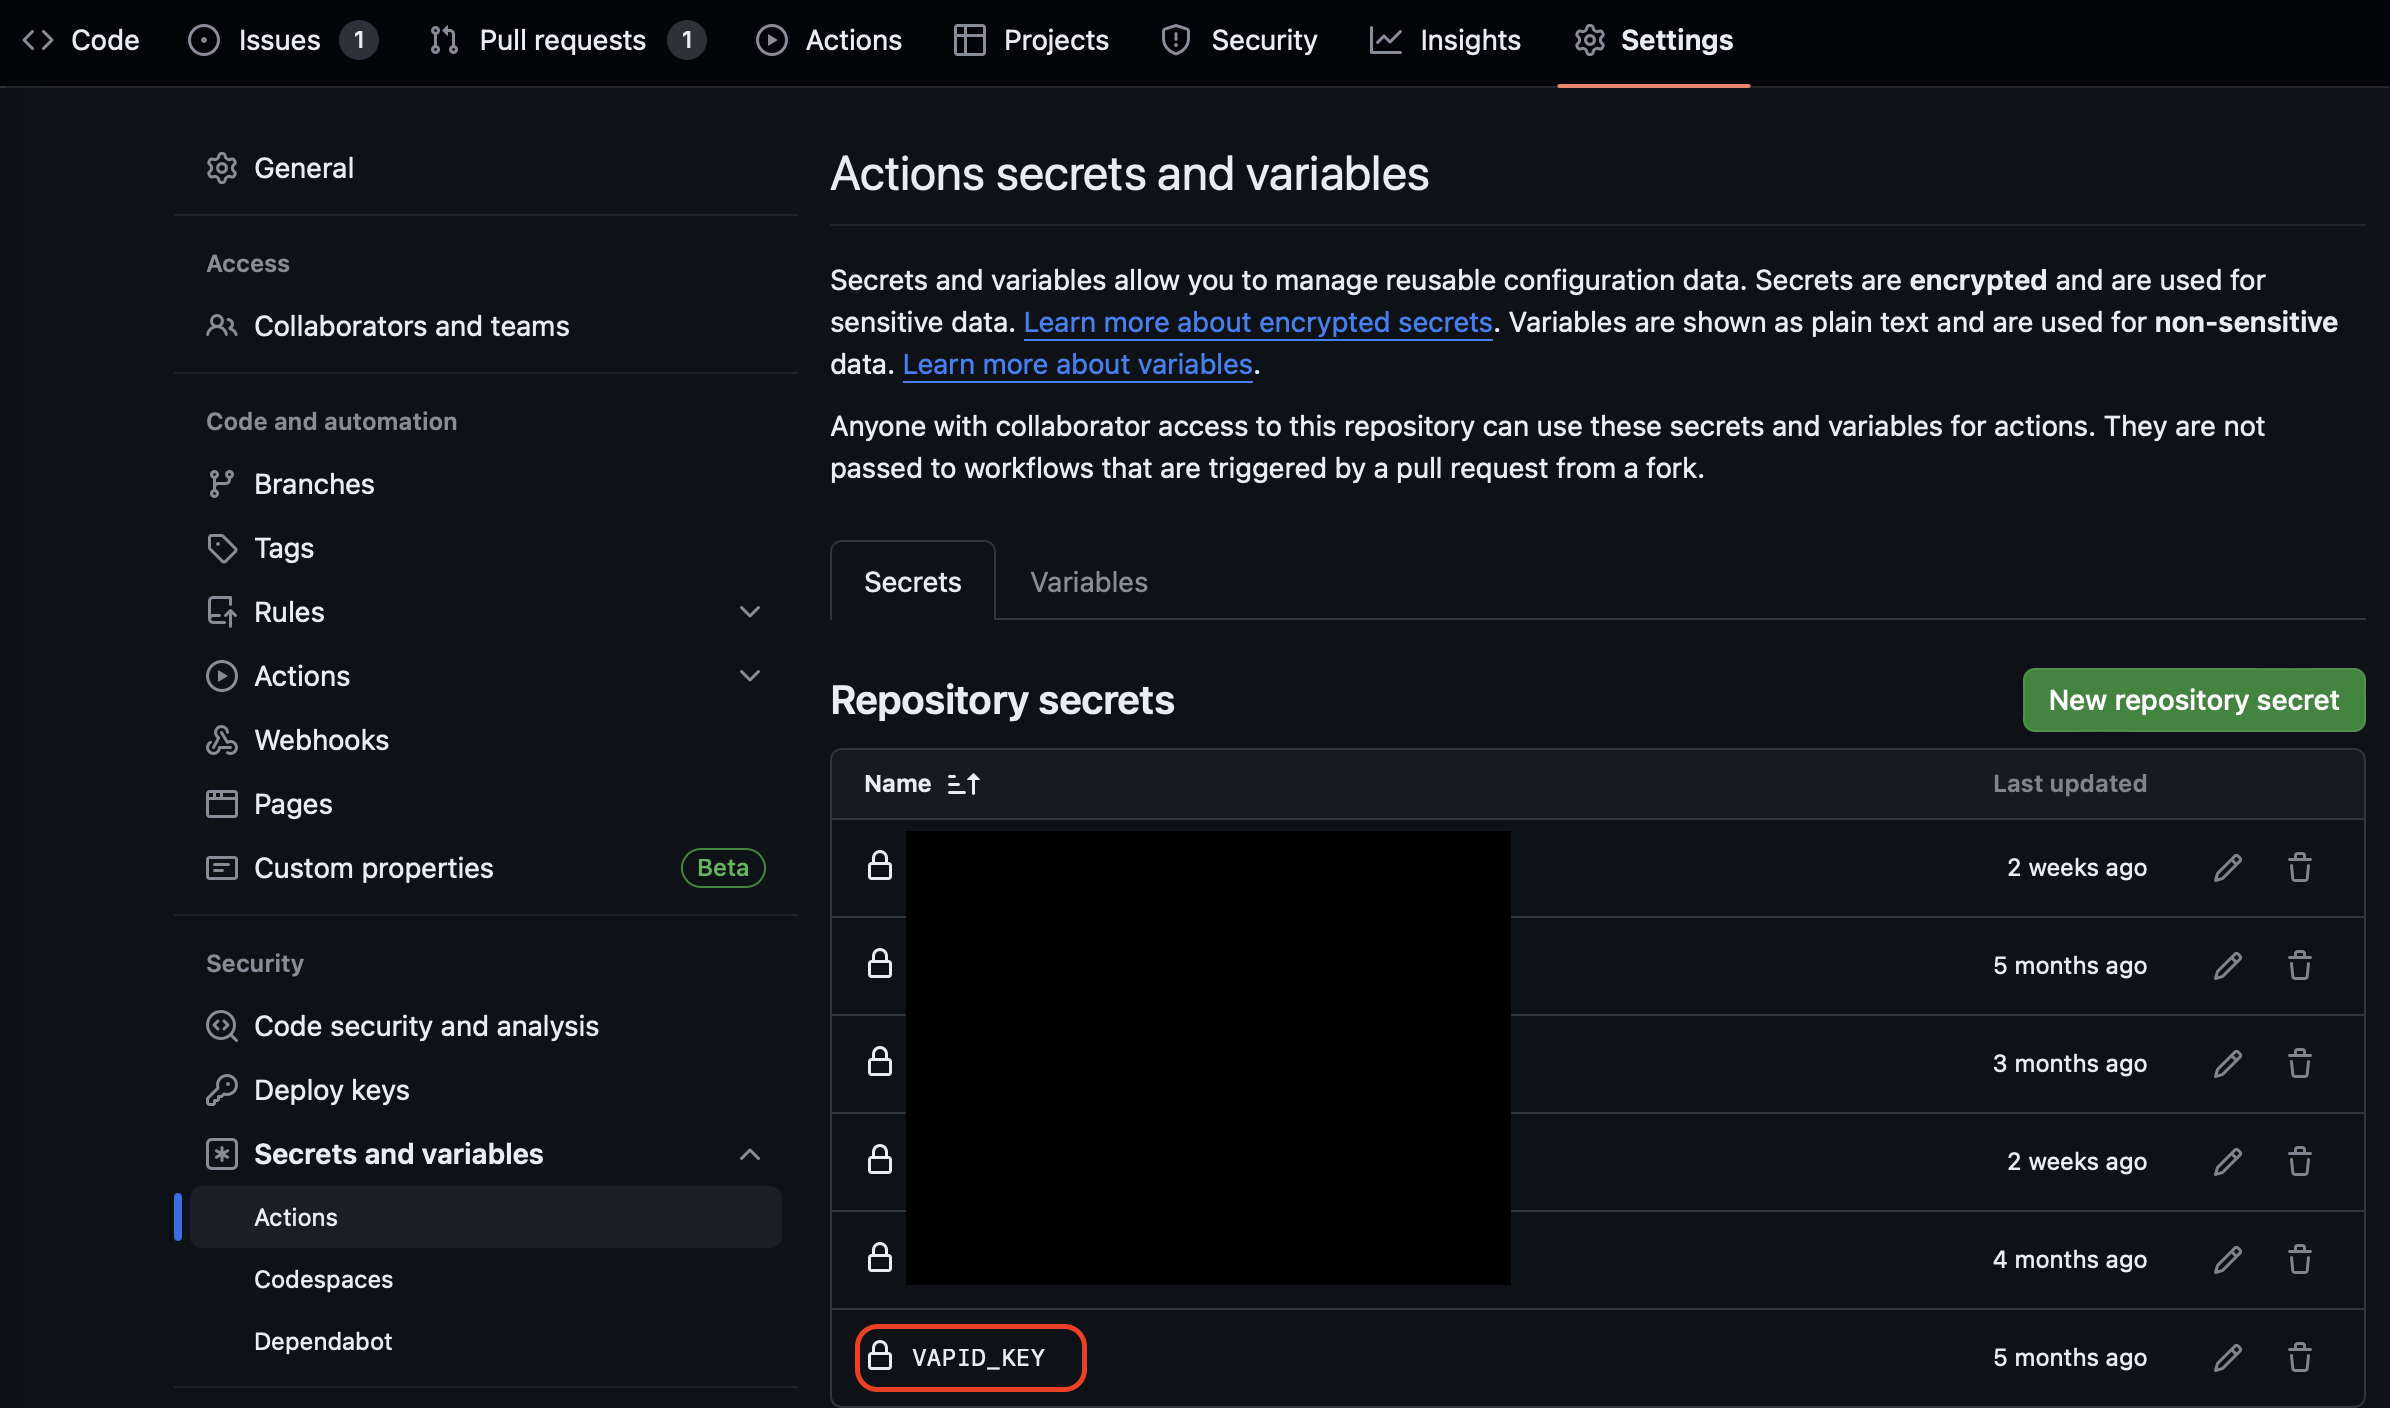
上記vapidKeyにはFirebaseコンソールの [プロジェクト設定] > [Cloud Messaging] > [ウェブプッシュ証明書] から取得できますが、ハードコードするのはリスキーなので、GitHub Secretsを使います。
設定手順は省略しますが、以下のように設定できます。
アプリ側にその値を取り込むには、プロジェクトフォルダ直下に.envファイルを作成し、その値を設定しておきます。
VAPID_KEY: xxxxxx(上記VAPID_KEYの値を貼り付けます)
そして、pubspec.yamlで以下のように.envファイルを指定し、
flutter:
  assets:
    - .env
レポジトリにコミットしないように.gitignoreファイルに1行追加しておきます。
.env
これで、FlutterでWebアプリケーションを作成し、Service WorkerとPush Notificationの設定を行うことができました。
実際にPWAを起動してみます。私の場合は、mainブランチにマージされた時に実行されるGitHub ActionsからFirebase Hostingに自動でデプロイするようにしていますが、手順はこの私の記事を参照ください。
ちなみに、GitHub ActionsからFirebase Hostingにデプロイする時は、以下のようにローカル環境と同等のenvファイルになるように設定する必要があります。
name: Deploy to Firebase Hosting on merge

on:
  push:
    branches:
      - main

jobs:
  build_and_deploy:
    runs-on: ubuntu-latest
    env:
      VAPID_KEY: '${{ secrets.VAPID_KEY }}'
    steps:
      - uses: actions/checkout@v3
      - run: sudo snap install flutter --classic
      - run: flutter config --enable-web
      - name: 'Create env file'
        run: |
          touch .env
          echo VAPID_KEY=${{ secrets.VAPID_KEY }} >> .env
      - run: flutter build web -t lib/main.dart --release
      - uses: FirebaseExtended/action-hosting-deploy@v0
        with:
          repoToken: '${{ secrets.GITHUB_TOKEN }}'
          firebaseServiceAccount: '${{ secrets.FIREBASE_SERVICE_ACCOUNT_XXX }}'
          channelId: live
          projectId: are-doko-web
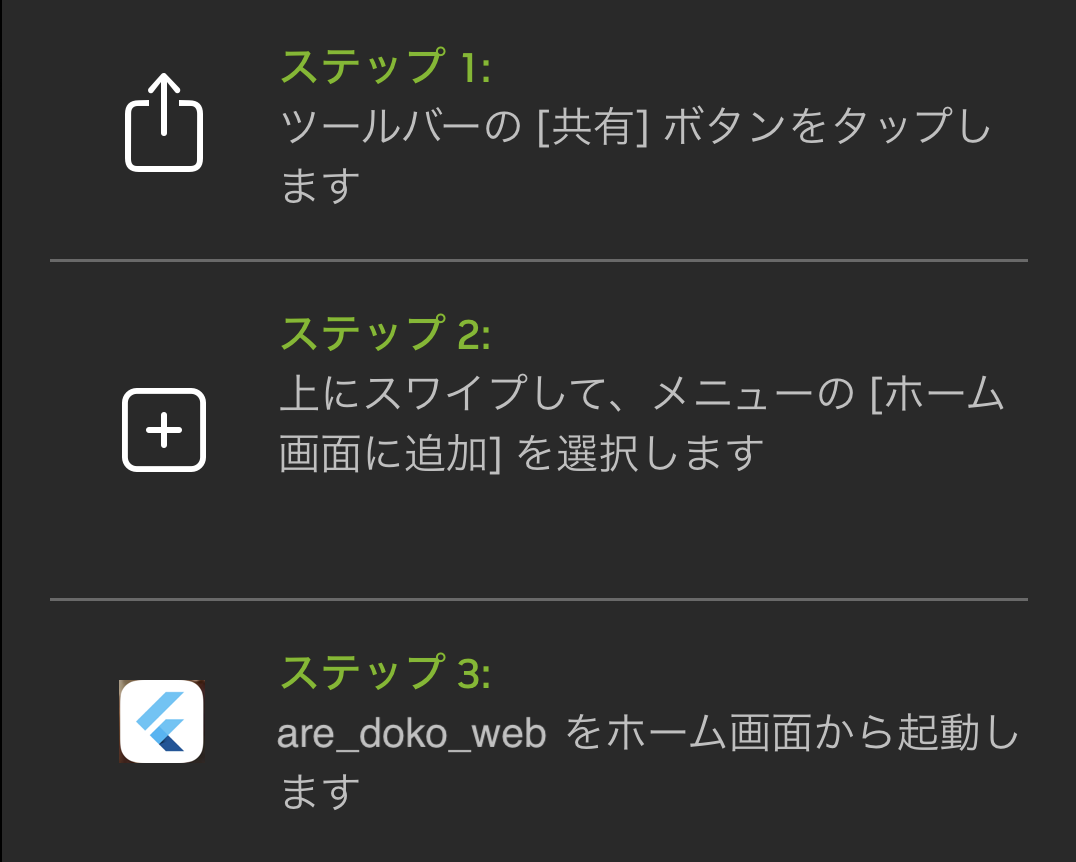
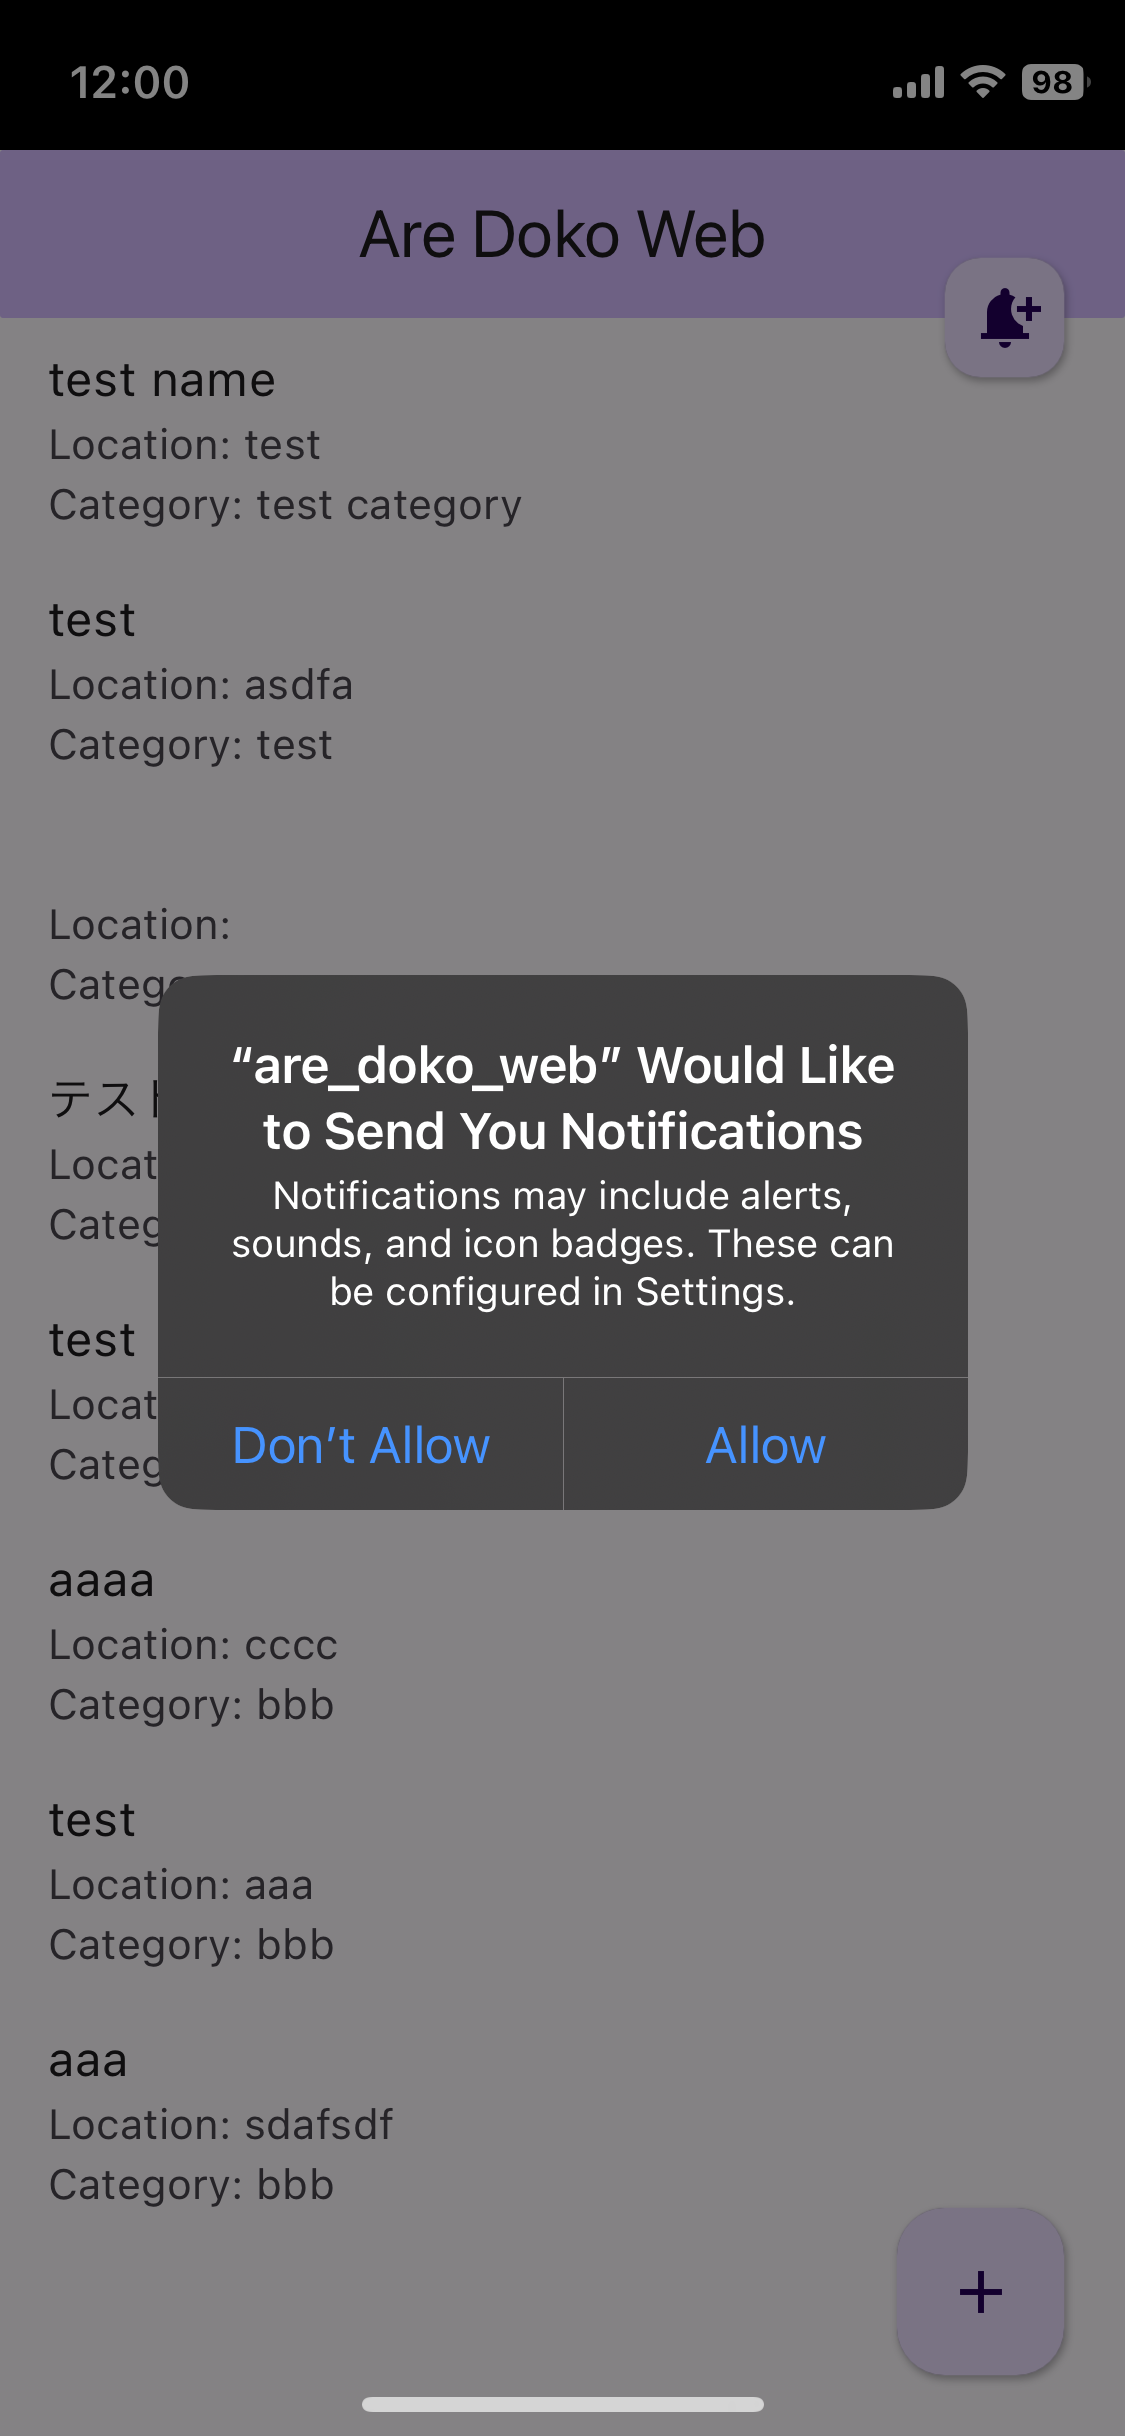
PWAはSafariで該当のURLを開き、以下の手順で起動できます。
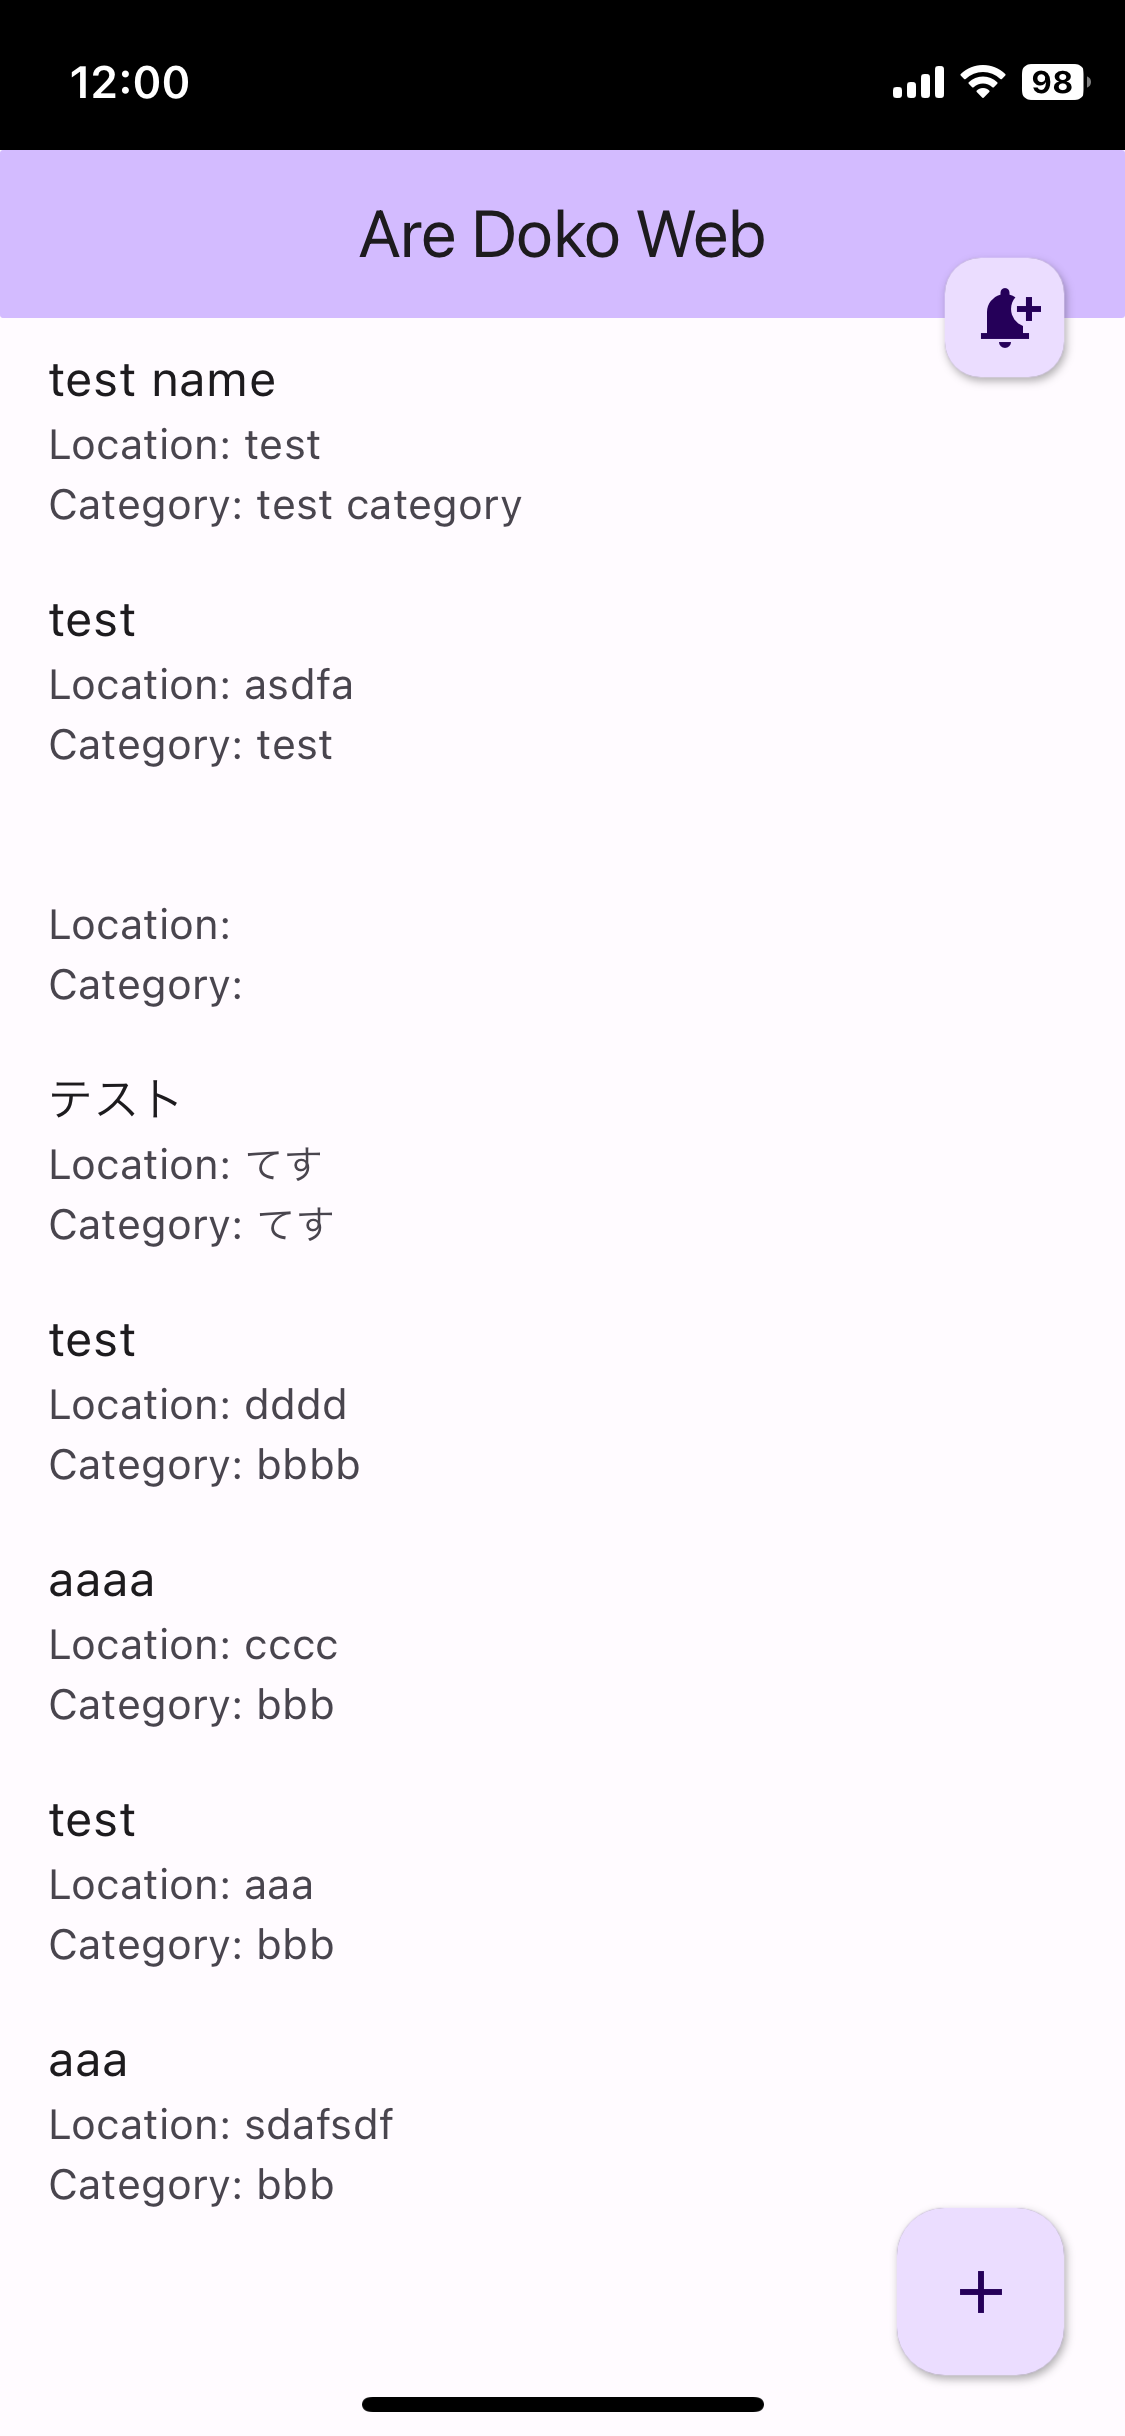
起動すると、以下のような画面になります。
(Safariから同じことをしても、Service Workerがエラーを吐きます。この画面の他の実装については割愛で...)
| 起動後 | 通知ボタンタップ後 |
|---|---|
 |
 |
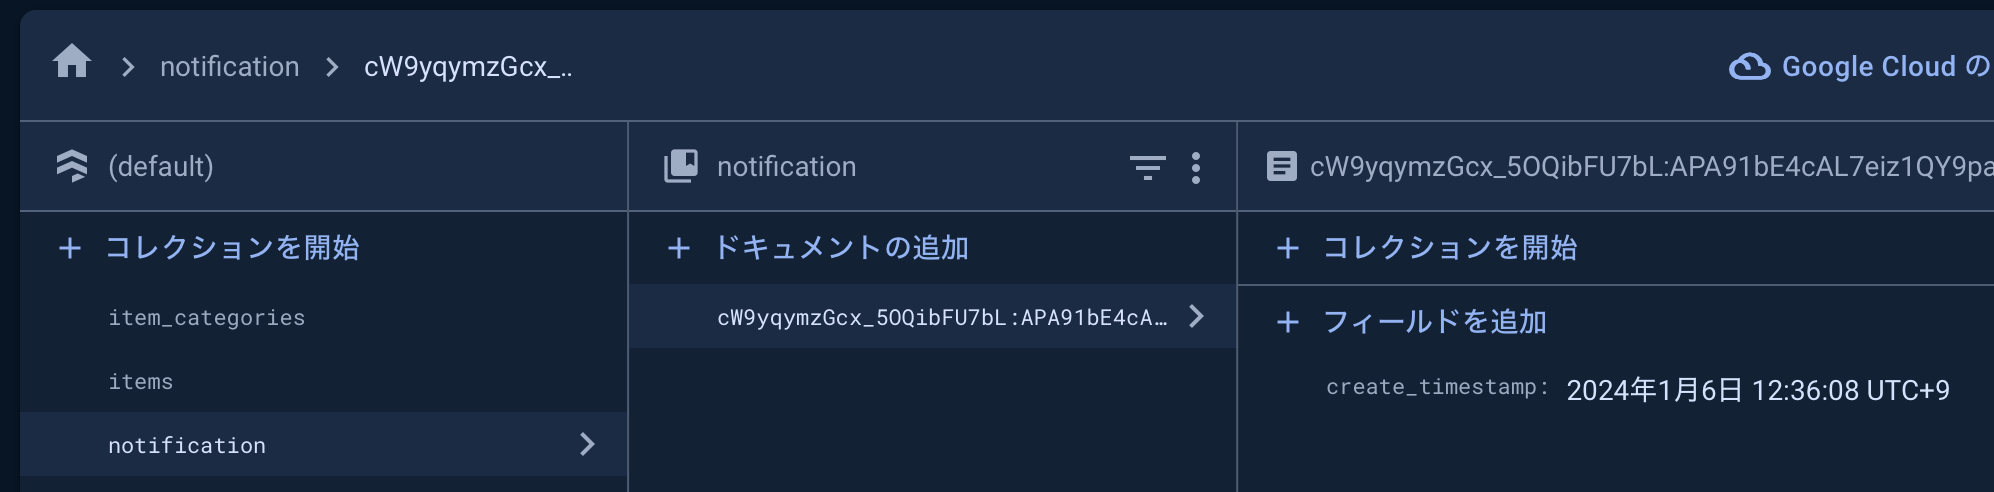
Firestoreには以下のように登録されていました。
次に、あるFirestoreのデータが追加されたら、firestore上に保存されたToken宛にFCMを使ってCloud Functionsから通知を送信していきます。
FCMから通知を送信する
前の手順で、Push Subscriptionのendpoint(通知のToken)をfirestoreに保存するコードを書きました。
Cloud Functionsを使うためには、Firebase CLIをインストールし、プロジェクトフォルダでfirebase init functionsコマンドを実行する必要があります。Firebase CLIのインストール方法やfirebase init functionsコマンドの実行方法は、公式ドキュメントを参照してください。使用言語はPython,TypeScript,JavaScriptから選べますが、今回はTypesSriptを使いました。
firebase init functionsコマンドを実行したら、functionsフォルダの中にあるindex.tsファイルを開きます。このファイルは、Cloud Functionsのコードを記述するファイルです。ここで、以下のコードを追加します。
import * as functions from "firebase-functions";
import * as admin from "firebase-admin";
import {Notification} from "firebase-admin/messaging";;

admin.initializeApp();

export const onAddItem = functions.firestore
  .document("items/{itemId}")
  .onCreate(async (snapshot: admin.firestore.DocumentSnapshot) => {
    const data = snapshot.data();
    if (data) {
      const document = {
        name: data.name,
        category: data.category,
        location_category: data.location_category,
      };
      const serializedDocument = JSON.stringify(document);
      const notification: Notification = {
        title: "ドキュメントが追加されました。",
        body: serializedDocument,
      };

      // 通知するユーザーのトークン一覧を取得します。
      const notificationSnapshot = await admin.firestore()
        .collection("notification").get();
      const tokens = notificationSnapshot.docs.map((doc) => doc.id);
      for (const token of tokens) {
        // 通知を送信します。
        await sendNotification(token, notification);
      }
    }
  });

// 通知を送信する関数を定義します。
export const sendNotification = async function(
  token: string,
  notification: Notification,
): Promise<void> {
  // FCMのクライアントを生成します。
  const fcm = admin.messaging();

  // 通知を送信します。
  await fcm.send({
    token: token,
    notification: notification,
  }).then((response) => {
    // Response is a message ID string.
    console.log("Successfully sent message:", response);
  })
    .catch((error) => {
      console.log("Error sending message:", error);
    });
};
これで、itemsのCollectionにドキュメントが追加されたら、firestore上に保存されたToken宛にFCMを使ってCloud Functionsから通知を送信する実装ができました。
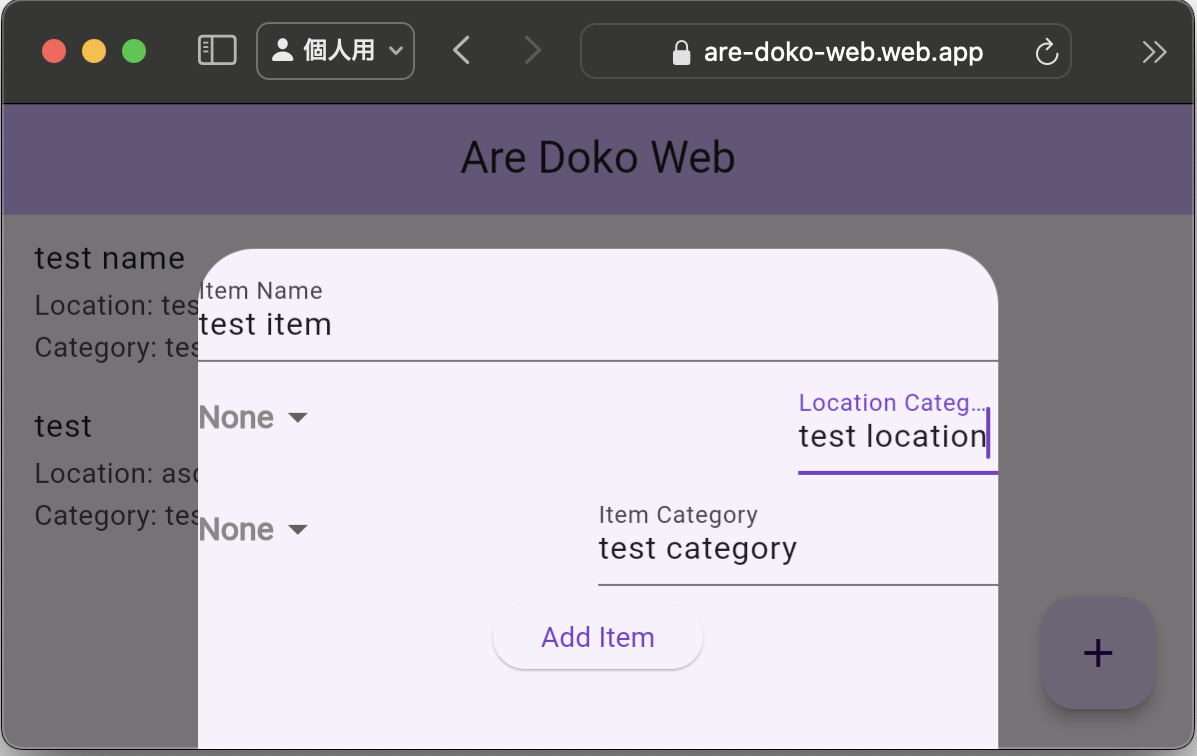
実際にブラウザから該当URLを開き、itemを追加してみます。(レイアウト崩れてますが...)
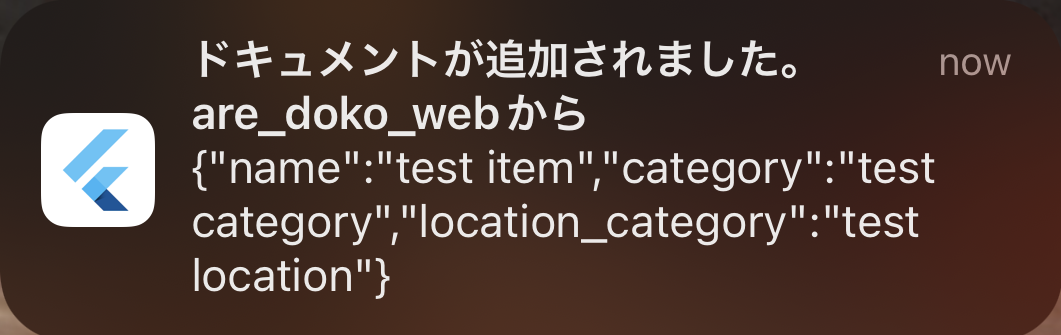
数秒後に、PWAとしてTokenを登録していたiPhoneに以下の通知が届きました。
まとめ
この記事では、FlutterでiOS Web Pushを受け取れる簡単なWebアプリケーションを実装する方法を紹介しました。具体的には、以下のような手順で実装しました。
これで、FlutterでクロスプラットフォームなWebアプリケーションにWeb Push機能を追加することができました。iOSでもWeb Pushがサポートされたことで、FlutterでWebアプリケーション開発する魅力がさらに高まりましたね。
もちろん、この記事で紹介した方法はあくまでも簡単な例です。実際には、通知の内容やデザイン、エラー処理やセキュリティ対策など、もっと細かい部分にも注意しなければなりません。また、iOS以外のプラットフォームでもWeb Pushが正常に動作するかどうかも確認する必要があります。
FlutterでWeb Pushを使って、ユーザーに素敵な体験を提供しましょう!