
概要
EC2をWebサーバーとして利用する際に、EC2までの通信をHTTPSで暗号化したいケースがあると思います。
そんな時に便利なのがCertbotです。今回は、Certbotを使ってEC2のSSL化を試してみます。
Certbotとは
Let's Encryptを認証局とした無料かつ自動でSSL/TLSサーバー証明書を発行することができる無料のOSSツールです。
ACME (Automatic Certificate Management Environment)という証明書の管理を自動化するプロトコルを使い、Let's Encryptに対してSSL/TLSサーバー証明書の検証及び発行を実施します。
ACM (AWS Certificate Manager)ではできないのか
結論、できます。
ACMは各証明書のプロビジョニング及び管理するマネージドサービスです。
- Amazonの認証局 (Amazon Trust Services)から発行したパブリック証明書
- ACM Private Certificate Authority (プライベート認証局)から発行したプライベート証明書
- インポートしたサードパーティー製のパブリック/プライベート証明書
ACMで管理する証明書をプロビジョニングできるAWSサービスは公式サイトに記載されている通りです。
そのうちの一つにあるAWS Nitro EnclavesというEC2の機能を利用すれば、ACMで管理する証明書を使ってEC2への通信をHTTPSとすることが可能です。
ただし、利用可能なインスタンスタイプ及びOSに制限があります。
無料証明書ってどうなのか
以下の記事が非常にわかりやすいため掲載させていただきます。
実践
実際にCertbotを使って無料のSSL/TLSサーバー証明書を作成し、EC2にHTTPSで繋いで行きましょう。
構成図は以下の通りです。詳細はGitHubを参照してみてください。
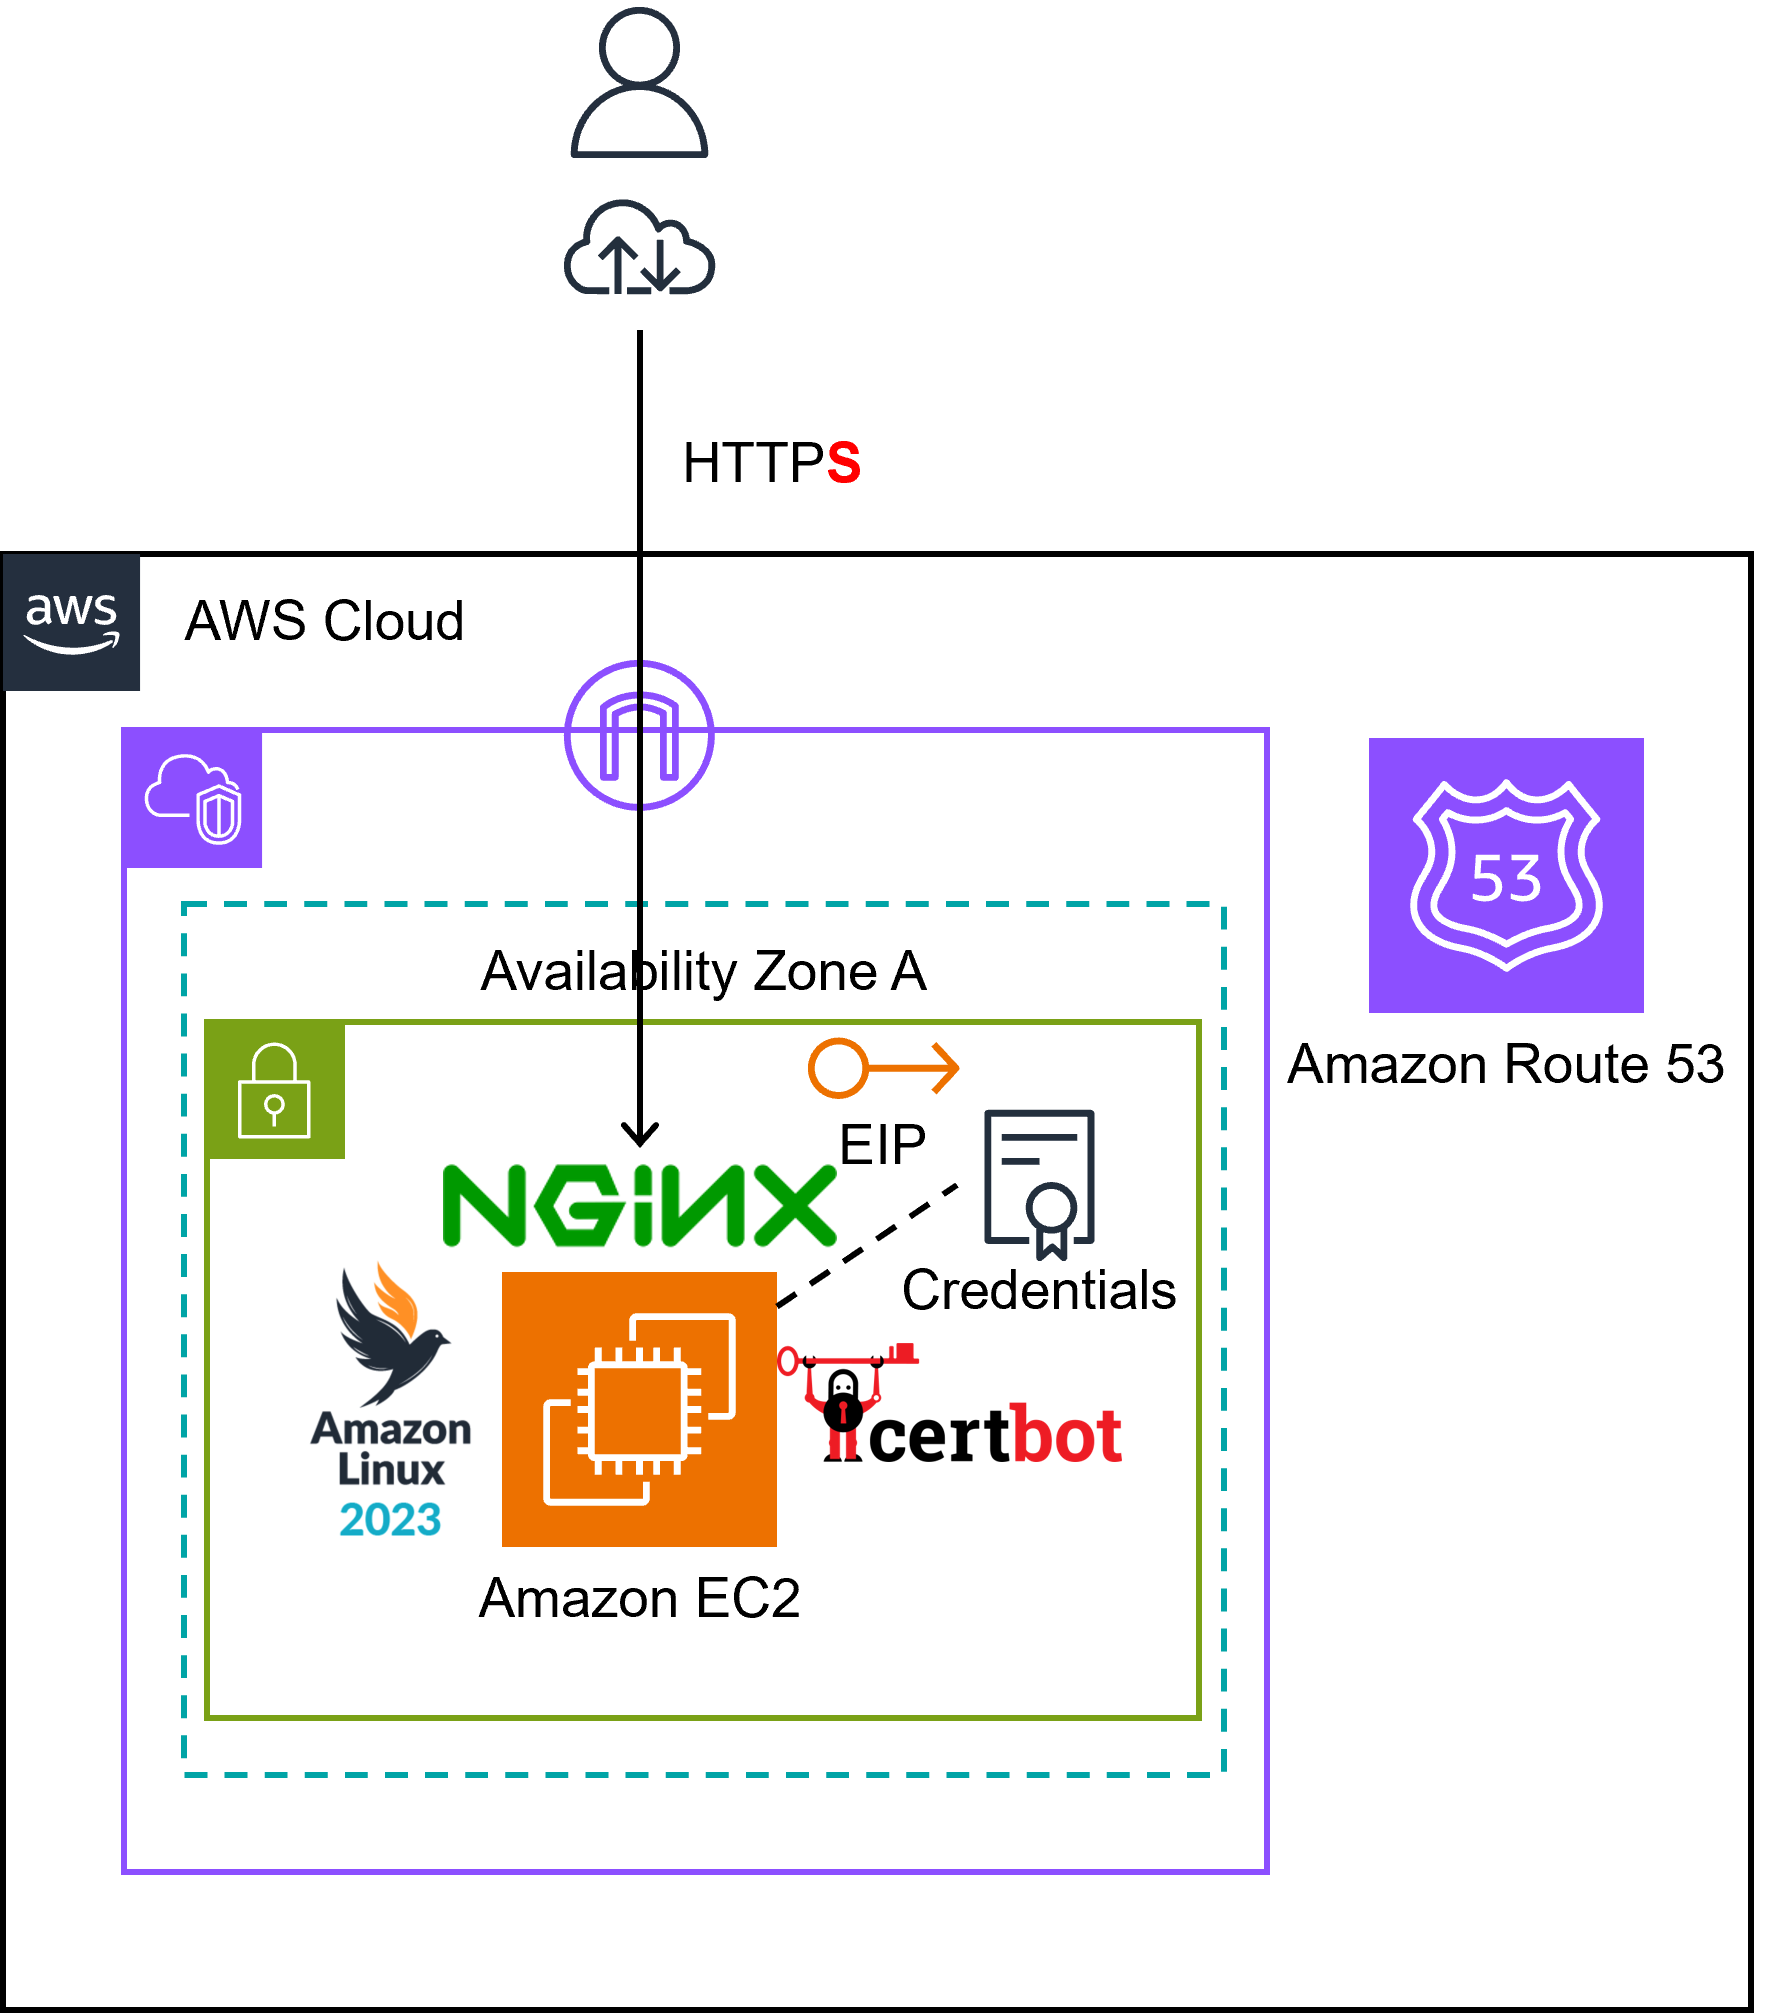
前提条件
- ドメイン取得済みで、EC2に対するAレコードが登録済みであること
- 以下作業は
rootユーザーで実施していきます
Nginxインストール
まずはNginxをインストールし、ブラウザからHTTPでアクセスできるかを確認していきます。
パッケージリスト更新
# dnf update
インストール
# dnf install nginx -y
Nginx起動&自動起動設定
# systemctl enable --now nginx
HTTPでブラウザからアクセス確認
Python仮想環境設定
Certbotのインストール方法はDockerなどもありますが、今回はpip (Pythonパッケージ管理ツール)を使った方法で実施していきます。
具体的には、venv (仮想環境ツール)を使ってPython仮想環境を作成し、その環境にCertbotをインストールします。そのための準備をしていきましょう。
パッケージインストール
- python3: Python
- augeas-libs: Apacheプラグイン
# dnf install python3 augeas-libs -y
仮想環境作成
# mkdir /opt/certbot
# python3 -m venv /opt/certbot
# /opt/certbot/bin/pip install --upgrade pip
Certbotインストール
Certbot&Nginx用パッケージインストール
# /opt/certbot/bin/pip install certbot certbot-nginx
シンボリックリンク作成
# ln -s /opt/certbot/bin/certbot /usr/bin/certbot
SSL/TLSサーバー証明書作成
nginx.confファイル修正
後述するコマンドを実行すると、Certbotが自動でnginx.confを修正してくれます。
ただその際に、ファイル内のserver_nameを確認するため、事前に修正します。
# For more information on configuration, see:
#   * Official English Documentation: http://nginx.org/en/docs/
#   * Official Russian Documentation: http://nginx.org/ru/docs/

user nginx;
worker_processes auto;
error_log /var/log/nginx/error.log notice;
pid /run/nginx.pid;

# Load dynamic modules. See /usr/share/doc/nginx/README.dynamic.
include /usr/share/nginx/modules/*.conf;

events {
    worker_connections 1024;
}

http {
    log_format  main  '$remote_addr - $remote_user [$time_local] "$request" '
                      '$status $body_bytes_sent "$http_referer" '
                      '"$http_user_agent" "$http_x_forwarded_for"';

    access_log  /var/log/nginx/access.log  main;

    sendfile            on;
    tcp_nopush          on;
    keepalive_timeout   65;
    types_hash_max_size 4096;

    include             /etc/nginx/mime.types;
    default_type        application/octet-stream;

    # Load modular configuration files from the /etc/nginx/conf.d directory.
    # See http://nginx.org/en/docs/ngx_core_module.html#include
    # for more information.
    include /etc/nginx/conf.d/*.conf;

    server {
        listen       80;
        listen       [::]:80;
-        server_name  _;
+        server_name  www.example.com; # 自身の登録するドメイン名に修正
        root         /usr/share/nginx/html;

        # Load configuration files for the default server block.
        include /etc/nginx/default.d/*.conf;

        error_page 404 /404.html;
        location = /404.html {
        }

        error_page 500 502 503 504 /50x.html;
        location = /50x.html {
        }
    }

# Settings for a TLS enabled server.
#
#    server {
#        listen       443 ssl;
#        listen       [::]:443 ssl;
#        http2        on;
#        server_name  _;
#        root         /usr/share/nginx/html;
#
#        ssl_certificate "/etc/pki/nginx/server.crt";
#        ssl_certificate_key "/etc/pki/nginx/private/server.key";
#        ssl_session_cache shared:SSL:1m;
#        ssl_session_timeout  10m;
#        ssl_ciphers PROFILE=SYSTEM;
#        ssl_prefer_server_ciphers on;
#
#        # Load configuration files for the default server block.
#        include /etc/nginx/default.d/*.conf;
#
#        error_page 404 /404.html;
#        location = /404.html {
#        }
#
#        error_page 500 502 503 504 /50x.html;
#        location = /50x.html {
#        }
#    }
}
証明書作成&Nginx設定ファイル自動編集
# certbot --nginx
上記コマンドを実行すると、メールアドレスや登録するドメイン情報の入力が求められます。
nginx.confの確認
実際の変更点は以下の通りです。
# For more information on configuration, see:
#   * Official English Documentation: http://nginx.org/en/docs/
#   * Official Russian Documentation: http://nginx.org/ru/docs/

user nginx;
worker_processes auto;
error_log /var/log/nginx/error.log notice;
pid /run/nginx.pid;

# Load dynamic modules. See /usr/share/doc/nginx/README.dynamic.
include /usr/share/nginx/modules/*.conf;

events {
    worker_connections 1024;
}

http {
    log_format  main  '$remote_addr - $remote_user [$time_local] "$request" '
                      '$status $body_bytes_sent "$http_referer" '
                      '"$http_user_agent" "$http_x_forwarded_for"';

    access_log  /var/log/nginx/access.log  main;

    sendfile            on;
    tcp_nopush          on;
    keepalive_timeout   65;
    types_hash_max_size 4096;

    include             /etc/nginx/mime.types;
    default_type        application/octet-stream;

    # Load modular configuration files from the /etc/nginx/conf.d directory.
    # See http://nginx.org/en/docs/ngx_core_module.html#include
    # for more information.
    include /etc/nginx/conf.d/*.conf;

    server {
        server_name  www.example.com;
        root         /usr/share/nginx/html;
                                                                                                                                                                                                                 or        # Load configuration files for the default server block.
        include /etc/nginx/default.d/*.conf;

        error_page 404 /404.html;
        location = /404.html {
        }

        error_page 500 502 503 504 /50x.html;
        location = /50x.html {
        }

+    listen [::]:443 ssl ipv6only=on; # managed by Certbot
+    listen 443 ssl; # managed by Certbot
+    ssl_certificate /etc/letsencrypt/live/www.example.com/fullchain.pem; # managed by Certbot
+    ssl_certificate_key /etc/letsencrypt/live/www.example.com/privkey.pem; # managed by Certbot
+    include /etc/letsencrypt/options-ssl-nginx.conf; # managed by Certbot
+    ssl_dhparam /etc/letsencrypt/ssl-dhparams.pem; # managed by Certbot

}

# Settings for a TLS enabled server.
#
#    server {
#        listen       443 ssl;
#        listen       [::]:443 ssl;
#        http2        on;
#        server_name  _;
#        root         /usr/share/nginx/html;
#
#        ssl_certificate "/etc/pki/nginx/server.crt";
#        ssl_certificate_key "/etc/pki/nginx/private/server.key";
#        ssl_session_cache shared:SSL:1m;
#        ssl_session_timeout  10m;
#        ssl_ciphers PROFILE=SYSTEM;
#        ssl_prefer_server_ciphers on;
#
#        # Load configuration files for the default server block.
#        include /etc/nginx/default.d/*.conf;
#
#        error_page 404 /404.html;
#        location = /404.html {
#        }
#
#        error_page 500 502 503 504 /50x.html;
#        location = /50x.html {
#        }
#    }


+    server {
+    if ($host = www.example.com) {
+        return 301 https://$host$request_uri;
+    } # managed by Certbot
+
+
+        listen       80;
+        listen       [::]:80;
+        server_name  www.example.com;
+    return 404; # managed by Certbot
+}}
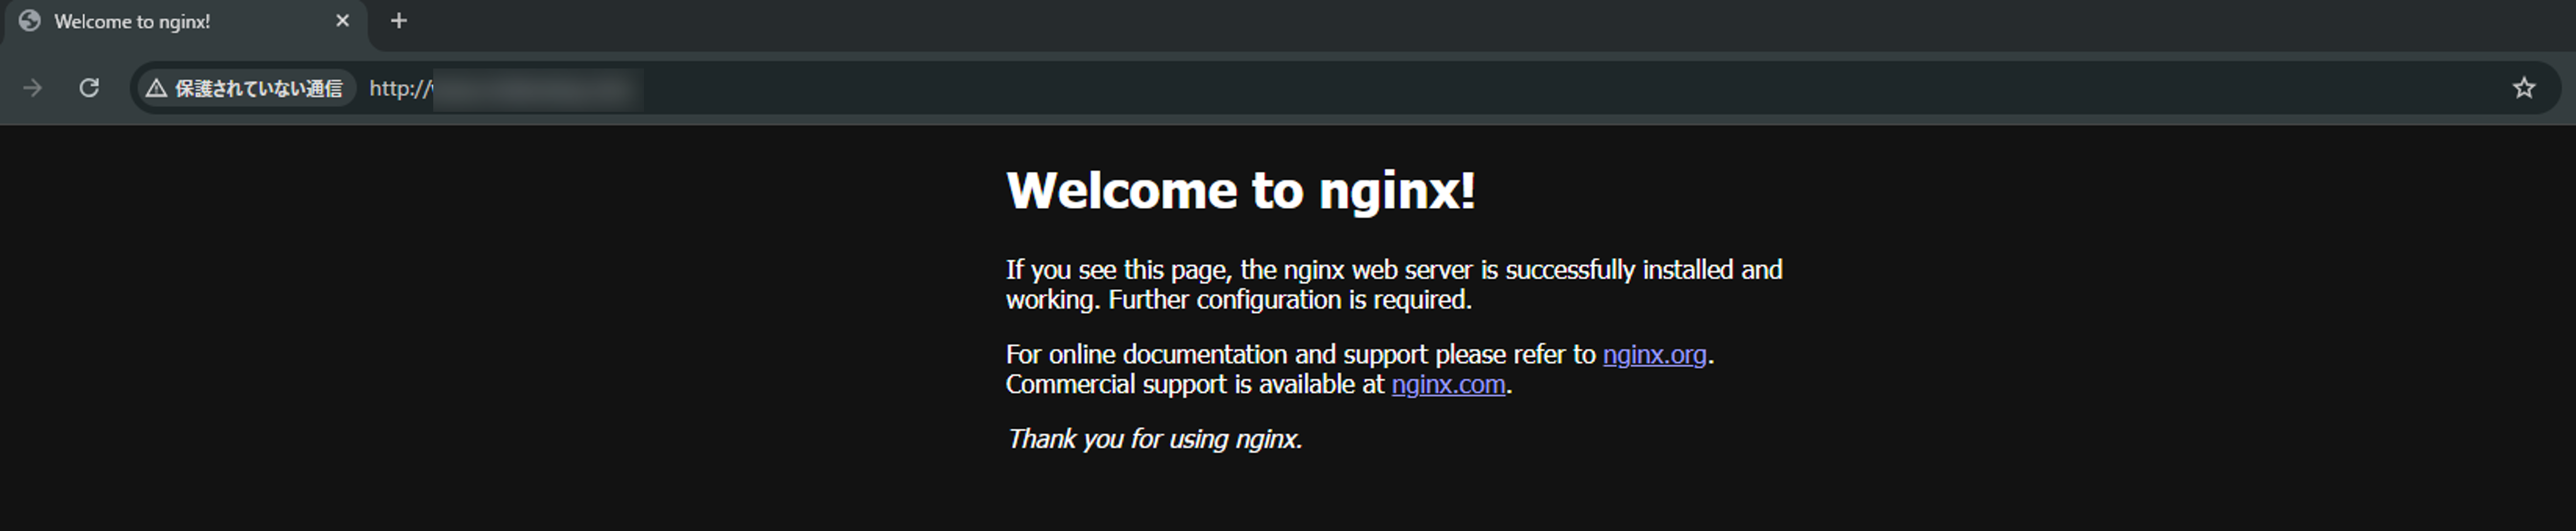
動作確認
HTTPSでアクセスできています。

証明書もLet's Encryptから発行されているのが確認できます。

自動更新設定(おまけ)
# echo "0 0,12 * * * root /opt/certbot/bin/python -c 'import random; import time; time.sleep(random.random() * 3600)' && sudo certbot renew -q" | sudo tee -a /etc/crontab > /dev/null
証明書失効(おまけ)
# /opt/certbot/bin/certbot revoke --cert-path /etc/letsencrypt/live/www.example.com/fullchain.pem

Saving debug log to /var/log/letsencrypt/letsencrypt.log

- - - - - - - - - - - - - - - - - - - - - - - - - - - - - - - - - - - - - - - -
Would you like to delete the certificate(s) you just revoked, along with all
earlier and later versions of the certificate?
- - - - - - - - - - - - - - - - - - - - - - - - - - - - - - - - - - - - - - - -
(Y)es (recommended)/(N)o: Y

- - - - - - - - - - - - - - - - - - - - - - - - - - - - - - - - - - - - - - - -
The following certificate(s) are selected for deletion:

  * www.example.com

WARNING: Before continuing, ensure that the listed certificates are not being
used by any installed server software (e.g. Apache, nginx, mail servers).
Deleting a certificate that is still being used will cause the server software
to stop working. See https://certbot.org/deleting-certs for information on
deleting certificates safely.

Are you sure you want to delete the above certificate(s)?
- - - - - - - - - - - - - - - - - - - - - - - - - - - - - - - - - - - - - - - -
(Y)es/(N)o: Y
Deleted all files relating to certificate www.example.com.
Congratulations! You have successfully revoked the certificate that was located at /etc/letsencrypt/live/www.example.com/fullchain.pem.
証明書削除(おまけ)
# /opt/certbot/bin/certbot delete --cert-name www.example.com
まとめ
今回はCertbotを使ったEC2のSSL化を実施してみました。
やってみると非常に簡単でした。
今回はLet's EncryptがCertbotへのドメイン認証方式としてHTTP-01 チャレンジを利用しているため、認証する際には80番ポートの解放が必要となります。自動更新設定を入れるとなると常時80番ポートの解放が必要となるため、本番環境での利用ではDNS-01 チャレンジ方式の採用を検討した方が良いかなと思います。
この記事が誰かの役に立てば幸いです。