はじめに
私が開発しているネットワーク管理ソフトTWSNMP FC
と
TWSNMP FK
にMQTTサーバー(ブローカー)とMQTTクライアントを組み込んだ時に利用したGo言語のパッケージの紹介です。
MQTTサーバーパッケージ
Go言語でMQTTサーバーを開発するためのパッケージは
がおすすめです。
単体で動作するMQTTサーバーコマンドも提唱されていますが、ライブラリーとしてGo言語のアプリに組み込むことができます。GitHUBには、簡単なサンプルコードが紹介されていますが、動作している様子を確認するためにログに出力できるようなしたサンプルコードを作成しました。
package main

import (
	"bytes"
	"fmt"
	"log"
	"os"
	"os/signal"
	"syscall"

	mqtt "github.com/mochi-mqtt/server/v2"
	"github.com/mochi-mqtt/server/v2/hooks/auth"
	"github.com/mochi-mqtt/server/v2/listeners"
	"github.com/mochi-mqtt/server/v2/packets"
)

func main() {
	if len(os.Args) < 2 {
		log.Fatalln("mqtt_sv <tcp port> [<stats port>]")
	}
	// シグナルで停止できるようにします。
	sigs := make(chan os.Signal, 1)
	done := make(chan bool, 1)
	signal.Notify(sigs, syscall.SIGINT, syscall.SIGTERM)
	go func() {
		<-sigs
		done <- true
	}()
	// MQTTサーバーを作成します。
	server := mqtt.New(nil)
	if err := server.AddHook(new(auth.AllowHook), nil); err != nil {
		log.Fatal(err)
	}
	// Hookを登録します。
	if err := server.AddHook(new(ExampleHook), &ExampleHookOptions{
		Server: server,
	}); err != nil {
		log.Fatal(err)
	}
	// TCPの待ち受けポートを作成して登録します。
	tcp := listeners.NewTCP(listeners.Config{ID: "tcp1", Address: ":" + os.Args[1]})
	if err := server.AddListener(tcp); err != nil {
		log.Fatal(err)
	}
	if len(os.Args) > 2 {
		// Statsの待ち受けポートを作成して登録します。
		stats := listeners.NewHTTPStats(
			listeners.Config{
				ID:      "stats1",
				Address: ":" + os.Args[2],
			}, server.Info,
		)
		if err := server.AddListener(stats); err != nil {
			log.Fatal(err)
		}
	}
	go func() {
		err := server.Serve()
		if err != nil {
			log.Fatal(err)
		}
	}()
	<-done
}

// ExampleHookOptions は、ExampleHookのオプションです。
type ExampleHookOptions struct {
	Server *mqtt.Server
}

// ExampleHook はMQTTサーバーの動作をログに出力するHookです。
type ExampleHook struct {
	mqtt.HookBase
	config *ExampleHookOptions
}

func (h *ExampleHook) ID() string {
	return "events-example"
}

func (h *ExampleHook) Provides(b byte) bool {
	return bytes.Contains([]byte{
		mqtt.OnConnect,
		mqtt.OnDisconnect,
		mqtt.OnSubscribed,
		mqtt.OnUnsubscribed,
		mqtt.OnPublished,
		mqtt.OnPublish,
	}, []byte{b})
}

func (h *ExampleHook) Init(config any) error {
	h.Log.Info("initialised")
	if _, ok := config.(*ExampleHookOptions); !ok && config != nil {
		return mqtt.ErrInvalidConfigType
	}

	h.config = config.(*ExampleHookOptions)
	if h.config.Server == nil {
		return mqtt.ErrInvalidConfigType
	}
	return nil
}

func (h *ExampleHook) OnConnect(cl *mqtt.Client, pk packets.Packet) error {
	h.Log.Info("client connected", "client", cl.ID)
	return nil
}

func (h *ExampleHook) OnDisconnect(cl *mqtt.Client, err error, expire bool) {
	h.Log.Info("client disconnected", "client", cl.ID, "expire", expire, "error", err)
}

func (h *ExampleHook) OnSubscribed(cl *mqtt.Client, pk packets.Packet, reasonCodes []byte) {
	h.Log.Info(fmt.Sprintf("subscribed qos=%v", reasonCodes), "client", cl.ID, "filters", pk.Filters)
}

func (h *ExampleHook) OnUnsubscribed(cl *mqtt.Client, pk packets.Packet) {
	h.Log.Info("unsubscribed", "client", cl.ID, "filters", pk.Filters)
}

func (h *ExampleHook) OnPublish(cl *mqtt.Client, pk packets.Packet) (packets.Packet, error) {
	h.Log.Info("received from client", "client", cl.ID, "topic", pk.TopicName, "payload", string(pk.Payload))
	return pk, nil
}

func (h *ExampleHook) OnPublished(cl *mqtt.Client, pk packets.Packet) {
	h.Log.Info("published to client", "client", cl.ID, "topic", pk.TopicName, "payload", string(pk.Payload))
}
MQTTクライアントパッケージ
Go言語のMQTTクライアントパッケージは、多くの人が紹介している
がよいと思います。
こちらも、先程のサーバーのサンプルを試すためのサンプルコードを作成しました。
package main

import (
	"fmt"
	"log"
	"os"
	"os/signal"
	"syscall"

	mqtt "github.com/eclipse/paho.mqtt.golang"
)

// 受信した時のハンドラー
var publishHandler mqtt.MessageHandler = func(client mqtt.Client, msg mqtt.Message) {
	log.Printf("Received message: %s from topic: %s", msg.Payload(), msg.Topic())
}

// 接続した時のハンドラー
var connectHandler mqtt.OnConnectHandler = func(client mqtt.Client) {
	log.Println("Connected")
}

// 切断した時のハンドラー
var connectLostHandler mqtt.ConnectionLostHandler = func(client mqtt.Client, err error) {
	log.Printf("Connect lost: %v", err)
}

func main() {
	if len(os.Args) < 2 {
		log.Fatalln("mqtt_cl <IP:port>")
	}
	// MQTTクライアントを作成します。
	opts := mqtt.NewClientOptions()
	opts.AddBroker(fmt.Sprintf("tcp://%s", os.Args[1]))
	opts.SetClientID("test-mqtt-client")
	opts.SetDefaultPublishHandler(publishHandler)
	opts.OnConnect = connectHandler
	opts.OnConnectionLost = connectLostHandler
	client := mqtt.NewClient(opts)
	// サーバーに接続します。
	if token := client.Connect(); token.Wait() && token.Error() != nil {
		log.Fatalln(token.Error())
	}
	// Topicをサブスクライブします。
	subscribe(client, "topic/test")
	// Topicを10回パブリッシュします。
	for i := 0; i < 10; i++ {
		publish(client, "topic/test", fmt.Sprintf("payload:%d", i))
	}
	// Ctl+cが押されるまで待ちます。
	c := make(chan os.Signal, 2)
	signal.Notify(c, os.Interrupt, syscall.SIGTERM)
	<-c
	client.Disconnect(250)
}

// サブスクライブの登録
func subscribe(client mqtt.Client, topic string) {
	token := client.Subscribe(topic, 1, nil)
	token.Wait()
	log.Printf("subscribe topic: %s", topic)
}

// Topicのパブリッシュ
func publish(client mqtt.Client, topic, payload string) {
	token := client.Publish(topic, 0, false, payload)
	token.Wait()
	log.Printf("publish topic:%s payload:%s", topic, payload)
}
サンプルコードを動かす
MQTTサーバーとクライアントのサンプルコードを試してみます。
サーバーを
$go run main.go 1887 1888
のように起動してから、クライアントを
$go run main.go 127.0.0.1:1887
のように実行します。
サーバーのログは、
ime=2025-11-23T05:32:10.290+09:00 level=INFO msg="added hook" hook=allow-all-auth
time=2025-11-23T05:32:10.290+09:00 level=INFO msg="added hook" hook=events-example
time=2025-11-23T05:32:10.290+09:00 level=INFO msg=initialised hook=events-example
time=2025-11-23T05:32:10.291+09:00 level=INFO msg="attached listener" id=tcp1 protocol=tcp address=[::]:1887
time=2025-11-23T05:32:10.291+09:00 level=INFO msg="attached listener" id=stats1 protocol=http address=:1888
time=2025-11-23T05:32:10.291+09:00 level=INFO msg="mochi mqtt starting" version=2.7.9
time=2025-11-23T05:32:10.291+09:00 level=INFO msg="mochi mqtt server started"
time=2025-11-23T05:32:20.272+09:00 level=INFO msg="client connected" hook=events-example client=test-mqtt-client
time=2025-11-23T05:32:20.272+09:00 level=INFO msg="subscribed qos=[1]" hook=events-example client=test-mqtt-client filters="[{ShareName:[] Filter:topic/test Identifier:0 Identifiers:map[] RetainHandling:0 Qos:1 RetainAsPublished:false NoLocal:false FwdRetainedFlag:false}]"
time=2025-11-23T05:32:20.272+09:00 level=INFO msg="received from client" hook=events-example client=test-mqtt-client topic=topic/test payload=payload:0
time=2025-11-23T05:32:20.272+09:00 level=INFO msg="published to client" hook=events-example client=test-mqtt-client topic=topic/test payload=payload:0
|
time=2025-11-23T05:32:23.841+09:00 level=INFO msg="client disconnected" hook=events-example client=test-mqtt-client expire=true error=<nil>
time=2025-11-23T05:32:23.841+09:00 level=INFO msg=unsubscribed hook=events-example client=test-mqtt-client filters="[{ShareName:[] Filter:topic/test Identifier:0 Identifiers:map[] RetainHandling:0 Qos:1 RetainAsPublished:false NoLocal:false FwdRetainedFlag:false}]"
のようになります。
クライアント側のログは、
2025/11/23 05:32:20 Connected
2025/11/23 05:32:20 subscribe topic: topic/test
2025/11/23 05:32:20 publish topic:topic/test payload:payload:0
|省略
2025/11/23 05:32:20 publish topic:topic/test payload:payload:9
2025/11/23 05:32:20 Received message: payload:0 from topic: topic/test
|省略
2025/11/23 05:32:20 Received message: payload:9 from topic: topic/test
のようになります。
ブラウザーかcurlでhttp://localhost:1888にアクセスすれば、
$curl http://localhost:1888
{
	"version": "2.7.9",
	"started": 1763843928,
	"time": 1763843948,
	"uptime": 20,
	"bytes_received": 279,
	"bytes_sent": 239,
	"clients_connected": 0,
	"clients_disconnected": 0,
	"clients_maximum": 1,
	"clients_total": 0,
	"messages_received": 10,
	"messages_sent": 10,
	"messages_dropped": 0,
	"retained": 0,
	"inflight": 0,
	"inflight_dropped": 0,
	"subscriptions": 0,
	"packets_received": 13,
	"packets_sent": 12,
	"memory_alloc": 2015232,
	"threads": 6
}
のようにサーバーのStatsを取得できます。
TWSNMP FC/FKの応用例
TWSNMP FC/FKをMQTT対応した目的に一つは、
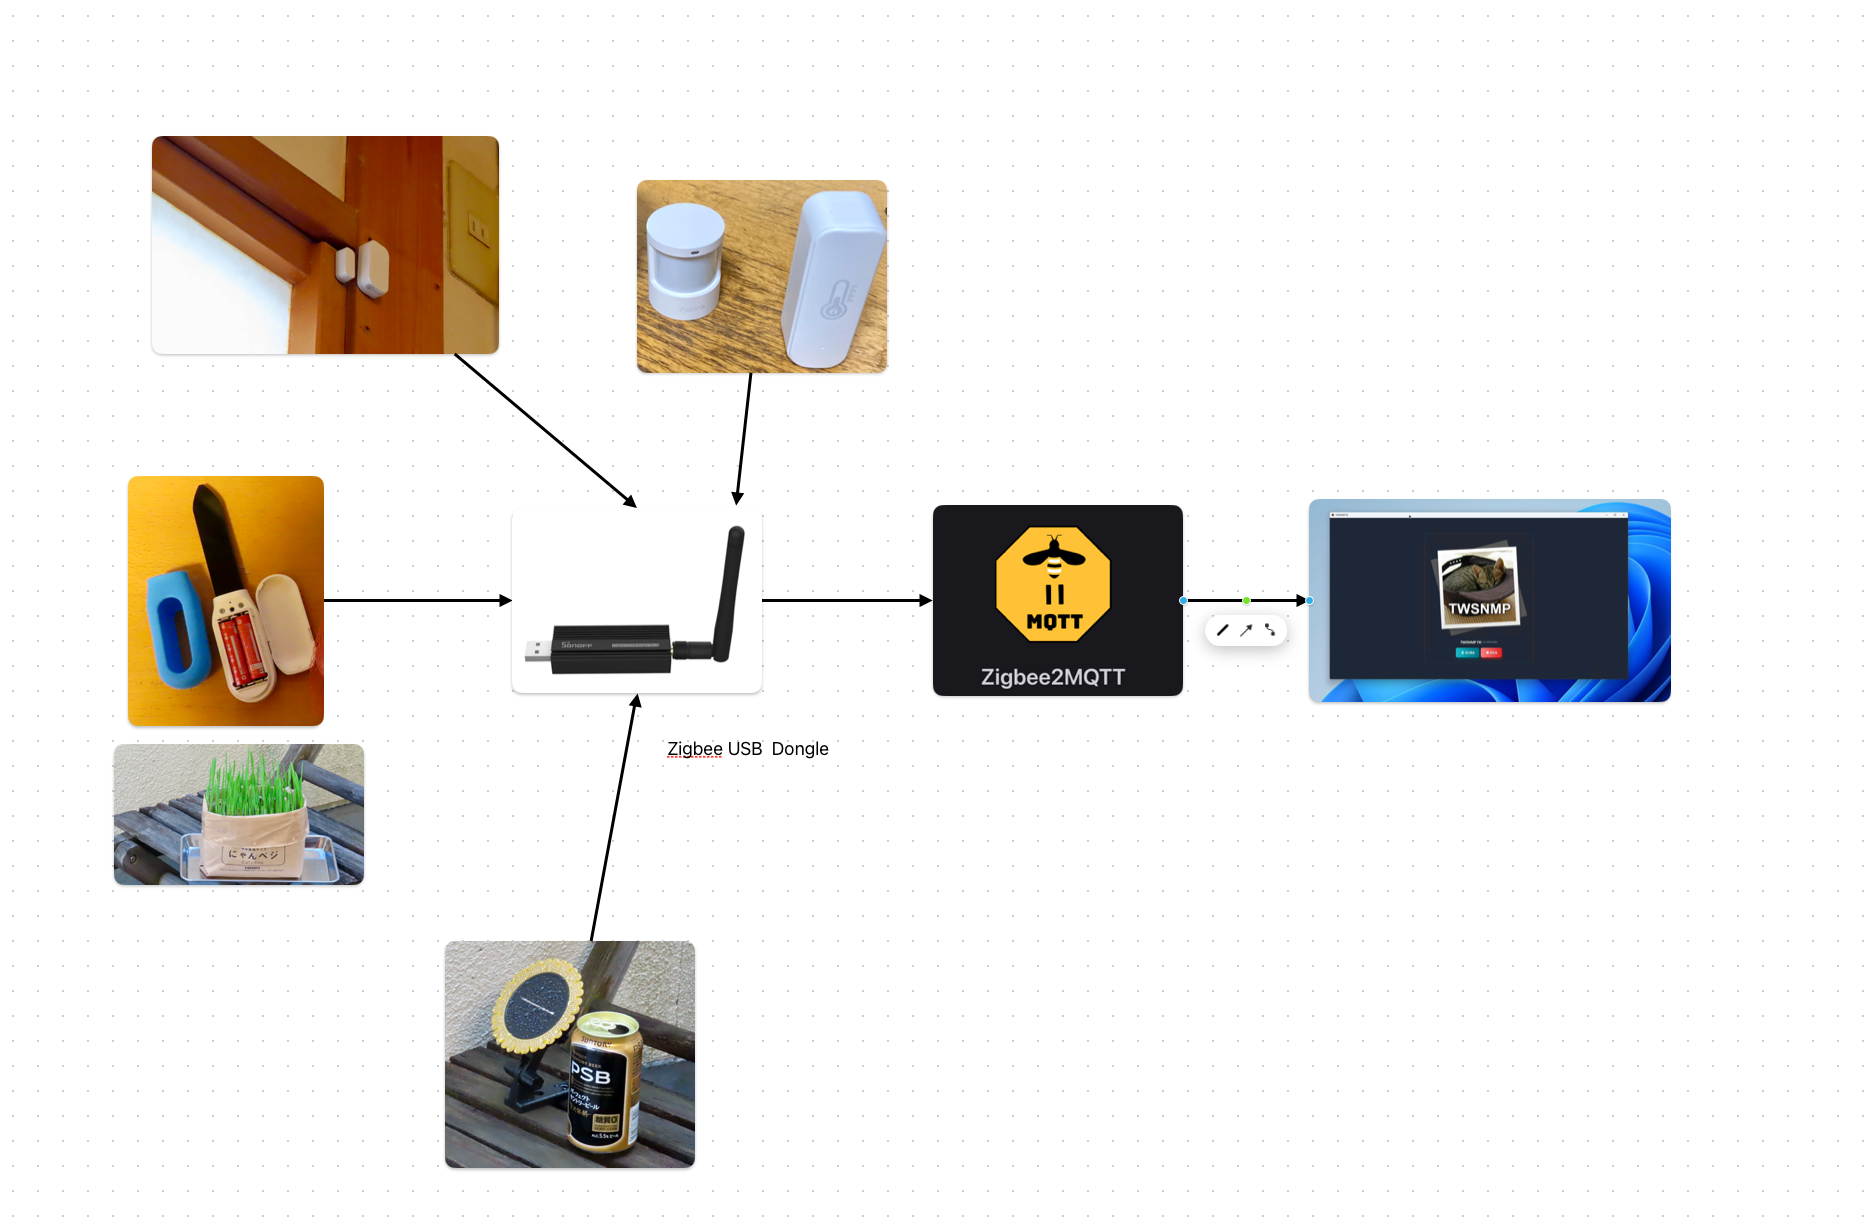
のような環境でZigbeeのセンサーのデータをTWSNMPで監視することです。最初は、mosquittoというMQTTサーバーを経由していましたが、サーバーも組み込んでしまいました。
クライアント
クライアントは、ポーリング機能で使っています。MQTTサーバー(ブローカー)に接続して特定のTopicをサブスクライブすることで監視する仕組みです。

のように取得したデータを
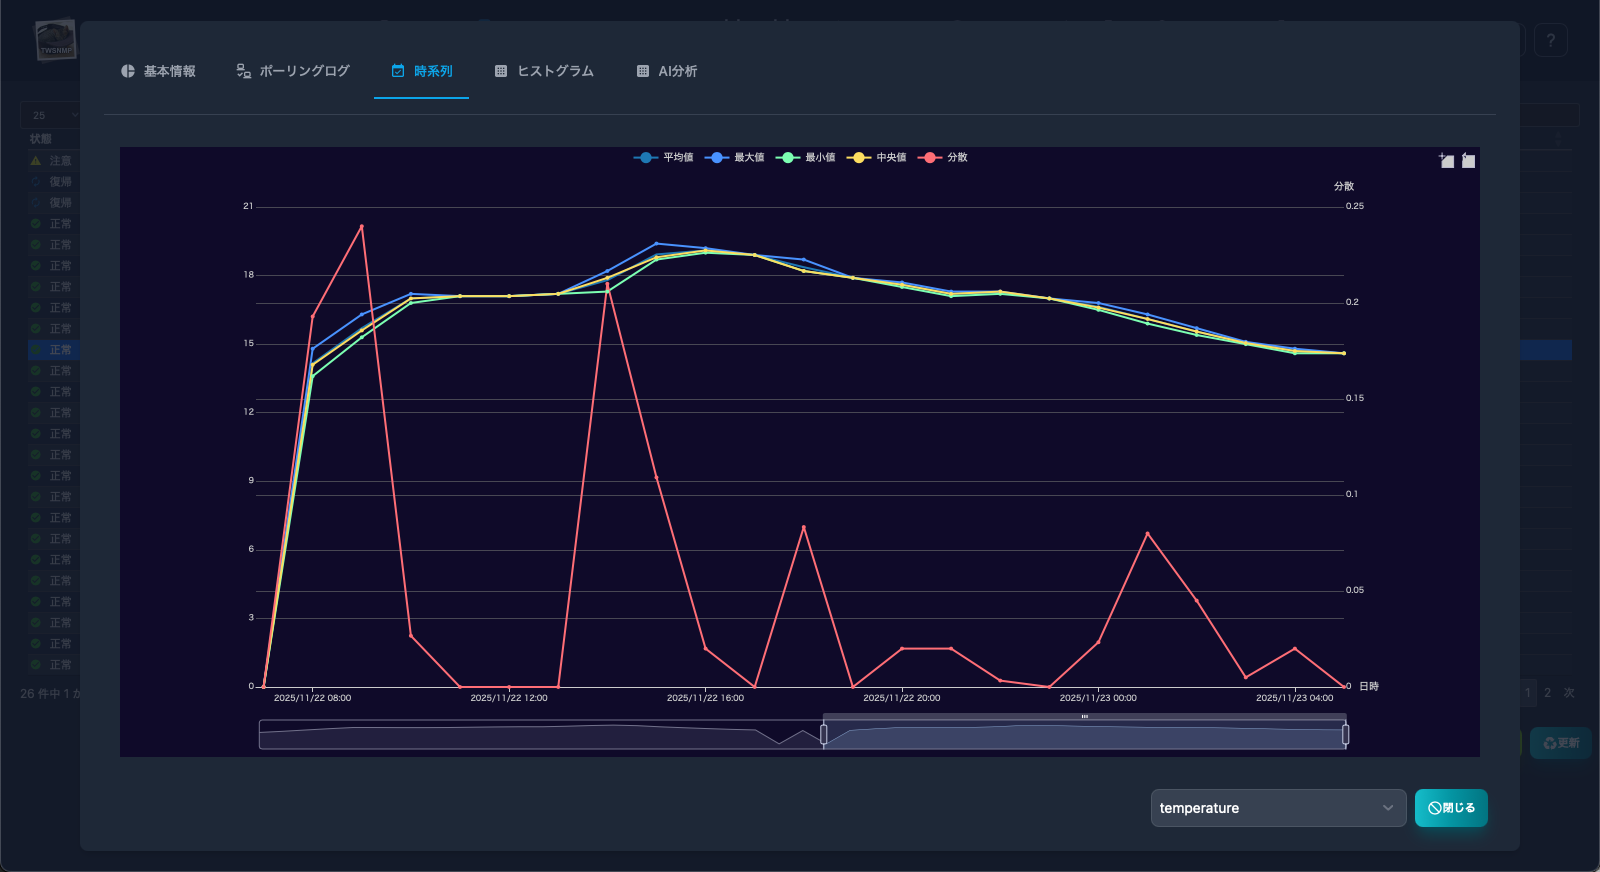
のような感じでグラフ化できます。
TWSNMP内蔵のMQTTサーバー以外でも使えます。
サーバー
サーバーは、ブローカーの役割をしますが、MQTTクライアントのテストにも使えます。

のようにTopicの受信状況を一覧でみることができます。
もちろん、このサーバーからデータを取得するポーリングもできます。
受信したTopicをsyslogに記録する設定にすれば、Topicをログに記録することもできます。