Go言語ライブラリ15選
Golangのおすすめのライブラリを15個(+おまけ1個)紹介します。ライブラリの特徴、インストール方法、使い方を徹底解説していきます。
cmp
テストで等価性を調べるために使う標準ライブラリ。reflect.DeepEqualははオブジェクトが完全一致していないと false になるが、cmp を使うとスライスの順番を無視できたり、一部のフィールドを比較対象から除外したり、様々なオプションを追加することができる。また、diffで差分を出すこともできる。
package main

import (
	"fmt"
	"reflect"

	"github.com/google/go-cmp/cmp"
	"github.com/google/go-cmp/cmp/cmpopts"
)

func main() {
	slice1 := []int{1, 2, 3}
	slice2 := []int{2, 3, 1}

	equal := reflect.DeepEqual(slice1, slice2)
	fmt.Println("reflect.DeepEqual:", equal) // false

	// cmpopts.SortSlices オプションを使用して、スライスの順序を無視して比較
	options := cmpopts.SortSlices(func(a, b int) bool { return a < b })

	diff := cmp.Diff(slice1, slice2, options)
	fmt.Println("cmp.Diff:", diff) // 差分なし

	equal2 := cmp.Equal(slice1, slice2, options)
	fmt.Println("cmp.Equal:", equal2) // true
}
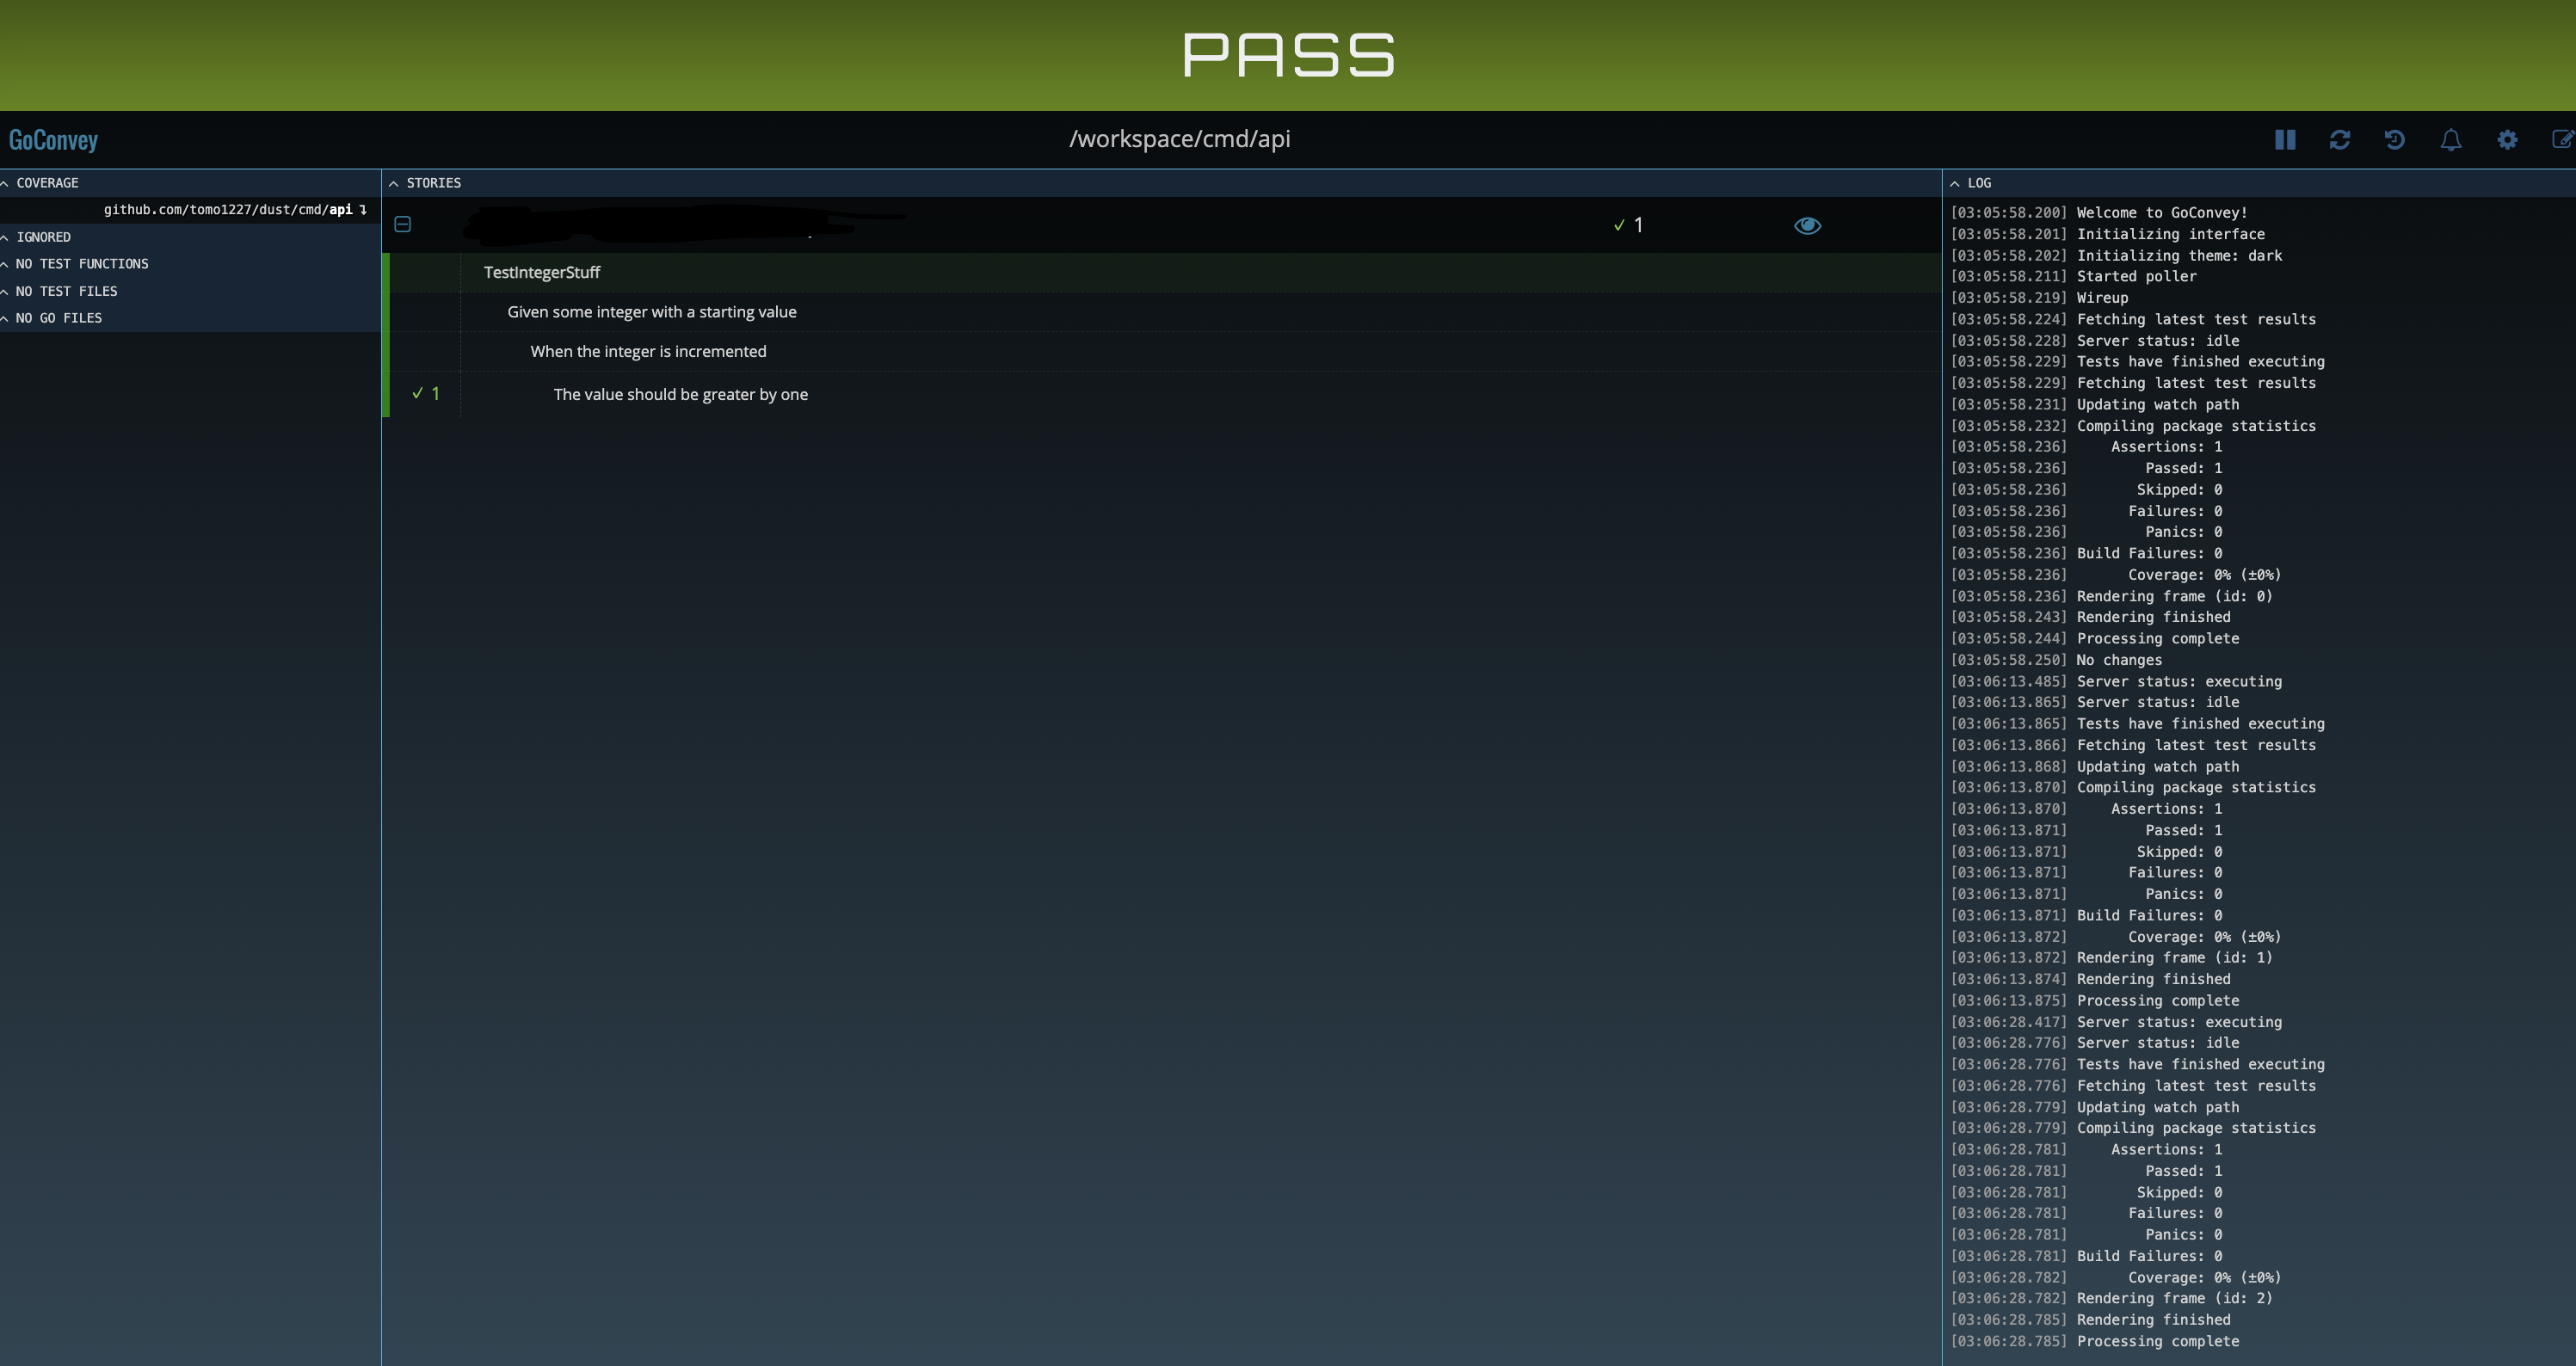
GoConvey
GoConveyを使うと、ブラウザ上でテスト結果を見ることができるようになる。また、テストを監視してくれるので、テスト結果もホットリロードされる。
$ cd <project path>
$ go get github.com/smartystreets/goconvey
$ go install github.com/smartystreets/goconvey
$ $GOPATH/bin/goconvey
http://localhost:8080 にブラウザにアクセスする。
docker内で起動している場合はgoconvey -host 0.0.0.0を叩かないと、ローカルのブラウザで起動できない。(gconvey in docker? · Issue #449 · smartystreets/goconvey)
以下のようにmain_test.goを作成する。
package main_test

import (
	"testing"
	. "github.com/smartystreets/goconvey/convey"
)

func TestIntegerStuff(t *testing.T) {
	Convey("Given some integer with a starting value", t, func() {
		x := 1

		Convey("When the integer is incremented", func() {
			x++

			Convey("The value should be greater by one", func() {
				So(x, ShouldEqual, 2)
			})
		})
	})
}
再度、http://localhost:8080 にブラウザにアクセスすると、テストが更新されている。
protobuf
Protocol Buffers をgolangで使えるようにするライブラリ。
まず、 Protocol buffers のコンパイラをインストールする。以下はMacの場合。
Mac以外のやり方 : Protocol Buffer Compiler Installation | gRPC
brew install protobuf
protoc --version
golangコード自動生成用のプラグインをインストールする
go install google.golang.org/protobuf/cmd/protoc-gen-go@latest
syntax = "proto3";

package tutorial;

option go_package = "./protobuf/gen";

message Person {
  string name = 1;
  int32 age = 2;
}
protoc -I=protobuf --go_out=./ sample.proto
すると./protobuf/gen/ に以下のような sample.pb.goが自動生成される。
sample.pb.go
// Code generated by protoc-gen-go. DO NOT EDIT.
// versions:
// 	protoc-gen-go v1.32.0
// 	protoc        v4.25.1
// source: sample.proto

package gen

import (
	protoreflect "google.golang.org/protobuf/reflect/protoreflect"
	protoimpl "google.golang.org/protobuf/runtime/protoimpl"
	reflect "reflect"
	sync "sync"
)

const (
	// Verify that this generated code is sufficiently up-to-date.
	_ = protoimpl.EnforceVersion(20 - protoimpl.MinVersion)
	// Verify that runtime/protoimpl is sufficiently up-to-date.
	_ = protoimpl.EnforceVersion(protoimpl.MaxVersion - 20)
)

type Person struct {
	state         protoimpl.MessageState
	sizeCache     protoimpl.SizeCache
	unknownFields protoimpl.UnknownFields

	Name string `protobuf:"bytes,1,opt,name=name,proto3" json:"name,omitempty"`
	Age  int32  `protobuf:"varint,2,opt,name=age,proto3" json:"age,omitempty"`
}

func (x *Person) Reset() {
	*x = Person{}
	if protoimpl.UnsafeEnabled {
		mi := &file_sample_proto_msgTypes[0]
		ms := protoimpl.X.MessageStateOf(protoimpl.Pointer(x))
		ms.StoreMessageInfo(mi)
	}
}

func (x *Person) String() string {
	return protoimpl.X.MessageStringOf(x)
}

func (*Person) ProtoMessage() {}

func (x *Person) ProtoReflect() protoreflect.Message {
	mi := &file_sample_proto_msgTypes[0]
	if protoimpl.UnsafeEnabled && x != nil {
		ms := protoimpl.X.MessageStateOf(protoimpl.Pointer(x))
		if ms.LoadMessageInfo() == nil {
			ms.StoreMessageInfo(mi)
		}
		return ms
	}
	return mi.MessageOf(x)
}

// Deprecated: Use Person.ProtoReflect.Descriptor instead.
func (*Person) Descriptor() ([]byte, []int) {
	return file_sample_proto_rawDescGZIP(), []int{0}
}

func (x *Person) GetName() string {
	if x != nil {
		return x.Name
	}
	return ""
}

func (x *Person) GetAge() int32 {
	if x != nil {
		return x.Age
	}
	return 0
}

var File_sample_proto protoreflect.FileDescriptor

var file_sample_proto_rawDesc = []byte{
	0x0a, 0x0c, 0x73, 0x61, 0x6d, 0x70, 0x6c, 0x65, 0x2e, 0x70, 0x72, 0x6f, 0x74, 0x6f, 0x12, 0x08,
	0x74, 0x75, 0x74, 0x6f, 0x72, 0x69, 0x61, 0x6c, 0x22, 0x2e, 0x0a, 0x06, 0x50, 0x65, 0x72, 0x73,
	0x6f, 0x6e, 0x12, 0x12, 0x0a, 0x04, 0x6e, 0x61, 0x6d, 0x65, 0x18, 0x01, 0x20, 0x01, 0x28, 0x09,
	0x52, 0x04, 0x6e, 0x61, 0x6d, 0x65, 0x12, 0x10, 0x0a, 0x03, 0x61, 0x67, 0x65, 0x18, 0x02, 0x20,
	0x01, 0x28, 0x05, 0x52, 0x03, 0x61, 0x67, 0x65, 0x42, 0x10, 0x5a, 0x0e, 0x2e, 0x2f, 0x70, 0x72,
	0x6f, 0x74, 0x6f, 0x62, 0x75, 0x66, 0x2f, 0x67, 0x65, 0x6e, 0x62, 0x06, 0x70, 0x72, 0x6f, 0x74,
	0x6f, 0x33,
}

var (
	file_sample_proto_rawDescOnce sync.Once
	file_sample_proto_rawDescData = file_sample_proto_rawDesc
)

func file_sample_proto_rawDescGZIP() []byte {
	file_sample_proto_rawDescOnce.Do(func() {
		file_sample_proto_rawDescData = protoimpl.X.CompressGZIP(file_sample_proto_rawDescData)
	})
	return file_sample_proto_rawDescData
}

var file_sample_proto_msgTypes = make([]protoimpl.MessageInfo, 1)
var file_sample_proto_goTypes = []interface{}{
	(*Person)(nil), // 0: tutorial.Person
}
var file_sample_proto_depIdxs = []int32{
	0, // [0:0] is the sub-list for method output_type
	0, // [0:0] is the sub-list for method input_type
	0, // [0:0] is the sub-list for extension type_name
	0, // [0:0] is the sub-list for extension extendee
	0, // [0:0] is the sub-list for field type_name
}

func init() { file_sample_proto_init() }
func file_sample_proto_init() {
	if File_sample_proto != nil {
		return
	}
	if !protoimpl.UnsafeEnabled {
		file_sample_proto_msgTypes[0].Exporter = func(v interface{}, i int) interface{} {
			switch v := v.(*Person); i {
			case 0:
				return &v.state
			case 1:
				return &v.sizeCache
			case 2:
				return &v.unknownFields
			default:
				return nil
			}
		}
	}
	type x struct{}
	out := protoimpl.TypeBuilder{
		File: protoimpl.DescBuilder{
			GoPackagePath: reflect.TypeOf(x{}).PkgPath(),
			RawDescriptor: file_sample_proto_rawDesc,
			NumEnums:      0,
			NumMessages:   1,
			NumExtensions: 0,
			NumServices:   0,
		},
		GoTypes:           file_sample_proto_goTypes,
		DependencyIndexes: file_sample_proto_depIdxs,
		MessageInfos:      file_sample_proto_msgTypes,
	}.Build()
	File_sample_proto = out.File
	file_sample_proto_rawDesc = nil
	file_sample_proto_goTypes = nil
	file_sample_proto_depIdxs = nil
}
ちなみに、protobufは主にgRPCを実装する際に使われる。
参考 : gRPC公式ドキュメント
goose
goose は、GolangのMigrationツール。
go install github.com/pressly/goose/v3/cmd/goose@latest
今回はMySQLに接続してみる。
goose mysql "$DB_USER:$DB_PASS@tcp($DB_HOST)/$DB_TABLE" status
$ goose create init sql
2024/01/03 02:33:01 Created new file: 20240103023301_init.sql
.
├── 20240103023301_init.sql
├── go.mod
├── go.sum
└── main.go
上記でできたSQLファイルを下記のように編集します。
-- +goose Up
CREATE TABLE user (
    id int NOT NULL,
    name text,
    age int,
    PRIMARY KEY(id)
);

-- +goose Down
DROP TABLE user;
-- +goose Upの下にupするときの動作、-- +goose Downの下にDownした際の動作を実装する。
$ goose mysql "$DB_USER:$DB_PASS@tcp($DB_HOST)/$DB_TABLE" up
2024/01/03 06:26:10 OK   20240103061927_init.sql (16.55ms)
2024/01/03 06:26:10 goose: successfully migrated database to version: 20240103061927
$ goose mysql "$DB_USER:$DB_PASS@tcp($DB_HOST)/$DB_TABLE" status
2024/01/03 06:26:19     Applied At                  Migration
2024/01/03 06:26:19     =======================================
2024/01/03 06:26:19     Wed Jan  3 15:26:10 2024 -- 20240103061927_init.sql
userテーブルが作成されている。
mysql> show tables;
+------------------+
| Tables_in_dust   |
+------------------+
| goose_db_version |
| user             |
+------------------+
2 rows in set (0.00 sec)
mysql> desc user;
+-------+------+------+-----+---------+-------+
| Field | Type | Null | Key | Default | Extra |
+-------+------+------+-----+---------+-------+
| id    | int  | NO   | PRI | NULL    |       |
| name  | text | YES  |     | NULL    |       |
| age   | int  | YES  |     | NULL    |       |
+-------+------+------+-----+---------+-------+
3 rows in set (0.00 sec)
$ goose mysql "$DB_USER:$DB_PASS@tcp($DB_HOST)/$DB_TABLE" down
2024/01/03 06:27:52 OK   20240103061927_init.sql (15.89ms)
downするとuserテーブルがdropされる。
mysql> show tables;
+------------------+
| Tables_in_dust   |
+------------------+
| goose_db_version |
+------------------+
1 row in set (0.00 sec)
fsnotify
fsnotifyは、ファイル監視ライブラリ。
以下のコマンドでインストールする
go get github.com/go-fsnotify/fsnotify
package main

import (
    "log"

    "github.com/fsnotify/fsnotify"
)

func main() {
    // Create new watcher.
    watcher, err := fsnotify.NewWatcher()
    if err != nil {
        log.Fatal(err)
    }
    defer watcher.Close()

    // Start listening for events.
    go func() {
        for {
            select {
            case event, ok := <-watcher.Events:
                if !ok {
                    return
                }
                log.Println("event:", event)
                if event.Has(fsnotify.Write) {
                    log.Println("modified file:", event.Name)
                }
            case err, ok := <-watcher.Errors:
                if !ok {
                    return
                }
                log.Println("error:", err)
            }
        }
    }()

    // Add a path.
    err = watcher.Add("/tmp")
    if err != nil {
        log.Fatal(err)
    }

    // Block main goroutine forever.
    <-make(chan struct{})
}
実行するとファイルの変更を監視してくれる。
$ go run main.go
2024/01/02 14:06:57 event: CREATE        "/tmp/go.1bf98f8185591c288e01bd9fb67907933818eb97559717d6f839f041449e0f35.3807461520.mod"
2024/01/02 14:06:57 event: WRITE         "/tmp/go.1bf98f8185591c288e01bd9fb67907933818eb97559717d6f839f041449e0f35.3807461520.mod"
     ・・・・
air
airはホットリロードを可能にするパッケージ。
以下はGinを使った例である。
go install github.com/cosmtrek/air@latest
.air.tomlに設定
root = "."
testdata_dir = "test"
tmp_dir = "tmp"

[build]
args_bin = []
bin = "./tmp/main"
cmd = "go build -o ./tmp/main ."
delay = 1000
exclude_dir = ["assets", "tmp", "vendor", "test"]
exclude_file = []
exclude_regex = ["_test.go"]
exclude_unchanged = true
follow_symlink = true
full_bin = ""
include_dir = []
include_ext = ["go", "tpl", "tmpl", "html"]
kill_delay = 500                                  #ms
log = "air.log"
send_interrupt = false
stop_on_error = true

[color]
# Customize each part's color. If no color found, use the raw app log.
app = ""
build = "yellow"
main = "magenta"
runner = "green"
watcher = "cyan"

[log]
# Show log time
time = true

[misc]
# Delete tmp directory on exit
clean_on_exit = true

[screen]
clear_on_rebuild = false
package main

import "github.com/gin-gonic/gin"

func main() {
	r := gin.Default()
	r.GET("/hello", func(c *gin.Context) {
		c.JSON(200, gin.H{
			"message": "Hello World!",
		})
	})
	r.Run()
}
以下コマンドでホットリロード可能なサーバが起動する。
$ air
pretty
Golangにおける pretty-print。
pretty.Formatter()を使うと綺麗に整列してくれる。
package main

import (
	"fmt"

	"github.com/kr/pretty"
)

func main() {
	type myType struct {
		a, b int
	}
	var x = []myType{{1, 2}, {3, 4}, {5, 6}}
	fmt.Printf("%# v\n", x)
	fmt.Printf("%# v", pretty.Formatter(x))
}
[]main.myType{main.myType{a: 1, b: 2}, main.myType{a: 3, b: 4}, main.myType{a: 5, b: 6}}
[]main.myType{
    {a:1, b:2},
    {a:3, b:4},
    {a:5, b:6},
}
cli
cli は、Golangでコマンドラインツールを構築するための、シンプルで高速なパッケージ。
package main

import (
	"fmt"
	"os"

	"github.com/urfave/cli/v2"
)

func main() {
	app := &cli.App{
		Name:  "HelloCLI",
		Usage: "A simple Hello, World! CLI application",
		Commands: []*cli.Command{
			{
				Name:    "greet",
				Aliases: []string{"g"},
				Usage:   "Greet someone",
				Flags: []cli.Flag{
					&cli.StringFlag{
						Name:    "name",
						Aliases: []string{"n"},
						Value:   "World",
						Usage:   "Specify the name for the greeting",
					},
				},
				Action: func(c *cli.Context) error {
					name := c.String("name")
					fmt.Printf("Hello, %s!\n", name)
					return nil
				},
			},
		},
	}

	err := app.Run(os.Args)
	if err != nil {
		fmt.Println(err)
	}
}
このコマンドを実行してみる。
$ go run main.go greet --name Alice
Hello, Alice!
cobra
簡単にCLIを実装できるライブラリ
ただし、cobra cliがgo workspaceに対応していない。(すでにPRはあるが、まだ取り込まれていない)
go install github.com/spf13/cobra-cli@latest
go get -u github.com/spf13/cobra@latest
cobra-cli initするとcmdディレクトリとmain.goが生成される。
$ cobra-cli init
$ tree .
.
├── cmd
│   └── root.go
├── go.mod
├── go.sum
├── main.go
cobra-cli add xxxで xxxコマンド を作成してくれる。
$ cobra-cli add hello
$ tree cmd
cmd
├── hello.go
└── root.go
自動生成されたcmd/hello.goに helloコマンド の処理を追加する。
/*
Copyright © 2024 NAME HERE <EMAIL ADDRESS>
*/
package cmd

import (
	"fmt"

	"github.com/spf13/cobra"
)

var helloCmd = &cobra.Command{
	Use:   "hello",
	Short: "This is hello command.",
	Long: `This is hello command.`,
	Run: func(cmd *cobra.Command, args []string) {
		// ここにコマンドの処理をかく
		fmt.Println("Hello world!")
	},
}

func init() {
	rootCmd.AddCommand(helloCmd)
}
helloコマンドを実行する。
$ go run main.go hello
Hello world!
viper
viper は toml, yaml, jsonなどの設定ファイルから環境変数を読み込むライブラリである。
実際に以下のtomlファイルから設定値を取得する。
go get github.com/spf13/viper
go get github.com/pelletier/go-toml # tomlの場合
go get gopkg.in/yaml.v2 # yamlの場合
message = "Hello TOML!"
package main

import (
	"fmt"

	"github.com/spf13/viper"
)

func main() {
	viper.SetConfigName("config") // 設定ファイル名を指定
	viper.SetConfigType("toml")   // 設定ファイルの形式を指定
	viper.AddConfigPath(".")      // ファイルのpathを指定

	// 設定ファイルの読み込み
	err := viper.ReadInConfig()
	if err != nil {
		panic(fmt.Errorf("fatal error config file: %w", err))
	}
	// キーが "message" の値を取得
	message := viper.GetString("message")
	fmt.Println("message :", message)
}
実行すると
$ go run main.go
message : Hello TOML!
wire
Golangの依存性注入(DI)のライブラリ。
wireは更新少ない、genericsに対応していないという理由から、sambor/doの方がいいかも知れない。
go install github.com/google/wire/cmd/wire@latest
まず、以下のようにmain.goとwire.goを作成する。
package main

import "fmt"

func main() {
	greeter := InitializeGreeter()
	message := greeter.Greet()
	fmt.Println(message)
}
//go:build wireinject
// +build wireinject

package main

import (
	"github.com/google/wire"
)

type Message string

func NewMessage() Message {
	return "Hello, Wire!"
}

func NewGreeter(m Message) Greeter {
	return Greeter{Message: m}
}

type Greeter struct {
	Message Message
}

func (g Greeter) Greet() Message {
	return g.Message
}

func InitializeGreeter() Greeter {
	wire.Build(NewMessage, NewGreeter)
	return Greeter{}
}
wire.goのあるディレクトリでwireと叩くとwire_gen.goが自動生成される。
wire_gen.go
// Code generated by Wire. DO NOT EDIT.

//go:generate go run github.com/google/wire/cmd/wire
//go:build !wireinject
// +build !wireinject

package main

// Injectors from wire.go:

func InitializeGreeter() Greeter {
	message := NewMessage()
	greeter := NewGreeter(message)
	return greeter
}

// wire.go:

type Message string

func NewMessage() Message {
	return "Hello, Wire!"
}

func NewGreeter(m Message) Greeter {
	return Greeter{Message: m}
}

type Greeter struct {
	Message Message
}

func (g Greeter) Greet() Message {
	return g.Message
}
fasthttp
Go 用の高速 HTTP 実装であり、net/http よりも最大10倍高速らしい。
go get github.com/valyala/fasthttp
簡単なサーバを起動してみる。
package main

import (
	"fmt"

	"github.com/valyala/fasthttp"
)

func requestHandler(ctx *fasthttp.RequestCtx) {
	fmt.Printf("Hello World!\n")
}

func main() {
	server := fasthttp.Server{
		Handler: requestHandler,
	}

	// ポート8080でサーバを起動
	err := server.ListenAndServe(":8080")
	if err != nil {
		fmt.Println("Error starting server:", err)
	}
}
$ go run main.go &
$ curl http://localhost:8080
Hello World!
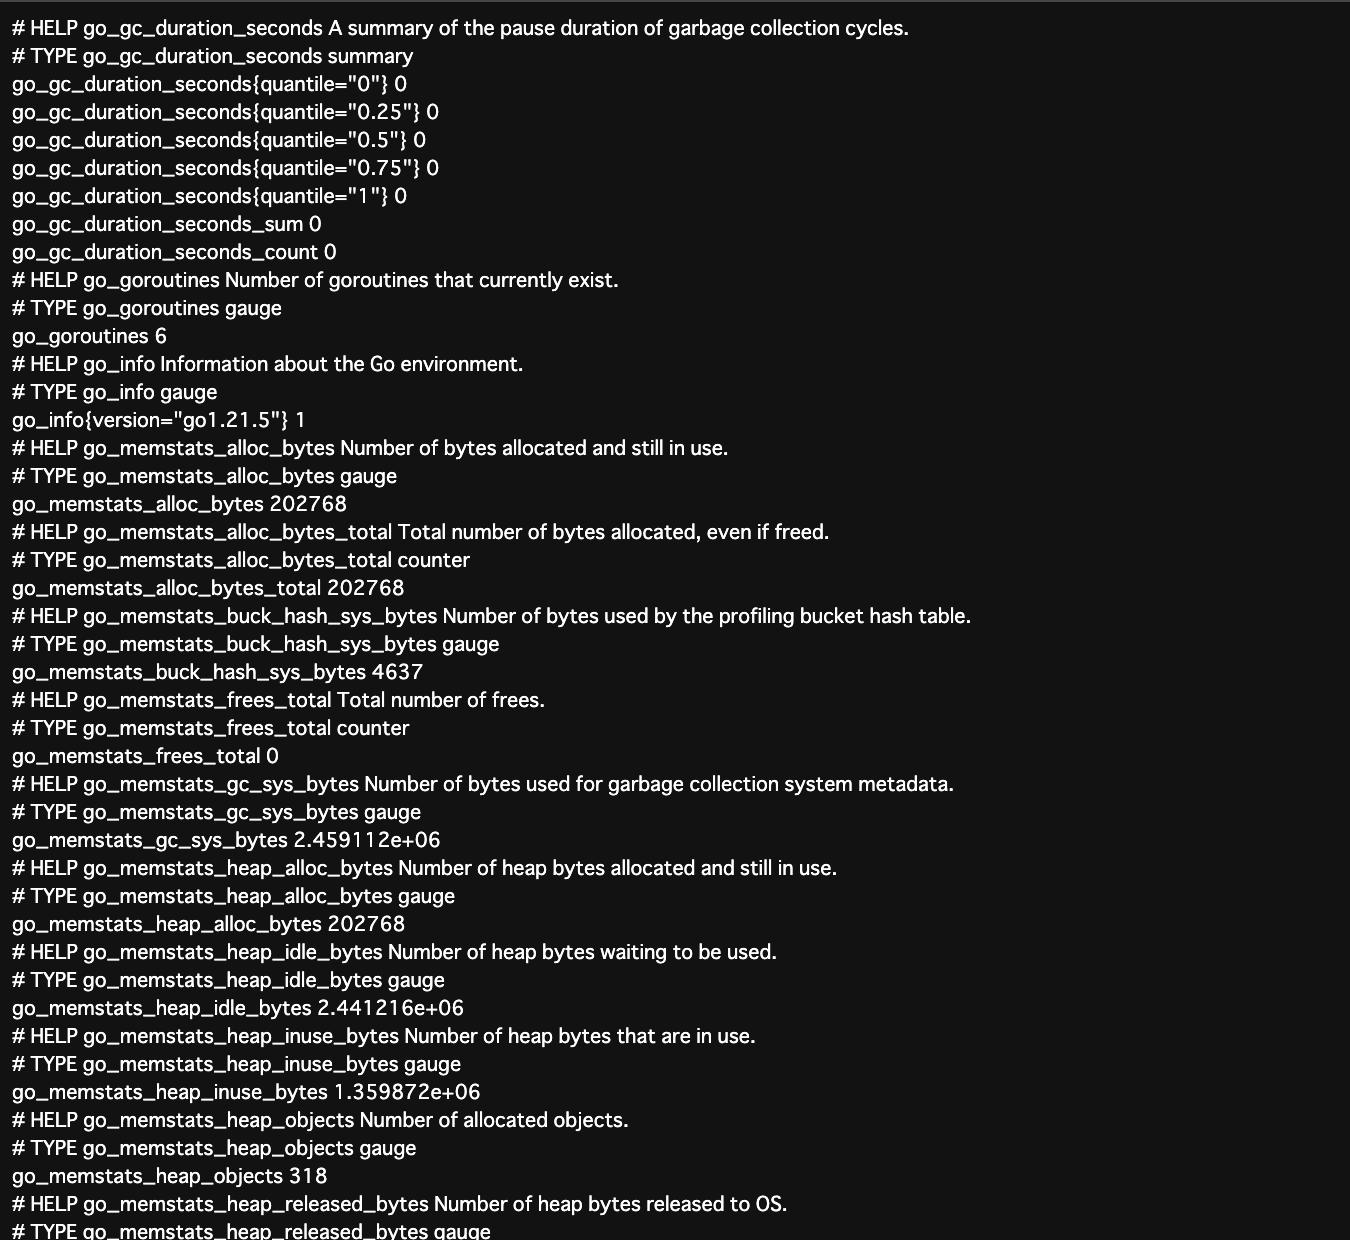
prometheus
Prometheus は、モニタリング用のメトリクスを計測するためのライブラリ。メトリクスの登録、HTTP経由での公開(promhttpパッケージ)、プッシュゲートウェイへのプッシュ(pushパッケージ)などができる。
go get github.com/prometheus/client_golang/prometheus
go get github.com/prometheus/client_golang/prometheus/promauto
go get github.com/prometheus/client_golang/prometheus/promhttp
package main

import (
	"net/http"

	"github.com/prometheus/client_golang/prometheus/promhttp"
)

func main() {
	http.Handle("/metrics", promhttp.Handler())
	http.ListenAndServe(":8080", nil)
}
サーバを起動。
go run main.go
http://localhost:8080/metrics にアクセスすると以下のような画面が表示される。
logrus
logrus は、有名なロギングライブラリ。
package main

import (
	log "github.com/sirupsen/logrus"
)

func main() {
	// ログフィールドの設定
	log.WithFields(log.Fields{
		"id":   "001",
		"size": 10,
	}).Info("start logrus")

	// ログのレベルを変更して出力
	log.SetLevel(log.DebugLevel)
	log.Debug("hello world")
	log.Error("error")
	log.SetFormatter(&log.JSONFormatter{})
	log.Info("json format")
}
これを実行すると、以下のようになる。
$ go run main.go
INFO[0000] start logrus                                  id=001 size=10
DEBU[0000] hello world
ERRO[0000] error
{"level":"info","msg":"json format","time":"2024-01-02T17:32:08Z"}
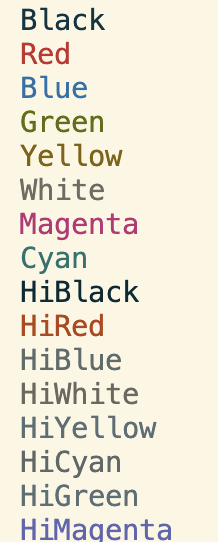
color
colorを使うと、ターミナルに色付きで出力できる。 他にもアンダーラインや太字、背景色の変更もできる。
go get github.com/fatih/color
実際に文字に色をつけてみた。
package main

import (
	"github.com/fatih/color"
)

func main() {
	color.Black("Black")
	color.Red("Red")
	color.Blue("Blue")
	color.Green("Green")
	color.Yellow("Yellow")
	color.White("White")
	color.Magenta("Magenta")
	color.Cyan("Cyan")
	color.HiBlack("HiBlack")
	color.HiRed("HiRed")
	color.HiBlue("HiBlue")
	color.HiWhite("HiWhite")
	color.HiYellow("HiYellow")
	color.HiCyan("HiCyan")
	color.HiGreen("HiGreen")
	color.HiMagenta("HiMagenta")
}
go run main.go をすると
Go kit (おまけ)
Go言語でマイクロサービスを構築するためのツール。
16個目になったので、おまけです。
Go kitについての実装例は、長くなりそう、私自身がまだ使ったことがない、といった理由から、割愛させてください。以下2つの記事が参考になります。1つ目は公式チュートリアルで、2つ目は実際にTODOアプリを作成する記事。
最後に
以下のサイトにジャンル別でライブラリやフレームワークが大量にまとまっている。
avelino/awesome-go: A curated list of awesome Go frameworks, libraries and software