TVExtBot for 暗号通貨(以下、TVExtBot)を使用してBitMEX取引所で自動売買するための設定方法について説明します。
(※ BitMEXテストネットを使用して説明します。)
スタートガイドをまだ見ていない方はこちらをどうぞ
![]() TVExtBotスタートガイド1(設定編)
TVExtBotスタートガイド1(設定編)
![]() TVExtBotスタートガイド2(Pineスクリプト編)
TVExtBotスタートガイド2(Pineスクリプト編)
![]() TVExtBotスタートガイド3(注文メッセージ作成及び設定編)
TVExtBotスタートガイド3(注文メッセージ作成及び設定編)
![]() TVExtBotスタートガイド4(決済&認証キー登録編)
TVExtBotスタートガイド4(決済&認証キー登録編)
![]() TVExtBotスタートガイド5(Webhook設定編)
TVExtBotスタートガイド5(Webhook設定編)
![]() TVExtBotスタートガイド6(Telegram通知ボット設定編)
TVExtBotスタートガイド6(Telegram通知ボット設定編)
自動売買に使用するサンプル用アラートインジケーターの説明
下記の戦略スクリプトを参考にしてアラート付きインジケーターに修正しました。
https://jp.tradingview.com/script/9RTfHpTI-Heiken-Ashi-Ichimoku-Kinko-Hyo-Strategy/
平均足と一目均衡表を使用したアラート付きインジケーターは以下の通りです。(サンプル用です。)
※ 本インジケーターの利用に伴い、トレードに損害が出たとしても、一切の責任は負いかねますのでご了承ください。
//@version=4
study("[TVExtBot]HeikinAshi+Ichimoku Indicator_v4", shorttitle="[TVExtBot]HaIv4", overlay=true)

hahigh = security(heikinashi(syminfo.tickerid), timeframe.period, high)
halow = security(heikinashi(syminfo.tickerid), timeframe.period, low)

enableLong = input(title="Longのみ表示", type=input.bool, defval=true)
enableShort = input(title=" Shortのみ表示", type=input.bool, defval=true)
TenkanSenPeriods = input(9, minval=1, title="転換線期間")
KijunSenPeriods = input(26, minval=1, title="基準線期間")
SenkouSpan2Periods = input(52, minval=1, title="先行スパン期間")
displacement = input(26, minval=1, title="Displacement")
donchian(len) =>
    avg(lowest(len), highest(len))
TenkanSen = donchian(TenkanSenPeriods)
KijunSen = donchian(KijunSenPeriods)
SenkouSpan1 = avg(TenkanSen, KijunSen)
SenkouSpan2 = donchian(SenkouSpan2Periods)
SenkouSpanH = max(SenkouSpan1[displacement - 1], SenkouSpan2[displacement - 1])
SenkouSpanL = min(SenkouSpan1[displacement - 1], SenkouSpan2[displacement - 1])
ChikouSpan = close[displacement - 1]

plot(TenkanSen, color=color.blue, title="転換線", linewidth=2)
plot(KijunSen, color=color.maroon, title="基準線", linewidth=3)
plot(close, offset=-displacement, color=color.orange, title="遅行スパン", linewidth=2)
sa = plot(SenkouSpan1, offset=displacement, color=color.green, title="先行スパン1", linewidth=2)
sb = plot(SenkouSpan2, offset=displacement, color=color.red, title="先行スパン2", linewidth=3)
fill(sa, sb, color=SenkouSpan1 > SenkouSpan2 ? color.green : color.red)

longCondition = hahigh > max(hahigh[1], hahigh[2]) and close > ChikouSpan and
   close > SenkouSpanH and (TenkanSen >= KijunSen or close > KijunSen)
longClose = halow < min(halow[1], halow[2]) and
   (TenkanSen < KijunSen or close < SenkouSpan1 or close < KijunSen or
   close < SenkouSpanH or close < ChikouSpan)

long_position_size = 0
if long_position_size[1] > 0
    long_position_size := long_position_size[1]
    long_position_size

isLongPositionEntry = false
isLongPositionClose = false
if longCondition and long_position_size == 0
    long_position_size := 1
    isLongPositionEntry := true
    isLongPositionEntry
if longClose and long_position_size > 0
    long_position_size := 0
    isLongPositionClose := true
    isLongPositionClose

shortCondition = halow < min(halow[1], halow[2]) and close < ChikouSpan and close < SenkouSpanL and
   (TenkanSen <= KijunSen or close < KijunSen)
shortClose = hahigh > max(hahigh[1], hahigh[2]) and
   (TenkanSen > KijunSen or close > SenkouSpan1 or close > KijunSen or
   close > SenkouSpanL or close > ChikouSpan)

short_position_size = 0
if short_position_size[1] > 0
    short_position_size := short_position_size[1]
    short_position_size

isShortPositionEntry = false
isShortPositionClose = false
if shortCondition and short_position_size == 0
    short_position_size := 1
    isShortPositionEntry := true
    isShortPositionEntry
if shortClose and short_position_size > 0
    short_position_size := 0
    isShortPositionClose := true
    isShortPositionClose

plotshape(enableLong and isLongPositionEntry, title="Buy", color=color.green, textcolor=color.green, transp=0, style=shape.triangleup, location=location.belowbar, size=size.small, text="Long\nEntry", offset=0)
plotshape(enableLong and isLongPositionClose, title="Buy Close", color=color.green, textcolor=color.white, transp=0, style=shape.labeldown, location=location.abovebar, size=size.small, text="Long\nClose", offset=0)
plotshape(enableShort and isShortPositionEntry, title="Sell", color=color.red, textcolor=color.red, transp=0, style=shape.triangledown, location=location.abovebar, size=size.small, text="Short\nEntry", offset=0)
plotshape(enableShort and isShortPositionClose, title="Sell Close", color=color.red, textcolor=color.white, transp=0, style=shape.labelup, location=location.belowbar, size=size.small, text="Short\nClose", offset=0)

alertcondition(isLongPositionEntry, title="Long Entry", message="Longメッセージ設定")
alertcondition(isLongPositionClose, "Long Close", "ポジション決済メッセージ設定")
alertcondition(isShortPositionEntry, title="Short Entry", message="Shortメッセージ設定")
alertcondition(isShortPositionClose, "Short Close", "ポジション決済メッセージ設定")
TradingViewのBitMEXチャートに適用した結果は以下の通りです。(15分足+平均足に適用)
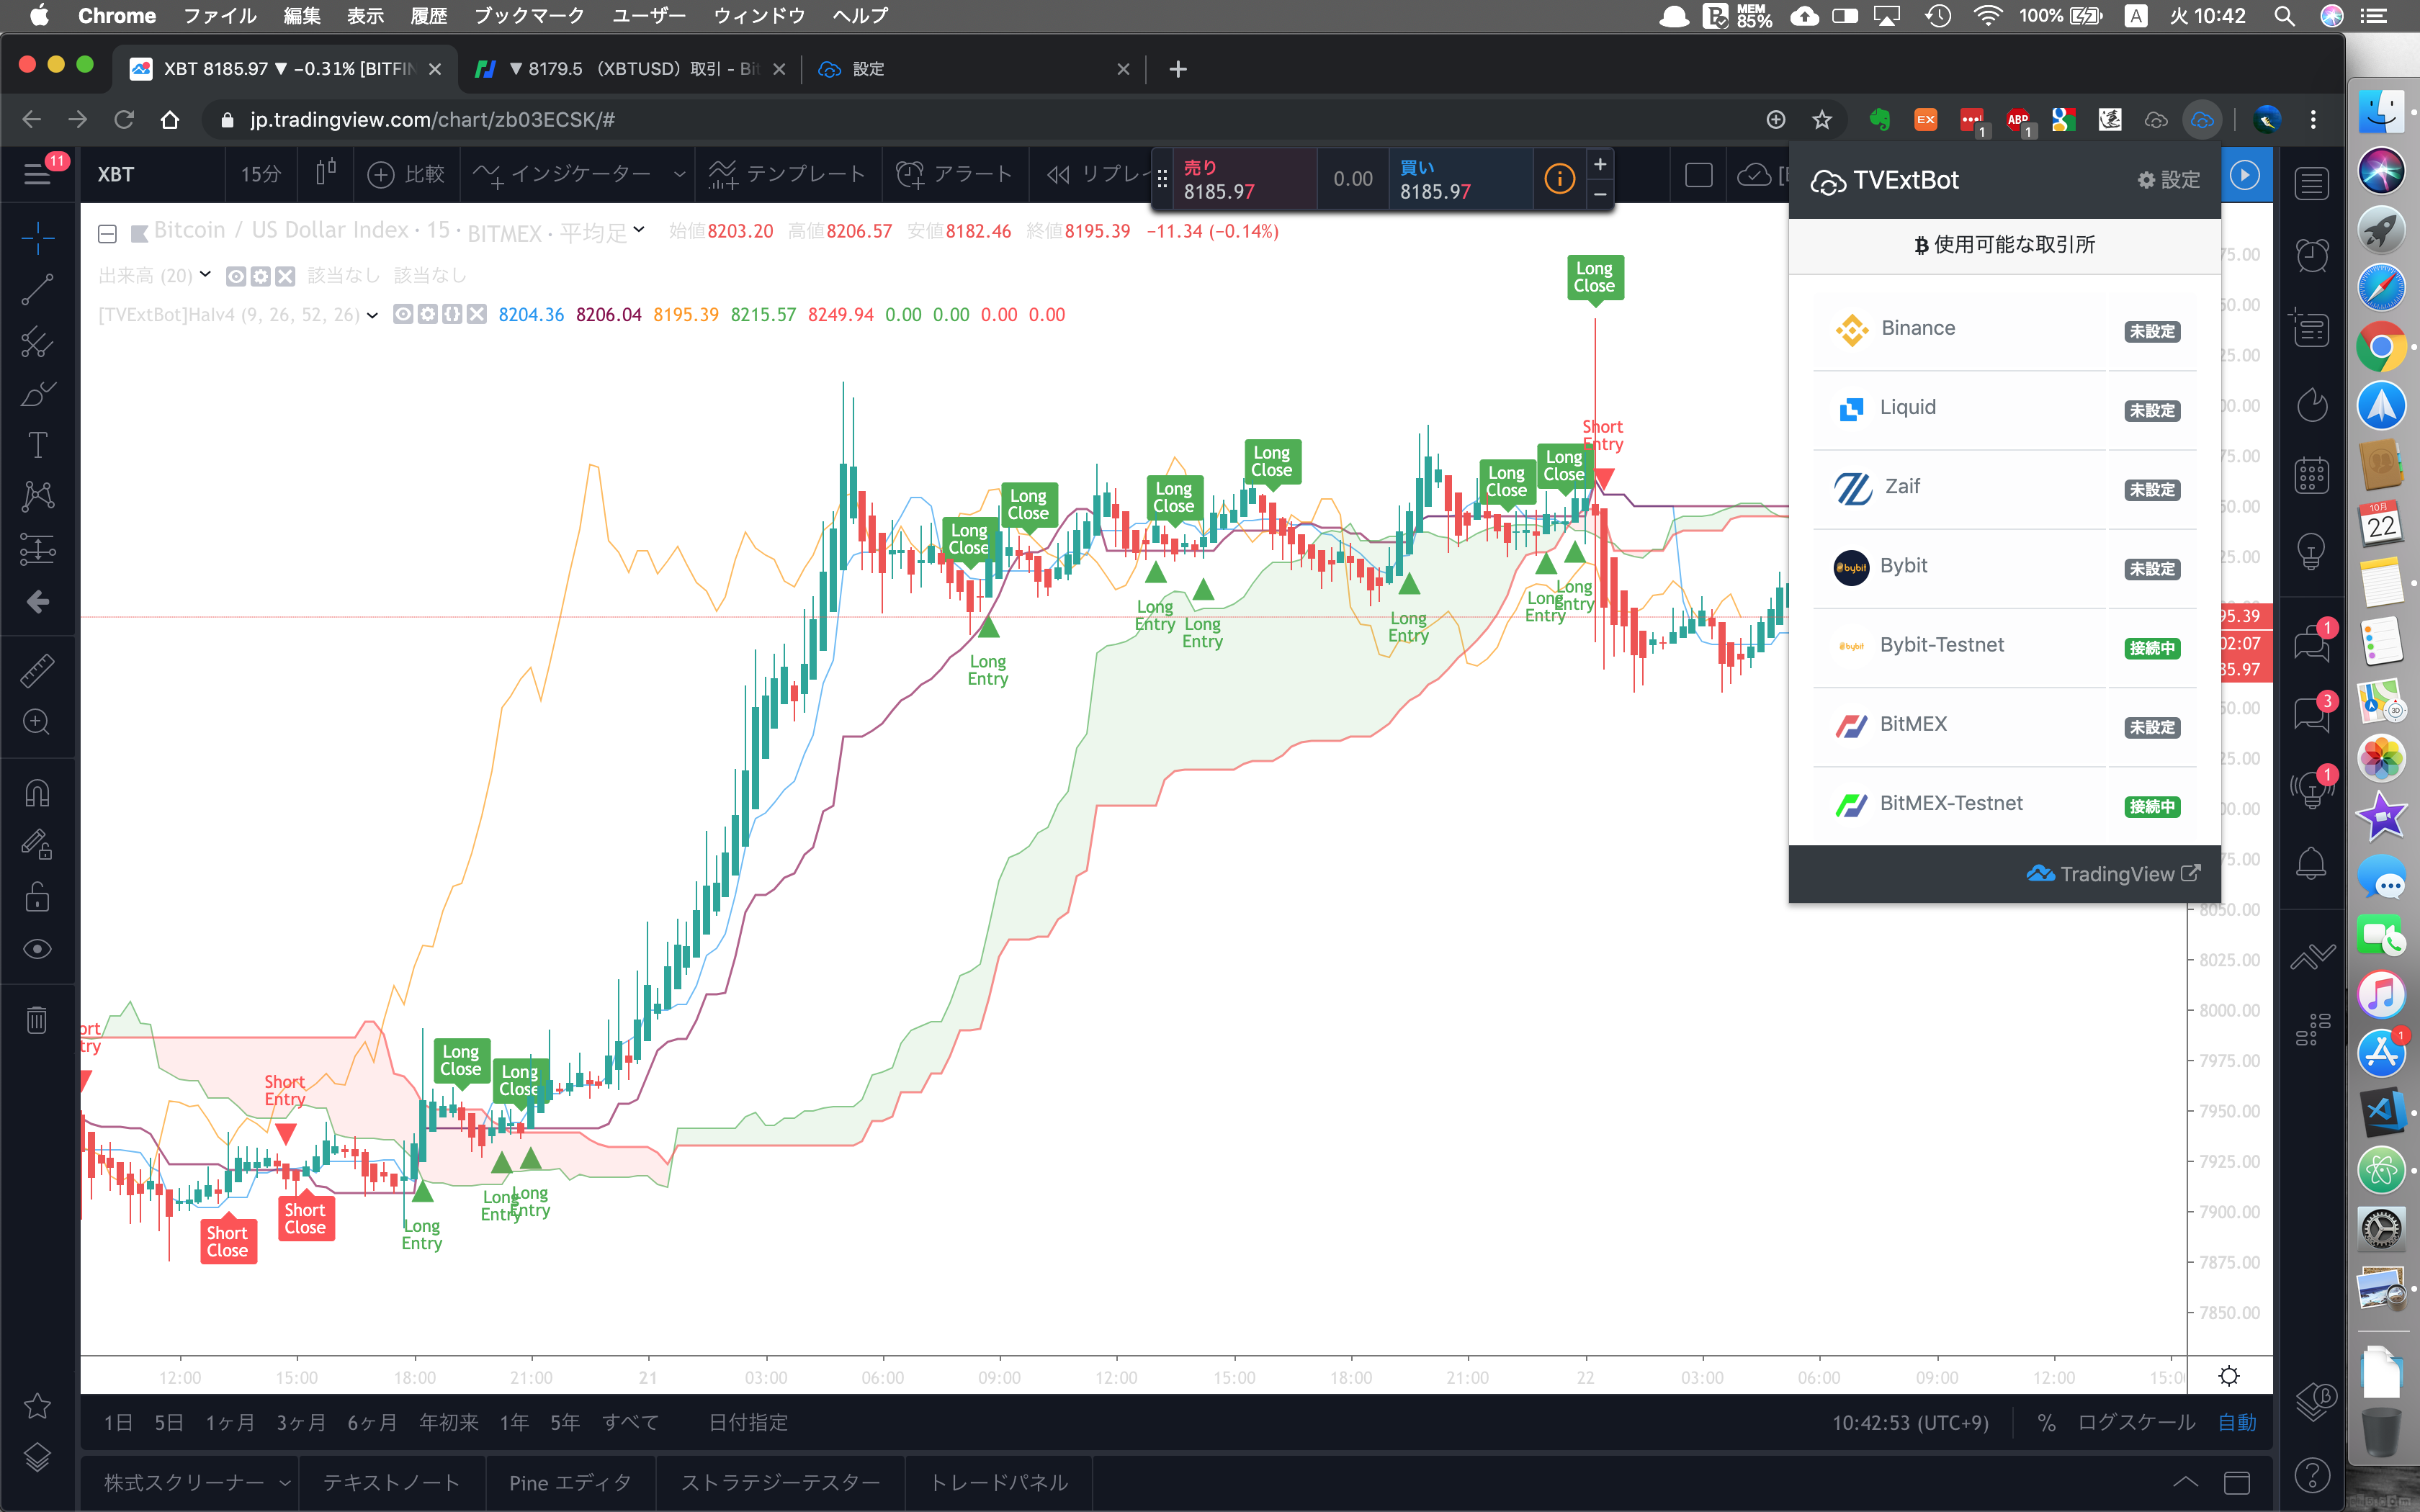
【説明】
・Long Entryで買い注文を出し、Long Closeでポジション決済を行います。
・Short Entryで売り注文を出し、Short Closeでポジション決済を行います。
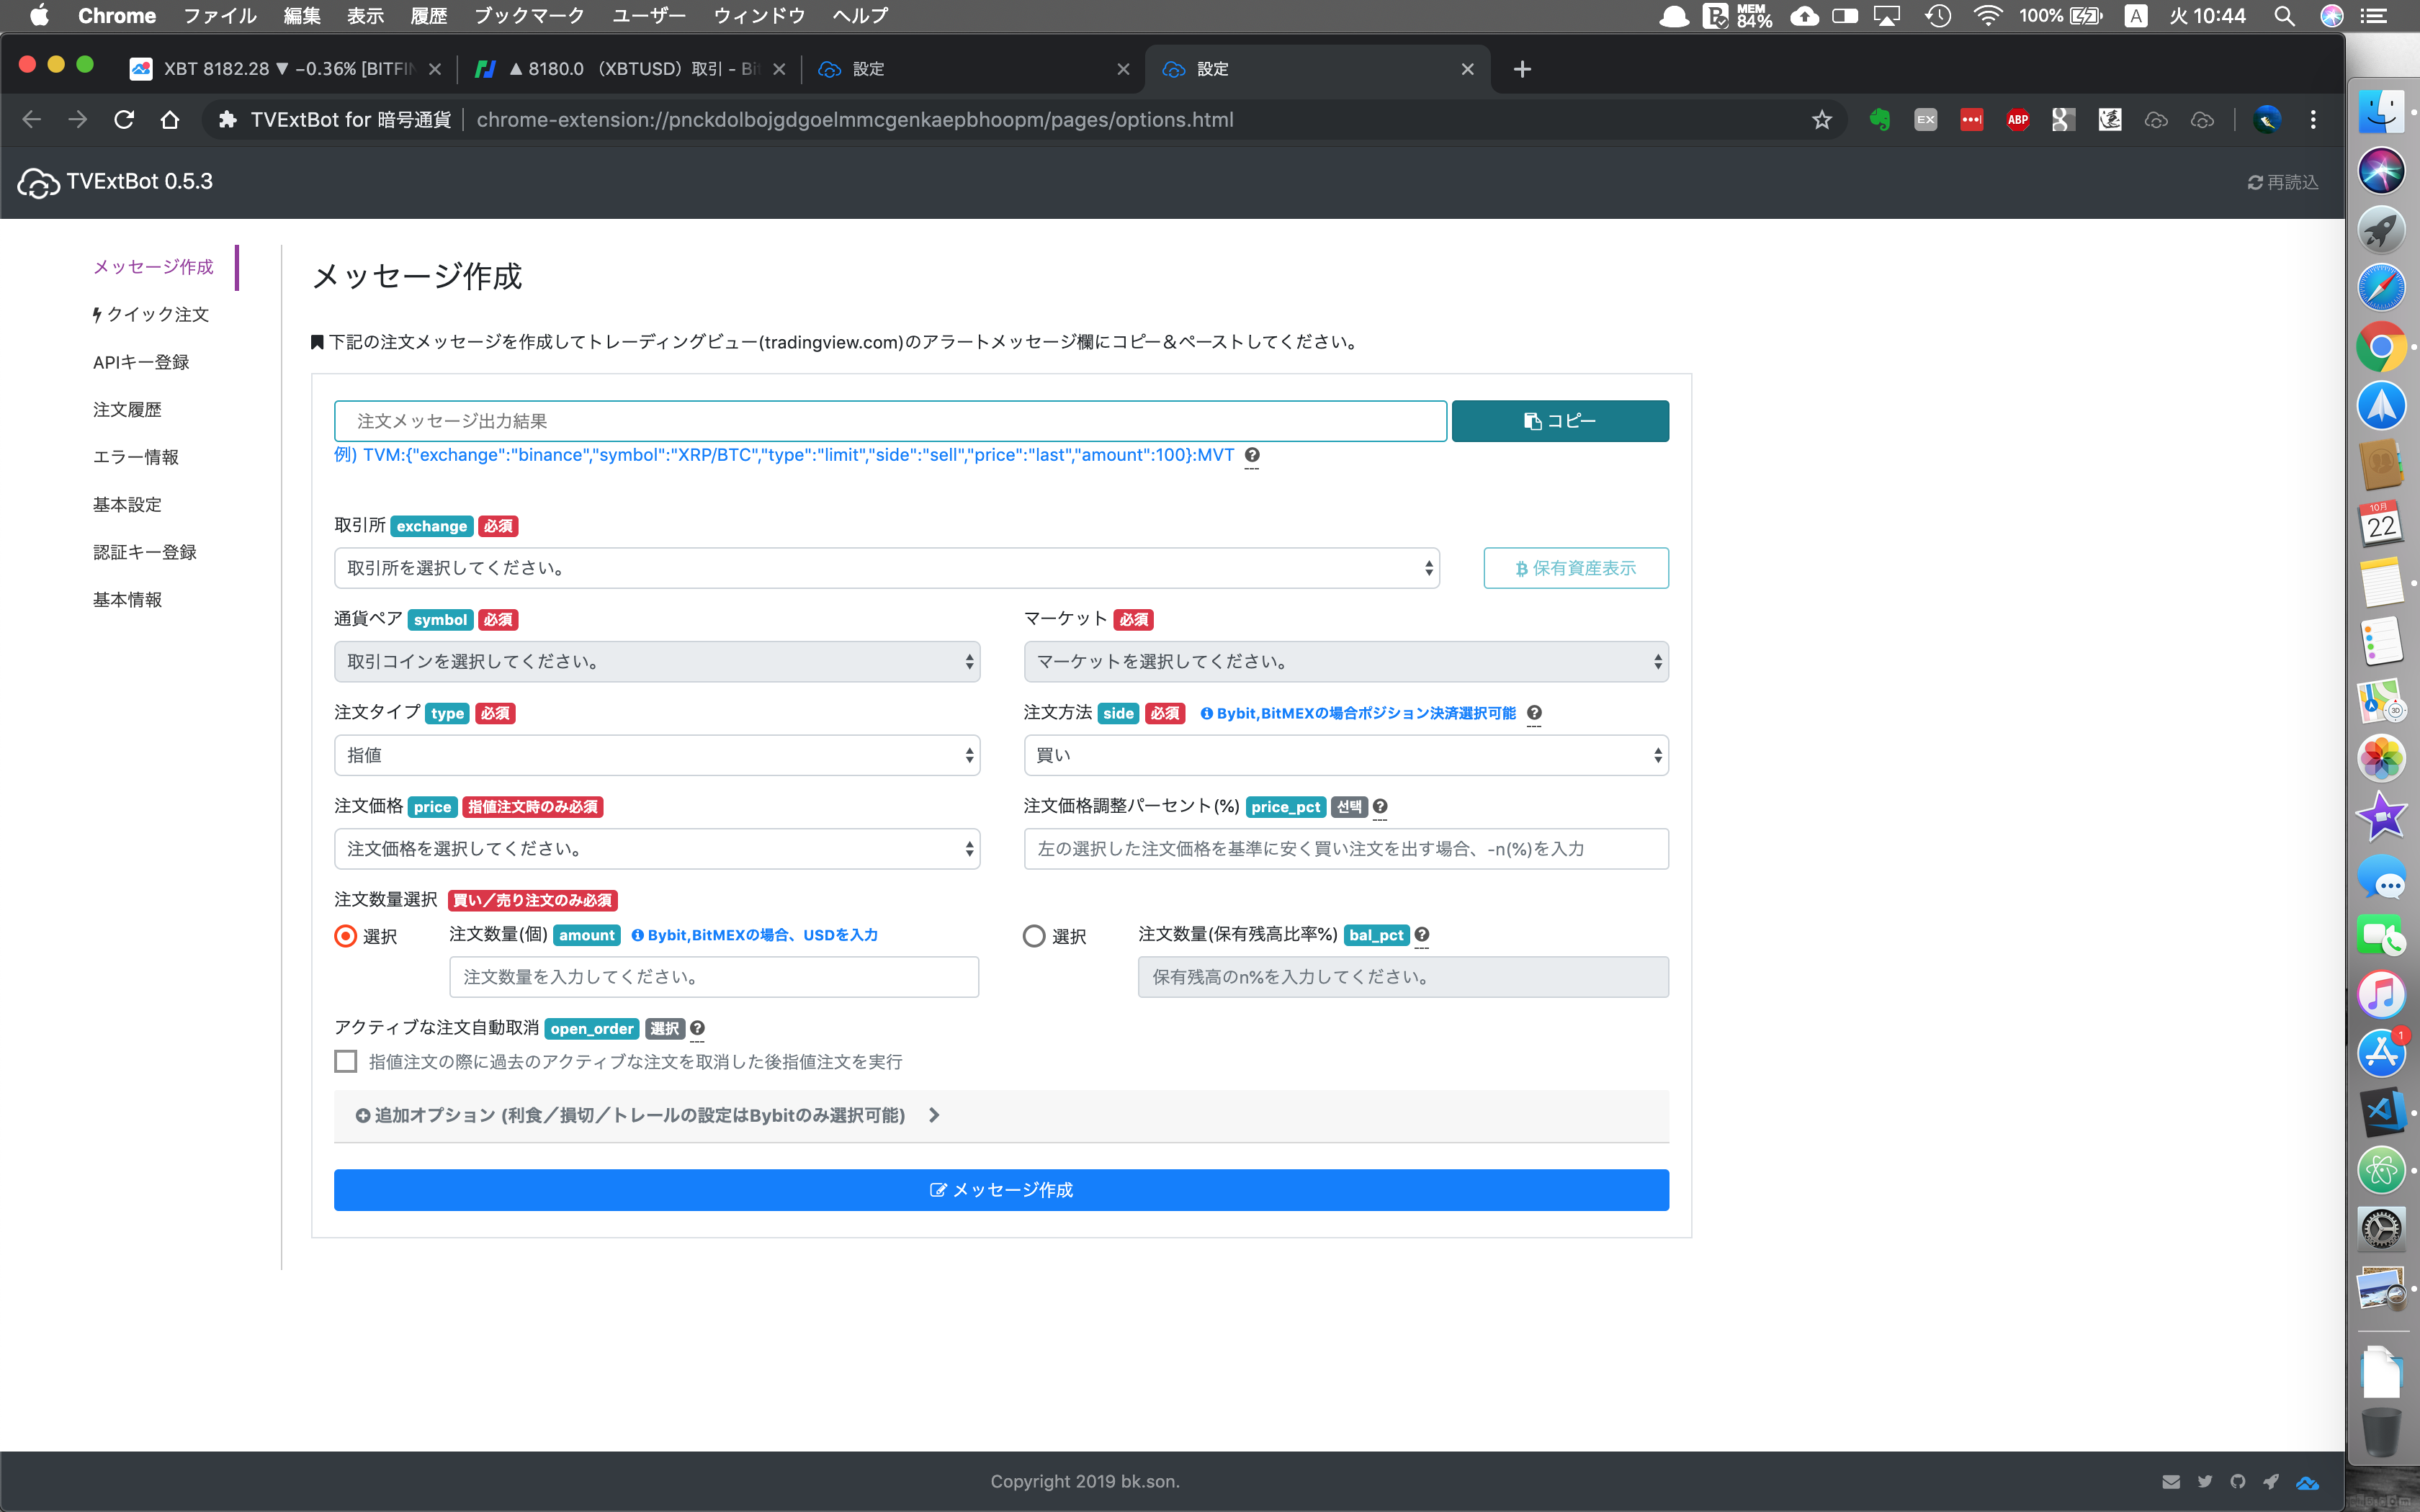
アラートメッセージ作成
BitMEXテストネットを利用するので、予めAPIキー登録を行なってください。
① 設定のメッセージ作成画面を開きます。
② BitMEXテストネットの保有資産を確認します。
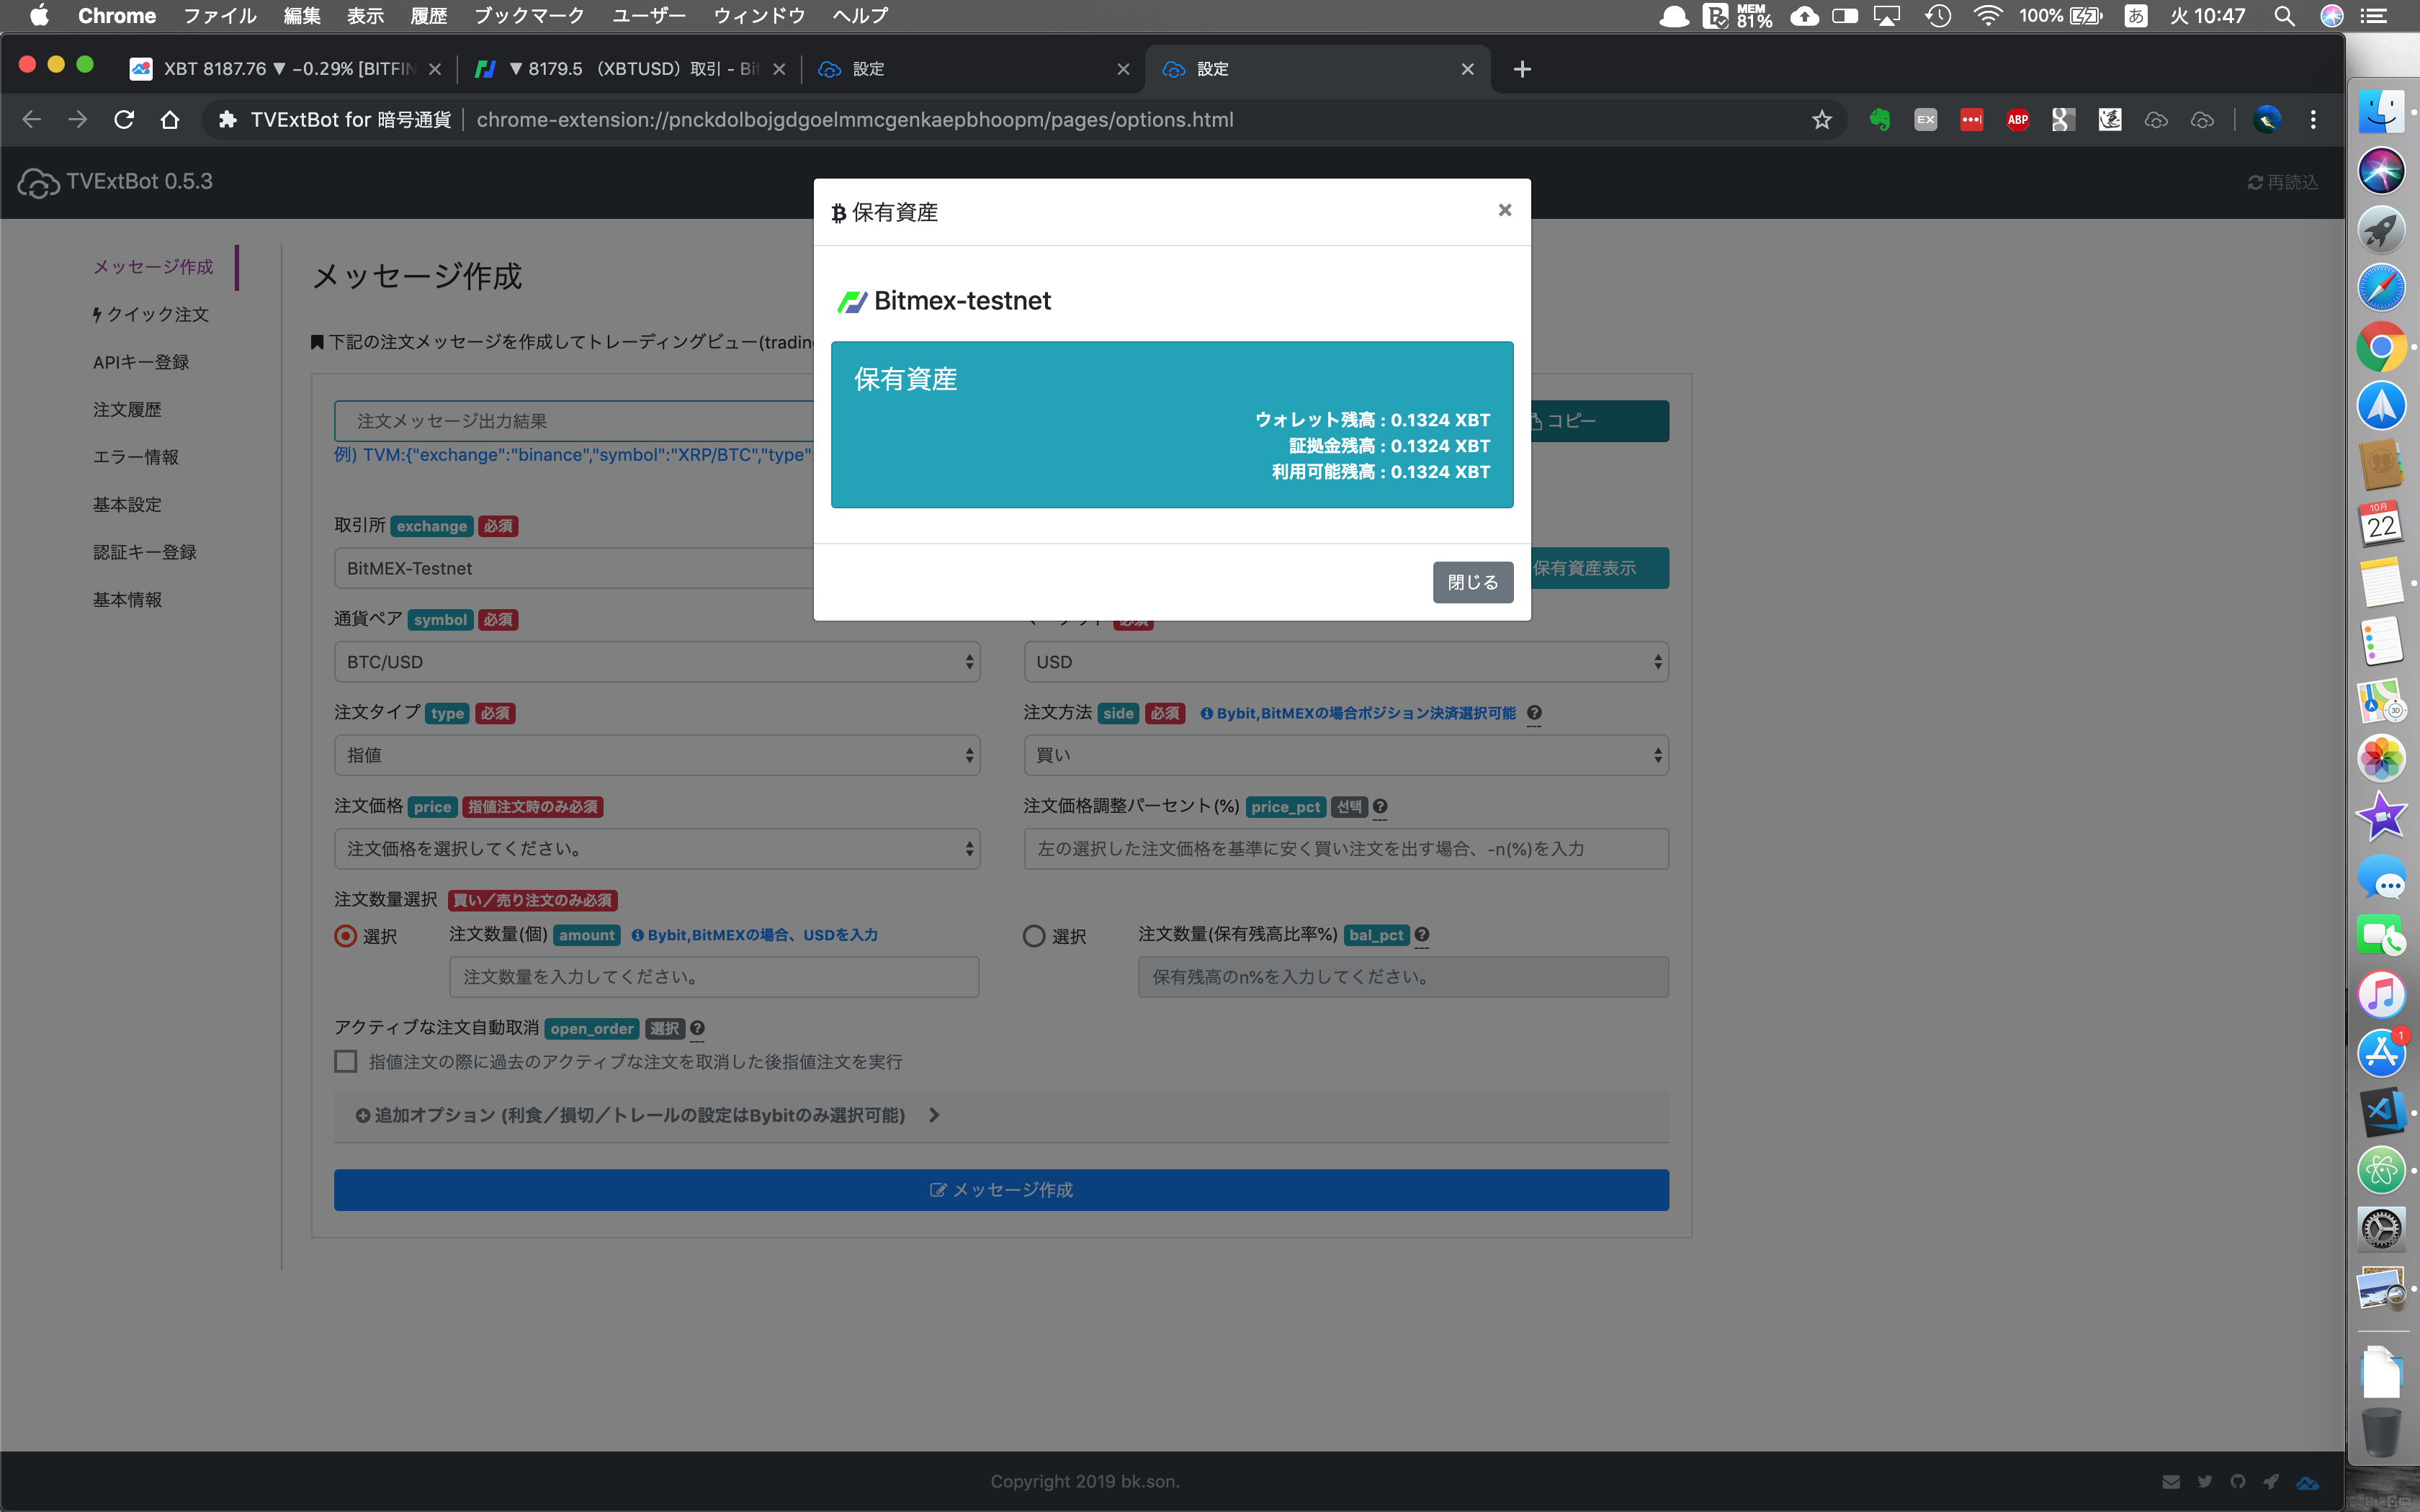
※ 使用可能残高は0.1323XBTあります。
③ 買い注文メッセージを作成します。
【入力情報】
- 取引所:BitMEX-Testnet
- 通貨ペア:BTC/USD
- マーケット:USD
- 注文方法:買い
- 注文タイプ:成行
- 注文数量(保有残高比率%):50
- レバレッジ:10
買い注文メッセージの作成結果は以下の通り。

【作成されたメッセージ】
TVM:{"exchange":"bitmex-testnet","symbol":"BTC/USD","type":"market","side":"buy","bal_pct":50,"leverage":10}:MVT
④ 売り注文メッセージを作成します。
※ 注文方法のみ売りに変更してメッセージ作成ボタンをクリックします。
【入力情報】
- 取引所:BitMEX-Testnet
- 通貨ペア:BTC/USD
- マーケット:USD
- 注文方法:売り
- 注文タイプ:成行
- 注文数量(保有残高比率%):50
- レバレッジ:10
売り注文メッセージの作成結果は以下の通り。
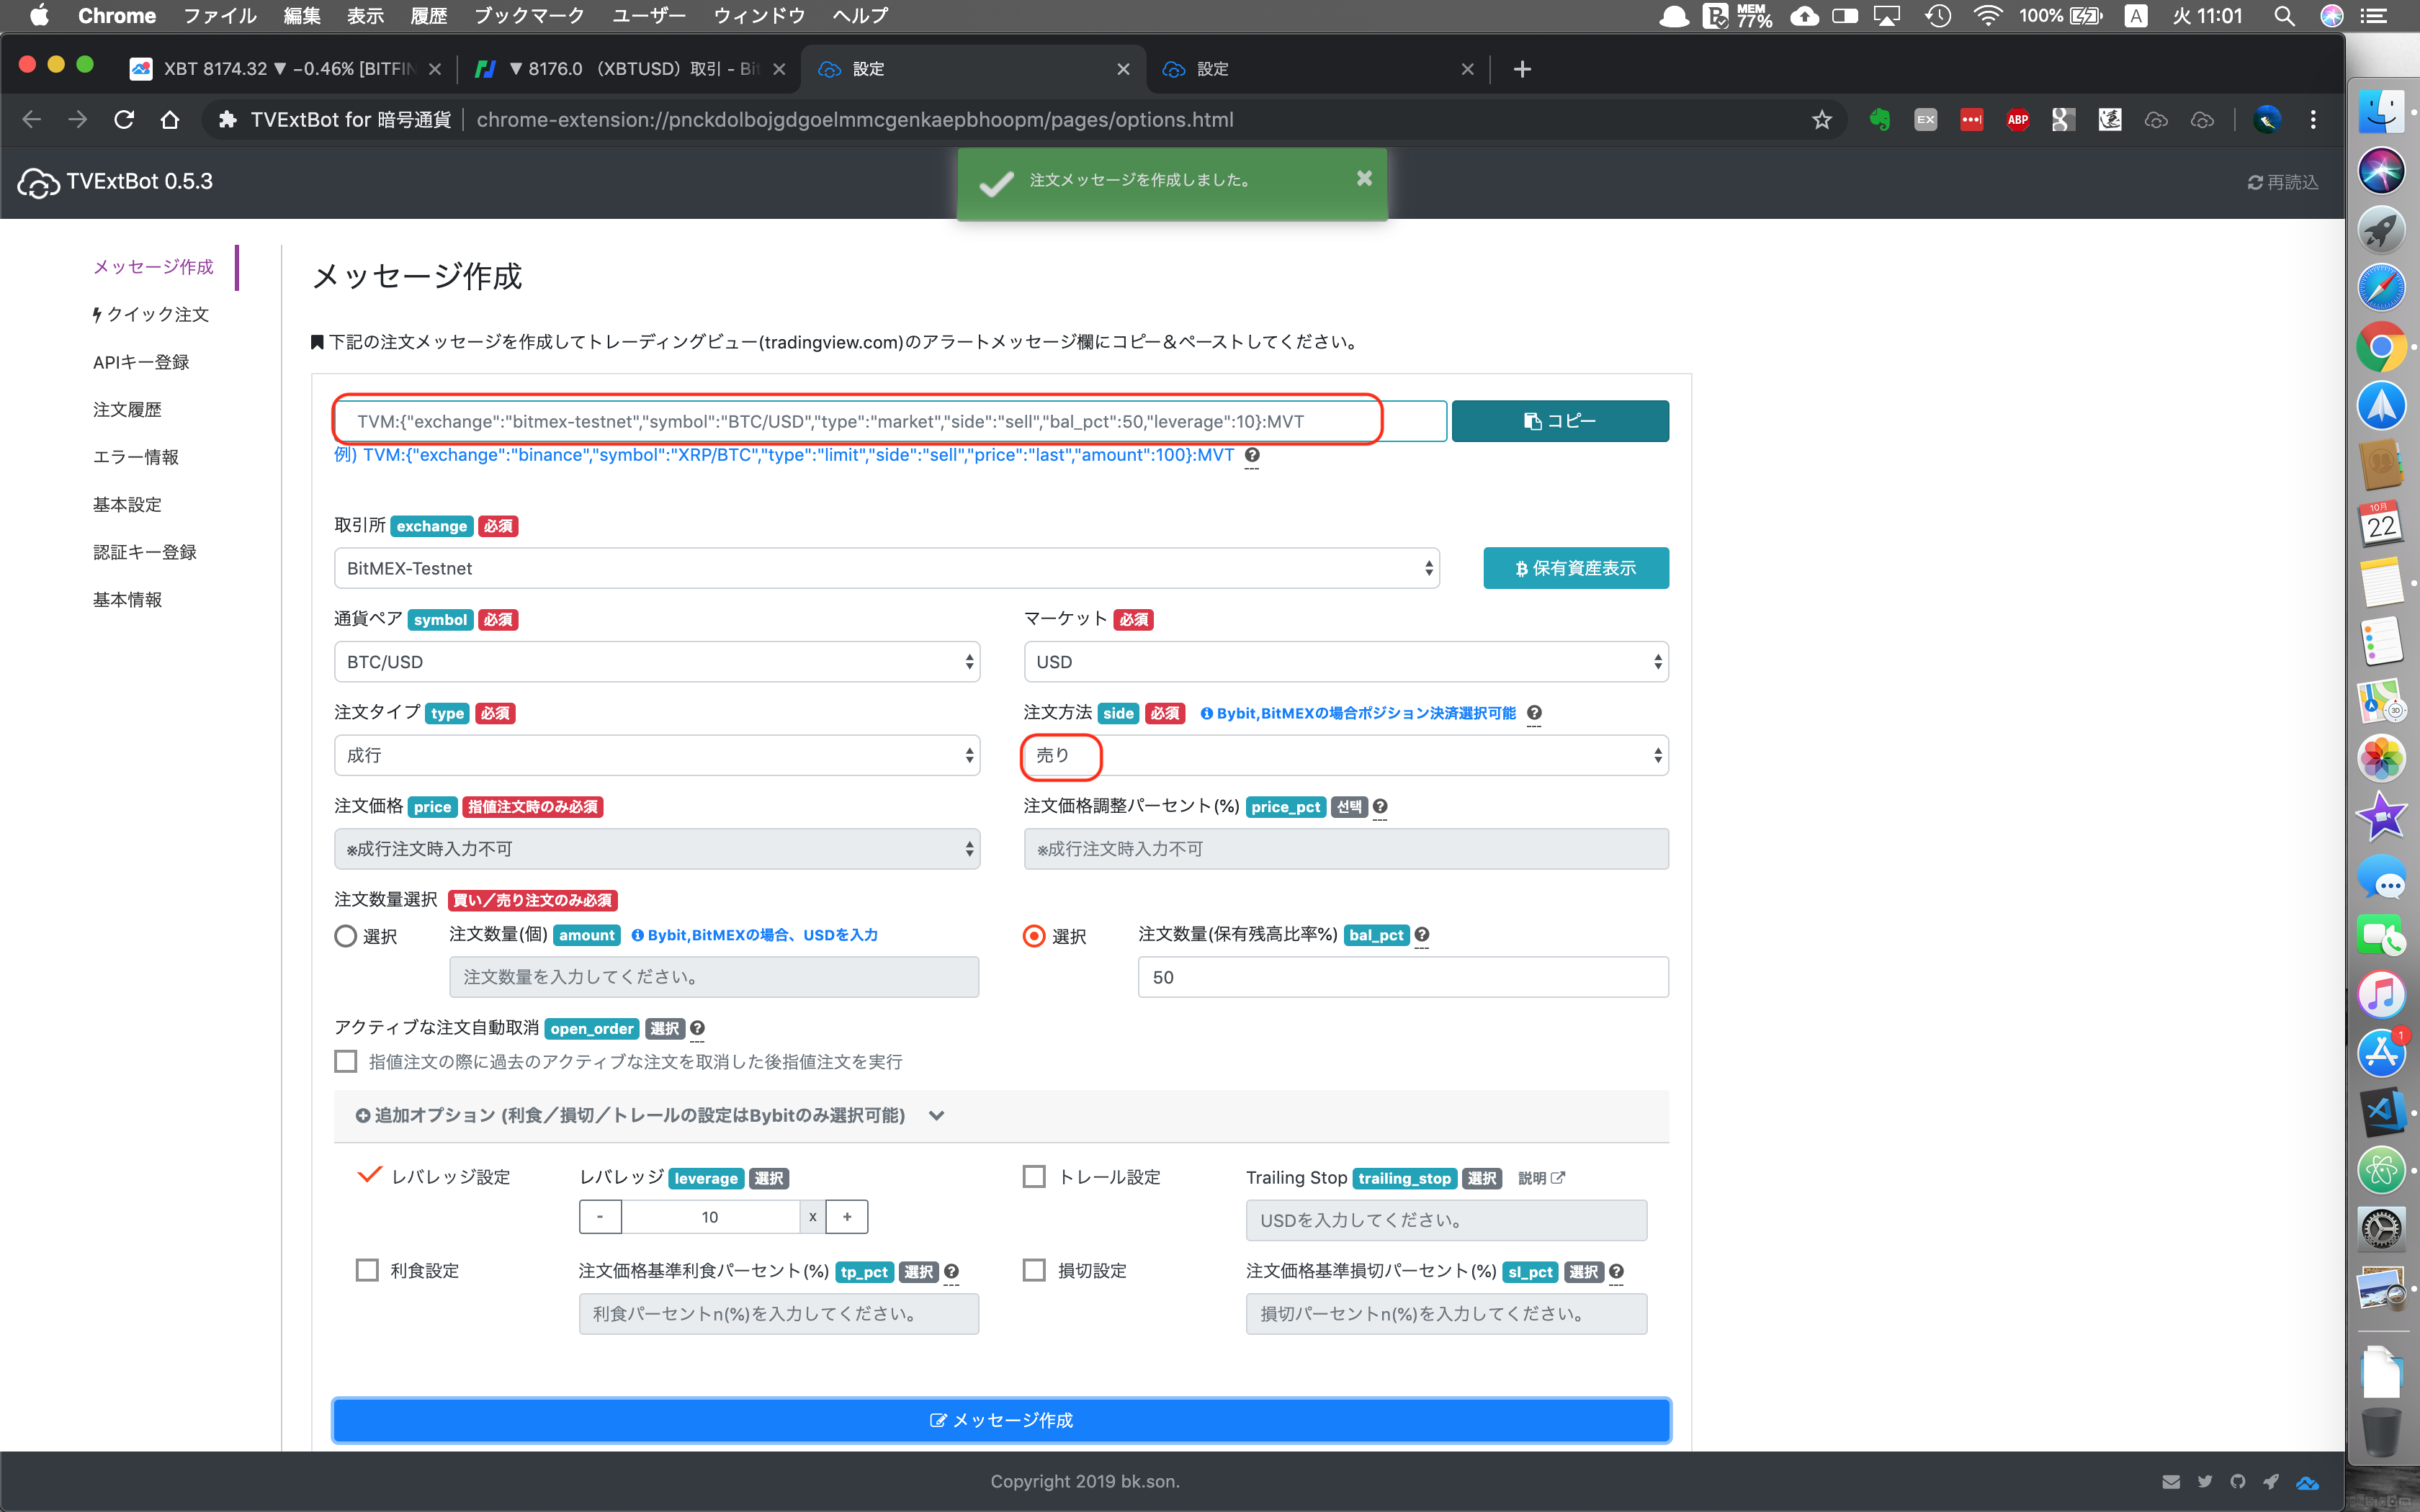
【作成されたメッセージ】
TVM:{"exchange":"bitmex-testnet","symbol":"BTC/USD","type":"market","side":"sell","bal_pct":50,"leverage":10}:MVT
⑤ ポジション決済メッセージを作成します。
※ 注文方法のみポジション決済に変更してメッセージ作成ボタンをクリックします。
【入力情報】
- 取引所:BitMEX-Testnet
- 通貨ペア:BTC/USD
- マーケット:USD
- 注文方法:ポジション決済
- 注文タイプ:成行
ポジション決済注文メッセージの作成結果は以下の通り。
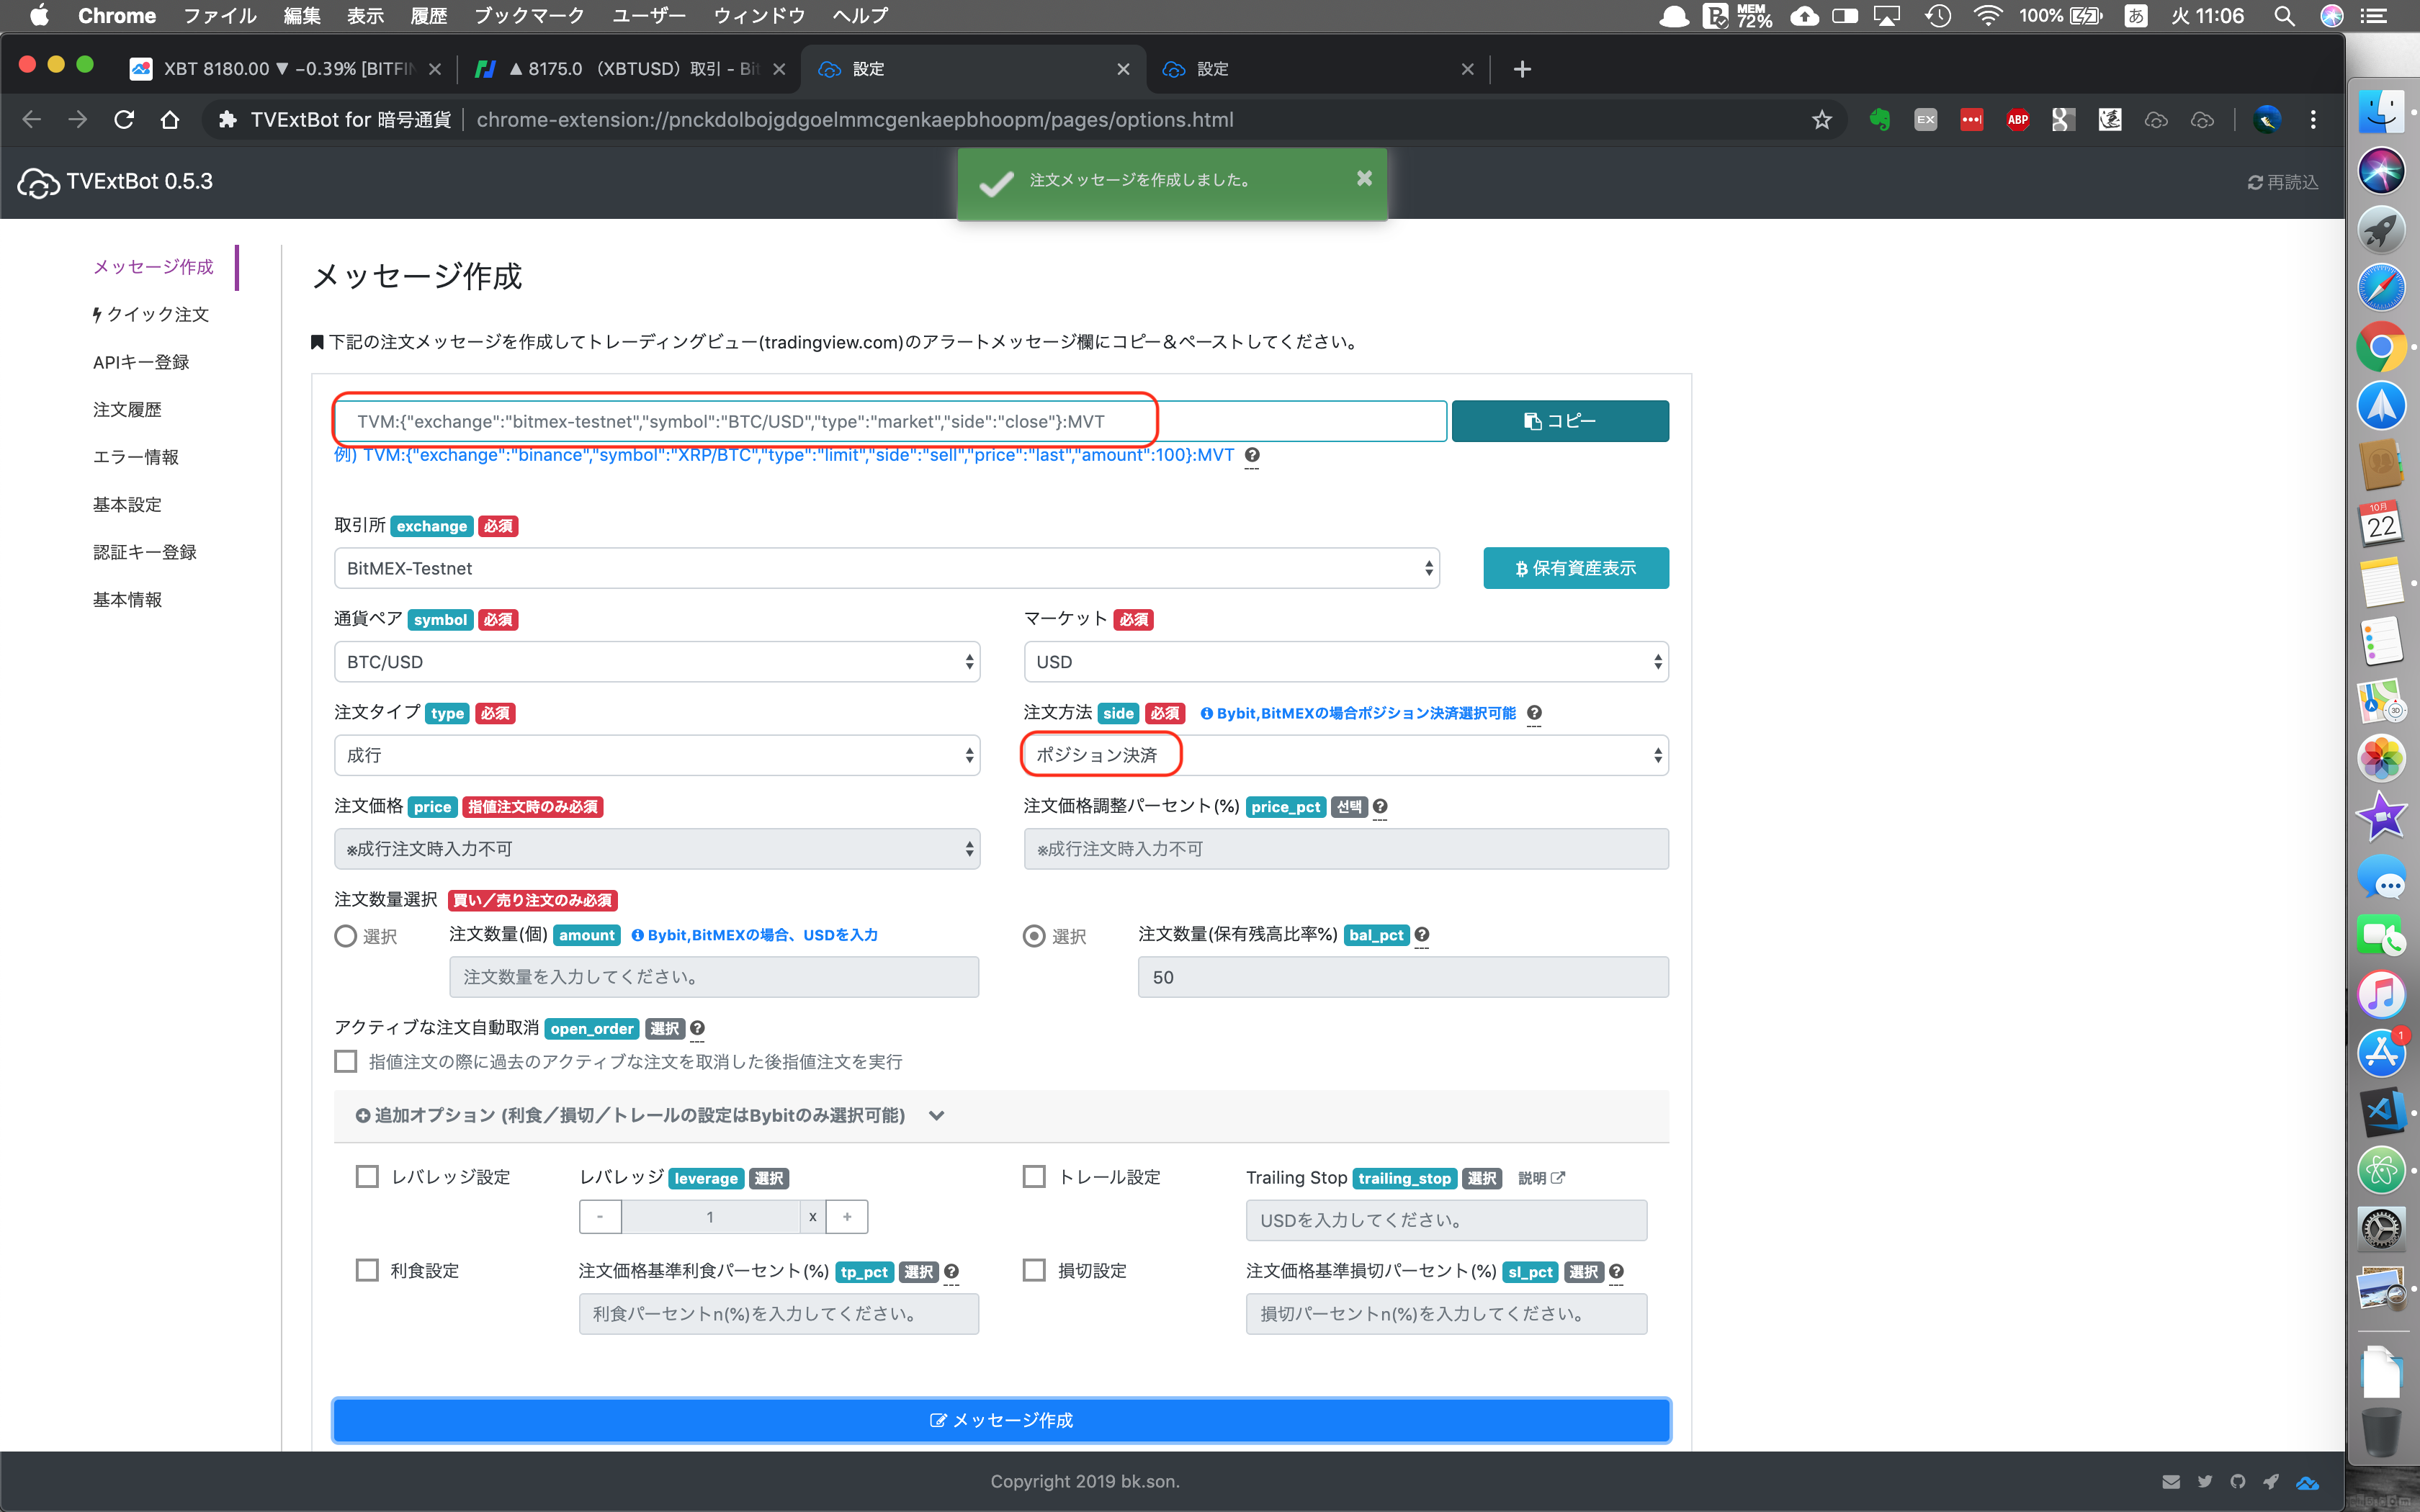
【作成されたメッセージ】
TVM:{"exchange":"bitmex-testnet","symbol":"BTC/USD","type":"market","side":"close"}:MVT
アラートメッセージ設定
① 買い注文メッセージを下記のように設定します。
TVM:{"exchange":"bitmex-testnet","symbol":"BTC/USD","type":"market","side":"buy","bal_pct":50,"leverage":10}:MVT
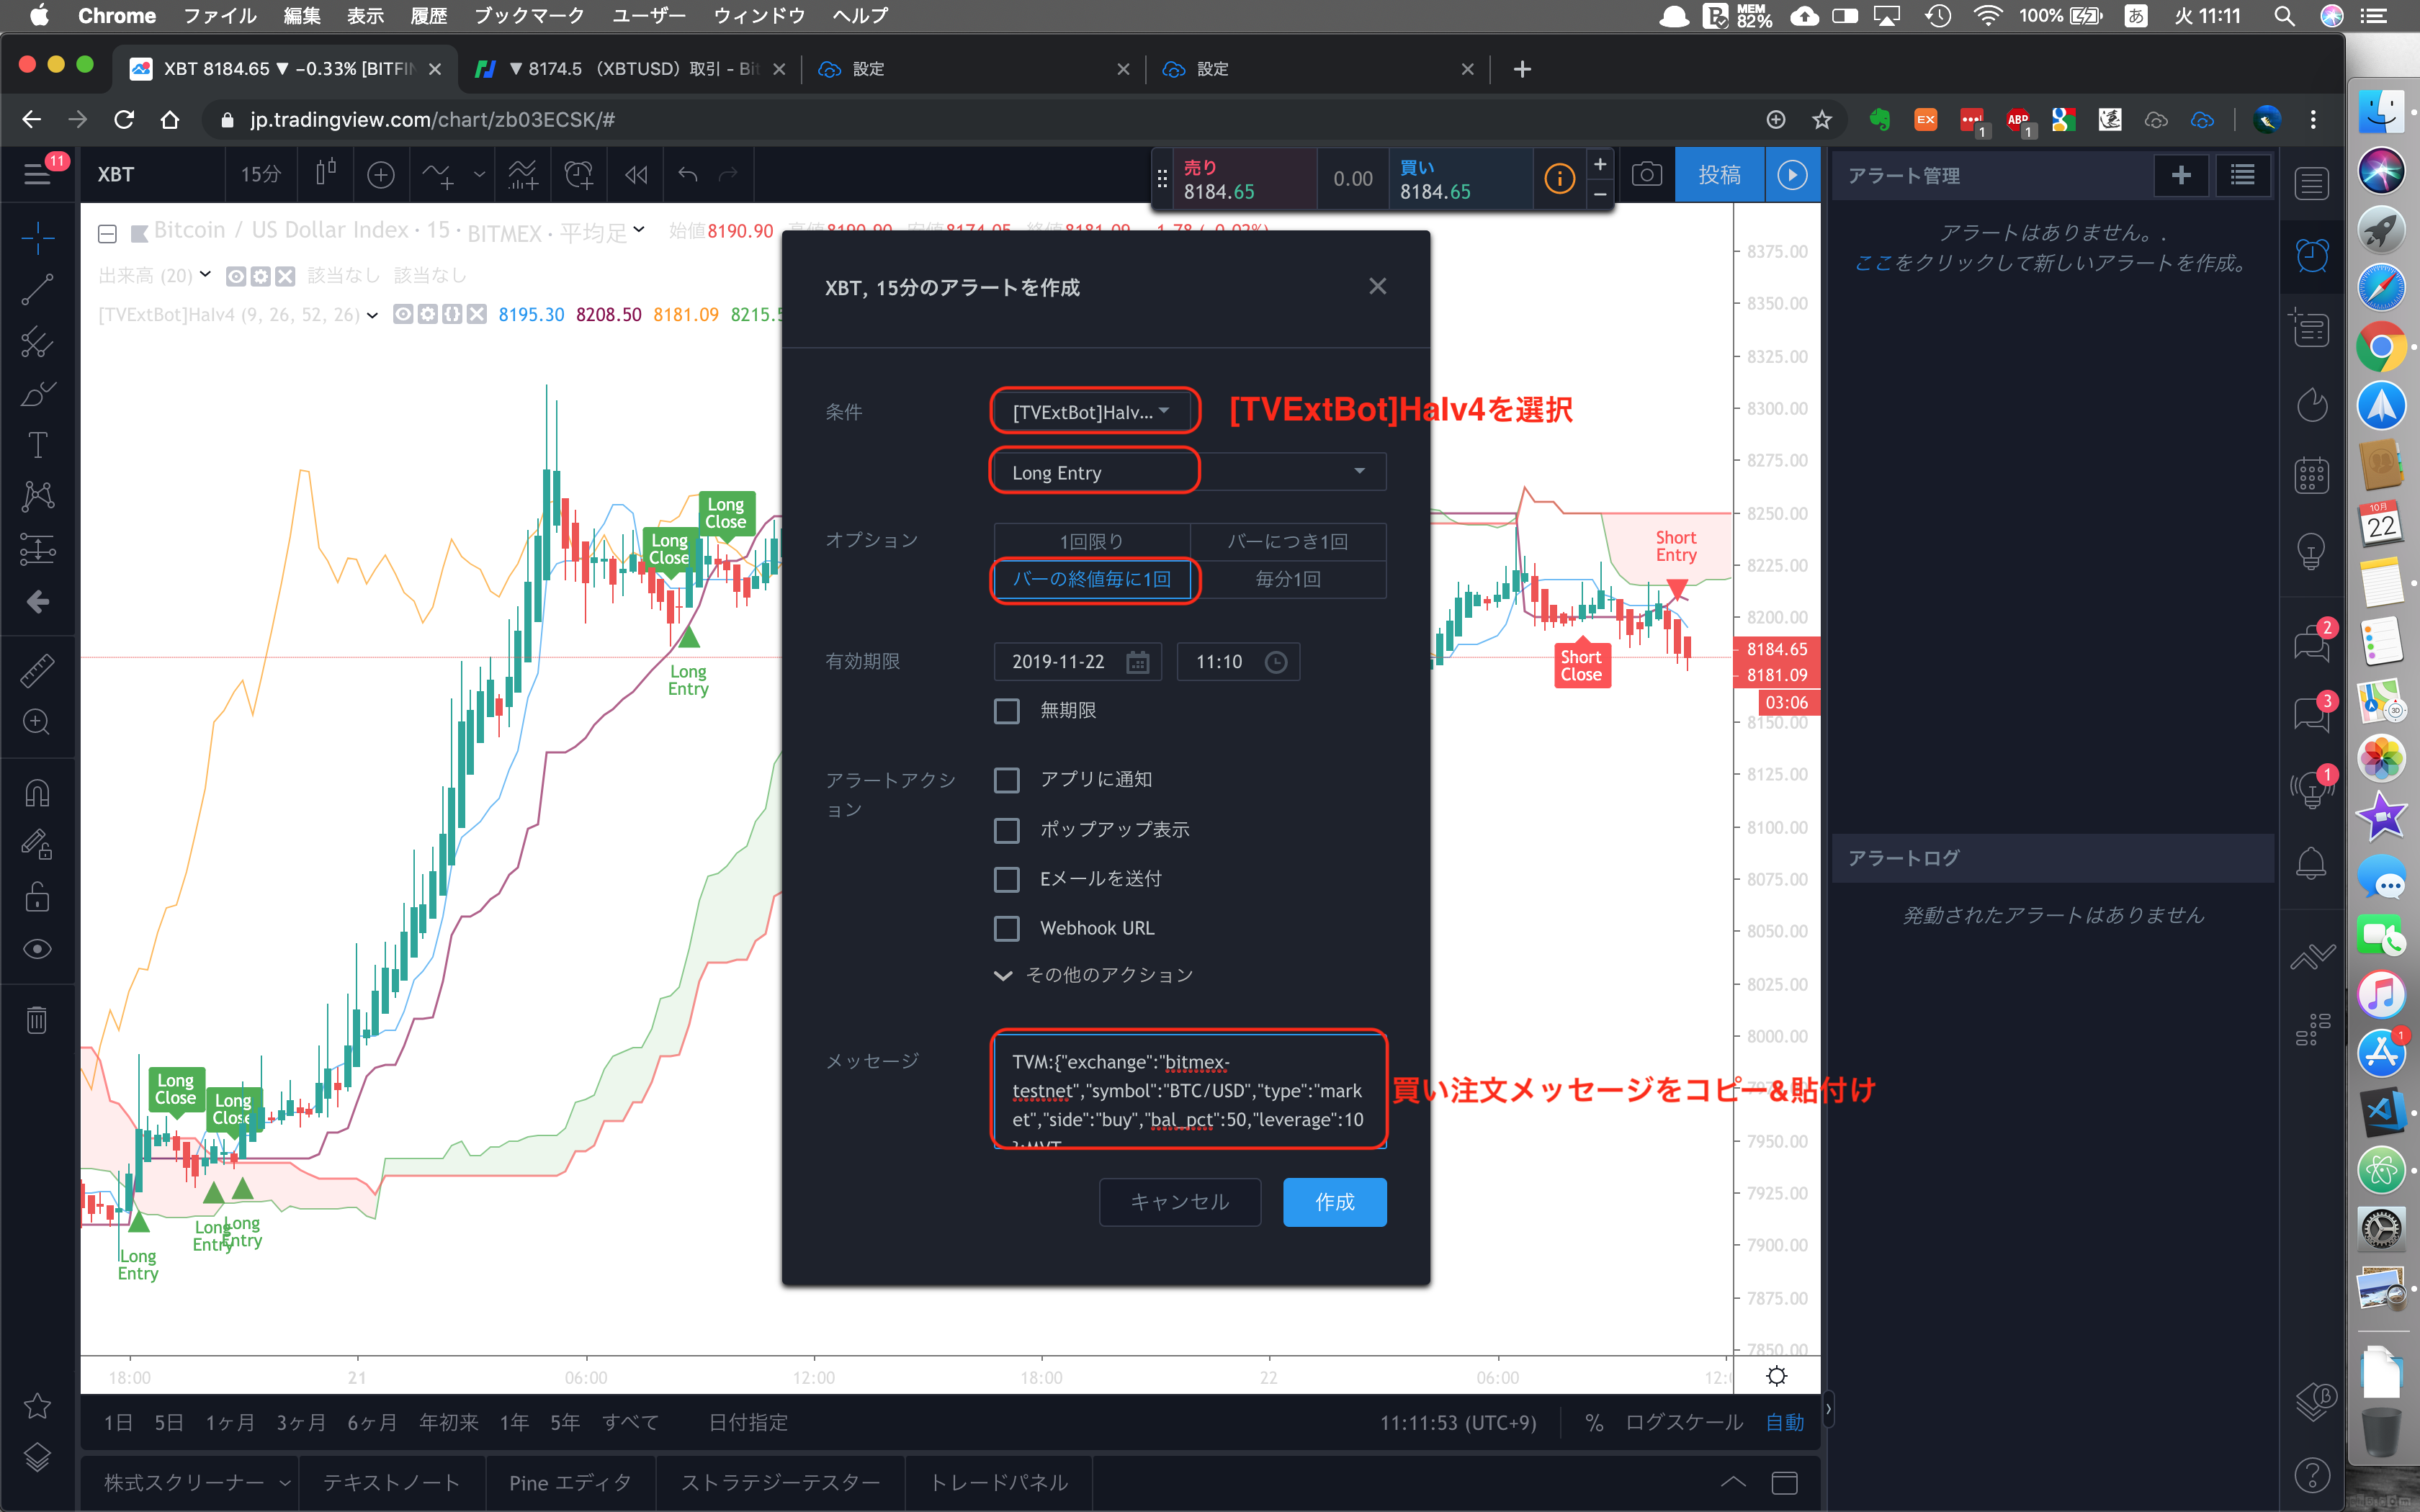 作成ボタンをクリックすると、以下の警告が表示しますが、「とにかく継続する」クリックします。
 ※ リペイントについては[詳細](https://www.tradingview.com/wiki/Indicator_repainting/ja "詳細")をご確認ください。
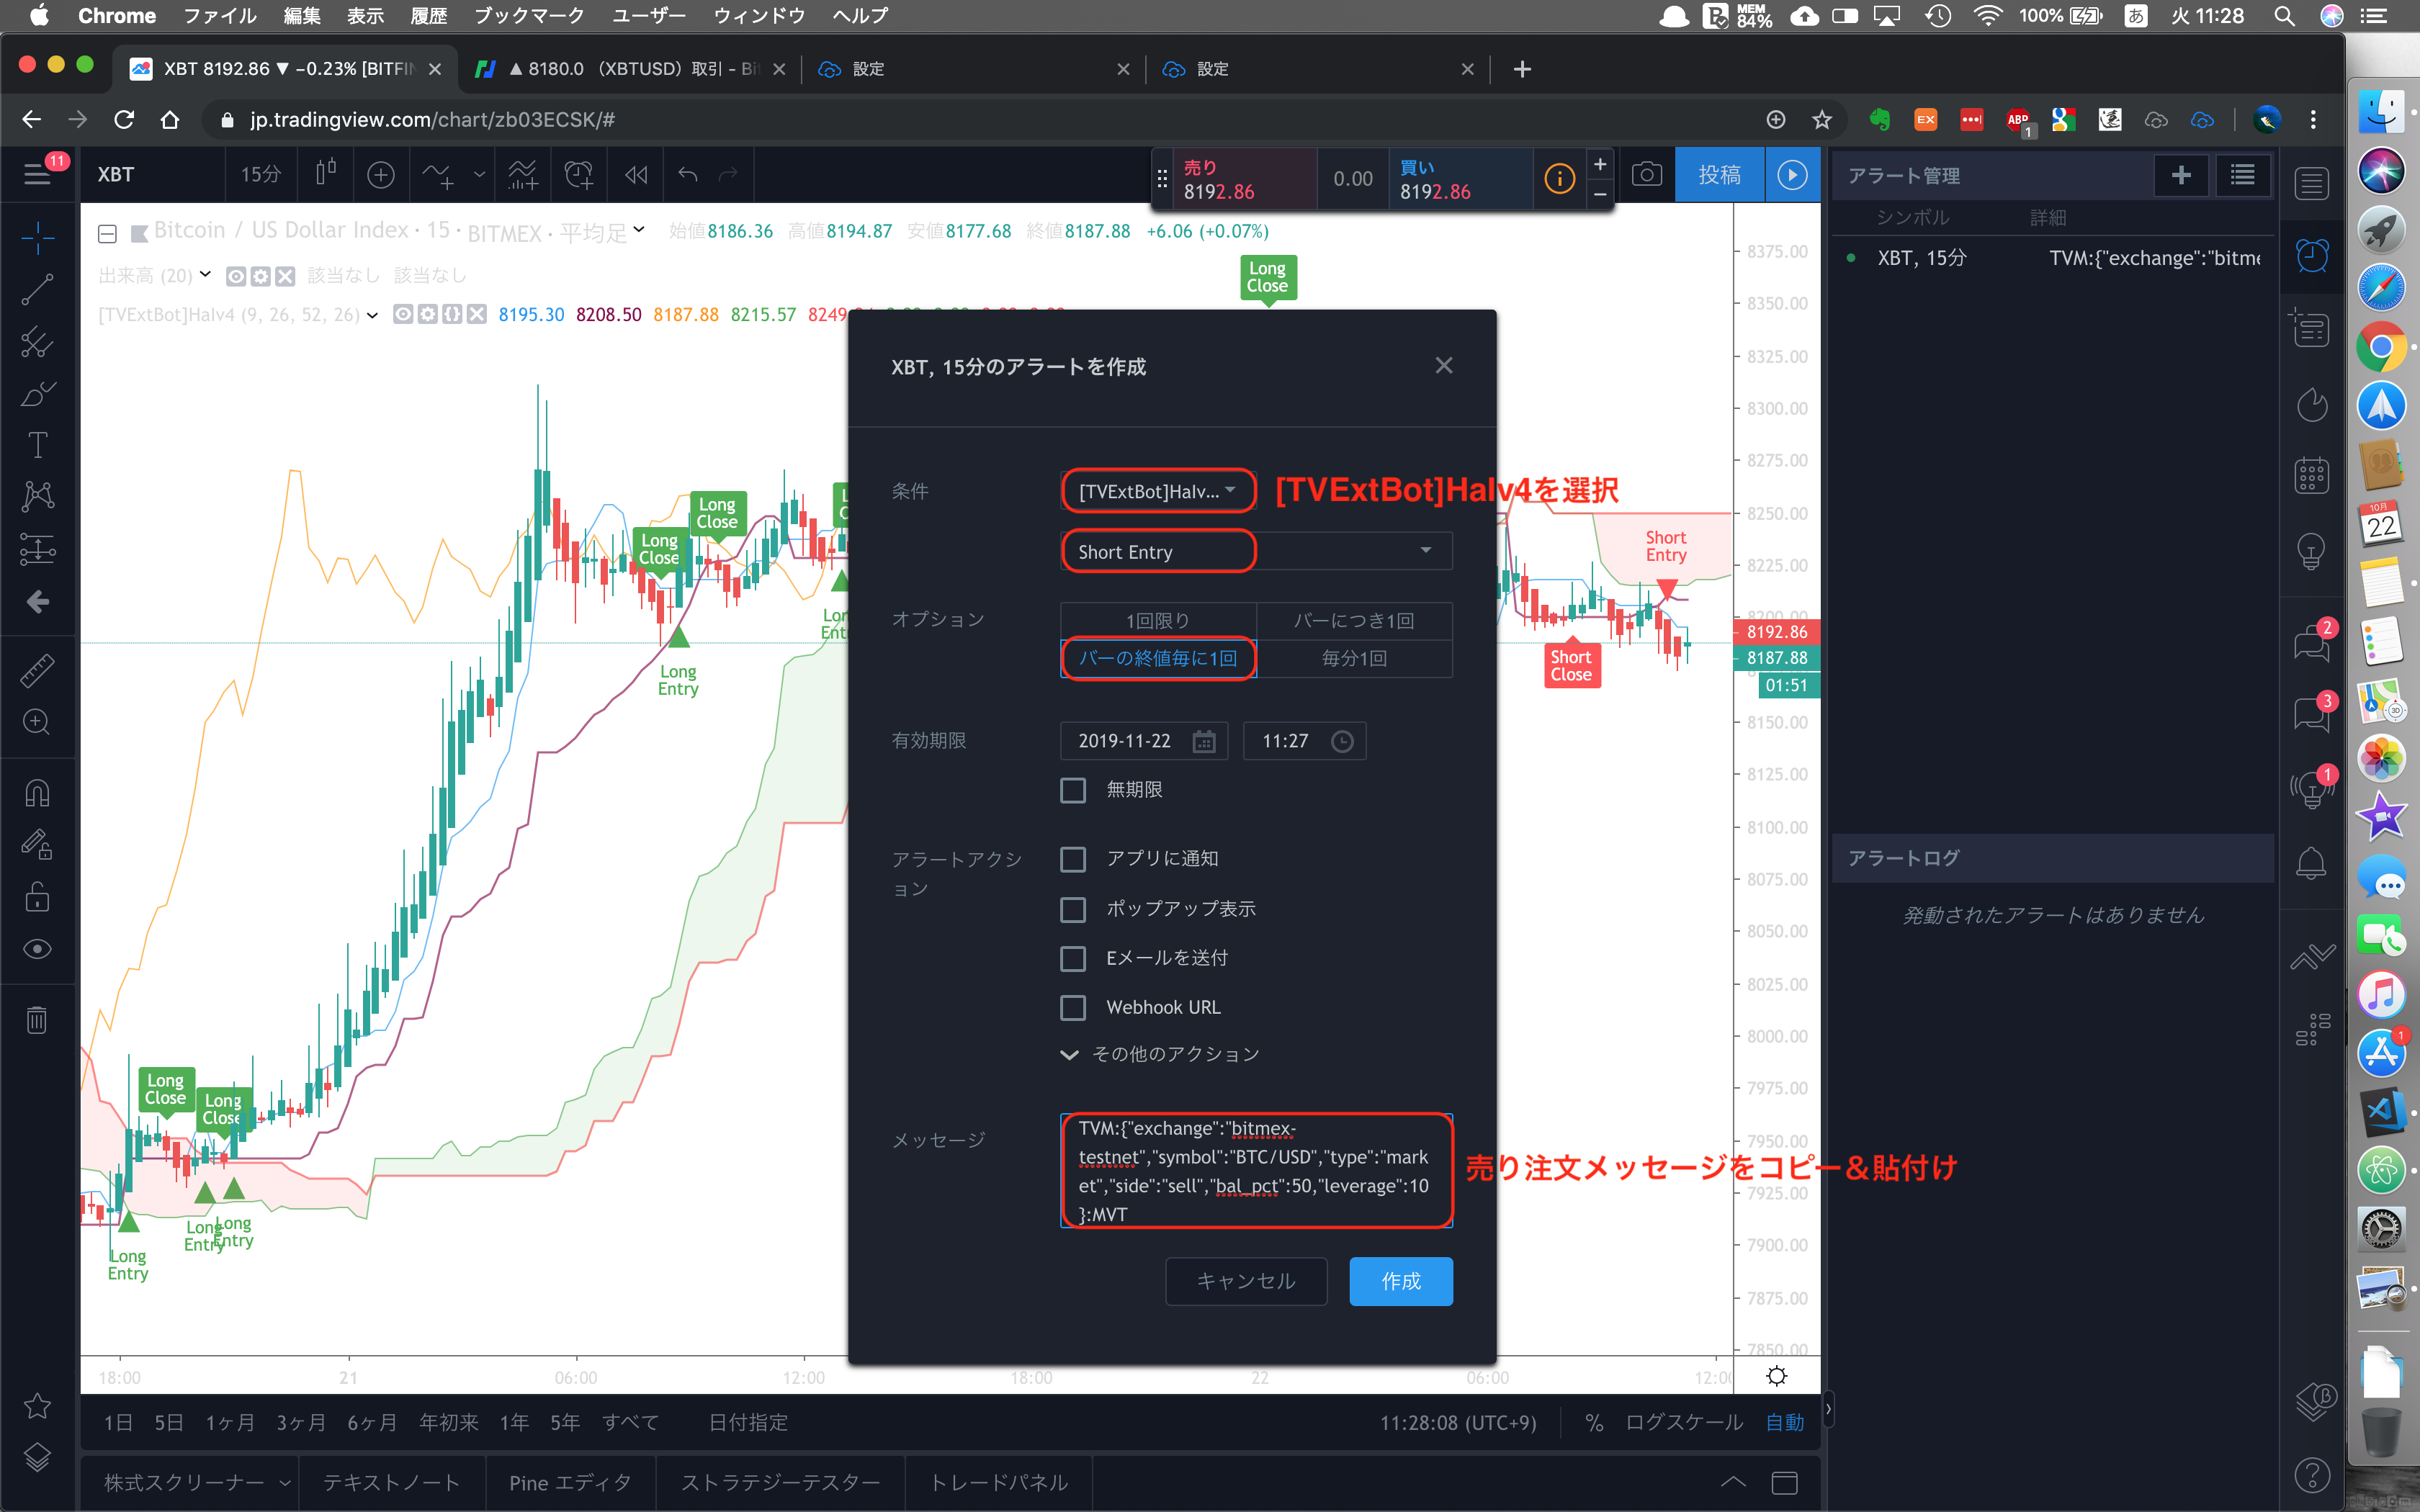
② 売り注文メッセージを下記のように設定します。
TVM:{"exchange":"bitmex-testnet","symbol":"BTC/USD","type":"market","side":"sell","bal_pct":50,"leverage":10}:MVT
③ 買い注文のポジション決済メッセージを設定します。
TVM:{"exchange":"bitmex-testnet","symbol":"BTC/USD","type":"market","side":"close"}:MVT
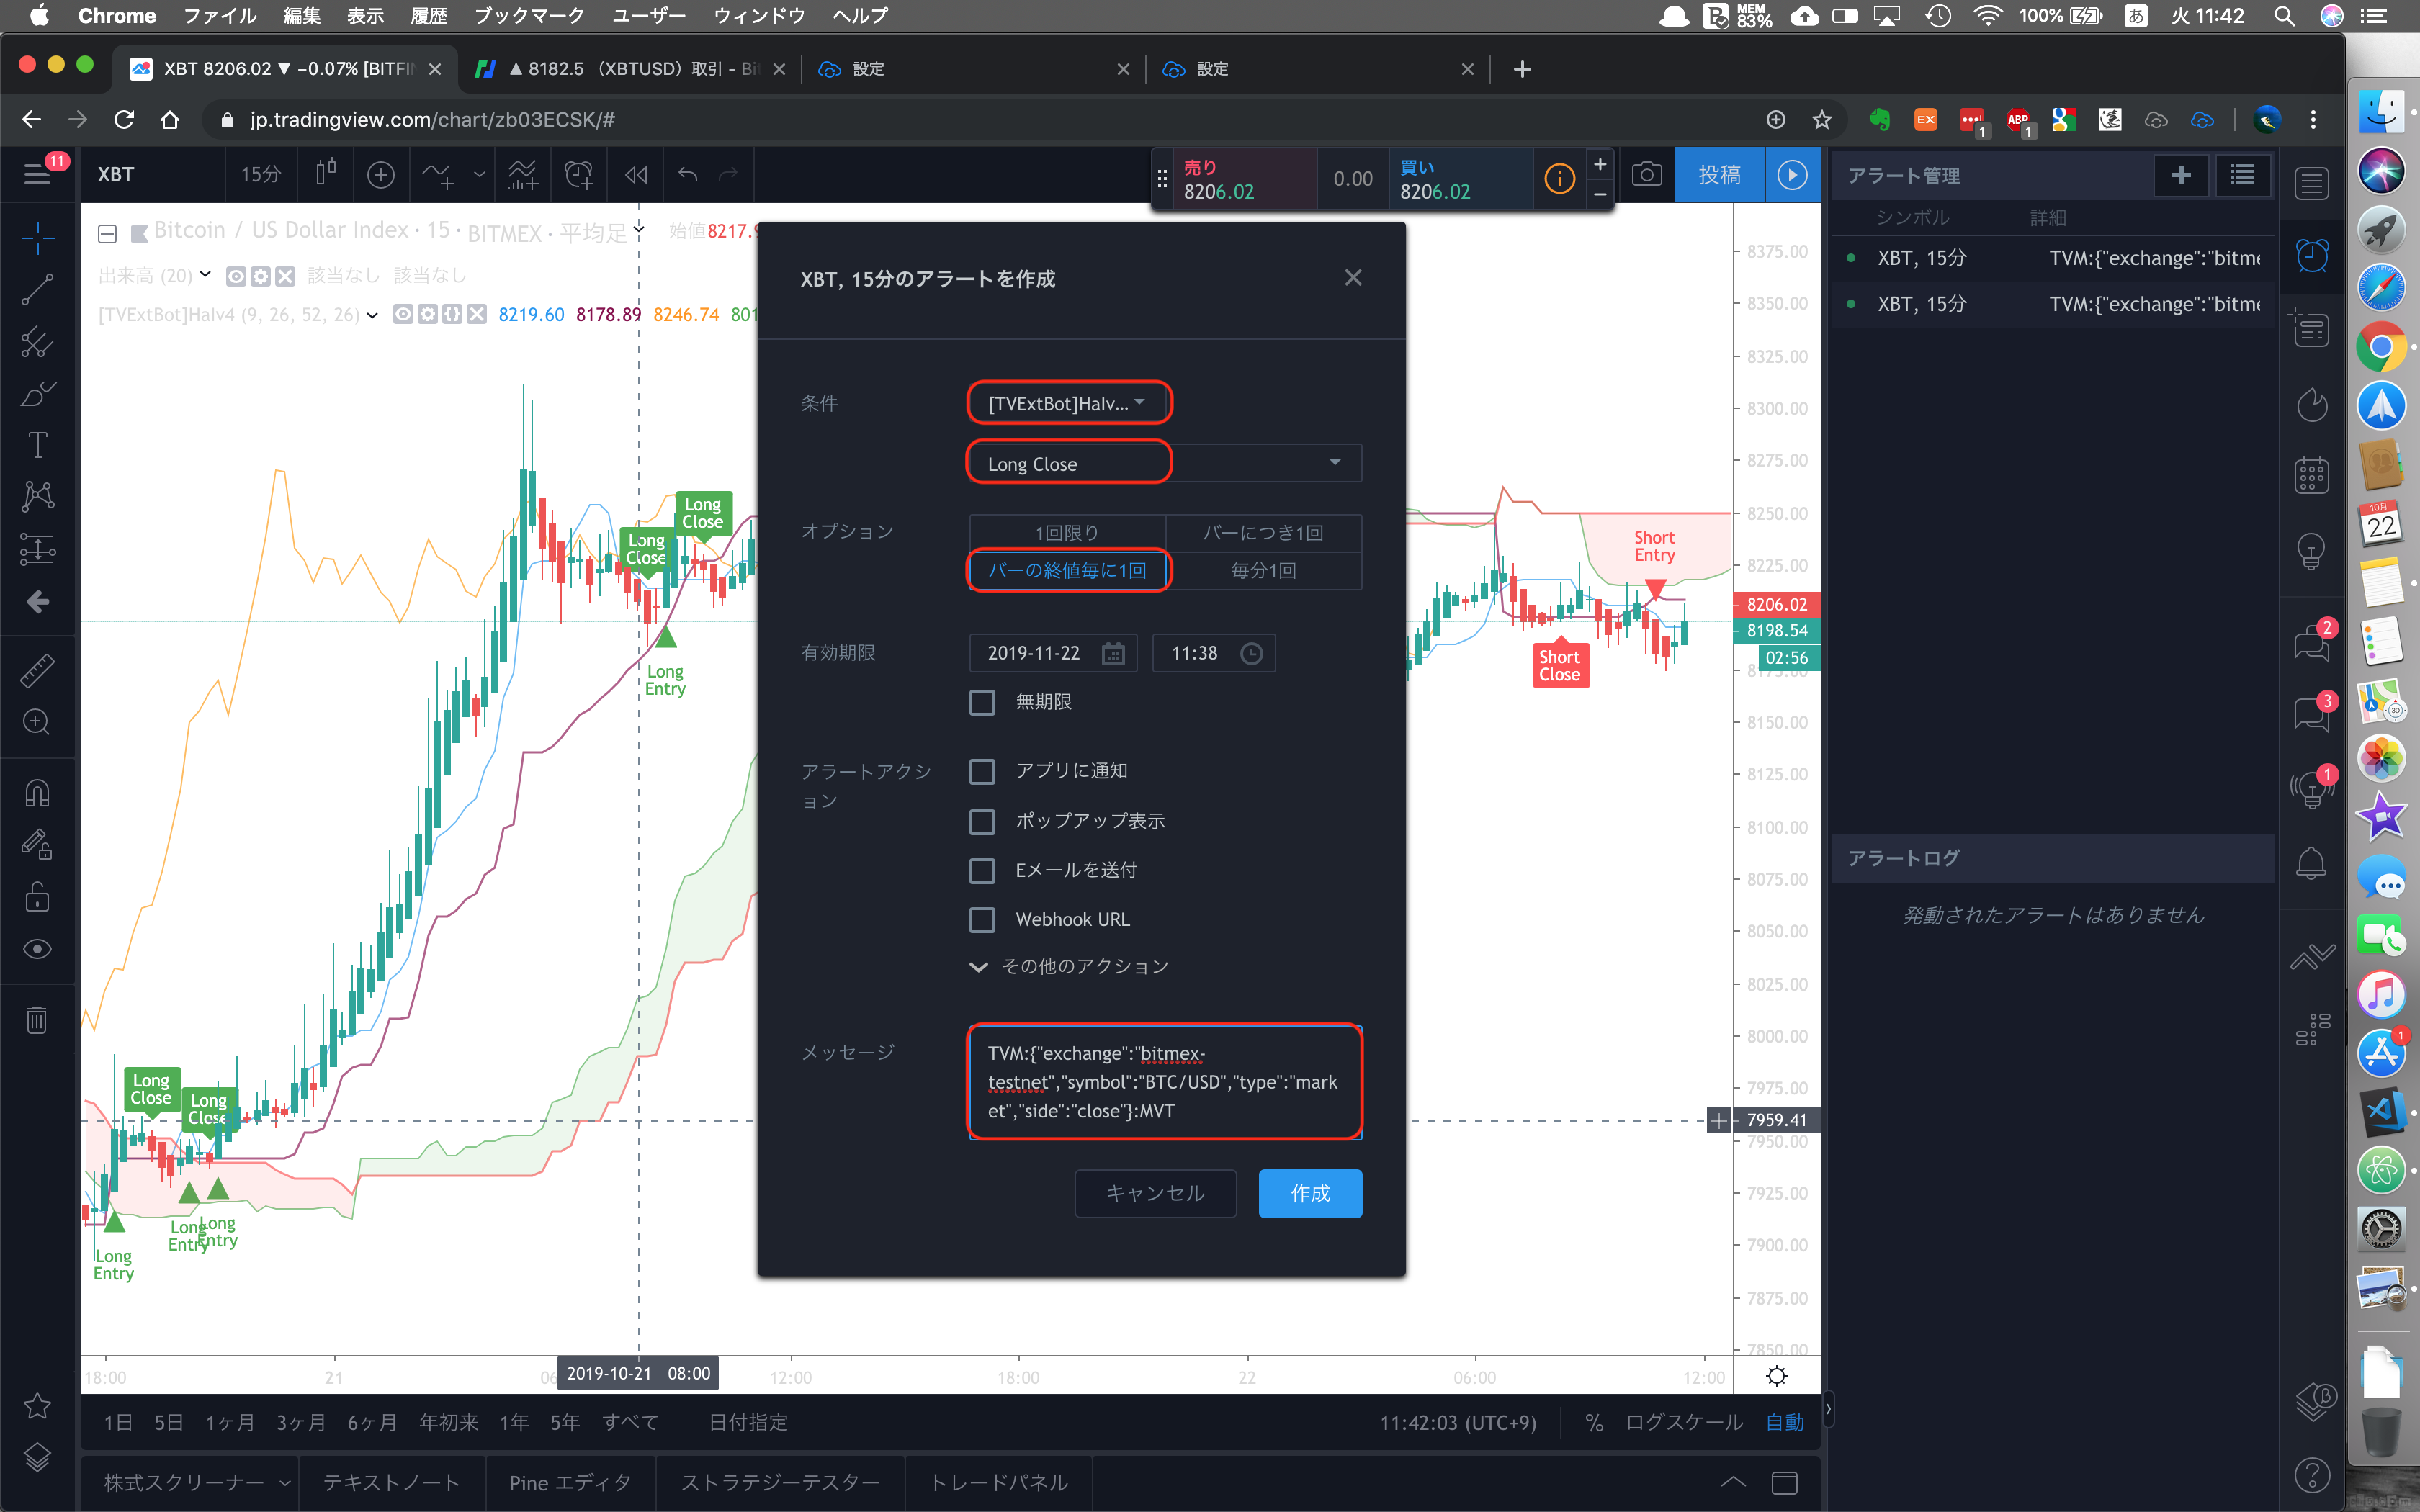
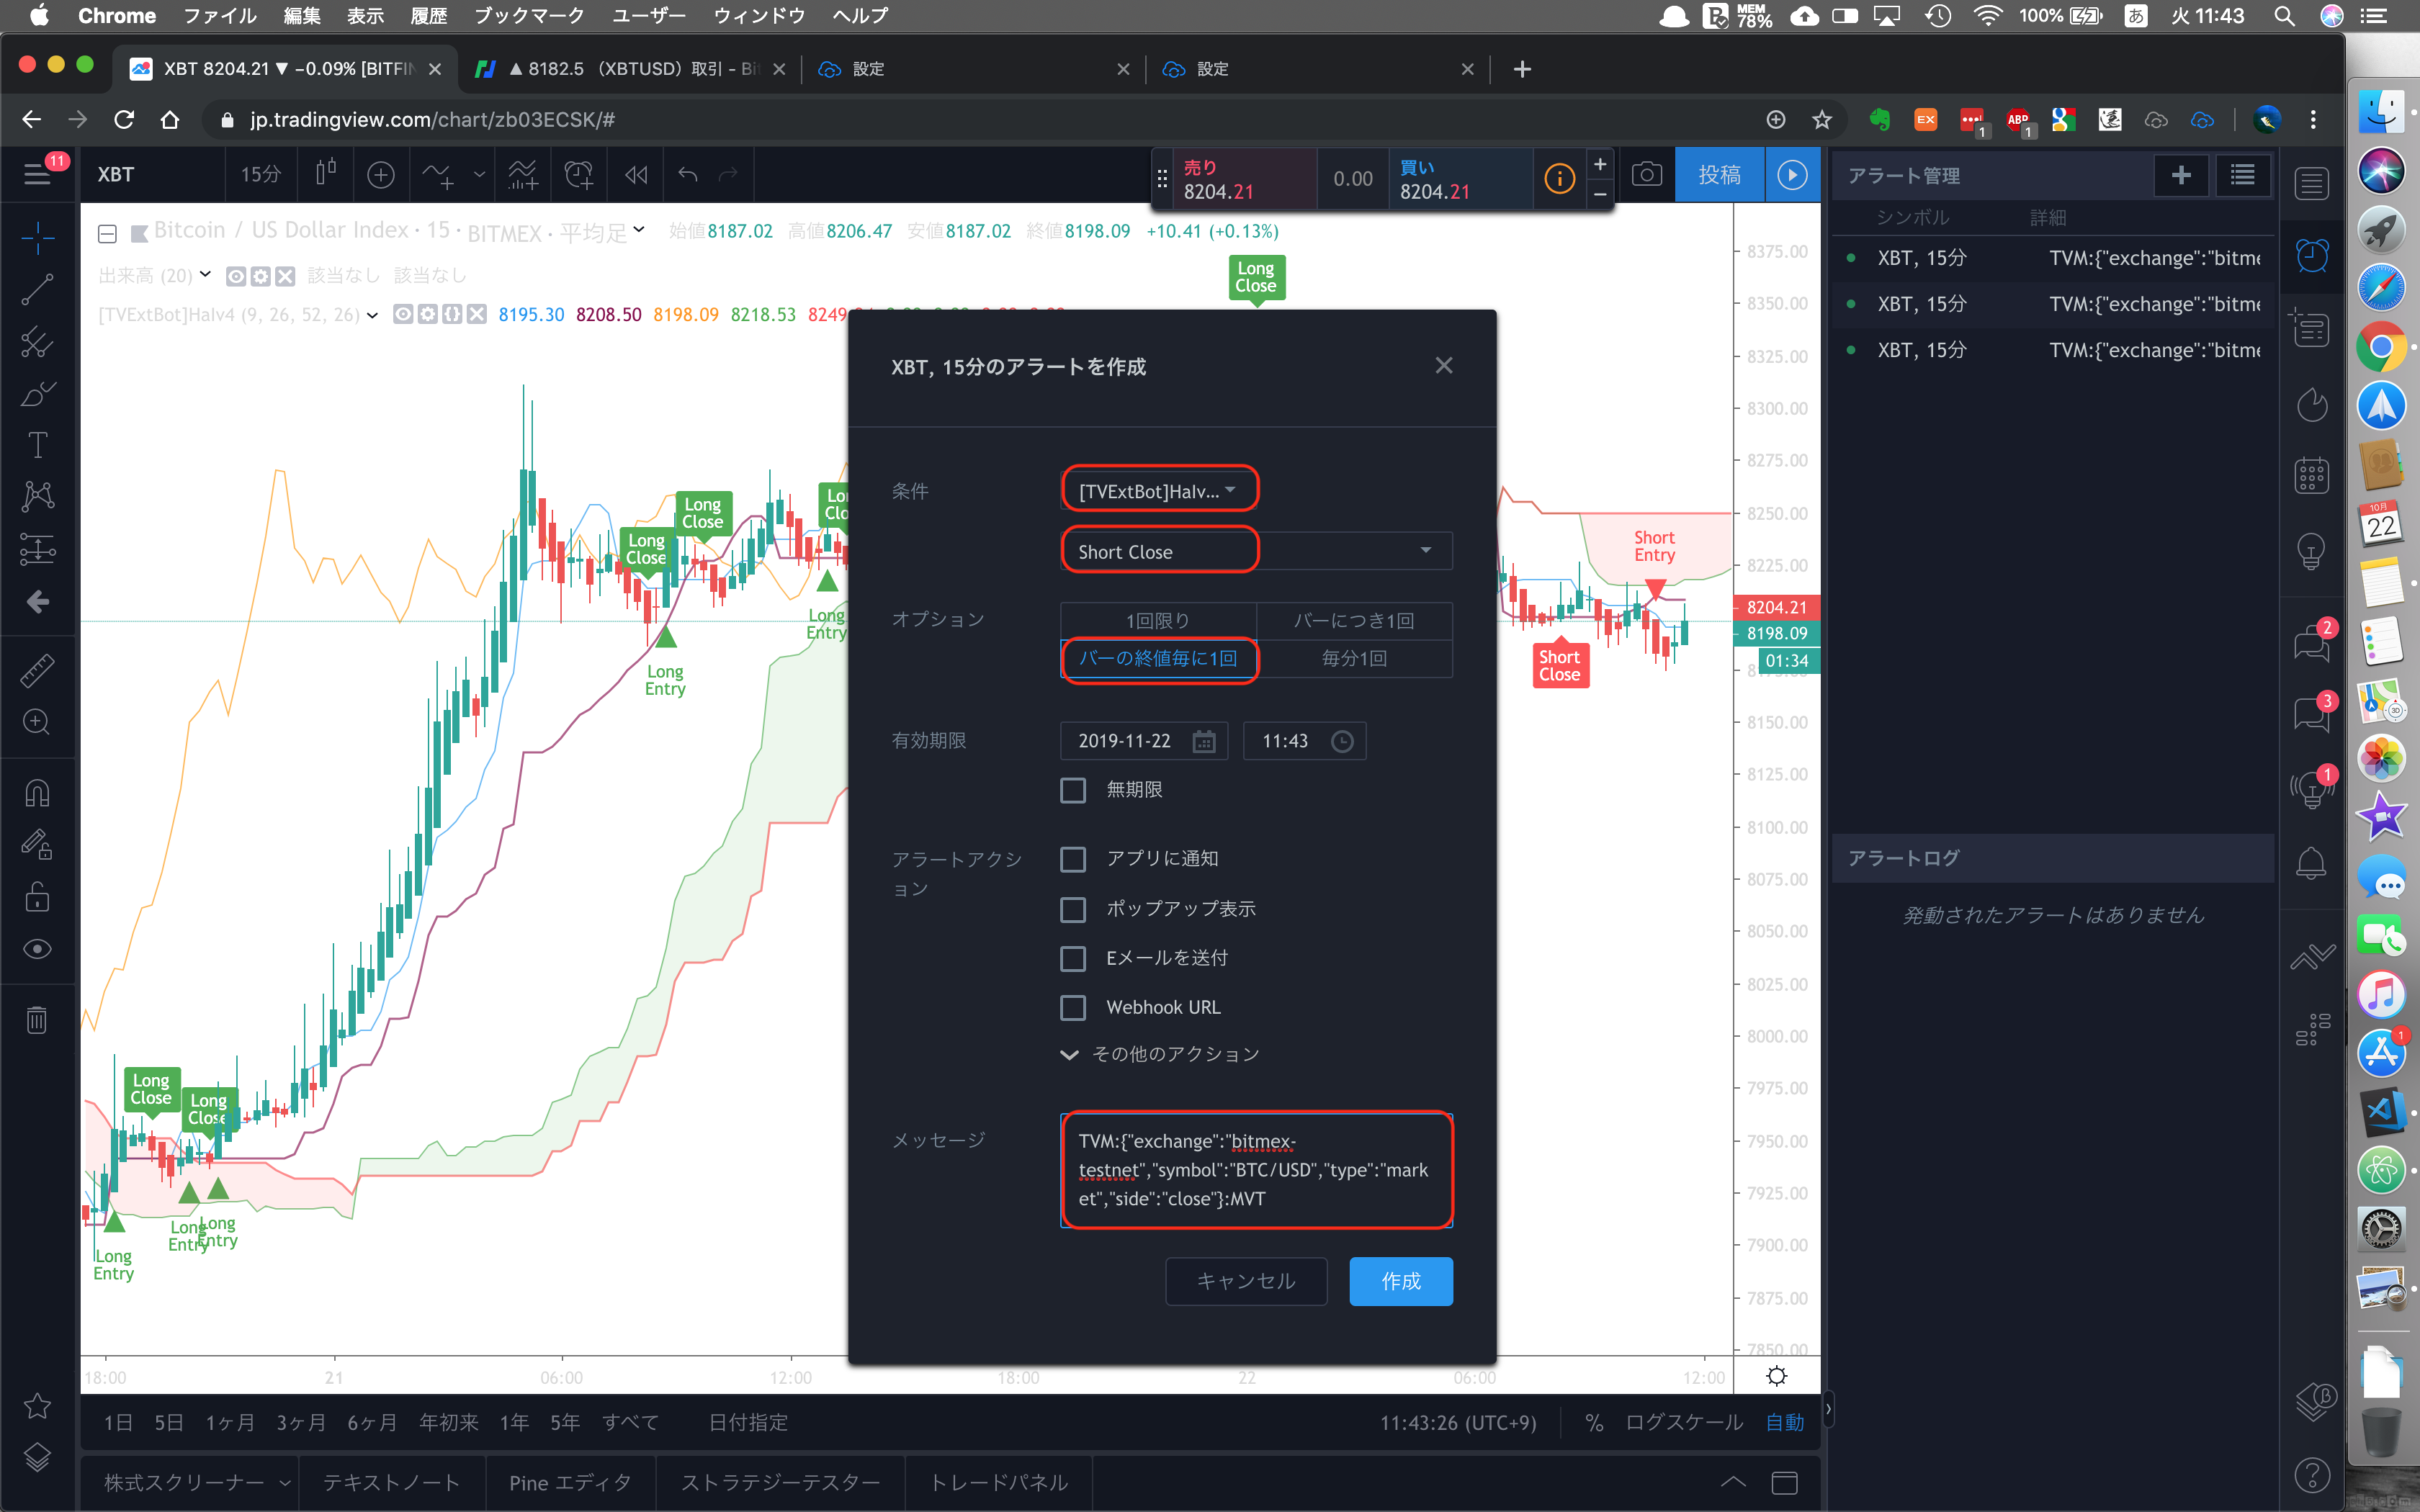
④ 売り注文のポジション決済メッセージを設定します。
TVM:{"exchange":"bitmex-testnet","symbol":"BTC/USD","type":"market","side":"close"}:MVT
※ ポジション決済メッセージは③のメッセージと同様です。
※ 上記の手順を下記の動画で確認できます!
[暗号通貨自動売買] TVExtBotスタートガイド(BitMEX編) https://t.co/fYKWkpfQ92 @YouTubeさんから
— TVExtBot (暗号通貨自動売買アプリ) (@tvextbot) October 22, 2019
以上、これで自動売買するための設定は完了です。