Note: 本記事は、2018年11月時点の内容です。
【Q】Azure DevOps(VSTS)から、Private Network上のSonarQube Serverと連携したい。どうやったらできるの?
-
SonarCloud使えばいいじゃん、SonarQube ServerにPublic IPでインターネット接続させちゃうよという方はこの記事スキップしてください。
【A】ビルドサーバをPrivate Agentで立てれば、Private Network上で連携できるよ。
Agent Poolを
Hostedのエージェントではなく、Privateのエージェントを使えばできる。仮想マシン上に、Private Agentをセットアップする必要あり。
.Net以外のアプリケーションの場合は、docker imagesが提供されているので、さくっと立てることが可能。
Docker Hub : microsoft/vsts-agent
Configure a private Java build agent with Azure DevOps Services
- 以降の手順は、.Netアプリケーション向けのPrivate Agentを作成する手順を紹介する。
Deploy an agent on Windows
作業の手順
- 仮想マシンの作成
- Build Tools for Visual Studioのインストール
- PATの発行
- Build Agentのインストール
- Service connectionsの設定
- Agent Poolの変更
- SonarQubeタスクの追加
- Buildする
【手順1】仮想マシンの作成
- Windowsの仮想マシンを作成
【手順2】Build Tools for Visual Studioのインストール
Private Agentの仮想マシンにログイン
以下URLの
Tool for Visual Studio>Build Tools for Visual Studio 2017からダウンロード
Microsoft : Downloads
- インストール手順は、以下URLを参考に。
Windows 10 で Build Tools for Visual Studio 2017 のインストール
【手順3】PATの発行
- Azure DevOps(VSTS)にログインして、以下URLを参考にPAT(Personal Access Token)を発行する
-
Authenticate with a personal access token (PAT)あたりを参考に。 - Private Agentを構成する際にこのTokenを使うのでメモしておく。
-
Deploy an agent on Windows
【手順4】Build Agentのインストール
Private Agentの仮想マシンにログインして、以下URLを参考にBuild Agentをインストールする
-
以下URLからAgentをダウンロード
-
Download Agentをクリック。Windowsタブで、Downloadボタンをクリック。
-
Azure DevOps
Cドライブ直下に
agentというフォルダを作成。ダウンロードして解凍した内容を
agentフォルダにコピー
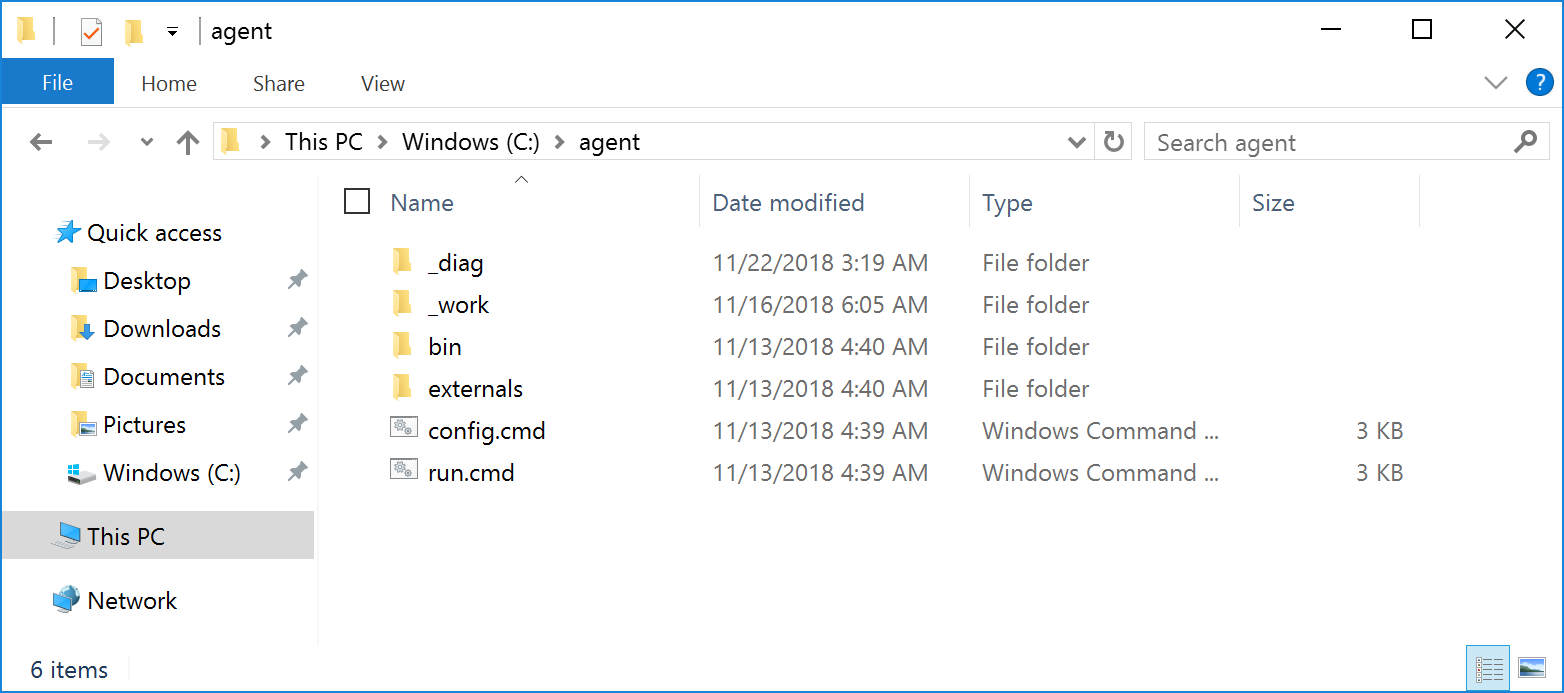
- 以下コマンドにて初期設定を行う
C:\agent> .\config.cmd
- Enter server URL : AzureDevOps(vsts)の
サイト名を入力 - Enter authentication type : PATで認証するので、
ENTER - Enter personal access token : 事前にメモしておいた
PATを貼り付け
>> Connect:

Enter server URL > https://<your-hostname>
Enter authentication type (press enter for PAT) >
Enter personal access token > ****************************************************
Connecting to server ...
- Enter agent pool : defaultのままでよいので、
ENTER - Enter agent name : defaultのままでよいので、
ENTER - Enter work folder : defaultのままでよいので、
ENTER
>> Register Agent:

Enter agent pool (press enter for default) >
Enter agent name (press enter for <your-agent-name>) >
Scanning for tool capabilities.
Connecting to the server.
Successfully added the agent
Testing agent connection.
Enter work folder (press enter for _work) >
2018-11-22 04:49:12Z: Settings Saved.
- Enter run agent as service : サービスとして動かしたいので
Y - Enter User account to use for the service : OSの
Adminユーザを入力 - Enter Password for the account : OSの
Adminユーザのパスワードを入力
Enter run agent as service? (Y/N) (press enter for N) > Y
Enter User account to use for the service (press enter for NT AUTHORITY\NETWORK SERVICE) > <your-account>
Enter Password for the account <your-computer-name>\<your-account> > ************
Granting file permissions to '<your-computer-name>\<your-account>'.
Service vstsagent.<your-domain>.<your-agent-name> successfully installed
Service vstsagent.<your-domain>.<your-agent-name> successfully set recovery option
Service vstsagent.<your-domain>.<your-agent-name> successfully set to delayed auto start
Service vstsagent.<your-domain>.<your-agent-name> successfully configured
Service vstsagent.<your-domain>.<your-agent-name> started successfully
再設定したい場合
- もし再設定したい場合は、以下コマンドにて一度設定を削除する。その後上記の手順を行う。
C:\agent> .\config.cmd remove

Removing service
Waiting for service to stop...
Succeeded: Removing service
Removing agent from the server
- Enter authentication type : PATで認証するので、
ENTER - Enter personal access token : 事前にメモしておいた
PATを貼り付け
Enter authentication type (press enter for PAT) >
Enter personal access token > ****************************************************
Connecting to server ...
Succeeded: Removing agent from the server
Removing .credentials
Succeeded: Removing .credentials
Removing .agent
Succeeded: Removing .agent
【手順5】Service connectionsの設定
- Azure DevOps(VSTS)にログイン
-
Project Settings>Service Connectionsに移動 -
+ New Service Connectionsをクリックし、SonarQubeを選択 - ダイアログにて以下情報を入力
- Connection Name : 分かりやすい名前を入力
- Server Url : SonarQube Serverの
Private IPを入力 - token : SonarQubeのSecurityタブで発行した
tokenを入力
Note:
SonarQubeを初めて使う方は、Azure DevOpsのMarketplaceからExtensionをインストールしておく
【手順6】Agent Poolの変更
- Azure DevOps(VSTS)にログイン
- メニューから
Pipelines>Buildsに移動 - 使用しているpipelineのAgent PoolをPrivate配下の
Defaultに変更
【手順7】SonarQubeタスクの追加
- Azure DevOps(VSTS)にログイン
- 以下URLを参考に、
Prepare Analysis ConfigurationとRun Code Analysisのタスクを追加-
Analysing a .NET solutionのあたりを参照 - Gate Controlしたい方は、
Publish Quality Gate Resultも追加
-
Analyzing with SonarQube Extension for VSTS/TFS
【手順8】Buildする
- Azure DevOps(VSTS)にログイン
- メニューから
Pipelines>Buildsに移動 - 対象のpipelineをビルドする
- うまくいけば、pipelineが正常終了する。sonarqubeサイトにログインすると解析結果が表示される
ビルド時にvstest関連のエラーが出た場合
- ↓こんな感じのエラーが出た場合
No agent found in pool Default which satisfies the specified demands:
     msbuild
     visualstudio
     vstest
     Agent.Version -gtVersion 2.115.0
- 以下URLの対応を実施してください。
【FAQ】Azure DevOpsのprivate agentでvstestがないエラー