Ruby on Rails
RubyとRailsのMacでの環境構築手順
環境
macOS 10.14
homebrewの導入
homebrewを参照。
rbenvのインストール
Rubyのバージョン管理のために、rbenvをインストールする。
terminal
$ brew install rbenv
インストールの確認。
terminal
$ rbenv -v
rbenv 1.1.1
.bash_profileに追記。
terminal
$ echo 'export PATH="~/.rbenv/shims:/usr/local/bin:$PATH"' >> ~/.bash_profile
$ echo 'eval "$(rbenv init -)"' >> ~/.bash_profile
$ source ~/.bash_profile
Rubyのインストール
rbenvからRubyをインストールする。
以下コマンドで、インストールできるRubyを確認。
terminal
$ rbenv install --list
Ruby 2.5.4をインストールする。
terminal
$ rbenv install 2.5.4
ruby-build: use openssl from homebrew
Downloading ruby-2.5.4.tar.bz2...
-> https://cache.ruby-lang.org/pub/ruby/2.5/ruby-2.5.4.tar.bz2
Installing ruby-2.5.4...
ruby-build: use readline from homebrew
Installed ruby-2.5.4 to /Users/*****/.rbenv/versions/2.5.4
Rubyをインストールしたものに切り替える
Rubyをインストールした2.5.4に切り替える。
terminal
$ rbenv global 2.5.4
$ rbenv rehash
$ ruby -v
ruby 2.5.4p155 (2019-03-13 revision 67245) [x86_64-darwin18]
2.5.4になっていればOK。
Bundlerのインストール
Bundlerとはgemの依存関係とバージョンを管理してくれるツール。
Bundlerをgemでインストールする。
terminal
$ gem install bundler
Fetching: bundler-2.0.1.gem (100%)
Successfully installed bundler-2.0.1
Parsing documentation for bundler-2.0.1
Installing ri documentation for bundler-2.0.1
Done installing documentation for bundler after 2 seconds
1 gem installed
インストール確認。
terminal
$ bundle -v
Bundler version 2.0.1
MySQLをインストール
homebrewでMySQLをインストールする。
terminal
$ brew install mysql
Updating Homebrew...
==> Auto-updated Homebrew!
Updated 1 tap (homebrew/cask).
No changes to formulae.

==> Downloading https://homebrew.bintray.com/bottles/mysql-8.0.15.mojave.bottle.
######################################################################## 100.0%
==> Pouring mysql-8.0.15.mojave.bottle.tar.gz
==> Caveats
We've installed your MySQL database without a root password. To secure it run:
    mysql_secure_installation

MySQL is configured to only allow connections from localhost by default

To connect run:
    mysql -uroot

To have launchd start mysql now and restart at login:
  brew services start mysql
Or, if you don't want/need a background service you can just run:
  mysql.server start
==> Summary
🍺  /usr/local/Cellar/mysql/8.0.15: 267 files, 234.6MB
コネクタライブラリであるmysql2をインストール
terminal
$ gem install mysql2
作業用ディレクトリの作成
作業用ディレクトリ(workspace_ruby)を作成し、移動する。
terminal
$ mkdir workspace_ruby
$ cd workspace_ruby/
Railsのインストール
Rubyのバージョンを固定する。
terminal
$ rbenv local 2.5.4
作業用ディレクトリに.ruby-versionが作成される。
terminal
$ ls .ruby-version
.ruby-version
Gemfileを作成する。
terminal
$ bundle init
Writing new Gemfile to /*****/workspace_ruby/Gemfile
Gemfileを開き、gem "rails"のコメントアウトを削除する。
terminal
$ vi Gemfile
# frozen_string_literal: true

source "https://rubygems.org"

git_source(:github) {|repo_name| "https://github.com/#{repo_name}" }

# 下のコメントアウトを削除する。
gem "rails"
Railsをインストールする。
terminal
$ bundle install
バージョン確認
terminal
$ bundle exec rails -v
Rails 5.2.2.1
Railsアプリを作成
terminal
$ bundle exec rails new [アプリ名] -d mysql
-d オプションでDBを設定することで生成されるアプリケーションの接続先DBが設定される。
terminal
$ bundle exec rails new app -d mysql

... (略) ...

* bin/rails: spring inserted
DBの作成
rakeコマンドでアプリケーションが監視するDBを作成する。
terminal
$ cd app/
$ rake db:create

... (略) ...

Created database 'app_development'
Created database 'app_test'
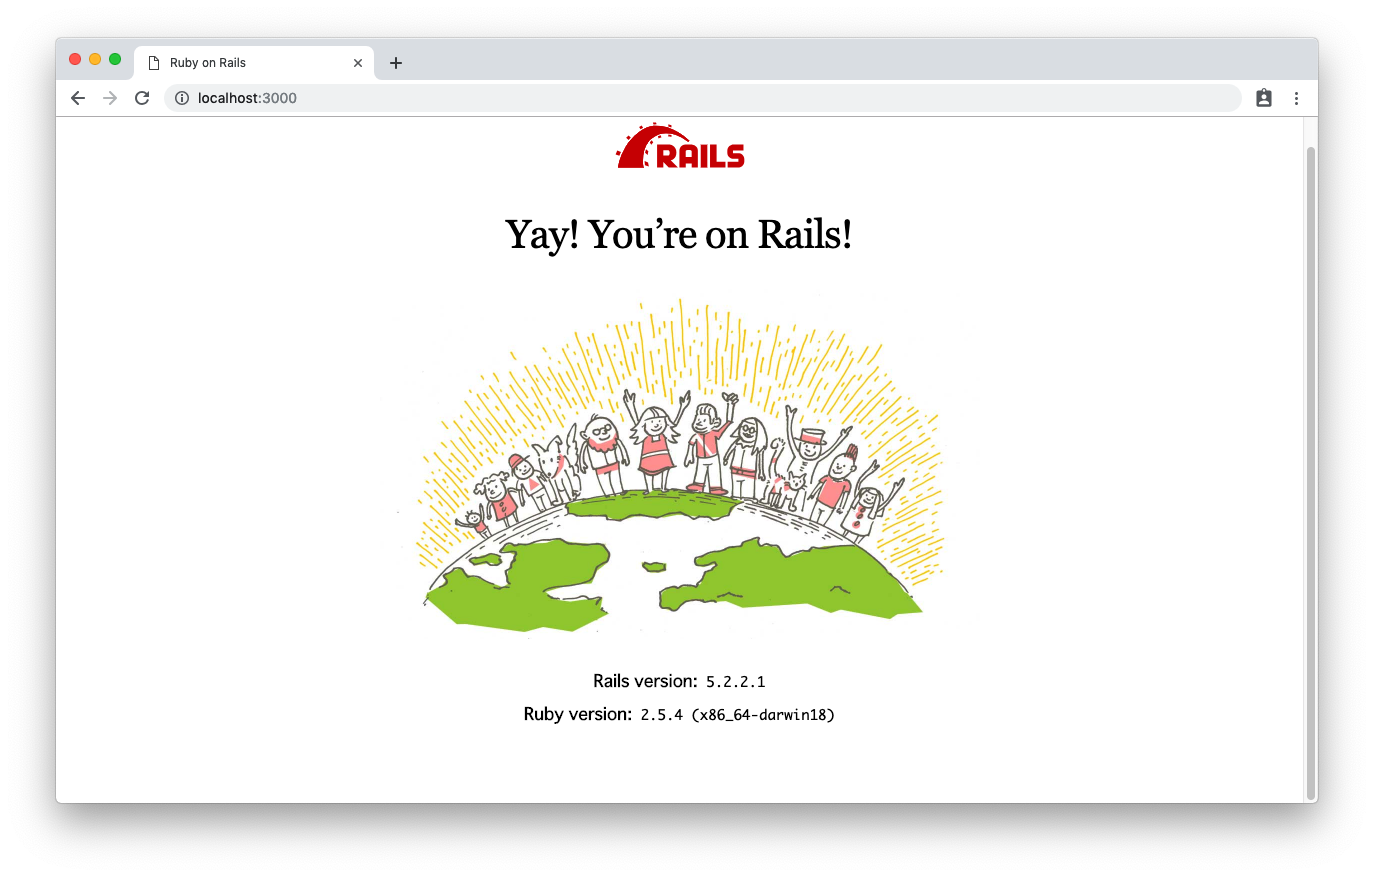
Railsサーバの起動
Railsサーバを起動できることを確認
terminal
$ rails s
=> Booting Puma
=> Rails 5.2.2.1 application starting in development
=> Run `rails server -h` for more startup options
Puma starting in single mode...
* Version 3.12.0 (ruby 2.5.4-p155), codename: Llamas in Pajamas
* Min threads: 5, max threads: 5
* Environment: development
* Listening on tcp://0.0.0.0:3000
http://localhost:3000へアクセスすると