
【Next.js × TypeScript】Todoアプリのフロントエンドをゼロから理解する(2/3)
この記事は、Todoリストアプリのフロントエンド実装を初心者の視点で解説するシリーズの2つ目です。
バックエンド編(1/3)を先に読むと理解がスムーズです。インフラについては次の記事で解説します。
シリーズ記事: 1/3 バックエンド編 | 2/3 フロントエンド編(この記事) | 3/3 インフラ編
ソースコード: github.com/tseno/todo-fullstack
この記事でわかること
- Next.js(App Router)+ TypeScript で画面を作る基本的な流れ
- コンポーネントの分割と、親子間のデータの流れ
-
fetchAPI でバックエンドと通信する方法 - Cognito を使った OAuth2 PKCE ログインの仕組み
-
useState/useEffect/useCallbackの使いどころ
技術スタック
| 技術 | 役割 |
|---|---|
| Next.js | Reactベースのフレームワーク(App Router) |
| React | UIライブラリ |
| TypeScript | 型付きJavaScript |
| Tailwind CSS | スタイリング |
| Amazon Cognito | ログイン画面とトークン発行 |
プロジェクト構成
frontend/
├── app/
│   ├── layout.tsx         # ルートレイアウト(HTMLの外枠)
│   ├── page.tsx           # メインページ(アプリ全体)
│   ├── todo.ts            # Todo型の定義
│   ├── todo-form.tsx      # Todo作成フォーム
│   ├── update-form.tsx    # Todo編集フォーム
│   ├── delete-button.tsx  # 削除ボタン
│   ├── login-button.tsx   # ログインボタン
│   ├── logout-button.tsx  # ログアウトボタン
│   └── globals.css        # グローバルCSS
├── lib/
│   ├── api.ts             # バックエンドへのHTTPリクエスト
│   └── cognito.ts         # Cognito認証の実装
└── next.config.ts         # Next.jsの設定
1. アプリ全体の構造
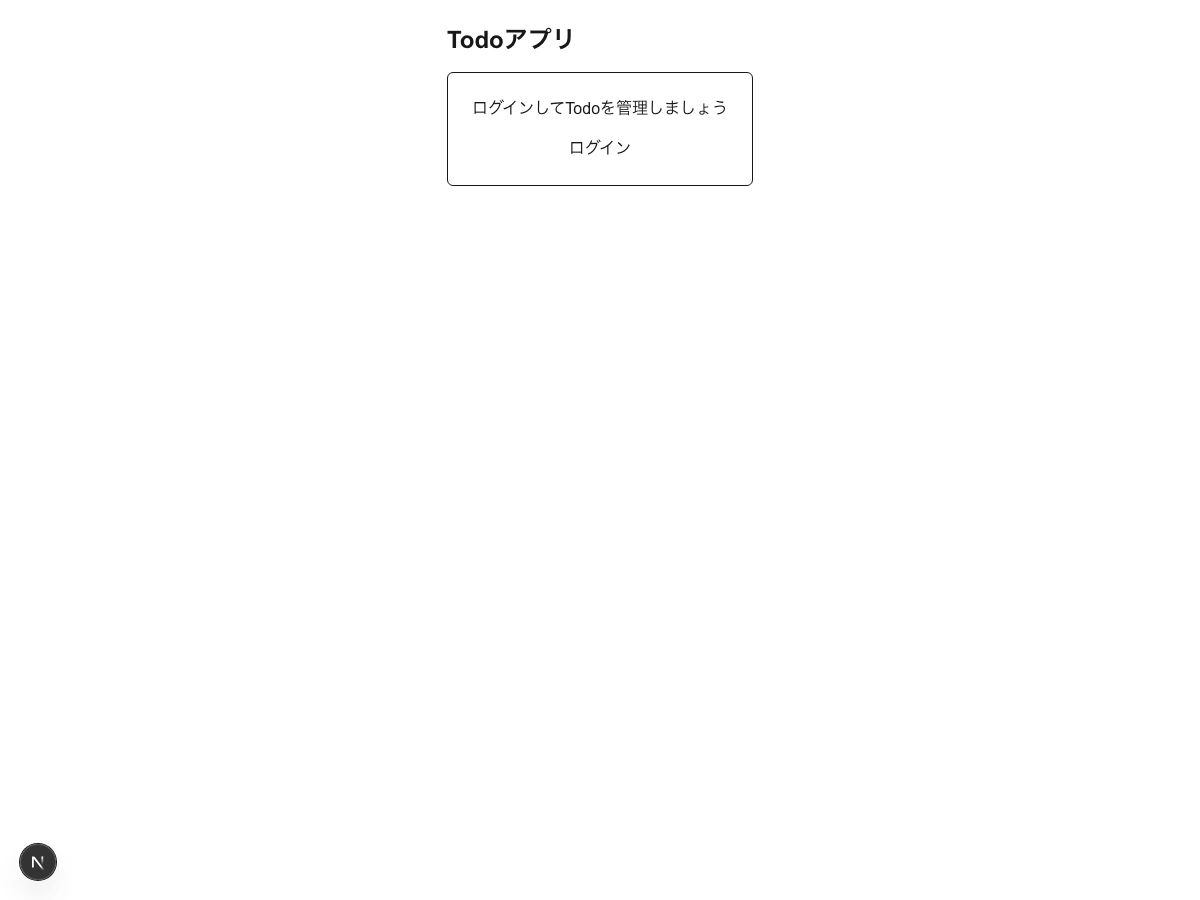
このアプリの画面はこれだけです。未ログインのときは「ログイン」ボタンだけが表示され、クリックするとCognitoのHosted UIへリダイレクトします。
layout.tsx(ルートレイアウト)
すべてのページを包む「外枠」です。HTMLの <html> と <body> を定義します。
export default function RootLayout({ children }: LayoutProps<"/">) {
  return (
    <html lang="ja" className="h-full antialiased">
      <body className="min-h-full flex flex-col">{children}</body>
    </html>
  );
}
layout.tsx には "use client" が付いていません。つまり サーバーコンポーネント です。フォント読み込みやメタデータ(ページタイトル)など、ブラウザで動かす必要のない処理を担当します。
コンポーネントの階層
RootLayout (layout.tsx)
  └── Page (page.tsx)
        ├── LoginButton   (未ログイン時に表示)
        ├── LogoutButton  (ログイン時に表示)
        ├── TodoForm      (新規作成フォーム)
        └── Todo一覧
              └── Todo 1件ごと
                    ├── チェックボックス(完了の切り替え)
                    ├── UpdateForm(編集フォーム)
                    └── DeleteButton(削除ボタン)
このアプリは 1ページだけ です。ルーティングはなく、/ にすべてのUIがあります。
2. 型定義(todo.ts)
まず、Todoの形をTypeScriptで定義します。
export interface Todo {
  id: number;
  title: string;
  description: string | null;
  dueDate: string | null;
  priority: string;
  completed: boolean;
}
バックエンドの TodoResponse と対応しています。
string | null とは
TypeScriptでは | で「どちらかの型」を表します。description は「文字列 または null」という意味で、値が入っていない状態を null で表現します。
バックエンド側の String?(Kotlin)と同じ考え方です。
3. APIクライアント(lib/api.ts)
バックエンドとの通信を1ファイルにまとめています。使うのは標準の fetch です(axiosなどは使いません)。
認証ヘッダーの付与
const API_BASE = process.env.NEXT_PUBLIC_API_BASE_URL ?? "";

function authHeaders(): HeadersInit {
  const token = localStorage.getItem("access_token");
  return {
    "Content-Type": "application/json",
    ...(token !== null ? { Authorization: `Bearer ${token}` } : {}),
  };
}
-
API_BASEが空文字なら 同一オリジン(本番ではCloudFrontが/apiをバックエンドに転送) -
localStorageからトークンを取り出し、Authorization: Bearer <token>を付ける - これがバックエンドの JWT 認証に対応します
4つの関数
| 関数 | メソッド | エンドポイント | 用途 |
|---|---|---|---|
fetchTodos() |
GET | /api/todos |
一覧取得 |
createTodo(input) |
POST | /api/todos |
作成 |
updateTodo(id, input) |
PUT | /api/todos/:id |
更新 |
deleteTodo(id) |
DELETE | /api/todos/:id |
削除 |
export async function fetchTodos(): Promise<Todo[] | null> {
  try {
    const res = await fetch(`${API_BASE}/api/todos`, { headers: authHeaders() });
    if (!res.ok) return null;
    return (await res.json()) as Todo[];
  } catch (e) {
    console.error("Todo一覧の取得に失敗しました", e);
    return null;
  }
}
エラー時に null を返す設計
すべての関数は try/catch で囲み、失敗時は null を返します。
呼び出し側は null を「未ログイン(またはトークン切れ)」の合図として扱います。
const data = await apiFetchTodos();
if (data === null) {
  setIsLoggedIn(false);   // 未ログイン扱い
  return;
}
例外を投げずに null を返すことで、呼び出し側の分岐がシンプルになります。
4. 状態管理(page.tsx)
このアプリの中心です。状態管理ライブラリ(Reduxなど)は使わず、useState だけで完結しています。
export default function Page() {
    // 静的エクスポートでは useSearchParams を使うコンポーネントをSuspenseで包む必要がある
    return (
        <Suspense fallback={<main className="p-6">読み込み中...</main>}>
            <Home />
        </Suspense>
    );
}
useSearchParams() を使うため、Suspense で包む必要があります(静的エクスポートの制約)。
中心となる状態は2つ
function Home() {
    const [todos, setTodos] = useState<Todo[]>([]);
    const [isLoggedIn, setIsLoggedIn] = useState<boolean>(false);
| 状態 | 型 | 役割 |
|---|---|---|
todos |
Todo[] |
表示するTodoの一覧 |
isLoggedIn |
boolean |
ログイン済みかどうか |
この2つが中心です。Todoの件数、完了数、ソート順などはすべて todos から計算できます(これに加えて、編集中のTodoを管理する状態が1つあります →後述)。
データ取得の関数と useCallback
const fetchTodos = useCallback(async () => {
    const data = await apiFetchTodos();
    if (data === null) {
        setIsLoggedIn(false);
        setTodos([]);
        return;
    }
    setTodos(data);
    setIsLoggedIn(true);
}, []);
なぜ useCallback を使うのか
Reactでは、再レンダリングのたびに関数が作り直されます。中身が同じでも、別の関数オブジェクトとして扱われます。
const fetchTodos = async () => { ... }; // 毎回「別物」になる
useCallback を使うと、依存が変わらない限り 同じ関数を使い回します。
const fetchTodos = useCallback(async () => { ... }, []); // 参照が変わらない
理由は、この関数を useEffect の依存配列に入れているからです。useCallback がないと参照が毎回変わり、useEffect が毎回実行されて無限ループになります。
① 関数が作り直される → ② useEffect が「依存が変わった」と判断して実行
→ ③ setTodos で状態更新 → ④ 再レンダリング → ①へ戻る(無限ループ)
useEffect と依存配列
useEffect(() => {
    if (!code) {
        // 通常表示: トークンがあればTodo一覧を取りに行く
        if (localStorage.getItem("access_token")) {
            fetchTodos();
        }
        return;
    }
    // Cognitoからのリダイレクト: 認可コードをトークンに交換してから一覧を取得する
    async function login() {
        const token = await exchangeCodeForToken(code!, state ?? "");
        if (token !== null) {
            await fetchTodos();
        }
        // URLのクエリパラメータを削除する
        router.replace("/");
    }
    login();
}, [code, state, fetchTodos, router]);
この useEffect は2つの役割を兼ねています。
| 状況 | 処理 |
|---|---|
URLに code がない(通常表示) |
トークンがあれば一覧を取得 |
URLに code がある(Cognitoから戻ってきた) |
トークン交換 → 一覧取得 → URLをきれいにする |
依存配列には「使った値」を全部書く
useEffect の中で使っている値は、すべて依存配列に書くのがReactのルールです。
}, [code, state, fetchTodos, router]);
effect は作られた時点の値を閉じ込める(クロージャ) ため、依存を書かないと古い値を使い続けてしまう可能性があります。これを stale closure(古いクロージャ) と呼びます。
今回 fetchTodos は useCallback(..., []) なので参照が変わらず、実質的な依存は [code, state, router] です。それでも書くことで、将来 fetchTodos に依存が増えたときに正しく動きます。
完了状態の切り替え
async function toggleCompleted(todo: Todo) {
    await updateTodo(todo.id, {
        title: todo.title,
        description: todo.description,
        dueDate: todo.dueDate,
        priority: todo.priority,
        completed: !todo.completed,   // 反転させる
    });
    fetchTodos();   // 更新後に一覧を取り直す
}
バックエンドの更新APIは Todo全体を送る方式(部分更新ではない)なので、チェックを付けるだけでも全フィールドを送ります。
編集対象の管理
const [editingTodoId, setEditingTodoId] = useState<number | null>(null);
「今どのTodoを編集中か」を id で管理します。null なら編集中のTodoはありません。
5. フォームコンポーネント
todo-form.tsx(新規作成)
export default function TodoForm({ onTodoChanged }: { onTodoChanged: () => void }) {
    const [title, setTitle] = useState("");
    const [description, setDescription] = useState("");
    const [dueDate, setDueDate] = useState("");
    const [priority, setPriority] = useState("MEDIUM");

    async function handleSubmit(event: React.FormEvent<HTMLFormElement>) {
        event.preventDefault();

        await createTodo({
            title,
            description: description === "" ? null : description,
            dueDate: dueDate === "" ? null : dueDate,
            priority,
            completed: false,
        });

        setTitle("");
        setDescription("");
        setDueDate("");
        setPriority("MEDIUM");
        onTodoChanged();   // 親に通知して一覧を取り直す
    }
- 各入力欄を
useStateで管理(制御コンポーネント) -
event.preventDefault()でブラウザ標準のフォーム送信を止める - 空文字は
nullに変換して送る(バックエンドのString?に合わせる) - 送信後はフォームをリセットし、
onTodoChanged()で親に再取得を依頼
update-form.tsx(編集)
export default function UpdateForm({
    todo,
    onSaved,
    onCancel,
}: {
    todo: Todo;
    onSaved: () => void;
    onCancel: () => void;
}) {
    const [title, setTitle] = useState(todo.title);
    const [description, setDescription] = useState(todo.description ?? "");
    const [dueDate, setDueDate] = useState(todo.dueDate ?? "");
    const [priority, setPriority] = useState(todo.priority);

    async function handleSubmit(event: React.FormEvent<HTMLFormElement>) {
        event.preventDefault();

        await updateTodo(todo.id, {
            title,
            description: description === "" ? null : description,
            dueDate: dueDate === "" ? null : dueDate,
            priority,
            completed: todo.completed,
        });
        onSaved();
    }
受け取ったTodoの値を初期値にするのがポイントです。
const [title, setTitle] = useState(todo.title); // 既存の値から始まる
?? は「左辺が null/undefined なら右辺を使う」という演算子です。todo.description ?? "" で「null なら空文字」に変換しています。
保存時は onSaved()、キャンセル時は onCancel() を呼び、どちらも親が editingTodoId を null に戻します。
delete-button.tsx(削除)
export default function DeleteButton({ id, onTodoChanged }: { id: number; onTodoChanged: () => void }) {
    async function handleDelete() {
        await deleteTodo(id);
        onTodoChanged();
    }
    return (
        <button onClick={handleDelete} className="rounded border border-red-300 px-2 py-0.5 text-sm text-red-600">
            削除
        </button>
    );
}
子から親への通知パターン
3つのフォームに共通するのが、「何か変更したら親に知らせる」 という設計です。
子コンポーネント → onTodoChanged() を呼ぶ → 親が fetchTodos() を実行
子はAPIを呼ぶだけで、「一覧をどう更新するか」は親が決めます。状態を持つのは親だけというルールです。
6. 認証(lib/cognito.ts)
Cognito Hosted UI を使った OAuth2 認可コードフロー + PKCE を自前で実装しています。SDKは使いません。
PKCE とは
Proof Key for Code Exchange の略で、公開クライアント(SPAなど、秘密鍵を安全に保てないアプリ)のための認可コード保護の仕組みです。
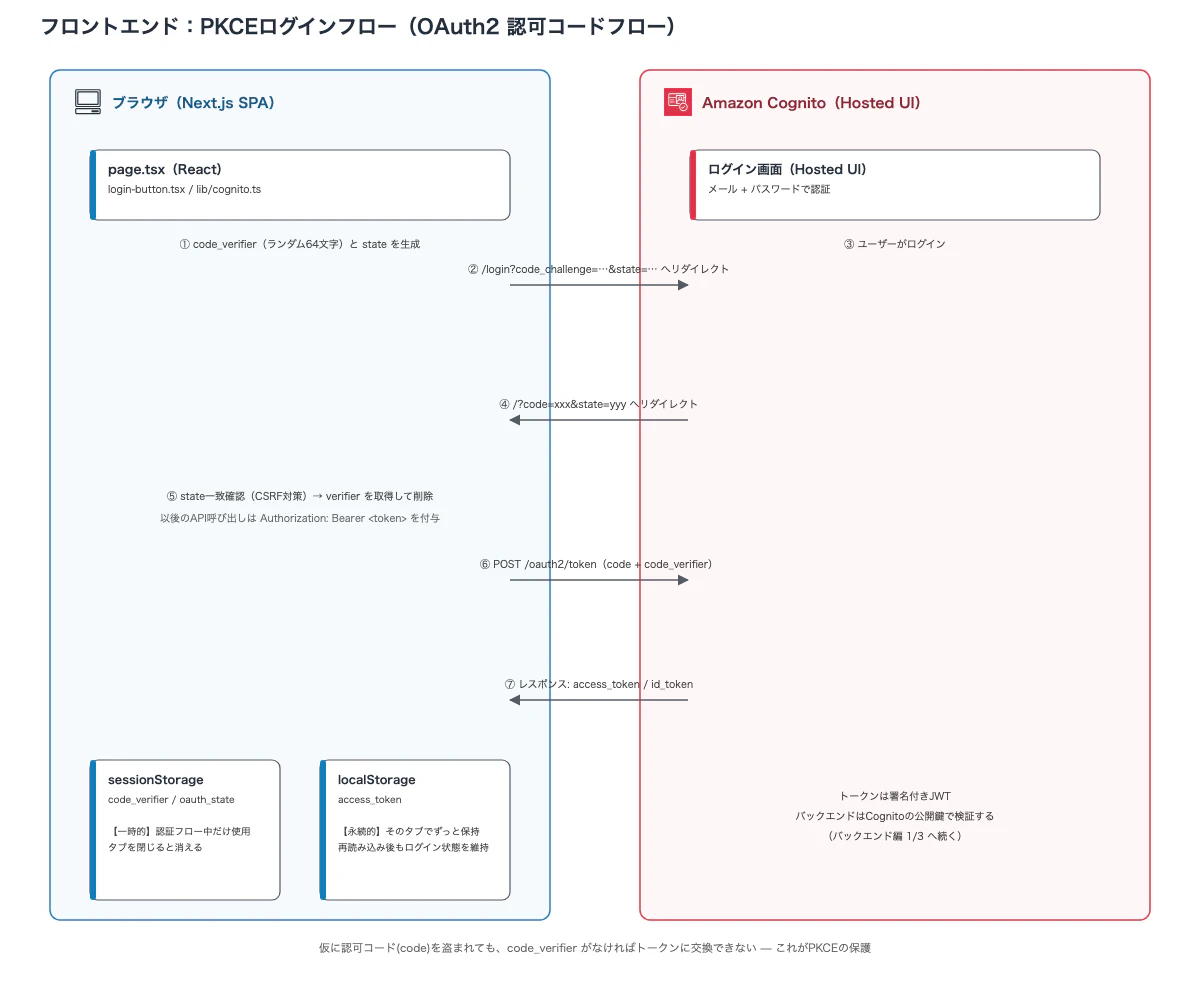
仮に code を盗まれても、code_verifier がなければトークンに交換できない、という仕組みです。
ログイン(redirectToLogin)
export async function redirectToLogin(): Promise<void> {
  if (!isConfigured()) return;

  const verifier = randomString(64);
  const state = randomString(16);
  sessionStorage.setItem("code_verifier", verifier);
  sessionStorage.setItem("oauth_state", state);

  const challenge = await createCodeChallenge(verifier);
  const params = new URLSearchParams({
    client_id: COGNITO_CLIENT_ID,
    response_type: "code",
    scope: "openid email profile",
    redirect_uri: window.location.origin,
    code_challenge: challenge,
    code_challenge_method: "S256",
    state,
  });
  window.location.href = `https://${COGNITO_DOMAIN}/login?${params}`;
}
-
code_verifierとstateを sessionStorage に保存 -
stateは CSRF対策(後で一致を確認する) - Cognitoのログイン画面へリダイレクト
コールバック(exchangeCodeForToken)
export async function exchangeCodeForToken(code: string, state: string): Promise<string | null> {
  if (!isConfigured()) return null;

  const storedState = sessionStorage.getItem("oauth_state");
  const verifier = sessionStorage.getItem("code_verifier");
  sessionStorage.removeItem("oauth_state");
  sessionStorage.removeItem("code_verifier");

  if (verifier === null || storedState === null) return null;

  // stateが一致しない場合は不正なリダイレクトの可能性があるため中止(CSRF対策)
  if (storedState !== state) {
    console.error("stateが一致しないためトークン交換を中止しました");
    return null;
  }

  const res = await fetch(`https://${COGNITO_DOMAIN}/oauth2/token`, {
    method: "POST",
    headers: { "Content-Type": "application/x-www-form-urlencoded" },
    body: new URLSearchParams({
      grant_type: "authorization_code",
      client_id: COGNITO_CLIENT_ID,
      code,
      redirect_uri: window.location.origin,
      code_verifier: verifier,
    }),
  });
  if (!res.ok) {
    console.error("トークン交換に失敗しました", await res.text());
    return null;
  }
  const data = await res.json();
  localStorage.setItem("access_token", data.access_token);
  return data.access_token as string;
}
保存した値を読んだ時点で削除するのがポイントです。認可コードは1回しか交換できないため、React StrictModeなどで二重に呼ばれても2回目は静かに止まります。
トークンの保存先
| 保存先 | 保存するもの | 理由 |
|---|---|---|
sessionStorage |
code_verifier, oauth_state
|
認証フロー中の一時的な値 |
localStorage |
access_token |
ページ再読み込み後もログイン状態を保つ |
使い分けの基準は「その値をいつまで残すべきか」 です。
-
sessionStorage(一時的): タブを閉じると消える。code_verifierやstateはログインの1回の流れでしか使わない値なので、これが最適。読んだ時点で削除することで、二重実行や再利用も防いでいる -
localStorage(永続的): タブを開いている間ずっと残る。ページを再読み込みしてもログイン状態を維持したいaccess_tokenの保存先として使う
「認証が終わったら消えてほしい値」は sessionStorage、「ログイン状態として保持したい値」は localStorage に入れる、と覚えると分かりやすいです。
ログアウト(redirectToLogout)
export function redirectToLogout(): void {
  localStorage.removeItem("access_token");
  if (!isConfigured()) return;

  const params = new URLSearchParams({
    client_id: COGNITO_CLIENT_ID,
    logout_uri: window.location.origin,
  });
  window.location.href = `https://${COGNITO_DOMAIN}/logout?${params}`;
}
ローカルのトークンを消し、Cognito側のセッションも破棄します。
7. スタイリング(Tailwind CSS)
CSSファイルにスタイルを書かず、JSXにクラス名を直接書く方式です。
<button className="rounded bg-blue-600 px-3 py-1 text-white">
    追加
</button>
| クラス | 意味 |
|---|---|
rounded |
角を丸くする |
bg-blue-600 |
背景を青にする |
px-3 py-1 |
左右に余白3、上下に余白1 |
text-white |
文字を白にする |
CSSを別ファイルで管理する必要がなく、コンポーネントを見れば見た目がわかるのが特徴です。
完了したTodoの打ち消し線も、条件分岐でクラスを切り替えています。
<p className={todo.completed ? "font-medium line-through text-gray-400" : "font-medium"}>
    {todo.title}
</p>
8. データの流れ
最後に、Todoを1つ追加したときの流れをまとめます。

変更のたびに全件を取り直す
このアプリは 「変更 → 全件再取得」 というシンプルな方式です。
追加したら → 一覧を全件取り直す
更新したら → 一覧を全件取り直す
削除したら → 一覧を全件取り直す
無駄な通信に見えますが、「画面は常にサーバーの状態と一致する」 という保証が得られます。小さいアプリでは十分実用的です。
(実務では TanStack Query などを使ってキャッシュや楽観的更新を行うことが多いです。)
まとめ
- layout.tsx: HTMLの外枠。サーバーコンポーネント
-
page.tsx: アプリの中心。状態は最小限(
todos/isLoggedIn/editingTodoId) - todo.ts: バックエンドのレスポンスに対応する型定義
-
lib/api.ts:
fetch+BearerトークンでAPIを呼ぶ層 -
子コンポーネント: 変更したら親に通知するだけ(
onTodoChanged/onSaved/onCancel) -
lib/cognito.ts: PKCE を自前実装。
localStorageにトークンを保存 - useCallback / useEffect: 依存配列を正しく書かないと無限ループになる
バックエンド編と合わせて読むと、「画面 → HTTP → Spring Security → DB」 の全体像が見えてきます。
次の記事では、Terraform と AWS によるインフラ構成を解説します。
シリーズ記事
- [1/3] Spring Boot × Kotlin バックエンド編
- [2/3] Next.js フロントエンド編(この記事)
- [3/3] Terraform × AWS インフラ編