この記事は、湯婆婆 Advent Calendar 2020の3日目です。
前日は、@h-takaumaさんのDialogflowで湯婆婆を実装してみるでした。
はじめに
- ひょんなことからAzureをはじめました
- PhoenixアプリをAzure コンテナーサービスで動かしてみます
- 動機はタイトルにおもいをこめました
- Phoenixアプリはなにでもいいのですが、Phoenixで湯婆婆を実装してみるなんてどうかなあー、と
- 以下、TORIFUKUKaiou/yubabaプロジェクトで説明します
- このプロジェクトはこの記事で説明している下記の変更は、すでに行っております
完成品
-
https://yubaba.torifuku-kaiou.tokyo/yubabaこの記事で紹介している方法で構築していますAzure Application Gatewayを使っていますAzure Application Gatewayが700円/日ほどかかるようなので課金状況みて止めるかもしれません↓↓↓へ転送します- 転送も止めました
-
https://yubaba-vm.torifuku-kaiou.tokyo/yubaba-
Azure VMで動かしています
- 止めました
-
Docker
- ほぼほぼ、Deploying with Releasesに書いてある通りのことをやります
-
config/prod.secret.exsをconfig/releases.exsにリネーム -
config/releases.exsの先頭のほうにあるuse Mix.Configをimport Configに書き換える
- よくみて書き換えてね
-
config/prod.exsの中でimport_config "prod.secret.exs"を呼び出しているところはもはやいらないので消す -
config/releases.exsに、config :yubaba, YubabaWeb.Endpoint, server: trueを足す -
config/prod.exsのurl:のところを変更する -
lib/yubaba/release.exをつくる -
Dockerfile、entrypoint.shファイルを作る-
Dockerfileはサンプルがあるのでほぼそのまま写します - Release a Phoenix application with docker and Postgresを参考にしていい感じに少し変えています
-
config/prod.exs
config/prod.exs
@@ -10,7 +10,7 @@ use Mix.Config
 # which you should run after static files are built and
 # before starting your production server.
 config :yubaba, YubabaWeb.Endpoint,
-  url: [host: "example.com", port: 80],
+  url: [host: "yubaba.torifuku-kaiou.tokyo", port: 443],
   cache_static_manifest: "priv/static/cache_manifest.json"

 # Finally import the config/prod.secret.exs which loads secrets
 # and configuration from environment variables.
-import_config "prod.secret.exs"
+# import_config "prod.secret.exs"
lib/yubaba/release.ex
lib/yubaba/release.ex
defmodule Yubaba.Release do
  @app :yubaba

  def migrate do
    load_app()

    for repo <- repos() do
      {:ok, _, _} = Ecto.Migrator.with_repo(repo, &Ecto.Migrator.run(&1, :up, all: true))
    end
  end

  def rollback(repo, version) do
    load_app()
    {:ok, _, _} = Ecto.Migrator.with_repo(repo, &Ecto.Migrator.run(&1, :down, to: version))
  end

  defp repos do
    Application.fetch_env!(@app, :ecto_repos)
  end

  defp load_app do
    Application.load(@app)
  end
end
Dockerfile
Dockerfile
FROM elixir:1.9.0-alpine AS build

# install build dependencies
RUN apk add --no-cache build-base npm git python

# prepare build dir
WORKDIR /app

# install hex + rebar
RUN mix local.hex --force && \
    mix local.rebar --force

# set build ENV
ENV MIX_ENV=prod

# install mix dependencies
COPY mix.exs mix.lock ./
COPY config config
RUN mix do deps.get, deps.compile

# build assets
COPY assets/package.json assets/package-lock.json ./assets/
RUN npm --prefix ./assets ci --progress=false --no-audit --loglevel=error

COPY priv priv
COPY assets assets
RUN npm run --prefix ./assets deploy
RUN mix phx.digest

# compile and build release
COPY lib lib
# uncomment COPY if rel/ exists
# COPY rel rel
RUN mix do compile, release

# prepare release image
FROM alpine:3.9 AS app
RUN apk add --no-cache openssl ncurses-libs bash

WORKDIR /app
COPY entrypoint.sh .

RUN chown nobody:nobody /app

USER nobody:nobody

COPY --from=build --chown=nobody:nobody /app/_build/prod/rel/yubaba ./

ENV HOME=/app

CMD ["bash", "/app/entrypoint.sh"]
entrypoint.sh
entrypoint.sh
# !/bin/bash

bin="/app/bin/yubaba"

eval "$bin eval \"Yubaba.Release.migrate\""
exec "$bin" "start"
Docker イメージを構築
- と準備が整ったところでDocker イメージを構築します
- Docker イメージとはコンテナの土台です と↑のリンク先に書いてあります
- 想像の翼を自由に広げて感じ取りましょう
$ chmod +x entrypoint.sh
$ mkdir -p priv/static
$ docker build -t yubaba .
- とりあえずローカルで動かしてみましょうか
-
mix phx.gen.secretの結果はここに書いてあるものとは異なりますので読み替えてください
$ mix phx.gen.secret
hogehogepekepekefoofooinoki123da

$ docker run -it --rm -p 5432:5432 -e POSTGRES_PASSWORD=postgres -e POSTGRES_DB=yubaba_dev postgres:9.6

$ docker run -it --rm -p 4000:4000 \
  -e DATABASE_URL=ecto://postgres:postgres@host.docker.internal/yubaba_dev -e SECRET_KEY_BASE="hogehogepekepekefoofooinoki123da" \
  yubaba
- visit: http://localhost:4000/yubaba
- ちゃんと動きましたか?
- 動かなかったら私の記述が足りていないところや誤りがあるかもしれないのでお気軽にお問い合わせください
- あー、
host.docker.internalはmacOSとWindowsでしか使えないのですかね - ここまででもだいぶ長くなりました
Azure コンテナーサービスで動かす
- ようやく本題です
-
Azure コンテナーサービスというのは、最初からDockerが使えるようになっているコンピュータがあって、ぽちぽちっとイメージや環境変数を指定したら勝手にいい感じに起動してくれるすぐれモノです
- 私のイメージを書いています
- 正しい定義は公式ページをご参照ください
完成品
概要
-
- まずは無料で始めるでアカウントをつくりましょう
-
- Azure Container Registryをつくってそこに上で作ったDockerイメージを置く(pushする)
-
- Azure コンテナーサービスでPostgreSQLを動かす
-
- Azure コンテナーサービスで湯婆婆アプリを動かす
-
- SSL証明書を取得して、
.pfx形式にする
- SSL証明書を取得して、
-
- Azure Application Gatewayと湯婆婆アプリを結びつける
-
- Azure Application GatewayのIPアドレスをAレコードとしてDNS設定する
1. Azure Container Registryをつくってそこに上で作ったDockerイメージを置く(pushする)
-
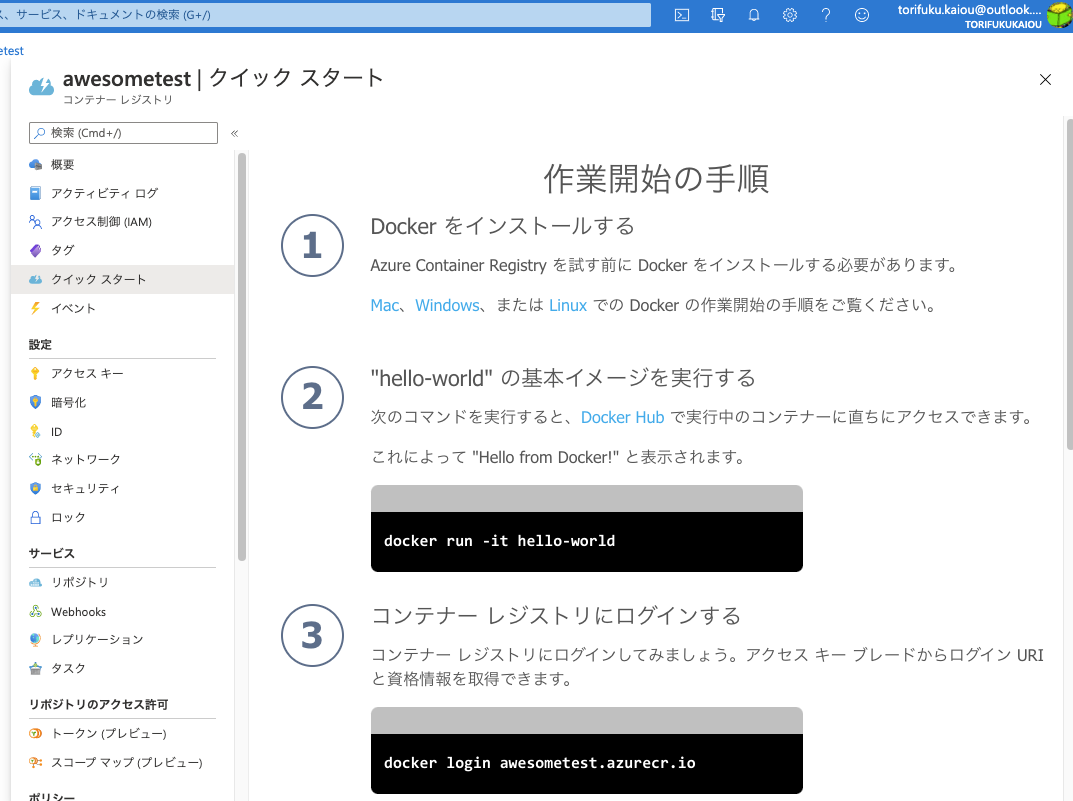
クイック スタート:Azure portal を使用して Azure コンテナー レジストリを作成するに従って、Docker イメージを置く場所を確保します
-
サブスクリプションとリソースグループは料金に関するアレなやつです - 感じてください
-
-
Azure Container Registryができあがったら、コンソールにあるクイックスタートに書いてあることを参考にしながらDockerイメージをプッシュします
-
docker login awesometest.azurecr.ioに使う情報は、↑左側のアクセスキーを押すとわかります
$ docker login awesometest.azurecr.io
$ docker tag yubaba awesometest.azurecr.io/yubaba
$ docker push awesometest.azurecr.io/yubaba
- これでDockerイメージがAzure Container Registryに置けたのであります


2. Azure コンテナーサービスでPostgreSQLを動かす
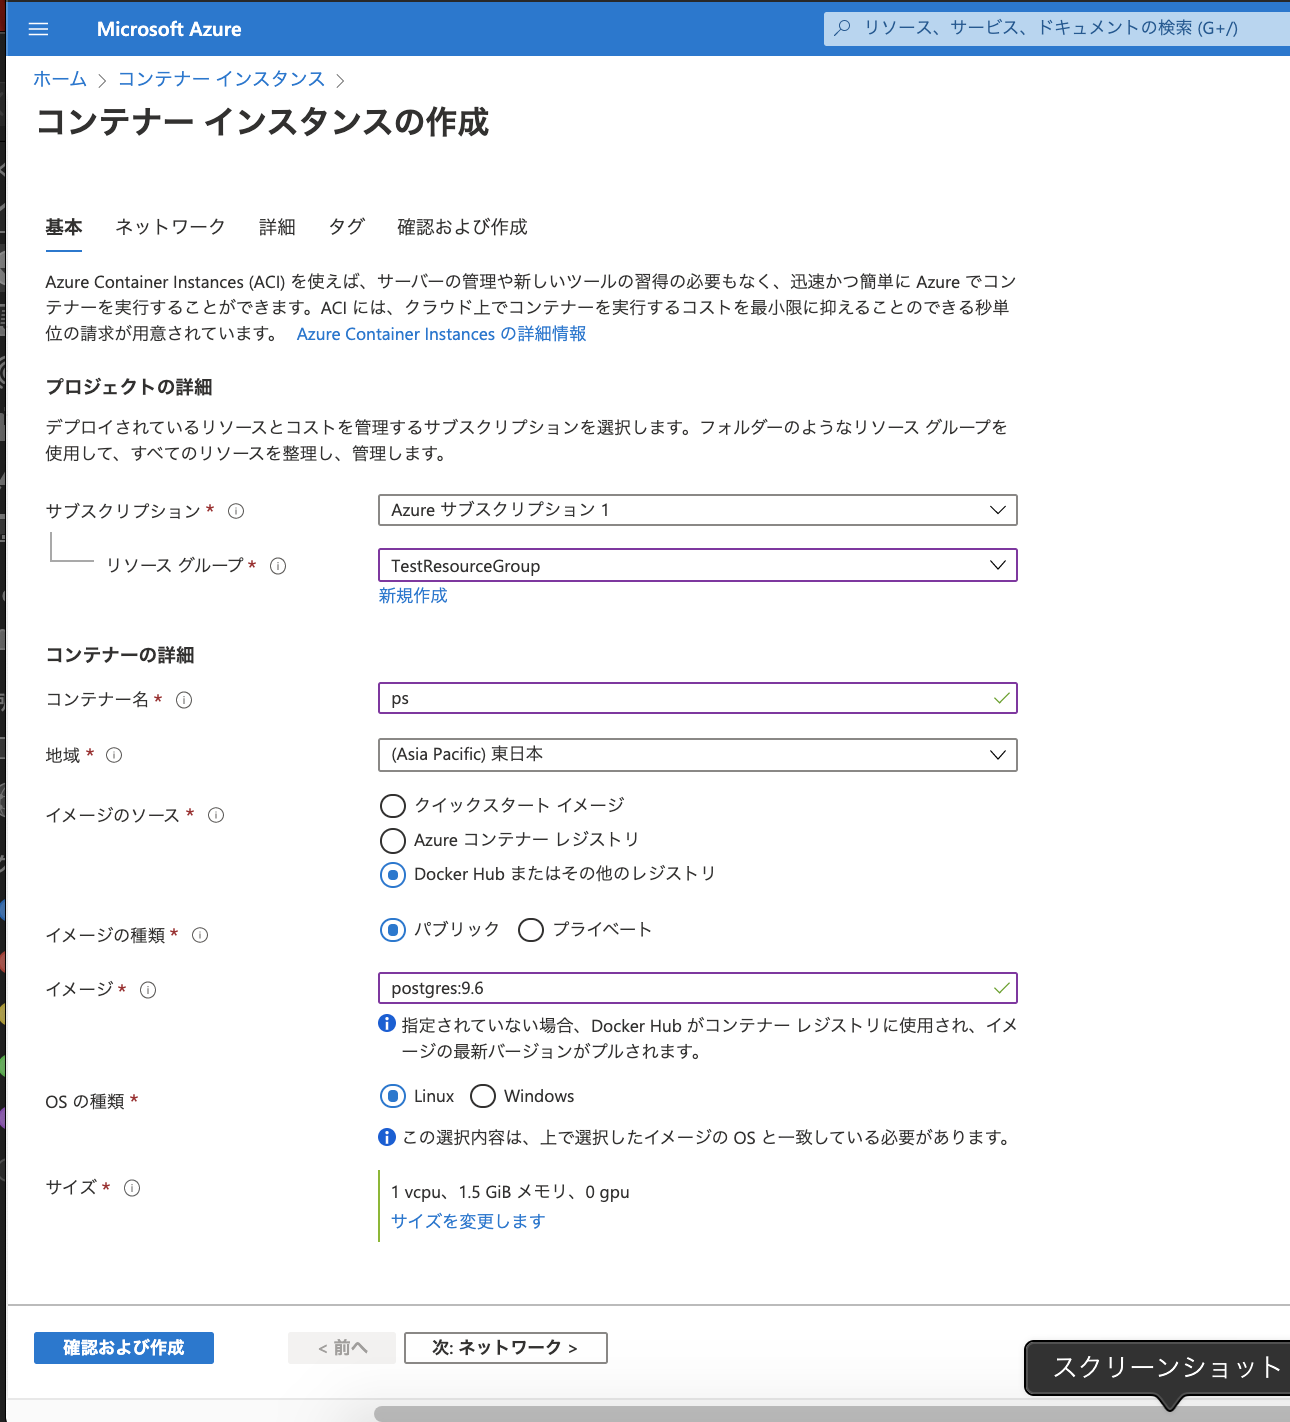
- 雰囲気、これなクイック スタート:Azure portal を使用してコンテナー インスタンスを Azure 内にデプロイする感じで進めます
- PostgreSQLはDocker Hubから頂戴します
-
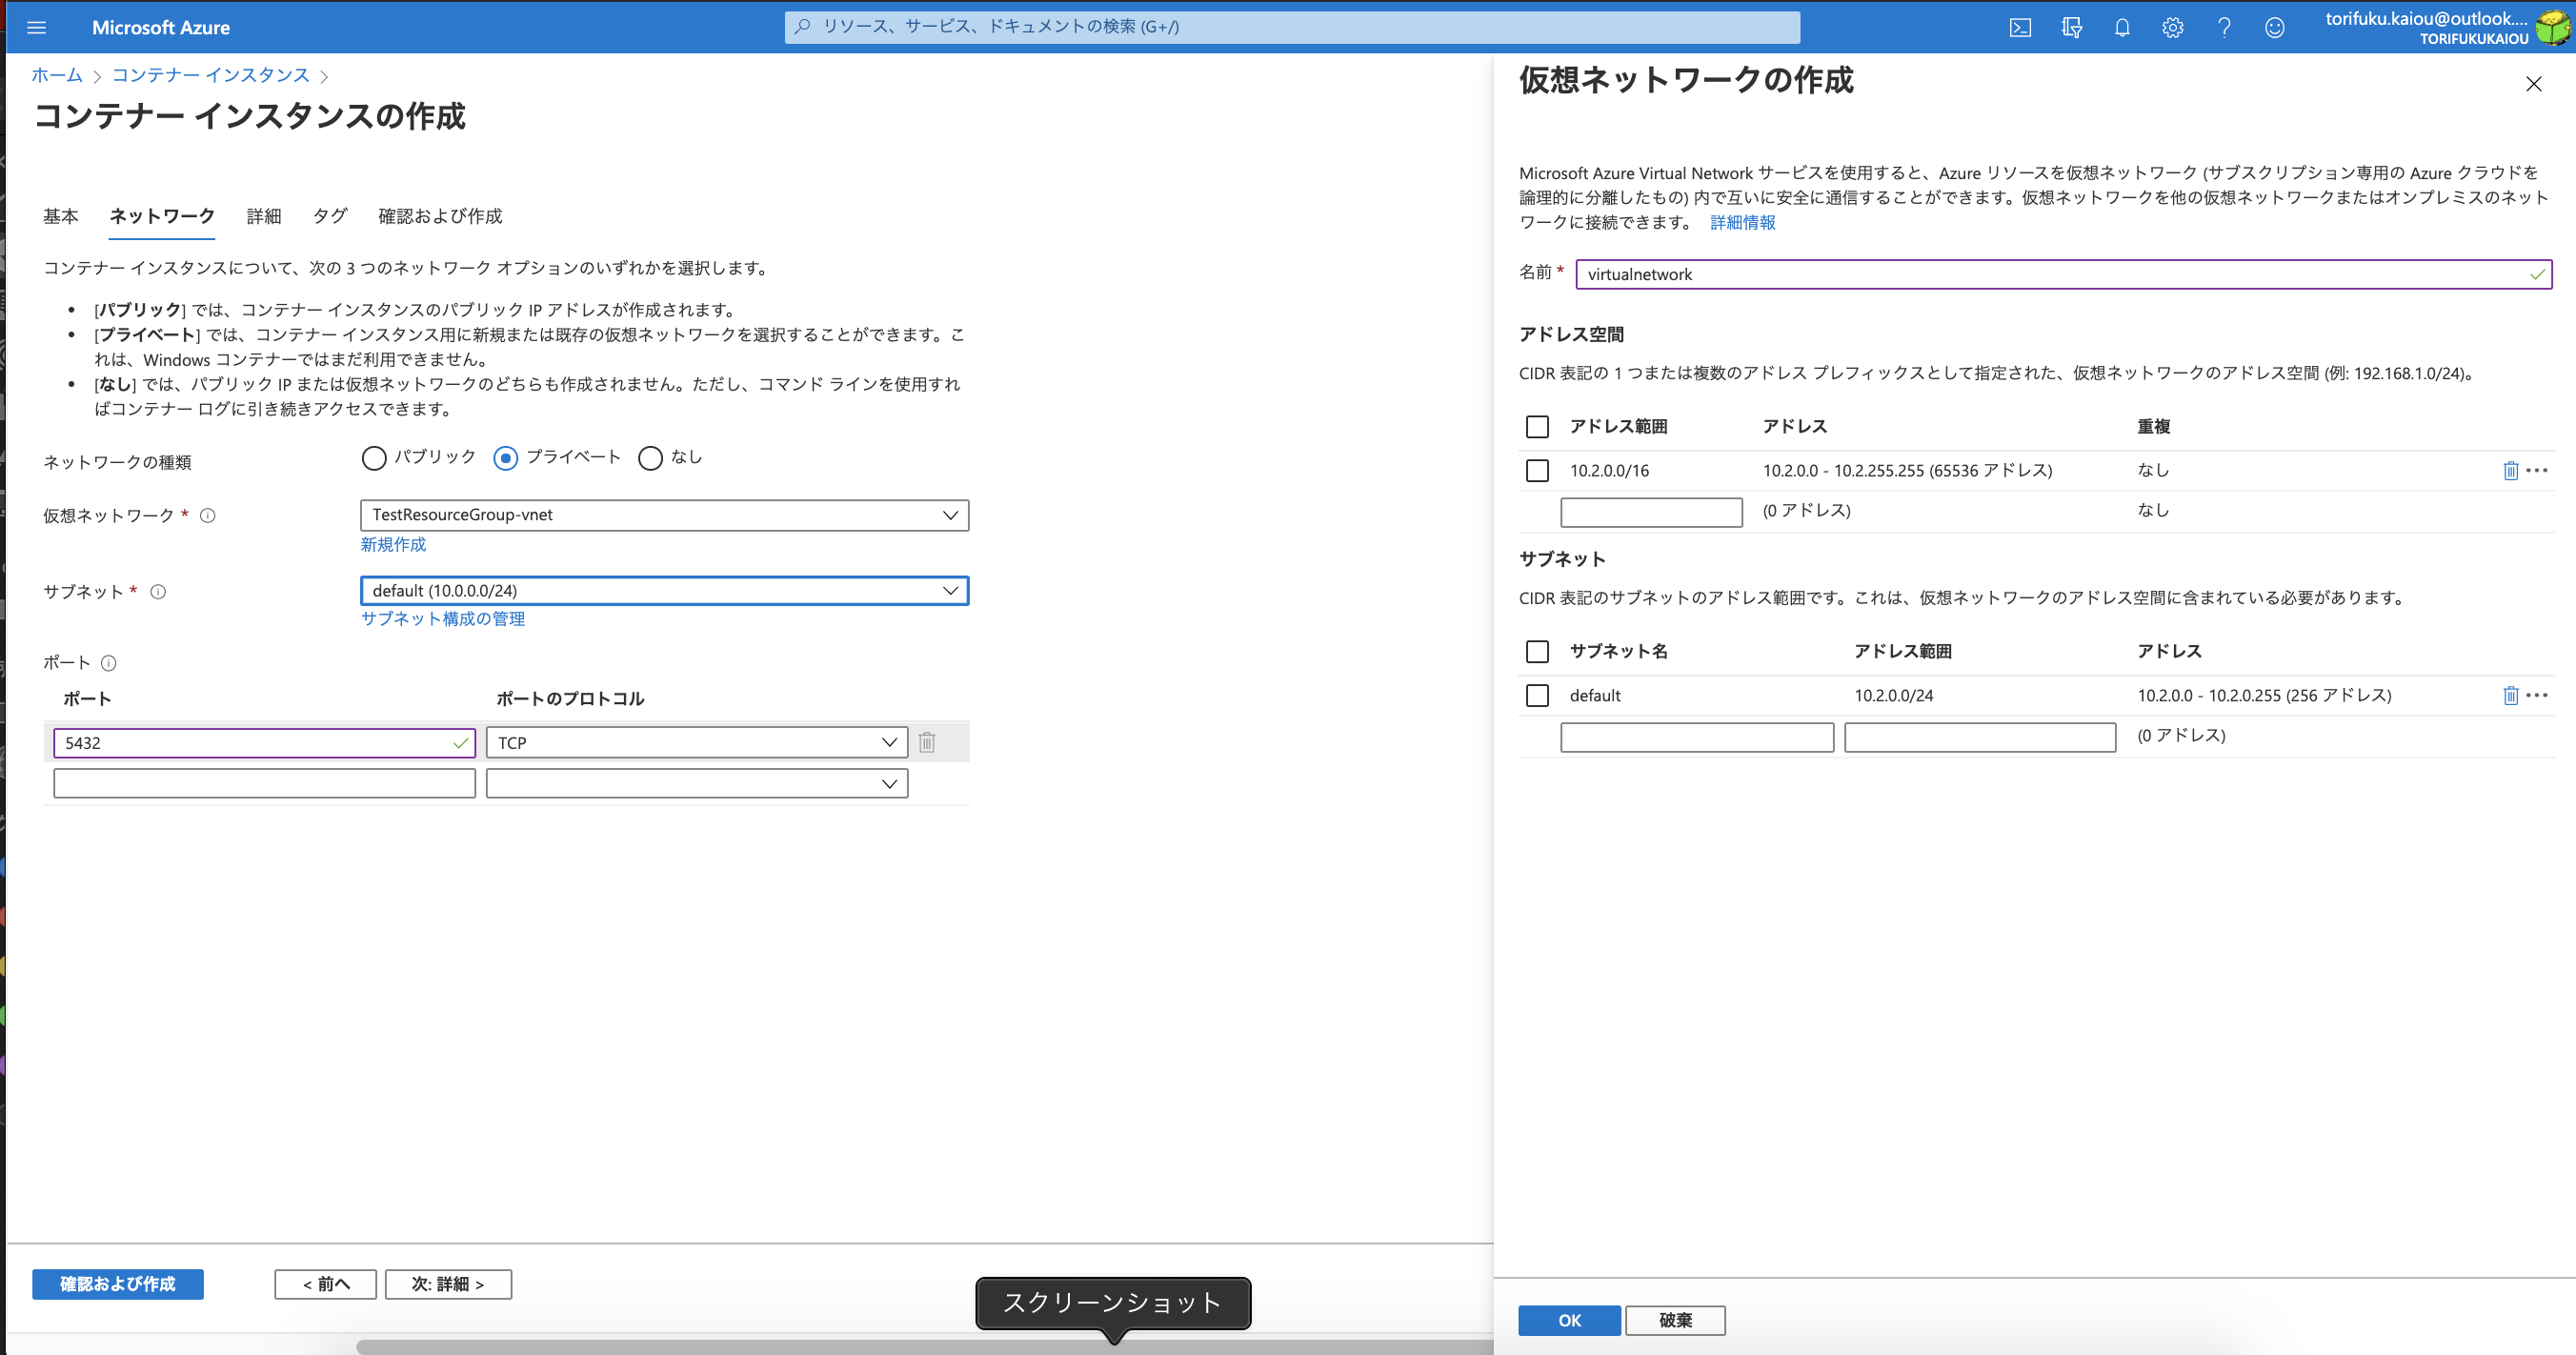
ネットワークの設定はプライベートにして、もしはじめてなら
仮想ネットワークは新規作成します(こだわりなければ名前だけつけておけばいいでしょう) -
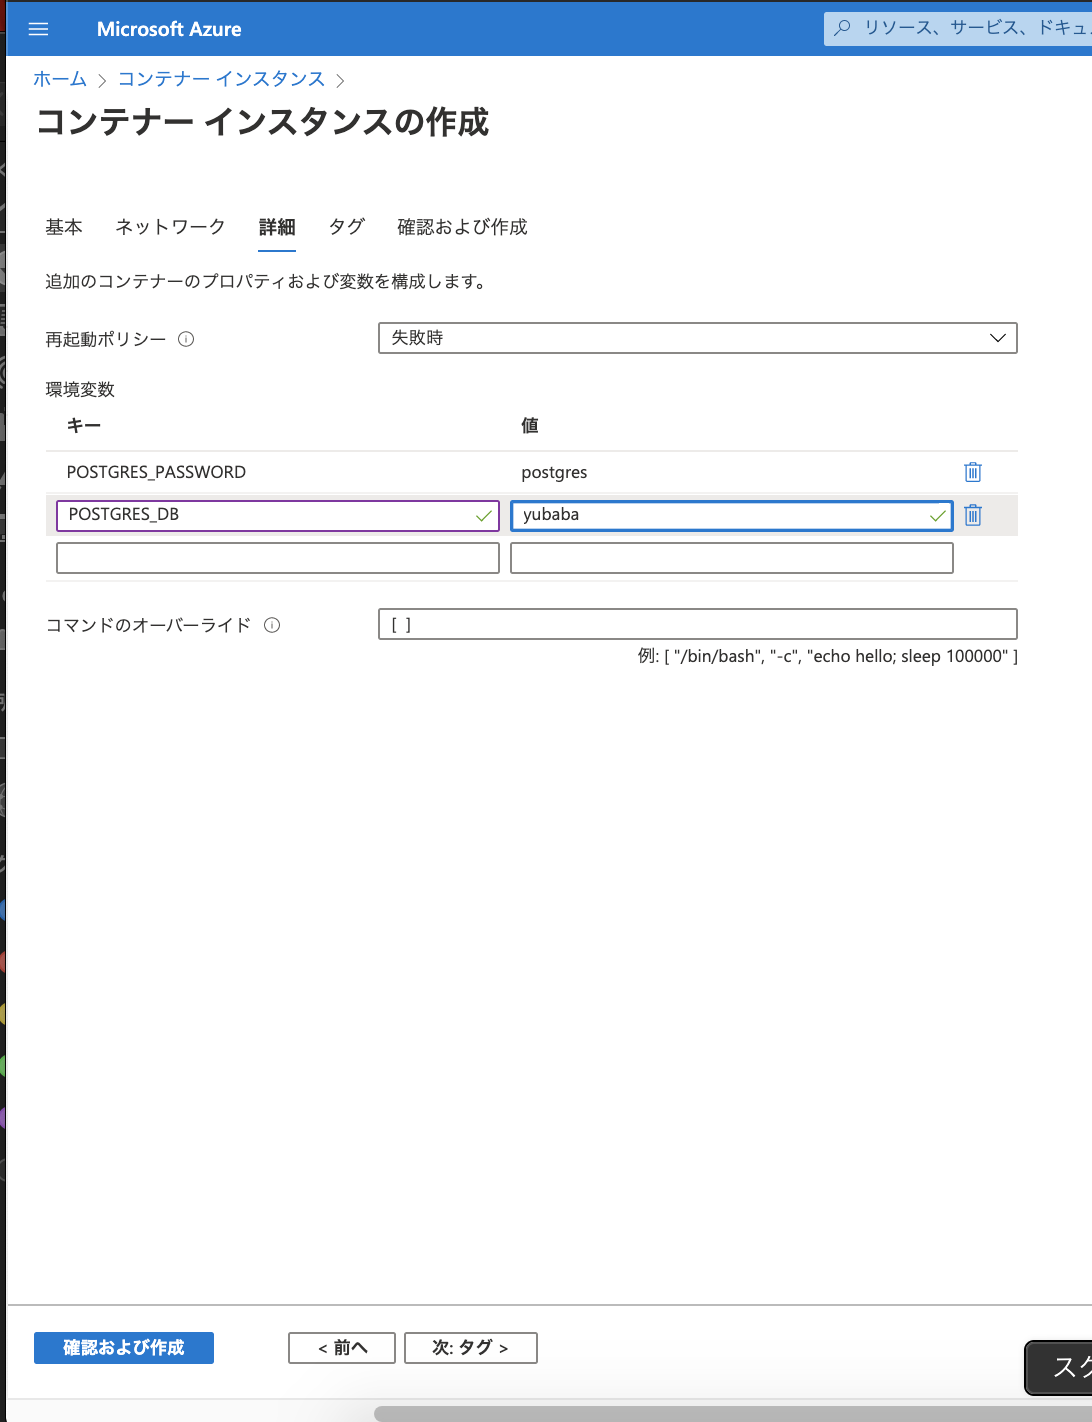
詳細のところで環境変数
POSTGRES_PASSWORDとPOSTGRES_DBを設定しておきます
- あとは作成へ一直線です
- できあがったらPostgreSQLのIPアドレスを控えておきます
3. Azure コンテナーサービスで湯婆婆アプリを動かす
- 手順2と同じような感じです
- 手順1で作って、イメージを置いているAzure Container Registryから取得します
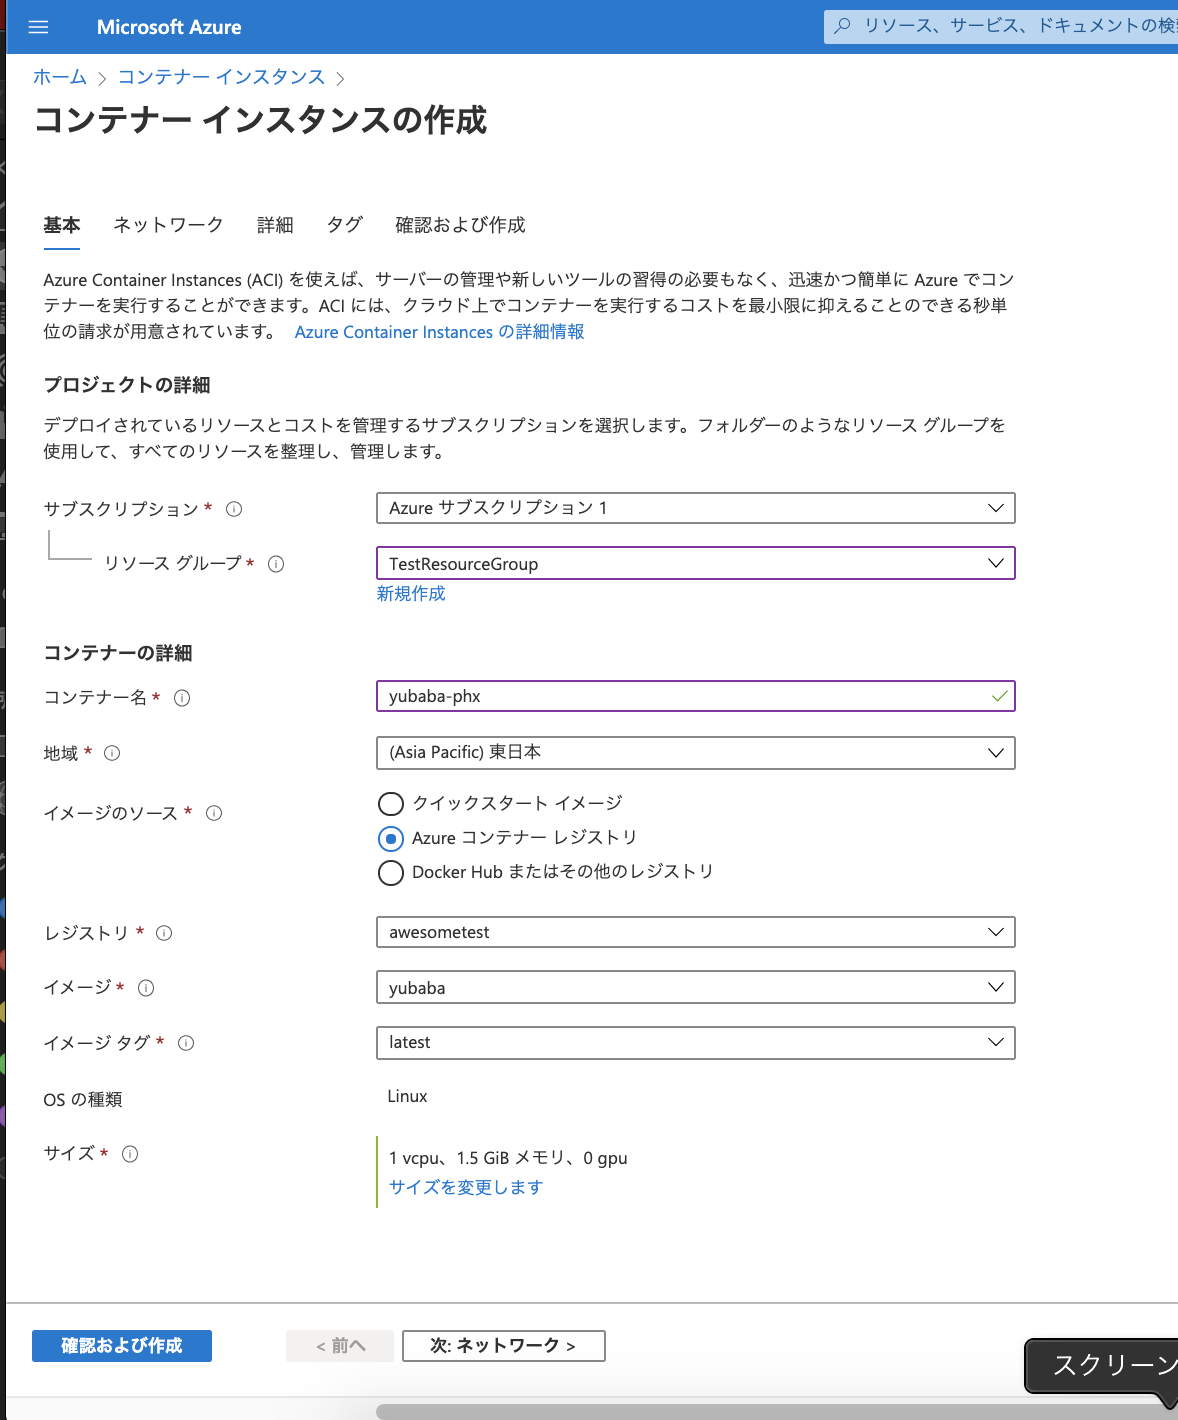
- ネットワークはプライベートにして、2番と同じ仮想ネットワークを選んでおきます
- ポートは
4000 TCPです - 環境変数には次の2つを設定してください
- DATABASE_URL
- ecto://postgres:postgres@10.1.0.4/yubaba
- 手順2のIPアドレスを指定します
- SECRET_KEY_BASE
- hogehogepekepekefoofooinoki123da (例)
- ローカルでの動作確認のときに
mix phx.gen.secretにて生成したものを書きます
- DATABASE_URL
- 作成できましたらIPアドレスを控えておきます
4. SSL証明書を取得して、.pfx形式にする
- SSL証明書はたとえばLet's Encryptを利用させてもらって、DNS-01 チャレンジで取得するのでどうでしょうか
- この記事では詳細は省きます
- すでに取得済という前提で進めます
-
.pfxという形式で必要となります -
Azure Application Gateway で Let’s Encrypt も使えます。Let’s Try !の記事で詳しく説明されています
- ありがとうございます!
# cd /etc/letsencrypt/live/torifuku-kaiou.tokyo/
# ls
cert.pem  chain.pem  fullchain.pem  privkey.pem

# openssl pkcs12 -export -inkey privkey.pem -in cert.pem -out agw.pfx
- Passwordをつけます
-
agw.pfxを5で適用します
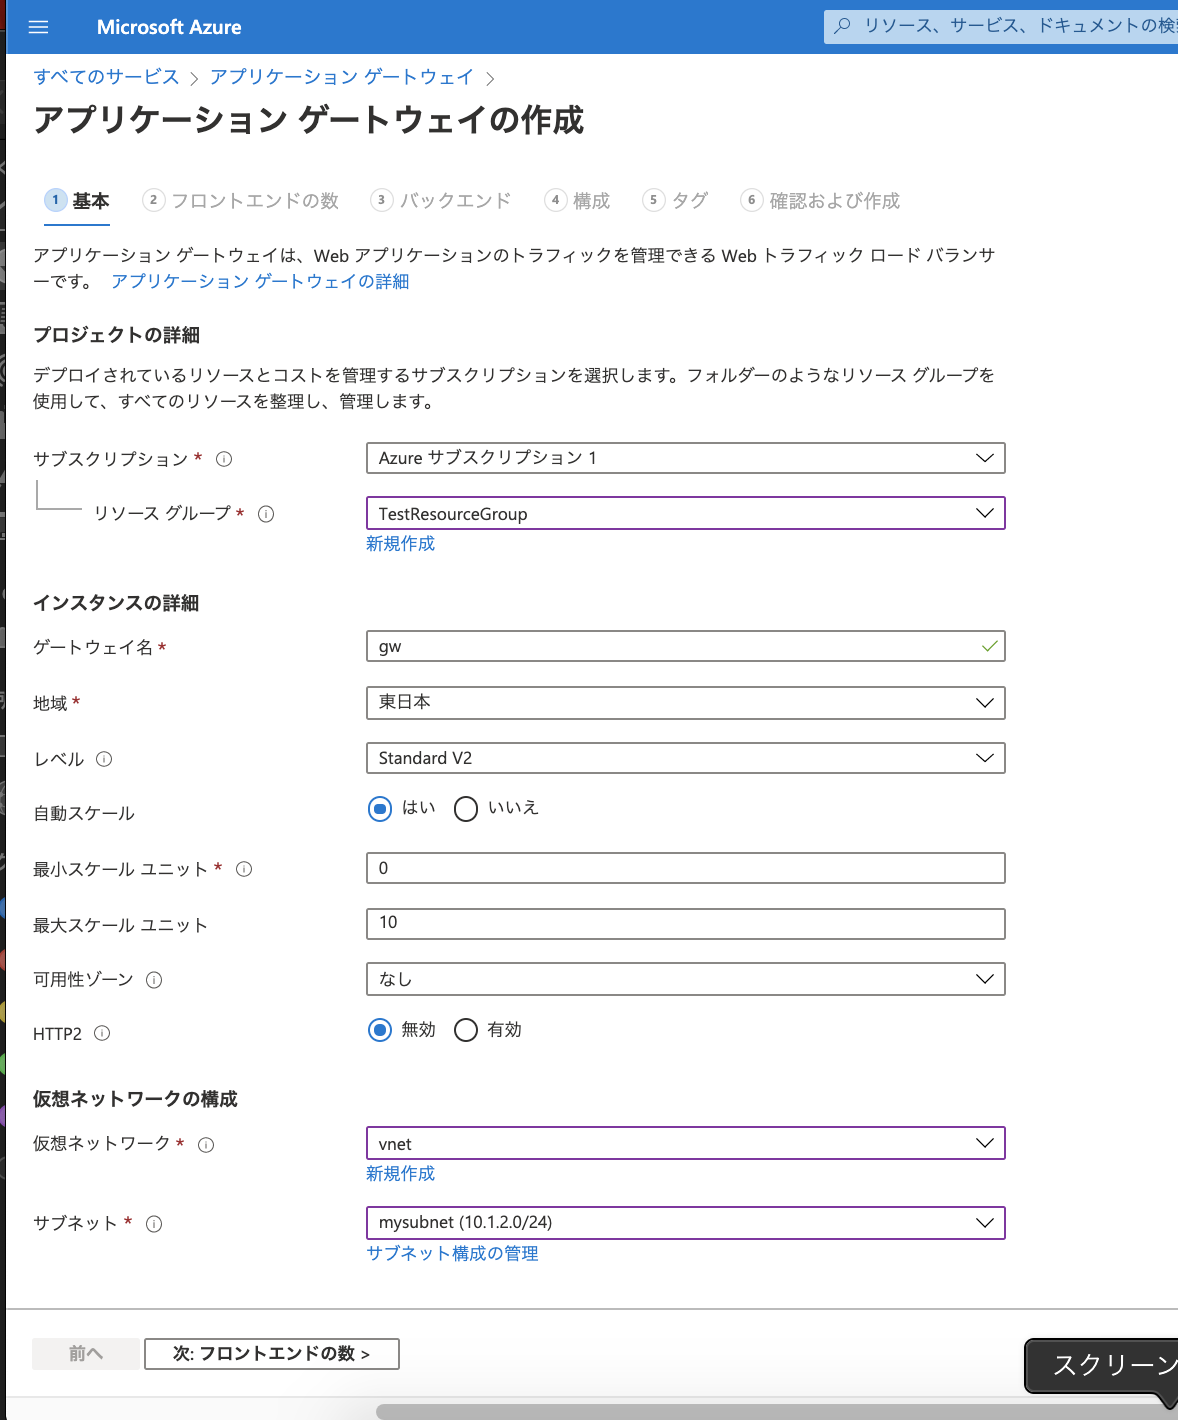
5. Azure Application Gatewayと湯婆婆アプリを結びつける
- 雰囲気、クイック スタート:Azure Application Gateway による Web トラフィックのルーティング - Azure portalこんな感じで設定していきます
- レベルは
Standard V2を選んでください - これにしておかないとWebSocketのエラーがでるようです
- 700円/日くらいと私が個人で使いつづけるにはまあまあする
- 湯婆婆で動かしつづけるのはもったいない。。。
- レベルは
- 仮想ネットワークは、PostgreSQLや湯婆婆をつくるときに使ったものと同じものを選びます
- 一番最初にやるときは
サブネット構成の管理からサブネットの追加が必要になります - 次の
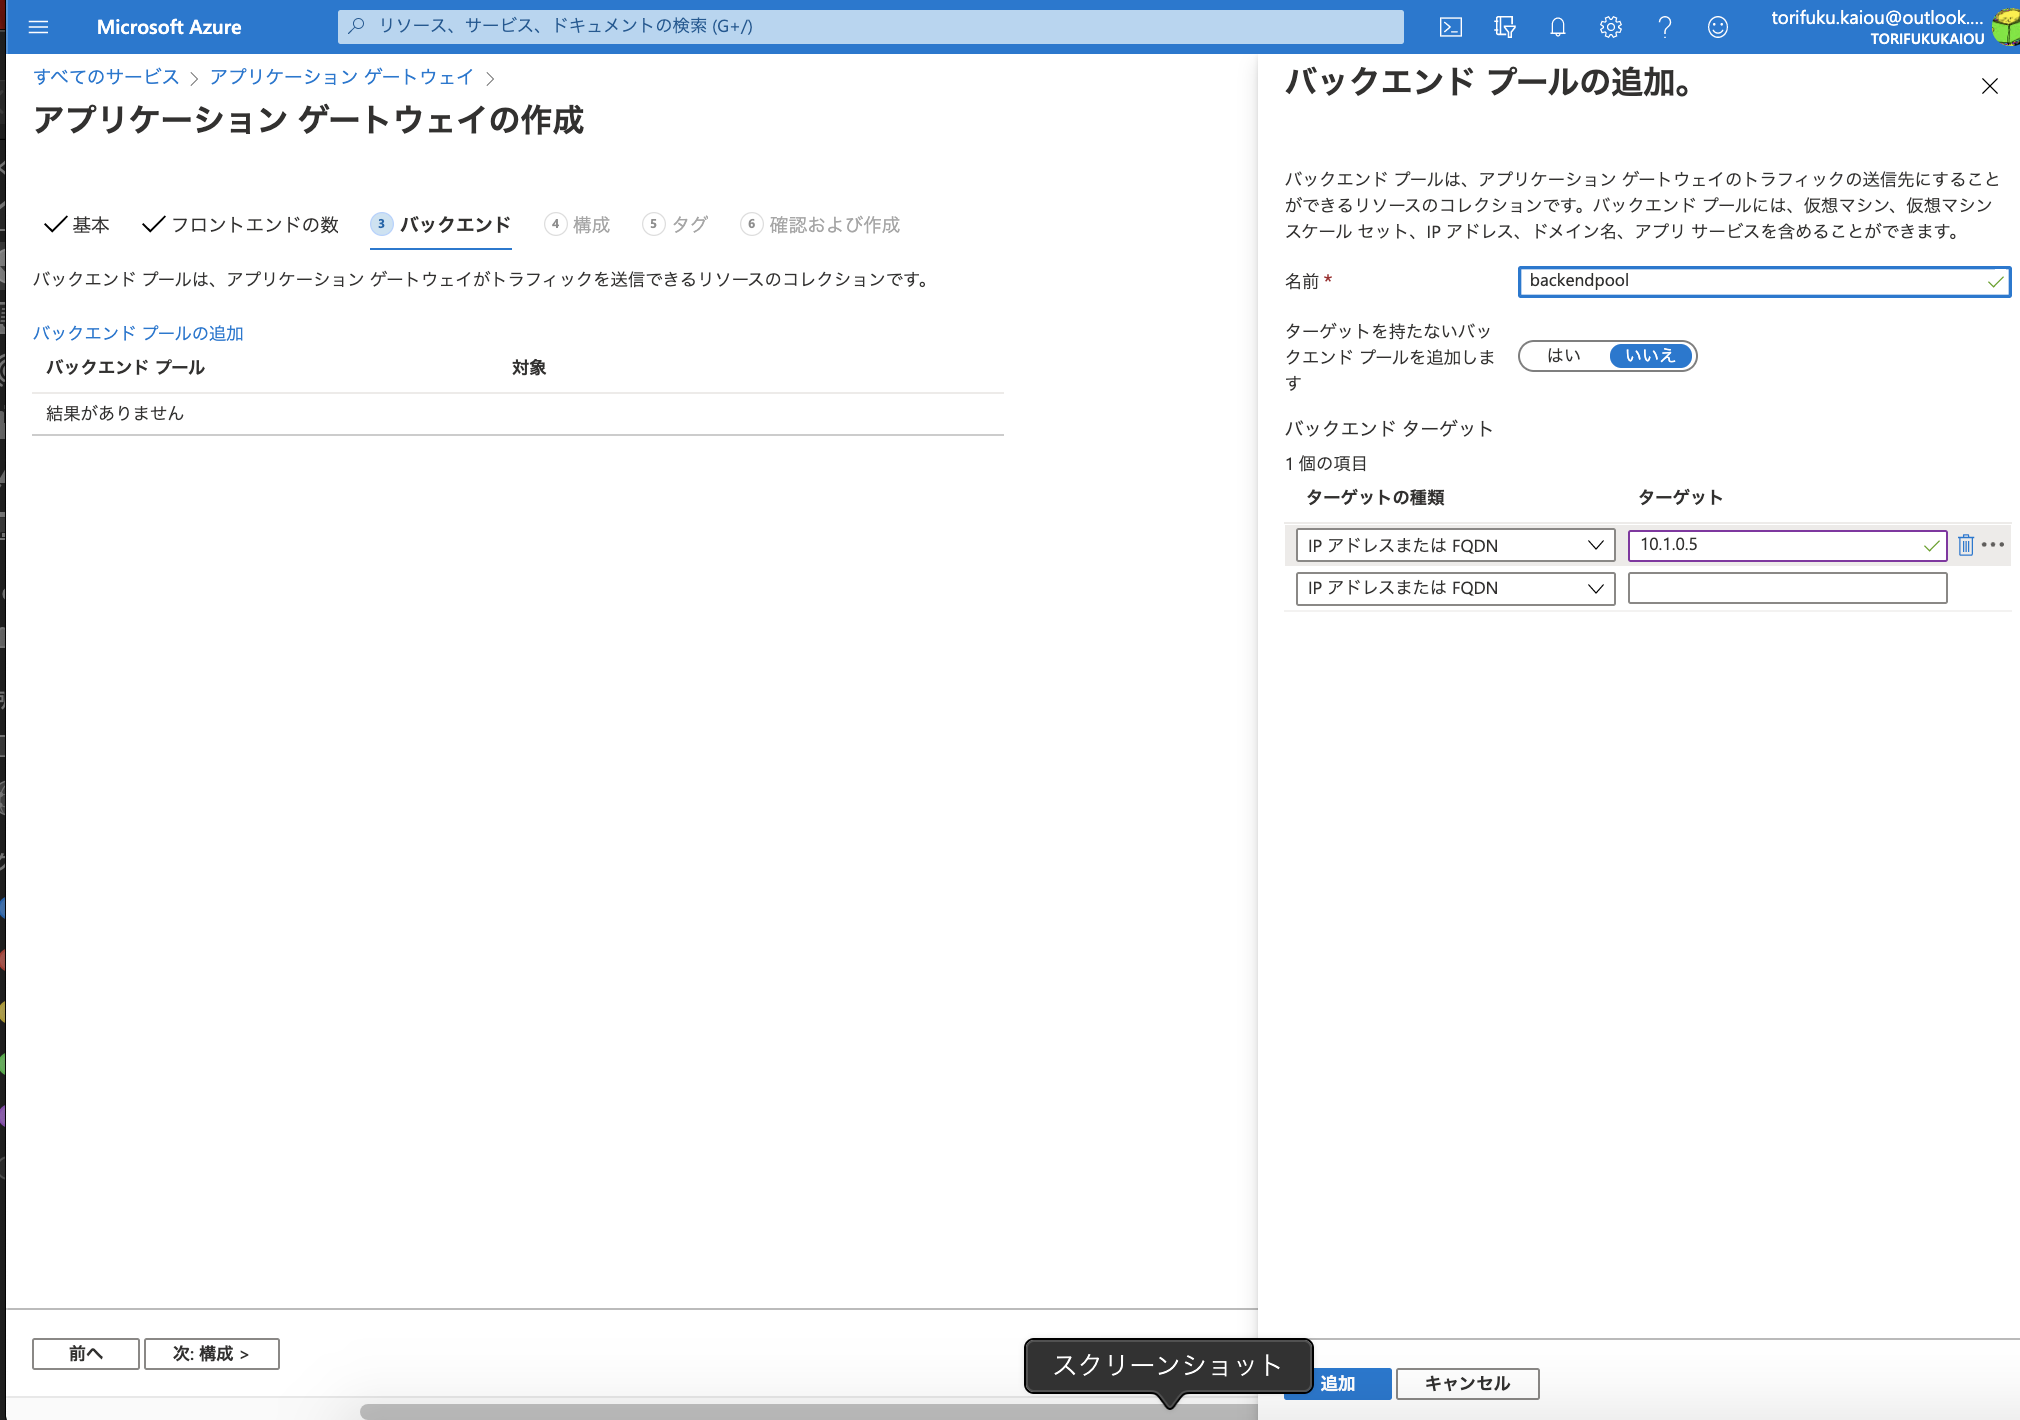
フロントエンドの数というタブではIPの種類をパブリックにしましょう- IPアドレスは選ぶものがなければ新規作成で作ってください
-
バックエンドタブは雰囲気↓な感じで設定します -
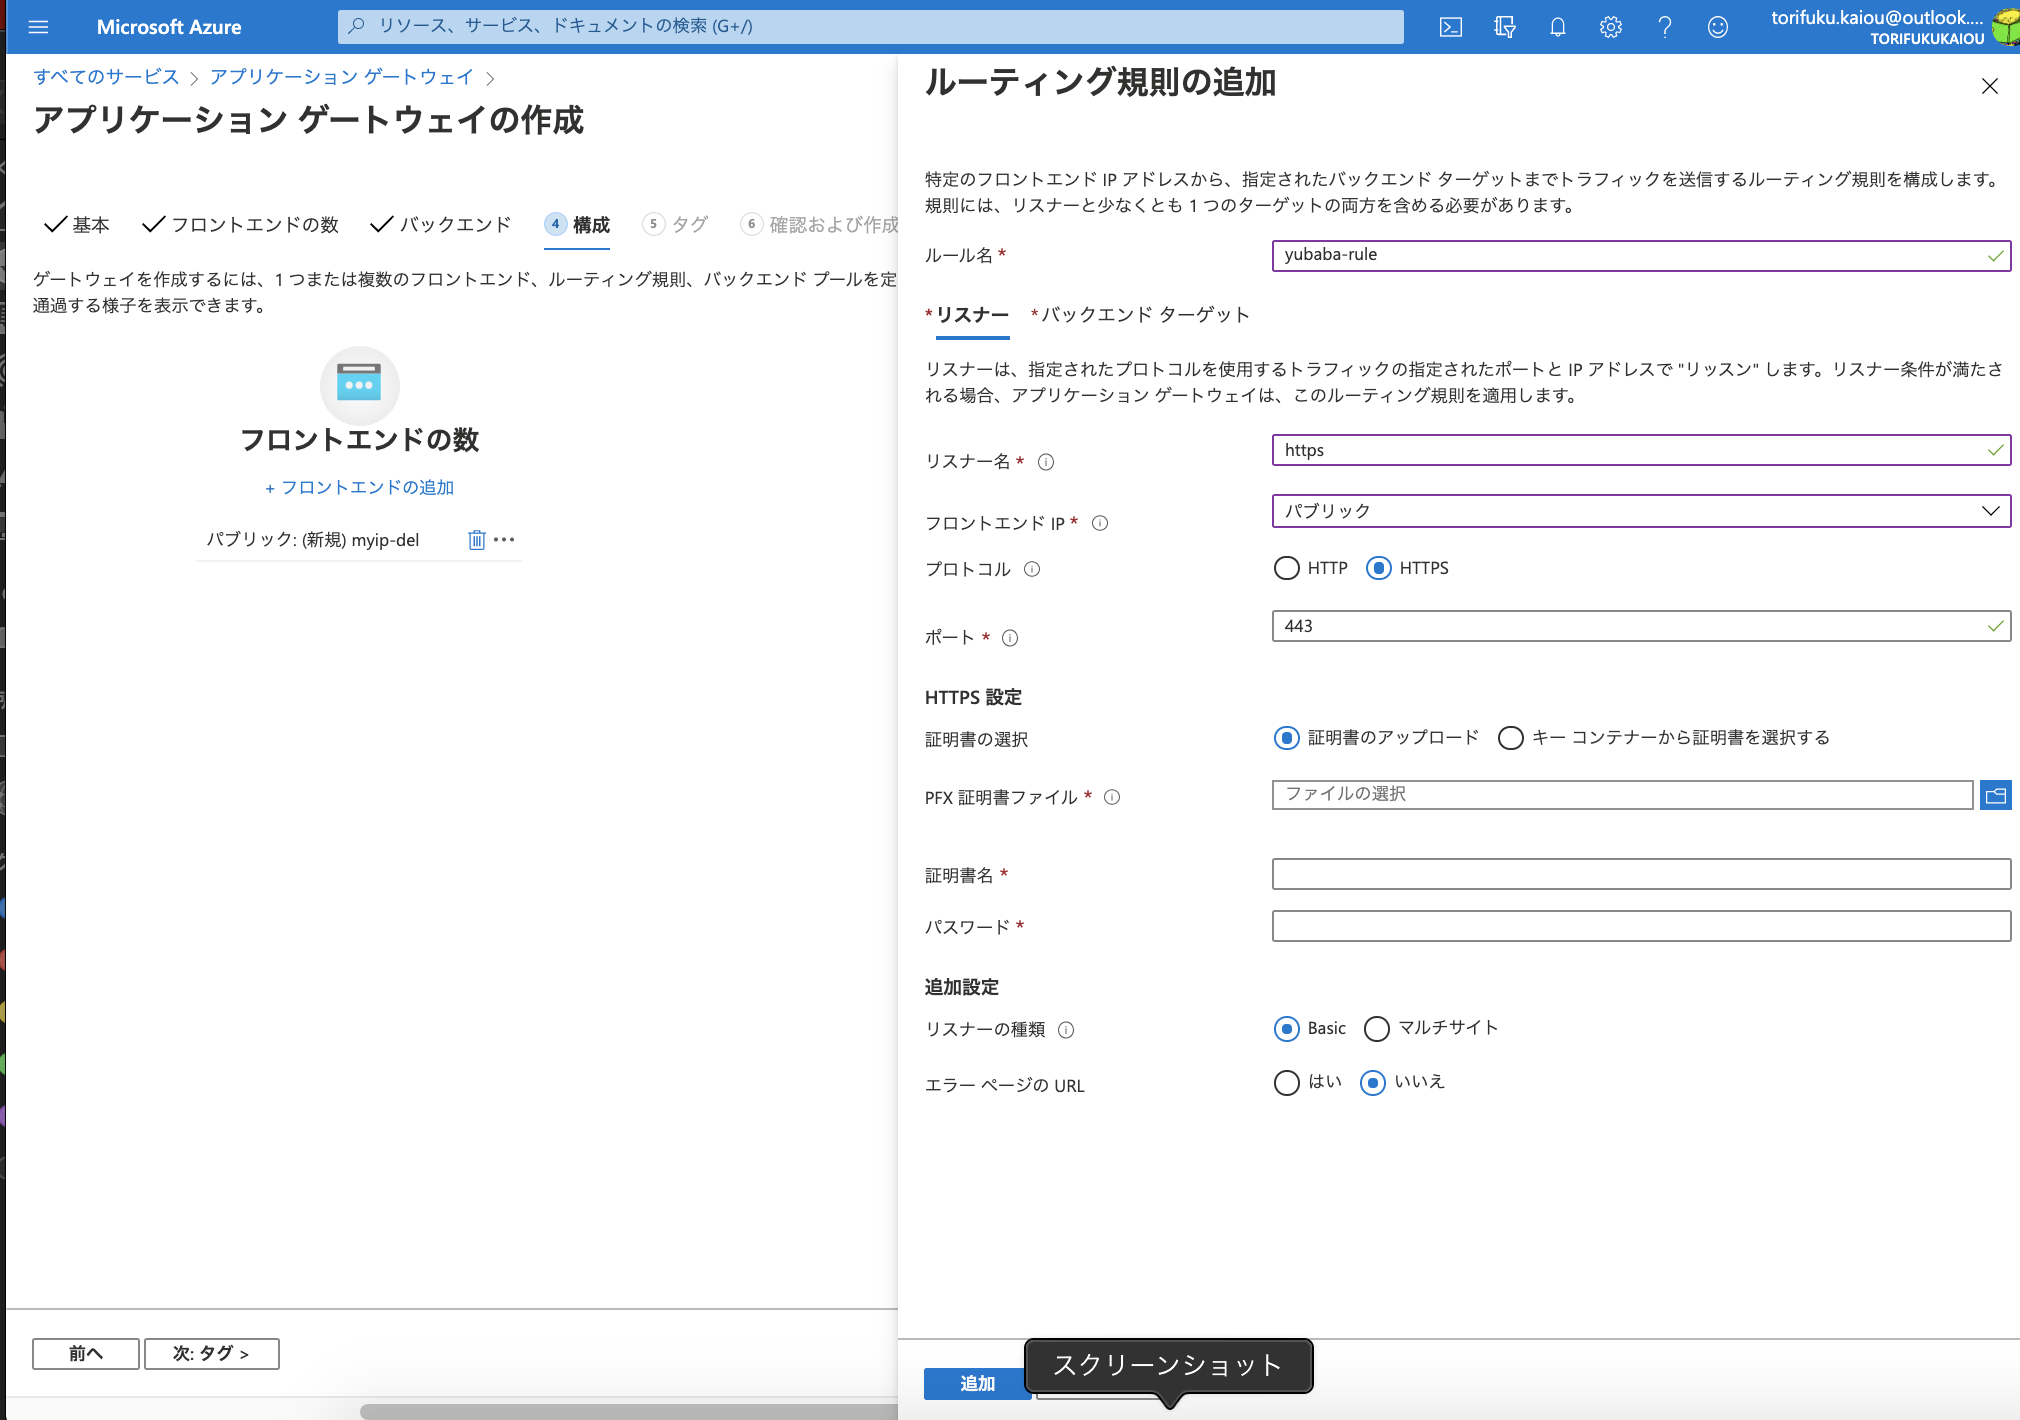
構成というタブでは真ん中のルーティング規則の追加を押して↓てな感じで設定します - 証明書は4のものをアップロードします
- あとは作成まで一直線です


- 作成できたら、
フロントエンド パブリック IP アドレスを控えておきます
6. Azure Application GatewayのIPアドレスをAレコードとしてDNS設定
- あとは
フロントエンド パブリック IP アドレスをAレコードとしてお使いのサービス(お名前.comやGoogle Domainsなど)にDNSの設定をすれば完了です


Wrapping Up! 


-
Deploying with Releasesには
Dockerfileが書いてあるなー、だけどこれなにに使うのだろう? という感じでいまいちピンときていませんでした - コンテナサービスと組み合わせることでそういうことに使うのね! というのがわかってきました
- 今回私は全編手作業でやっていますが、GitHub アクションを構成してコンテナー インスタンスを作成するを駆使して自動化するんだろうなあー ということにおもいをはせつつ筆をおきます
- Enjoy Elixir


- 4日目は、@wakwakさんの湯婆婆Androidアプリを作ってみました です。続けてお楽しみください。(おもしろいですよ〜)
