
Original: GitHub CodespacesでElixir Livebookを爆速セットアップ!
![]()
![]()
![]()
![]()
![]()
![]()
![]()
![]()
![]()
![]()
![]()
![]()
![]()
![]()
![]()
![]()
![]()
![]()
![]()
![]()
![]()
![]()
![]()
![]()
![]()
![]()
![]()
![]()
![]()
![]()
![]()
![]()
![]()
![]()
![]()
![]()
![]()
![]()
![]()
![]()
![]()
![]()
![]()
![]()
![]()
![]()
![]()
![]()
![]()
![]()
![]()
![]()
![]()
![]()
![]()
![]()
![]()
![]()
![]()
![]()
![]()
![]()
![]()
![]()
![]()
![]()
![]()
![]()
![]()
![]()
![]()
![]()
![]()
![]()
![]()
![]()
![]()
![]()
![]()
![]()
![]()
![]()
![]()
![]()
![]()
![]()
![]()
![]()
![]()
![]()
![]()
![]()
![]()
![]()
![]()
![]()
![]()
![]()
![]()
![]()
![]()
![]()
![]()
![]()
![]()
![]()
![]()
![]()
![]()
![]()
![]()
![]()
![]()
![]()
![]()
![]()
![]()
![]()
![]()
![]()
![]()
![]()
![]()
How many Qiitan mascots can you count!?
Introduction
This article explains how to run the Livebook, an Elixir-based development notebook, on GitHub Codespaces.
To help you get started right away, I have published a repository on GitHub. Along with instructions on how to launch Livebook, I will also briefly discuss its contents.
This setup could potentially be used as an environment for programming beginners (although you will need to create a GitHub account).
However, this article does not cover how to use Livebook itself. After all, "practice makes perfect." For detailed guidance, I recommend checking out an excellent article on the subject written by @RyoWakabayashi.
Of course, I’ll also talk about Antonio Inoki and the "Fighting Spirit" philosophy. In a way, writing about Fighting Spirit is my main reason for writing this article. And yes, I’d love to see more Qiitan. ![]()
![]()
![]()
Overview
Here is a visual summary of this article. (Powered by https://app.napkin.ai/)

What is GitHub Codespaces?
Simply put, GitHub Codespaces allows you to develop using just a browser. The development machine (resources) exists in the cloud.
It embodies the spirit of "learn by doing," "leap before you look," and "build the airplane as you’re falling off the cliff." Or as Antonio Inoki would say:
"Don’t fear. Fear and the path disappears. Take one step forward, and that step becomes the path. Go without hesitation; you’ll understand once you go."
The best way to understand it is by trying it out.
Here’s the official page for more information:
GitHub Codespaces
While it’s a paid service, if you use the lowest-spec machine, as of December 15, 2024, you can enjoy up to 80 hours per month for free. This makes it a practical tool for everyday use.
More details can be found here:
GitHub Codespaces Billing
Although knowledge of devcontainer can be helpful, it’s not strictly necessary for basic use, so I’ll skip the details here. If you’re interested, follow the link for more information.
In essence, GitHub Codespaces provides a seamless development experience with Docker containers integrated into Visual Studio Code and GitHub Codespaces. It feels as if you’re working on a Linux machine, without needing to consider the underlying Docker container. Development starts immediately within the container, and there’s rarely a moment where you need to think about Docker itself.
Livebook
Livebook, in simple terms, is a notebook environment for Elixir.
You can run it by installing Elixir on your local machine or by using Docker.
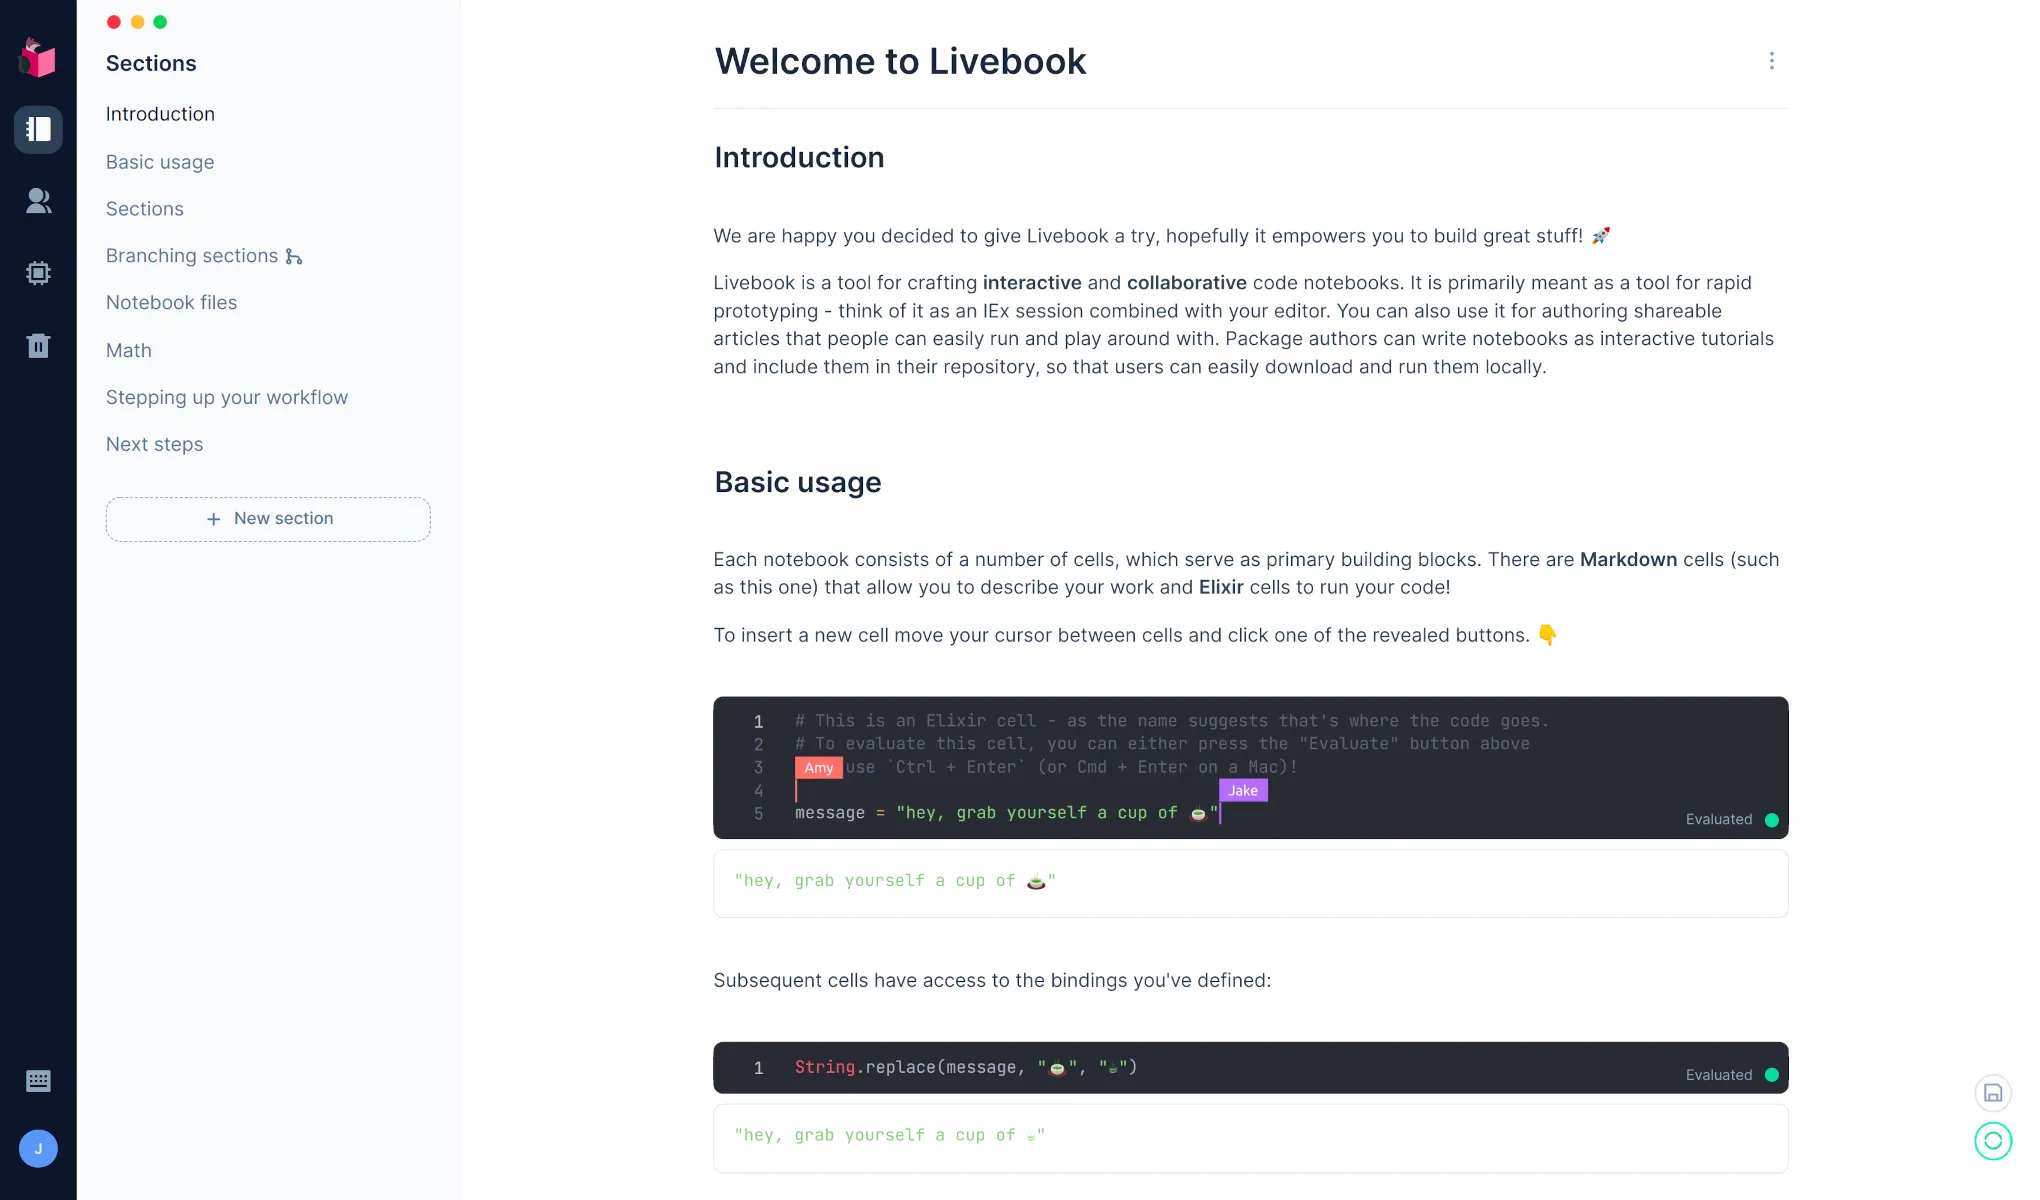
Since it works with Docker, it should also work seamlessly with GitHub Codespaces.
That’s what motivated me to try it out and share the results here.
Let’s dive into the details.
Usage
I’ve published livebook-devcontainer on GitHub.
Here, I’ll explain how to use it.
There are two options:
-
Password Fixed Version: Start Livebook with the password set to
securesecret. - Password Auto-Generated Version: Start Livebook with an automatically generated password.
Why are there two versions? I’ll explain this later in the repository section.
Additionally, if you’re hesitant to use my setup directly without verification, that’s completely understandable. It’s always wise to exercise caution to avoid malware or other risks.
Later in this article, I’ll explain the repository’s structure so that you can review the code and decide whether to use it as-is, fork it, or modify it to your needs. If you have ideas to improve it, feel free to submit a pull request or make your fork the new "main" version.
1. Password Fixed Version: Start Livebook with the password set to securesecret
Since this method uses the official Livebook image, startup is fast.
Even on the minimum spec machine (2-core Machine type), you’ll have a working Livebook environment in under two minutes.
Here’s how to start Livebook with the password set to securesecret:
-
Open livebook-devcontainer in your browser.
-
Click
<> Code (green button)>Codespaces> ⋮ >+ New with options.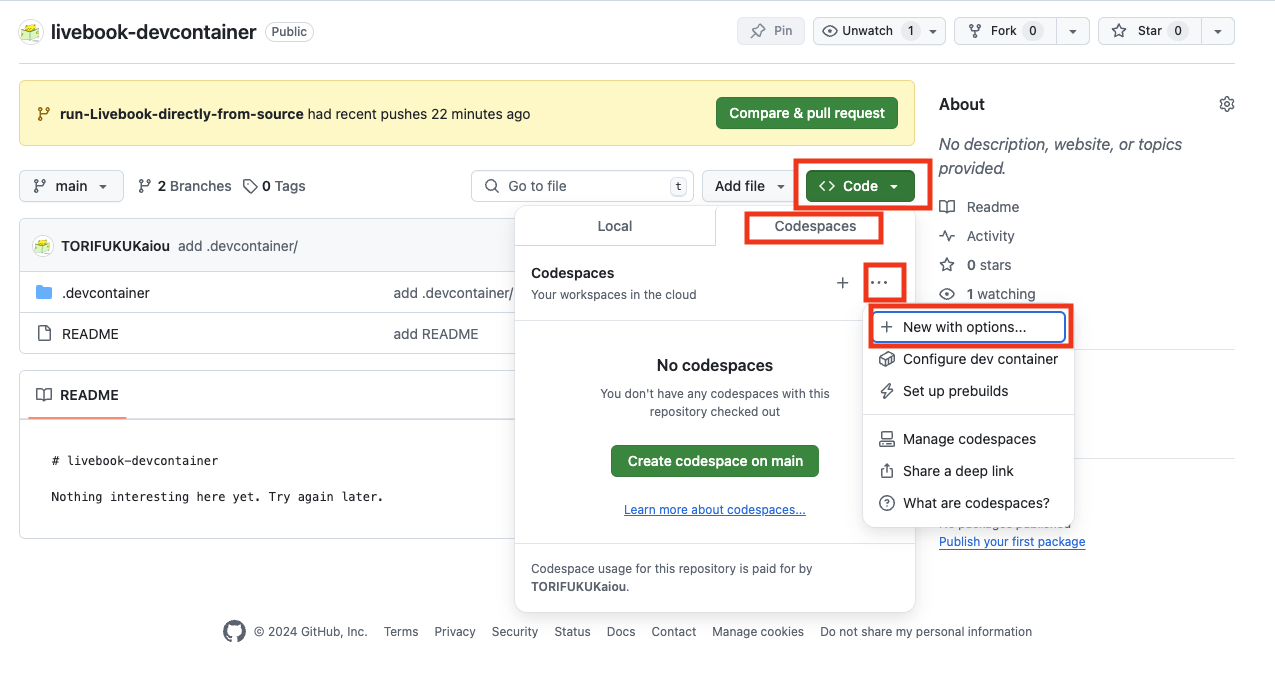
-
Set the Branch to
main, adjust other options to your preference, and confidently press the Create codespace button.
-
Wait about 1 minute and 23 seconds, and the environment will launch. Open the Ports tab at the bottom of the screen, hover over the Forwarded Address field for port
8080, and click the faint globe icon that appears.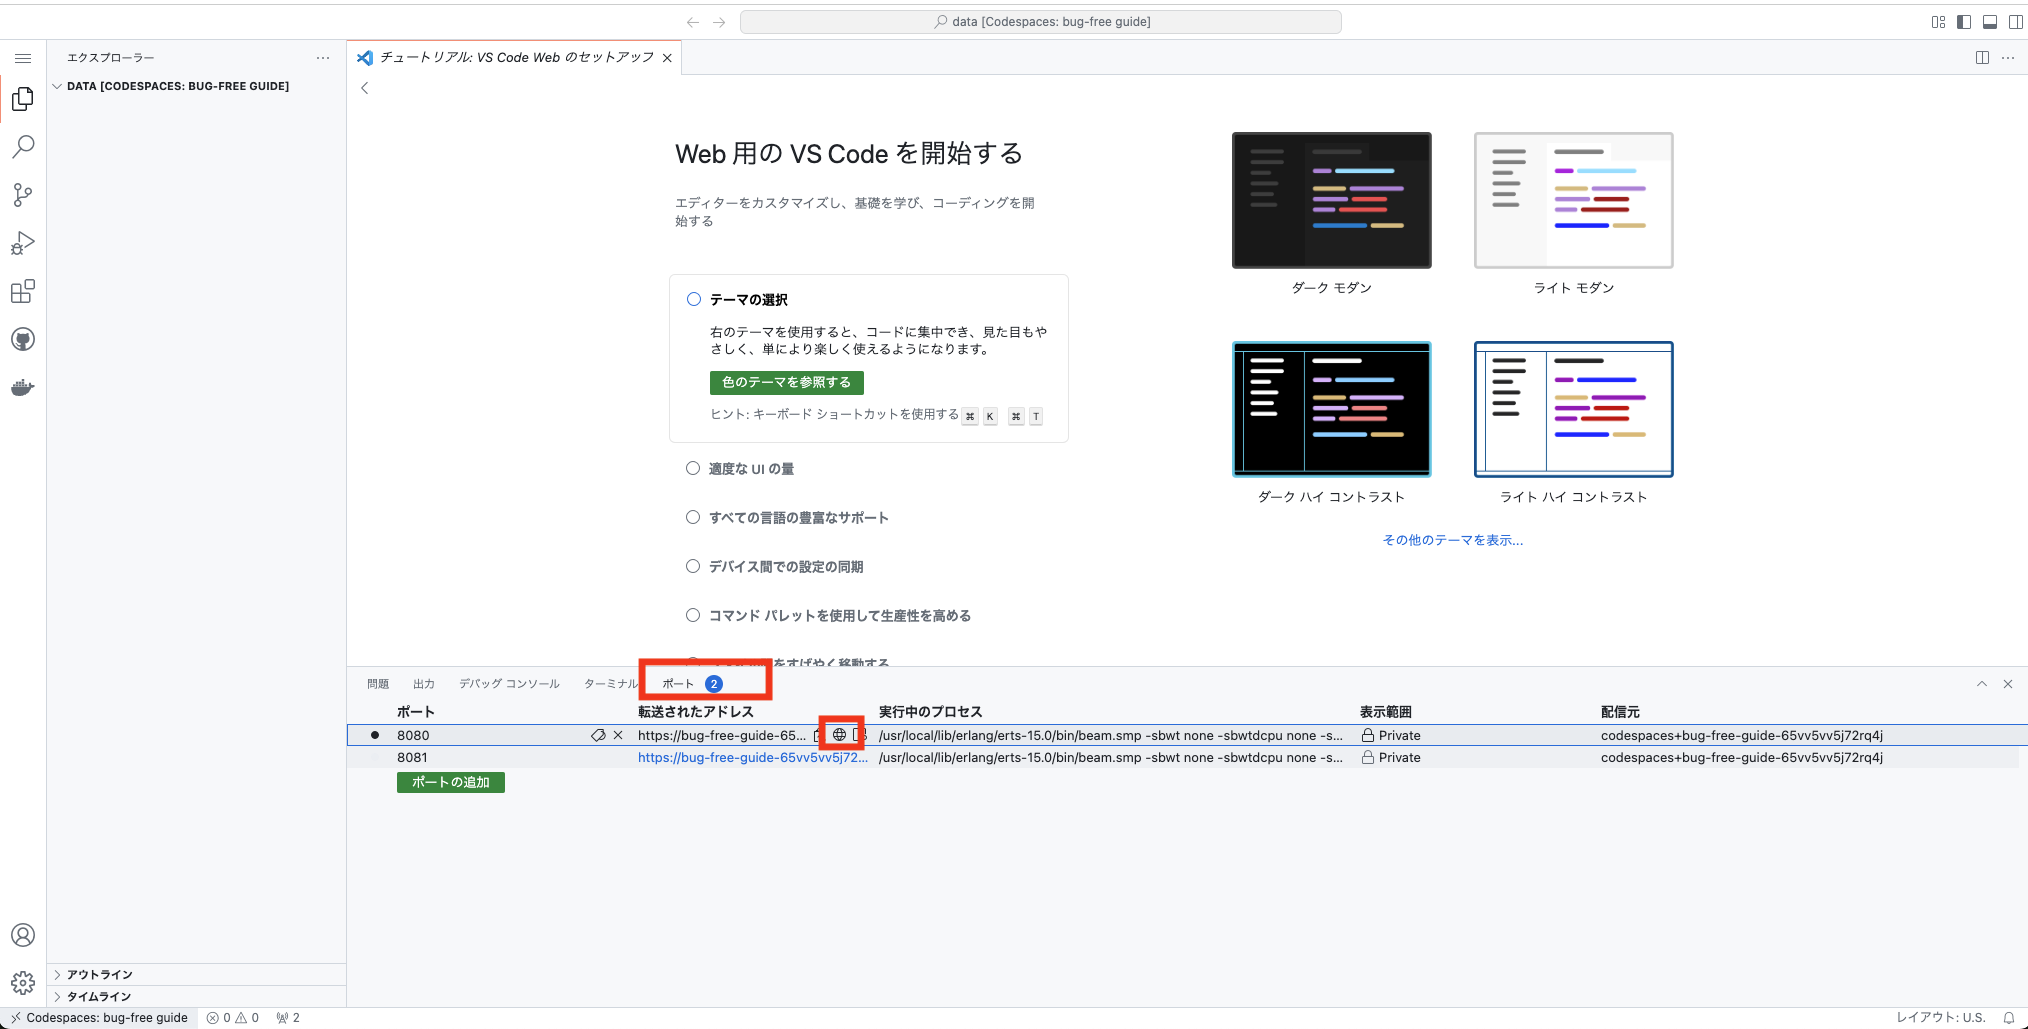
-
Notice the Private display? This indicates the environment is accessible only when logged in with the GitHub account used to create the Codespace.
-
🎉 Livebook is now running! Enter
securesecretas the password and enjoy developing with Livebook! That’s it—have fun exploring!
Issues
Some notebooks, especially those that rely on JavaScript functionality, may not work as expected. For example, as of December 15, 2024, certain parts of the learning content included in Livebook 0.14.5, such as "Exploring built-in Kinos" (Learn > 01 Exploring built-in Kinos), do not function properly.
To address this, you can change the Port Visibility setting in step 5 of the previous instructions to "Public." Here's how:
- Right-click on the port entry in the Ports tab and change the visibility setting to Public.
While this adjustment enables the notebook to work, setting the port to Public literally makes it accessible to anyone. Since the password is securesecret (and relatively weak), there's a risk of someone else accessing your Livebook instance without permission, potentially leading to regret.
If you're knowledgeable about Livebook, you might think, "Why not use an auto-generated password instead?" I had the same thought. However, when a Codespace starts, it’s already running inside a Docker container, and there’s no access to the host machine’s output where the auto-generated token is logged. I searched through devcontainer logs and other potential leads but couldn’t find a solution.
Another idea I explored was connecting to the Livebook node directly1 and calling LivebookWeb.Endpoint.access_url(). Despite my efforts, I couldn't make it work. If you’ve solved this issue, please share your insights in the comments or via a pull request. I’d be incredibly grateful! 🙏
There may also be other cases where Livebook features don’t work as expected. To avoid exposing your instance unnecessarily and risking unauthorized access, it’s better to explore Method 2: Auto-Generated Passwords, discussed in the next section.
2. [Auto-Generated Password Method] Launching Livebook with an Auto-Generated Password
This method involves building Livebook yourself and manually starting it. By doing so, you can view the generated token directly from the startup logs.
The steps are almost identical to those in the previous method. In Step 3, switch the branch to run-Livebook-directly-from-source. From there, the process begins with installing Elixir and takes about 4 minutes and 9 seconds2. While you wait, feel free to watch Antonio Inoki's retirement match3.
Before proceeding to Step 4, you will need to start Livebook manually.

Below are the differences in steps compared to the previous method:
1. Edit /home/vscode/livebook/config/prod.exs
For those familiar with system configurations, this step involves changing the IP setting to allow the Phoenix application (in this case, Livebook) to connect via a load balancer or other front-facing component. Modify the IP setting in /home/vscode/livebook/config/prod.exs from {127, 0, 0, 1} to {0, 0, 0, 0}.
(Note: I attempted to restrict this further by resolving the load balancer's hostname to an IP address via nslookup, but Phoenix failed to start.)
[Updated: 2024-12-16] Automatically Rewriting within the Dockerfile
-
Start Livebook in the Terminal
Once the setup is complete, Livebook will automatically start in the Terminal tab by running mix phx.server. Be sure to take note of the token value (as it changes with each startup, there’s no issue sharing it publicly).
-
Proceed to Step 4 as before
When prompted for the password, use the token from the startup logs.
If you need to run JavaScript-dependent notebooks, as in the previous method, change the Port Visibility setting to Public. While this method is more secure than using a fixed securesecret password, it is still not foolproof. Use with caution and at your own risk.
Repository Overview
Here, I will provide an explanation of the livebook-devcontainer repository.
This repository provides configurations to deploy and use Livebook efficiently within GitHub Codespaces. Below, I will detail the two key branches and their purposes.
Main Branch
This branch is used for launching Livebook with the fixed password securesecret.
The Docker command introduced in the Livebook repository has been adapted into a devcontainer for seamless integration with GitHub Codespaces.
Key details of this branch:
-
Official Docker Image
The Docker image utilized here is the same as the one recommended by the official Livebook project, ensuring compatibility and reliability. -
Pre-set Environment Variable
The environment variableLIVEBOOK_PASSWORDis configured with the valuesecuresecretto simplify access.
This branch is perfect for quick and straightforward setups!
run-Livebook-directly-from-source Branch
This branch is tailored for a more hands-on approach, allowing you to build and run Livebook directly from its source. Key features include:
-
Base on Microsoft's Development Container Images
Built on Microsoft's Base Development Container Images (Ubuntu 24.04), this setup provides an experience akin to developing on a Linux machine. -
Pre-installed Elixir and Erlang
Elixir and Erlang are installed using the official installation script maintained by the Elixir team. (As highlighted in the article, "A Deep Dive into the Redesigned Phoenix Official Page".) -
Prepped for Livebook Development
The repository already includes the following steps completed for Livebook:- Cloning the repository (
git clone) - Fetching dependencies (
mix deps.get) - Compiling the code (
mix compile)
- Cloning the repository (
-
Configuring IP for Load Balancer Access
To enable access to the Phoenix application (in this case, Livebook) from a load balancer-like front-end connected to the internet, the IP configuration is modified. This is done by editing/home/vscode/livebook/config/prod.exsusingsed. -
Launch for Token Generation
By runningmix phx.server, the output is displayed in the terminal, allowing you to confirm the automatically generated token yourself.
This branch offers greater control and flexibility, making it ideal for users who want to explore the Livebook source in depth.
We Need Better Solutions!
The run-Livebook-directly-from-source method has its flaws—I know this well. I want to avoid the regret of setting the [Port Visibility] to Public. Some aspects of the methods introduced in this article may be incorrect. If you know a better or more accurate solution, please share it in the comments section!
Problems Identified
Below are the issues I believe exist or areas where better solutions may be possible. With over 20 years of experience, I don’t think my approach is entirely wrong, but there’s always room for improvement:
- How can we reliably retrieve the auto-generated
tokenwhen launching a container from the official Livebook image on Codespaces? - Is there a way to use JS-based features without setting the [Port Visibility] to
Public? - In
/home/vscode/livebook/config/prod.exs, is there a way to restrict the:ipconfiguration to something other than{0, 0, 0, 0}? - Are there other Livebook features that might not function properly under the current setup?
If you notice anything or have suggestions for improvements, please leave your insights in the comments section. Your feedback is greatly appreciated!
Goals
Here’s what I want to achieve.
Currently, the Livebook, Elixir, and Erlang versions are set to the latest as of 2024-12-15. I plan to keep these updated in the future. However, I worry that I might forget to update them, so I want to solve this issue through automation.
Automation Plan
I aim to implement the following:
-
Automating Updates
- I believe this can be achieved using GitHub Actions.
- I already know about periodic execution in GitHub Actions and have experience with Git Push workflows.
- However, I lack detailed knowledge of text manipulation commands like
sed. - I could consult ChatGPT Plus for help or write a custom script to handle the updates efficiently.
- I believe this can be achieved using GitHub Actions.
By automating these updates, I hope to ensure the project remains up-to-date without relying on manual intervention.
Unused Codespaces: Save Costs by Deleting Them
When you're done using a Codespace, you can delete it to save costs. If needed, you can always create a new one later.
To manage and delete unused Codespaces, visit:
Deleting unused Codespaces can help you manage your budget effectively. One of the benefits of using the cloud is the ease of creating, breaking, and recreating environments as needed.

Notes for Using in Beginner-Friendly Hands-On Sessions
In the introduction, I mentioned the potential use of this setup for beginner programming environments. I believe it can be used effectively for this purpose.
However, since my use case does not involve hands-on sessions, I recommend thorough rehearsal before utilizing it in such a setting. Here are some points to focus on during rehearsal:
- Test the hands-on content: Ensure everything can be executed smoothly while keeping the port visibility range set to "Private." This minimizes the risk of unintended regrets.
- Set an appropriate timeout period: Refer to GitHub Codespaces timeout period settings and configure the timeout value as needed for the session.
For "true beginners" who do not yet have a GitHub account, it's worth noting that this process still poses a significant hurdle.
Summary
This article explained how to run the Livebook development notebook for Elixir using GitHub Codespaces.
Take the following actions to try it out:
-
Challenge yourself with the setup:
- Use the livebook-devcontainer repository and follow the steps to get Livebook up and running. (No need to fork it to start!)
-
Share ideas for improvement:
- Share your insights about the challenges mentioned in this article through comments or pull requests.
-
Utilize for hands-on sessions or learning purposes:
- Consider using it in beginner-friendly hands-on workshops or for your own projects.
As Antonio Inoki would say, "Don't hesitate, take the step forward, and you'll understand!" Embrace the challenge and sharpen your technical skills!
-
For those interested, this is the approach I tried: https://hexdocs.pm/iex/1.17.3/IEx.html#module-remote-shells ↩
-
Antonio Inoki's retirement match ended at exactly 4 minutes and 9 seconds, where he used the Grand Cobra Hold to defeat Don Frye, marking a glorious end to his career: https://www.asahi-net.or.jp/~yf7m-on/match5.html ↩