PythonでOAuth2.0の認証を突破して、アクセストークンを取得するスクリプトを作りました。
「PythonでCLIからOAuth2を利用してQiitaのアクセストークンを取得してみた」を参考にしています。今回はmauticのOAuth認証用のスクリプトですが、他のアプリケーションにも応用できると思います。
APIを使ってアプリケーションのデータ取得を行いたかったんですが、アクセストークンの取得に苦戦しました。アクセストークンはアプリケーション側ですぐに発行できるものと思ってたんですけど、OAuthではそうはいかないんですね。OAuthについて勉強するいい機会になりました。
OAuthとは
OAuthというのは、「アプリケーションを連携するための認証の仕組みのこと」と僕は理解しています。つまりOAuth認証を突破してよりアクセストークンを取得するにはアプリケーションが必要になります。
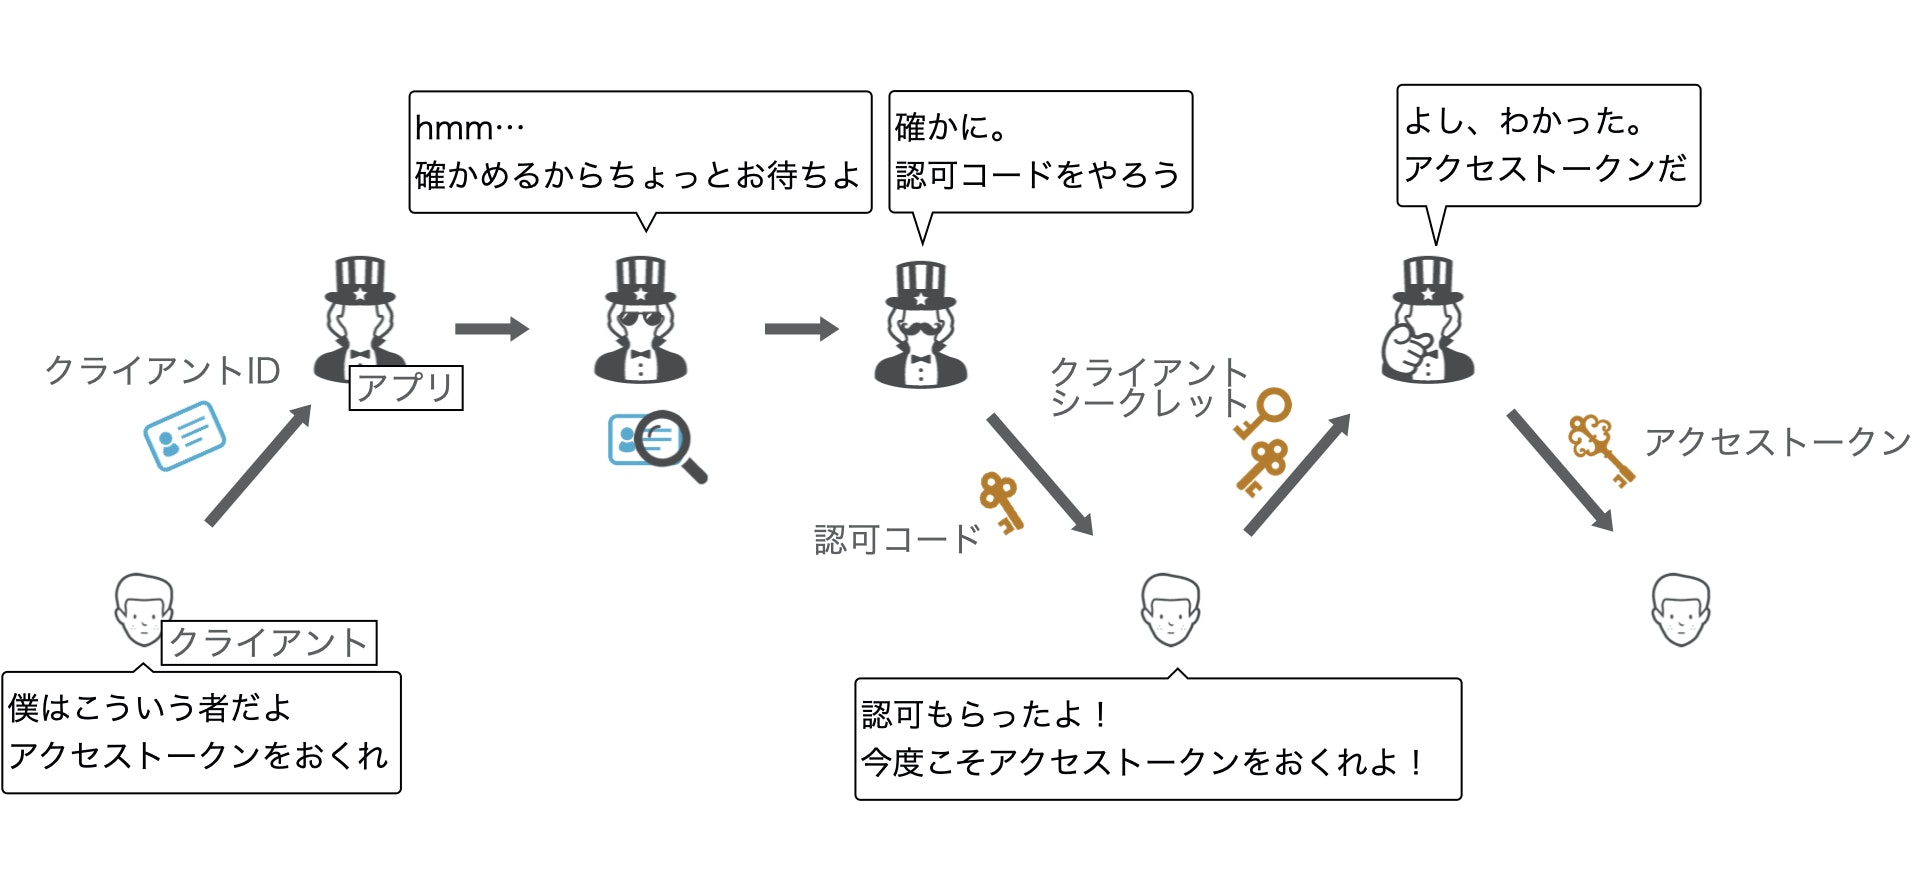
アクセストークンの取得には以下の3ステップが必要となります。
アクセストークン取得のステップ
- クレデンシャルの取得
- アプリケーション上で行う操作です。クライアントIDとクライアントシークレットのペアを取得します。公開鍵と秘密鍵と呼ばれていたり、名称はアプリケーションごとに異なるかもしれません。
- 認証のステップ
- クレデンシャルを使用して認可コードを取得します。クライアントのアプリケーションから、アクセストークンを発行したいアプリケーションに対してGETリクエストを投げます。レスポンスとして認可コードが返されます。
- 認可のステップ
- クレデンシャルと認可コードを使用してアクセストークンを取得します。クライアントアプリケーションからPOSTリクエストを投げると、レスポンスとしてアクセストークンが返されます。
認証と認可はややこしいですが、認証は「誰なのか」、認可は「何を許可するか (権限)」を確かめることくらいに理解しています。
以下の図は僕の頭の中のOAuthのイメージです。
実装
アプリケーションが必要と言いましたが、アプリケーションからのリクエストを受け取れれば問題ありません。今回のスクリプトでは、クライアントアプリケーションとして、HTTPServerを用いた簡易的なサーバを立てることで代用しています。
コードのポイントに関しては、後ほど追記していきたいと思います。
from access_token_request_handler import AccessTokenRequestHandler
from http.server import HTTPServer
from webbrowser import open_new
import ssl
import random
import string
import urllib.parse

class OAuthAuthenticator:

    def __init__(self, client_credential, client_info, authorize_url):
        # クレデンシャル読み込み
        self._client_credential = client_credential
        self._client_info = client_info
        self._authorize_url = authorize_url
        self._authorization_result = None
        self._app_uri = 'https://%s:%s' % (client_info['host'], client_info['port'])
        # 証明書読み込み

    def get_access_token(self):
        token = None

        params = {
            'client_id': self._client_credential['id'],
            'grant_type': 'authorization_code',
            'redirect_uri': self._app_uri,
            'response_type': 'code',
            'state': self.__randomname(40)
        }
        access_url = urllib.parse.urljoin(self._authorize_url, 'authorize')
        access_url = '?'.join([access_url, urllib.parse.urlencode(params)])

        # 認可コードリクエスト
        self.__request_authorization_code(access_url)

        # トークンリクエスト
        handler = lambda request, address, server: AccessTokenRequestHandler(
            request, address, server, self._client_credential, self._app_uri, self._authorize_url
        )
        with HTTPServer((self._client_info['host'], self._client_info['port']), handler) as server:
            print('Server Starts - %s:%s' % (self._client_info['host'], self._client_info['port']))
            server.socket = self.__wrap_socket_ssl(server.socket)

            try:
                while token is None:
                    server.result = None
                    server.handle_request()
                    token = server.result
            except KeyboardInterrupt:
                pass

        print('Server Stops - %s:%s' % (self._client_info['host'], self._client_info['port']))

    def result(self):
        return self._authorization_result

    def __request_authorization_code(self, access_url):
        open_new(access_url)

    def __wrap_socket_ssl(self, socket):
        context = ssl.create_default_context(ssl.Purpose.CLIENT_AUTH)
        context.load_cert_chain('./ssl_test.crt', keyfile='./ssl_test.key')
        context.options |= ssl.OP_NO_TLSv1 | ssl.OP_NO_TLSv1_1
        return context.wrap_socket(socket)

    def __randomname(self, n):
        randlst = [random.choice(string.ascii_letters + string.digits) for i in range(n)]
        return ''.join(randlst)
from http.server import BaseHTTPRequestHandler
import urllib.parse
import requests

class AccessTokenRequestHandler(BaseHTTPRequestHandler):
    def __init__(self, request, address, server, client_credential, client_url, authorize_url):
        self._client_credential = client_credential
        self._authorize_url = authorize_url
        self._client_url = client_url
        super().__init__(request, address, server)

    def do_GET(self):
        self.__responde_200()

        # アクセストークン取得
        if 'code' in self.path:
            response = self.__request_access_token()
            self.server.result = response
            self.__write_response_message(response)
            return

        self.wfile.write(bytes('failed to get authorization code.', 'utf-8'))
        return

    def __write_response_message(self, response):
        print('status code:', response.status_code)
        self.__wfwrite('Status Code: %s' % response.status_code)
        print('response:', response.reason)
        self.__wfwrite('Response: %s' % response.reason)
        print(response.json())
        if response.ok:
            self.__wfwrite('<br>'.join(['%s: %s' % val for val in response.json().items()]))
        else:
            self.__wfwrite(response.json()['errors'][0]['message'])

    def __wfwrite(self, string):
        self.wfile.write(bytes('<p>%s</p>' % string, 'utf-8'))

    def __responde_200(self):
        self.send_response(200)
        self.end_headers()

    def __request_access_token(self):
        params = self.__params_from_path()

        access_url = urllib.parse.urljoin(self._authorize_url, 'token')
        post_params = {
            'client_id': self._client_credential['id'],
            'client_secret': self._client_credential['secret'],
            'grant_type': 'authorization_code',
            'redirect_uri': self._client_url,
            'code': params['code']
        }
        # The redirect URI is missing or do not match
        # Code doesn't exist or is invalid for the client
        response = requests.post(access_url, data=post_params, verify=False) # WARN: verify=False
        return response

    def __params_from_path(self):
        query = urllib.parse.urlparse(self.path).query
        params = urllib.parse.parse_qs(query)
        return params
from oauth_authenticator import OAuthAuthenticator

AUTHORIZATION_URL = 'https://0.0.0.0/oauth/v2/'
CLIENT_ID = '1_5j8ecbsu9cowo4wk8kwwcc8k8wc08c8o4sgo4s084cg880ggo0'
CLIENT_SECRET = '172h8p6mevy8w8cggc44gw4w4ookk4ockg440osggkw808c00g'
APP_URI = 'https://0.0.0.0:8888'
APP_HOST = '0.0.0.0'
APP_PORT = 8888

if __name__ == '__main__':
    client_info = (APP_HOST, APP_PORT)
    authenticator = OAuthAuthenticator(
        {'id': CLIENT_ID, 'secret': CLIENT_SECRET},
        {'host': '0.0.0.0', 'port': 8888},
        AUTHORIZATION_URL
    )
    authenticator.get_access_token()
    print('結果', authenticator.result())
上記のソースは僕のgithubにリポジトリがあります。
参考
OAuthについて
*1 PythonでCLIからOAuth2を利用してQiitaのアクセストークンを取得してみた (Qiita)
*2 雰囲気でOAuth2.0を使っているエンジニアがOAuth2.0を整理して、手を動かしながら学べる本
*3 一番分かりやすい OAuth の説明 (Qiita)
SSLとHTTPサーバについて
*4 Python 3 で簡易の HTTPS サーバーを立てる (Qiita)
*5 Mac Chromeでプライバシーブロックされ「詳細設定」からもページが表示できない (Qiita)
*6 「エンジニアの教科書」【Python】[SSL: CERTIFICATE_VERIFY_FAILED] certificate verify failed: self signed certificate in certificate chain (_ssl.c:1123) エラー
*7 「PyMOTW」SocketServer – ネットワークサービスを作成する
