はじめに
一般に、異なるサブネットのネットワークに属するサーバ同士が通信するには、ルーターを介する必要があります(下図)。

しかし、とあるネットワーク構築において、サーバ2がサーバ1と同一のLAN-1にも属するケースの構築を担当することになりました。

実現したい構成はシンプルに、以下の通りとなります。
- サーバ1は、eth0からサーバ2のeth0ともeth1とも通信できる。
- サーバ2は、eth0はサーバ1のeth0と通信でき、eth1はルータを介してサーバ1のeth0と通信できる。
サーバ1については、LAN-2のサブネットに通信するときのgateway設定を施せばほぼ問題ありません。しかし、サーバ2は単純にLAN-1へのgatewayを設定してしまうと、ルータを介さずLAN-1通信する場合がうまく行かないと考えられます(たぶん)。
そのため、主にサーバ2のルーティング設定でどのような設定をすればいいか、検証する必要があるため、このたび検証用の環境を用意して検検証することにしました。
検証環境
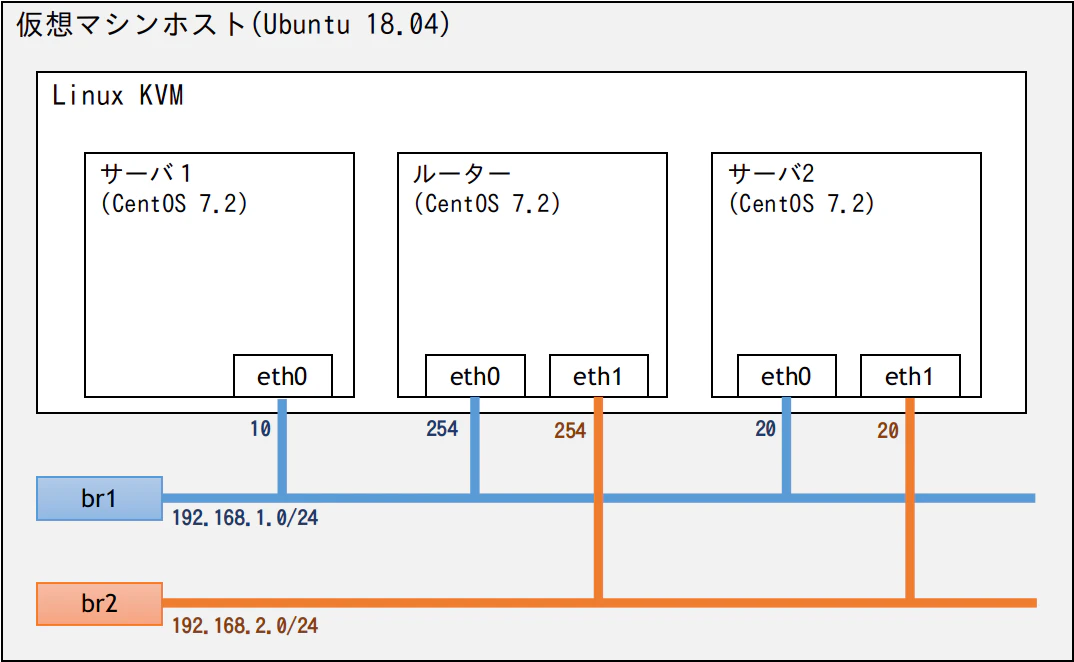
自分が持っているサーバ(というかPC)がUbuntuマシン1台しかないので、Linux KVMを用いて以下のような検証用環境を構成します。ルーターはLinuxをルータ化して代用することにします。
その他の構成としては、
- ゲストOSはCentOS 7.2(version lock済)を使用する。
- LAN-1 : 192.168.1.0/24, LAN-2 : 192.168.2.0/24 とする。
- それぞれのサーバに設定するネットワークアドレスは図の通りとする。
としています。
検証環境の構築
検証環境の構築にあたり、LinuxKVMを用いたCentOS7仮想マシンの構築は、本議題から外れるため割愛します。ここでは、仮想マシンは構築した状態から各ethポートに対して実施するIPアドレス設定について記述します。
サーバ1の静的なIPアドレス設定
root権限のユーザにて以下の設定を実施します。
- nmcliコマンドを用いて、eth0にIPアドレスを設定する。
- ネットワークを再起動する。
#  nmcli con add type ethernet ifname eth0
#  nmcli con mod ethernet-eth0 ipv6.method ignore ipv4.method manual ipv4.address 192.168.1.10/24
#  systemctl restart network
サーバ2の静的なIPアドレス設定
サーバ1と同様、root権限のユーザにて以下の設定を実施します。
- nmcliコマンドを用いて、eth0、eth1にIPアドレスを設定する。
- ネットワークを再起動する。
#  nmcli con add type ethernet ifname eth0
#  nmcli con mod ethernet-eth0 ipv6.method ignore ipv4.method manual ipv4.address 192.168.1.20/24
#  nmcli con add type ethernet ifname eth1
#  nmcli con mod ethernet-eth1 ipv6.method ignore ipv4.method manual ipv4.address 192.168.2.20/24
#  systemctl restart network
ルーターの設定
その1:静的なIPアドレス設定
サーバ1と同様、root権限のユーザにて以下の設定を実施します。
- nmcliコマンドを用いて、eth0、eth1にIPアドレスを設定する。
- ネットワークを再起動する。
#  nmcli con add type ethernet ifname eth0
#  nmcli con mod ethernet-eth0 ipv6.method ignore ipv4.method manual ipv4.address 192.168.1.254/24
#  nmcli con add type ethernet ifname eth1
#  nmcli con mod ethernet-eth1 ipv6.method ignore ipv4.method manual ipv4.address 192.168.2.254/24
#  systemctl restart network
その2:IPフォワーディング設定
LAN1<->LAN2間のファワーディングを有効にするため、/etc/sysctl.confにカーネルパラメータの設定変更を記述します。編集終了後、ルータを再起動します。
# vi /etc/sysctl.conf
# System default settings live in /usr/lib/sysctl.d/00-system.conf.
# To override those settings, enter new settings here, or in an /etc/sysctl.d/<name>.conf file
#
# For more information, see sysctl.conf(5) and sysctl.d(5).

net.ipv4.ip_forward=1
導通検証のやり方
基本的にはpingとtcpdumpを用いて経路ごとにecho requestとecho replyのやりとりを確認します。
(例)経路:サーバ2 eth1 -> サーバ1 eth0へのping
- サーバ1にて、
tcpdump -i eth0 icmpでeth0のパケット送受信をウォッチする。 - サーバ2にて、
tcpdump -i eth1 icmpでeth1のパケット送受信をウォッチする。 - サーバ2にて、
ping -I eth1 192.168.1.10とデバイス指定pingを実行する。 - tcpdumpのICMPのやり取りとping応答の状況を確認する(下のサンプル参照)。
(サーバ1 tcpdump)
#  tcpdump -i eth0 icmp
tcpdump: verbose output suppressed, use -v or -vv for full protocol decode
listening on eth0, link-type EN10MB (Ethernet), capture size 65535 bytes
01:19:20.110270 IP 192.168.2.20 > centos1: ICMP echo request, id 1038, seq 1, length 64
01:19:20.110311 IP centos1 > 192.168.2.20: ICMP echo reply, id 1038, seq 1, length 64
01:19:21.111793 IP 192.168.2.20 > centos1: ICMP echo request, id 1038, seq 2, length 64
01:19:21.111829 IP centos1 > 192.168.2.20: ICMP echo reply, id 1038, seq 2, length 64
                                  (以下略)

(サーバ2 tcpdump)
#  tcpdump -i eth1 icmp
tcpdump: verbose output suppressed, use -v or -vv for full protocol decode
listening on eth1, link-type EN10MB (Ethernet), capture size 65535 bytes
01:19:19.788623 IP 192.168.2.20 > 192.168.1.10: ICMP echo request, id 1038, seq 1, length 64
01:19:19.789339 IP 192.168.1.10 > 192.168.2.20: ICMP echo reply, id 1038, seq 1, length 64
01:19:20.789920 IP 192.168.2.20 > 192.168.1.10: ICMP echo request, id 1038, seq 2, length 64
01:19:20.790528 IP 192.168.1.10 > 192.168.2.20: ICMP echo reply, id 1038, seq 2, length 64
                                  (以下略)

(サーバ2 ping)
#  ping -I eth1 192.168.1.10
PING 192.168.1.10 (192.168.1.10) from 192.168.2.20 eth1: 56(84) bytes of data.
64 bytes from 192.168.1.10: icmp_seq=1 ttl=63 time=0.905 ms
64 bytes from 192.168.1.10: icmp_seq=2 ttl=63 time=1.13 ms
                                  (以下略)
検証結果:各経路でping導通するために必要なルーティング設定
各経路でのping導通確認を実施し、以下の設定が必要であるとわかりました。なお、ここで導出した設定はipコマンド等の揮発な設定のため、静的に実施したい場合はnmcliによる設定やsysctl.confへの追記、もしくは導出したコマンドをシェルスクリプトにまとめsystemdのサービス登録して起動時にONESHOT実行するなどが必要です。
サーバ1の設定
LAN-2へのルーティング設定を追加します。
# ip route add 192.168.2.0/24 via 192.168.1.254 dev eth0
サーバ2の設定
その1:ルーティング設定
その1-1:eth1のデフォルトゲートウェイ設定
eth1から出力する通信はルータをdefault gatewayに設定します。
# ip route add default via 192.168.2.254 dev eth1 proto static metric 100
その1-2:eth1から入力されたパケットは、eth1から返却する設定
サブネットごとのルーティング優先度により変わりますが、以下のようにroute優先度がLAN1>LAN2の場合、eth1に入力されたパケットの返却先サブネットがLAN1の場合、返却パケットがeth0から出力されてしまいます。
#  ip route show table main
192.168.1.0/24 dev eth0  proto kernel  scope link  src 192.168.1.20  metric 100
192.168.2.0/24 dev eth1  proto kernel  scope link  src 192.168.2.20  metric 100
これを回避するため、eth1に入力されたパケットに適用するルーティングルールを追加する必要があります。
(設定)
- /etc/iproute2/rt_tablesにsubroute-eth1を定義する。
- ip route コマンドでsubroute-eth1にルーティングルールを追加する。
- ip rule コマンドでsubroute-eth1を有効にする。
#  echo "100     subroute-eth1" >> /etc/iproute2/rt_tables
#  ip route add table subroute-eth1 192.168.2.0/24 dev eth1 scope link proto kernel
#  ip route add table subroute-eth1 192.168.1.0/24 via 192.168.2.254 dev eth1
#  ip rule add from 192.168.2.20 table subroute-eth1 prio 100
#  ip rule show
0:	from all lookup local
100:	from 192.168.2.20 lookup subroute-eth1
32766:	from all lookup main
32767:	from all lookup default
#  ip route show table subroute-eth1
192.168.1.0/24 via 192.168.2.254 dev eth1
192.168.2.0/24 dev eth1  proto kernel  scope link
その2:rp_filter設定(非常に重要)
(参考)CentOS 7 の rp_filter でハマった件 ( https://mano.xyz/2008/ )
*参考にさせていただきました。誠にありがとうございます。
CentOS7は標準設定では入力インターフェイスと出力インターフェイスが異なるトラフィックを破棄するのでカーネルパラメータを変更します。
# echo 2 > /proc/sys/net/ipv4/conf/all/rp_filter
設定後の導通確認結果
以下の4経路でのping導通を確認できました。
- 経路:サーバ1 eth0 -> サーバ2 eth0へのping : OK
- 経路:サーバ1 eth0 -> サーバ2 eth1へのping : OK
- 経路:サーバ2 eth0 -> サーバ1 eth0へのping : OK
- 経路:サーバ2 eth1 -> サーバ1 eth0へのping : OK
検証は、以上です。