はじめに
メインフレーム(z/OS)の開発環境をIBM Cloud上にセットアップしてみた時のログです。今回はZD&T管理サーバーのインストールまで。
関連記事
クラウド上でのメインフレーム開発環境構築 - (1) 仮想サーバー作成
クラウド上でのメインフレーム開発環境構築 - (2) ZD&T管理サーバーのインストール
クラウド上でのメインフレーム開発環境構築 - (3) ライセンス管理
クラウド上でのメインフレーム開発環境構築 - (4) ZD&Tインスタンス作成概要(ADCD)
クラウド上でのメインフレーム開発環境構築 - (5) ZD&Tインスタンス作成詳説(ADCD)
クラウド上でのメインフレーム開発環境構築 - (6) DeviceMapファイル補足
クラウド上でのメインフレーム開発環境構築 - (7) ネットワーク構成補足
クラウド上でのメインフレーム開発環境構築 - (8) ADCD IPL, Shutdown補足
クラウド上でのメインフレーム開発環境構築 - (9) DASD管理補足
クラウド上でのメインフレーム開発環境構築 - (10)既存ZD&Tからイメージ作成
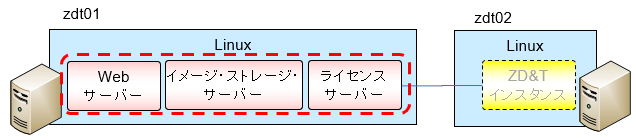
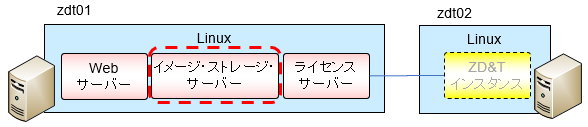
全体像
今回は、ZD&T管理サーバー群(図の左側のLinux)をセットアップしていきます。
事前準備
インストーラーやDASDイメージファイル(ADCD)は管理サーバーを導入するLinuxに転送しておきます。サイズが大きいのでファイル転送にはICOSを使うとよいです。
参考: IBM Cloud Object Storageを介したファイル転送
また、ZD&Tのインストーラーを実行すると依存関係のあるOSパッケージをインストールしてくれるのでyumでOSパッケージをインストールできるようにしておく必要があります。
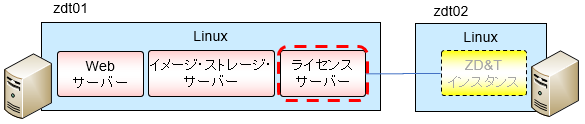
ライセンス・サーバーのセットアップ
ライセンス・サーバーのインストール
参考: Installing Software-based License Server
rootユーザーで実施する必要があるので、以降、suでrootにスイッチして実行します。
インストーラーが配置されているディレクトリに移動してインストーラーを解凍。
[root@zdt01 /mnt/Inst_Image/ZDT]# tar -xzvf ZDT_Install_EE_V12.0.5.0.tgz
README
ZDT_Install_EE_V12.0.5.0.x86_64
解凍されたインストーラーのスクリプトを実行します。
このインストーラーは以下の4つの機能の共通のインストーラーになっています(スクリプト実行した時に出てくるメニューが分かりにくいので注意!!!)。
(1) Webサーバー
(2) Software-Based ライセンス・サーバー
(3) Hardware-Based ライセンス・サーバー
(4) ZD&Tエミュレーター(ZD&Tインスタンス)
ここではSoftware-Baseのライセンス・サーバーをインストールするので、最初のプロンプトで2を選択し、その後メニューに従って進めていけばOKです。
[root@zdt01 /mnt/Inst_Image/ZDT]# ./ZDT_Install_EE_V12.0.5.0.x86_64
The following products can be installed, updated, or uninstalled. Select one action:
         1) ZD&T Enterprise Edition
                A simple role-based Web utility to ease the process of creating
                and managing your IBM ZD&T instances.
                It includes features to create assets, monitor and
                automatically configure, install and deploy to target systems.
                This offering can be installed on the same system as
                the ZD&T Hardware-Based License Server and as the
                ZD&T Software-Based License Server.
         2) ZD&T Software-Based License Server
                A server for centralized management of software-based license
                keys for one or more instances of ZD&T.
                This offering cannot be installed on the same system as
                ZD&T Hardware-Based License Server but can be on the same system
                as the ZD&T Enterprise Edition.
         3) ZD&T Hardware-Based License Server
                A server for centralized management of hardware (USB)-based
                license keys for one or more instances of ZD&T.
                This offering cannot be installed on the same system as
                ZD&T Software-Based License Server but can be on the same system
                as the ZD&T Enterprise Edition.
         4) ZD&T Emulator
                A platform for mainframe application demonstration, development,
                testing and education. It enables IBM z/OSR middleware
                and other z/OS software to run on Intel-compatible platforms
                without IBM ZR mainframe hardware. It emulates IBM Z
                architecture with virtual I/O and devices. It cannot be
                installed on the same system as the ZD&T Software-Based License Server,
                ZD&T Hardware-Based License Server and ZD&T Enterprise Edition.
==>2
What do you want to do with ZD&T Software-Based License Server?
         1) Install
         2) Update
         3) Uninstall
==>1
Press ENTER and read the following license agreements carefully.

<ライセンス表示(省略)>

Do you accept the terms in the license agreements? (y/n): y

*******************************Warning*******************************
Software-based License Server needs to be a static resource in any
infrastructure configuration. In a virtualized or cloud infrastructure,
it does not tolerate physical moving. If the Software-based License Server
is manually or automatically moved return the license before moving,
acquire the license after movement, and configure the Software-based
License Server again.
Do you accept the above terms? (y/N): y

*******************************Warning*******************************
You are attempting to install the IBM ZD&T Software-based license server on
virtual hardware.  The licensing for IBM ZD&T is based on a hardware signature
and if the underlying hardware changes then the licenses on this license
server will become invalid, preventing any IBM ZD&T emulators from functioning.
This scenario can happen very easily if the license server is installed on
a virtual machine and it will require IBMs assistance to help resolve
the problem and is a very time-consuming effort, sometimes taking up to a
week to resolve.  For this reason it is strongly recommended that you only
install the IBM ZD&T Software-based license server on physical hardware;
However, if you wish to proceed with installing on this virtual machine then
press Y indicating that you have read this warning and acknowledge the
consequences if the virtual machine stops working as a result of the hardware
changing.

I acknowledge the above statement and agree to install on virtual hardware y/N: y

Do you want the necessary Linux dependencies for the product to be installed? (y/N): y
Installing dependencies ...
Installation of dependencies was successful

Installing  +++++
Preparing...                          ################################# [100%]
Updating / installing...
   1:zpdtldk-1-10.55.04               ################################# [100%]
Installing aksusbd pkg  +++++
Preparing...                          ################################# [100%]
Updating / installing...
   1:aksusbd-7.80-1                   ################################# [100%]
Created symlink from /etc/systemd/system/multi-user.target.wants/aksusbd.service to /etc/systemd/system/aksusbd.service.
Created symlink from /etc/systemd/system/multi-user.target.wants/hasplmd.service to /etc/systemd/system/hasplmd.service.

Copy in hasp shared object +++++

Installing UIM +++++
Preparing...                          ################################# [100%]
Updating / installing...
   1:zpdtuim-1-10.55.04               ################################# [100%]

 To start the uimserver , using a non-root id,
  execute : /usr/z1090/bin/uimserverstart


 To generate a License request, issue command :
     /opt/IBM/LDK/request_license
  and then send the resulting file to
  your IBM representative.
2020-09-18_19:57:06:  uimserver started successfully.
Using port 9451  IPv4

The installer has created the non-root user id "ibmsys1" with a generated password.
Do not forget to change the password of this account
途中2度も警告されているように、Cloud上でライセンス・サーバーを立てる場合はH/Wが変更されない環境に構築する必要があります。今回はテンポラリーのテスト環境のためそのまま進めます。
(一度ライセンスをアクティベートした後、再起動して別のH/Wで稼働することになるとライセンスが有効化されずにZD&Tインスタンスが使えなくなります。)
ibmsys1ユーザーが作成されたのでパスワード変更しておきます。
[root@zdt01 /mnt/Inst_Image/ZDT]# passwd ibmsys1
Changing password for user ibmsys1.
New password:
Retype new password:
passwd: all authentication tokens updated successfully.
インストール状態確認
パッケージ
[root@zdt01 /mnt/Inst_Image/ZDT]# yum list installed | grep zpdt
zpdtldk.x86_64                      1-10.55.04               installed
zpdtuim.x86_64                      1-10.55.04               installed
[root@zdt01 /mnt/Inst_Image/ZDT]# yum list installed | grep aksusbd
aksusbd.x86_64                      7.80-1                   installed
systemd
[root@zdt01 ~]# systemctl status aksusbd.service
● aksusbd.service - Sentinel LDK Runtime Environment (aksusbd daemon)
   Loaded: loaded (/etc/systemd/system/aksusbd.service; enabled; vendor preset: disabled)
   Active: active (running) since Fri 2020-09-18 19:57:05 CDT; 1h 54min ago
  Process: 6005 ExecStart=/usr/sbin/aksusbd (code=exited, status=0/SUCCESS)
 Main PID: 6009 (aksusbd)
   CGroup: /system.slice/aksusbd.service
           mq6009 /usr/sbin/aksusbd

Sep 18 19:57:05 zdt01.ibmj-cloud-freeusage-p052.cloud systemd[1]: Starting Sentinel LDK Runtime Environment (aksusbd daemon)...
Sep 18 19:57:05 zdt01.ibmj-cloud-freeusage-p052.cloud systemd[1]: Started Sentinel LDK Runtime Environment (aksusbd daemon).
Sep 18 19:57:05 zdt01.ibmj-cloud-freeusage-p052.cloud aksusbd[6009]: loaded, daemon version: 7.80.1.74261, key API (USB) version: 3.88 (parallel driver not available)

[root@zdt01 ~]# systemctl status hasplmd.service
● hasplmd.service - Sentinel LDK Runtime Environment (hasplmd daemon)
   Loaded: loaded (/etc/systemd/system/hasplmd.service; enabled; vendor preset: disabled)
   Active: active (running) since Fri 2020-09-18 19:57:05 CDT; 1h 54min ago
  Process: 6011 ExecStart=/usr/sbin/hasplmd -s (code=exited, status=0/SUCCESS)
 Main PID: 6013 (hasplmd)
   CGroup: /system.slice/hasplmd.service
           mq6013 /usr/sbin/hasplmd -s

Sep 18 19:57:05 zdt01.ibmj-cloud-freeusage-p052.cloud systemd[1]: Starting Sentinel LDK Runtime Environment (hasplmd daemon)...
Sep 18 19:57:05 zdt01.ibmj-cloud-freeusage-p052.cloud hasplmd[6013]: HASP LM v21.0.1.77814 loaded
Sep 18 19:57:05 zdt01.ibmj-cloud-freeusage-p052.cloud systemd[1]: Started Sentinel LDK Runtime Environment (hasplmd daemon).
firewalld
<?xml version="1.0" encoding="utf-8"?>
<zone>
  <short>Public</short>
  <description>For use in public areas. You do not trust the other computers on networks to not harm your computer. Only selected incoming connections are accepted.</description>
  <service name="dhcpv6-client"/>
  <port protocol="tcp" port="2222"/>
  <port protocol="tcp" port="22"/>
  <port protocol="tcp" port="2022"/>
  <port protocol="tcp" port="1947"/>
  <port protocol="tcp" port="9450"/>
  <port protocol="tcp" port="9451"/>
  <port protocol="tcp" port="3270"/>
</zone>
ssh用のポートとして22番が勝手に追加されてます。(セキュリティ対策として22番じゃない別のポートでssh起動するようにしてるんだが...)
※注意
ここで、1947ポートについてはtcpだけでなくudpの通信も許可しておく必要がありますが、udpについては追加してくれていないので、手動で追加します。
参考: zPDT License Server - Notes - Firewalls
[root@zdt01 ~]# firewall-cmd --zone=public --add-port=1947/udp --permanent
success
[root@zdt01 ~]# cat /etc/firewalld/zones/public.xml
<?xml version="1.0" encoding="utf-8"?>
<zone>
  <short>Public</short>
  <description>For use in public areas. You do not trust the other computers on networks to not harm your computer. Only selected incoming connections are accepted.</description>
  <service name="dhcpv6-client"/>
  <port protocol="tcp" port="2222"/>
  <port protocol="tcp" port="22"/>
  <port protocol="tcp" port="2022"/>
  <port protocol="tcp" port="1947"/>
  <port protocol="tcp" port="9450"/>
  <port protocol="tcp" port="9451"/>
  <port protocol="tcp" port="3270"/>
  <port protocol="udp" port="1947"/>
</zone>
[root@zdt01 ~]# firewall-cmd --list-all
public
  target: default
  icmp-block-inversion: no
  interfaces:
  sources:
  services: dhcpv6-client
  ports: 2222/tcp
  protocols:
  masquerade: no
  forward-ports:
  source-ports:
  icmp-blocks:
  rich rules:
動的に反映はされていないのでreloadして再確認。
[root@zdt01 ~]# firewall-cmd --reload
success
[root@zdt01 ~]# firewall-cmd --list-all
public
  target: default
  icmp-block-inversion: no
  interfaces:
  sources:
  services: dhcpv6-client
  ports: 2222/tcp 22/tcp 2022/tcp 1947/tcp 9450/tcp 9451/tcp 3270/tcp 1947/udp
  protocols:
  masquerade: no
  forward-ports:
  source-ports:
  icmp-blocks:
  rich rules:
ライセンスのアクティベート
この後ライセンスをアクティベートする操作が必要になりますが、この辺りは別記事で記載します。ここでは一旦置いておいて次に進みます。
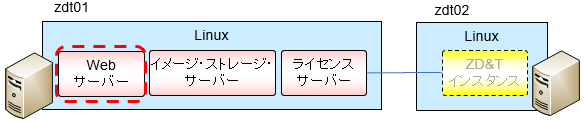
Webサーバーのセットアップ
Webサーバーのインストール
参考: Installing the Enterprise Edition web server
Webサーバーは/opt/ibm以下に導入されるようです。追加したディスクを使いたいので追加したファイルシステム下にディレクトリ作成してそこにシンボリックリンク作成しておくことにします。
[taguchi@zdt01 /mnt]$ sudo mkdir opt_ibm
[taguchi@zdt01 /mnt]$ sudo ln -s /mnt/opt_ibm/ /opt/ibm
[taguchi@zdt01 /mnt]$ sudo ls -la /opt
total 20
drwxr-xr-x.  5 root root 4096 Sep 19 00:35 .
dr-xr-xr-x. 19 root root 4096 Sep 18 19:57 ..
lrwxrwxrwx.  1 root root   13 Sep 19 00:35 ibm -> /mnt/opt_ibm/
drwxr-xr-x.  3 root root 4096 Sep 18 22:03 IBM
drwxr-xr-x.  3 root root 4096 Sep 18 19:57 man
drwxr-xr-x.  3 root root 4096 Sep 18 19:57 safenet_sentinel
rootユーザーにスイッチしてインストーラーのスクリプトを実行します。
[root@zdt01 /mnt/Inst_Image/ZDT]# ./ZDT_Install_EE_V12.0.5.0.x86_64
The following products can be installed, updated, or uninstalled. Select one action:
         1) ZD&T Enterprise Edition
                A simple role-based Web utility to ease the process of creating
                and managing your IBM ZD&T instances.
                It includes features to create assets, monitor and
                automatically configure, install and deploy to target systems.
                This offering can be installed on the same system as
                the ZD&T Hardware-Based License Server and as the
                ZD&T Software-Based License Server.
         2) ZD&T Software-Based License Server
                A server for centralized management of software-based license
                keys for one or more instances of ZD&T.
                This offering cannot be installed on the same system as
                ZD&T Hardware-Based License Server but can be on the same system
                as the ZD&T Enterprise Edition.
         3) ZD&T Hardware-Based License Server
                A server for centralized management of hardware (USB)-based
                license keys for one or more instances of ZD&T.
                This offering cannot be installed on the same system as
                ZD&T Software-Based License Server but can be on the same system
                as the ZD&T Enterprise Edition.
         4) ZD&T Emulator
                A platform for mainframe application demonstration, development,
                testing and education. It enables IBM z/OSR middleware
                and other z/OS software to run on Intel-compatible platforms
                without IBM ZR mainframe hardware. It emulates IBM Z
                architecture with virtual I/O and devices. It cannot be
                installed on the same system as the ZD&T Software-Based License Server,
                ZD&T Hardware-Based License Server and ZD&T Enterprise Edition.
==>1
What do you want to do with ZD&T Enterprise Edition?
         1) Install
         2) Update
         3) Uninstall
==>1
Press ENTER and read the following license agreements carefully.

<ライセンス表示(省略)>

Do you accept the terms in the license agreements? (y/n): y
Do you want a user called 'zdt' to be created automatically
for running the Enterprise Edition server? (Y/n): Y
Do you want to install to the /opt/ibm/ directory? (Y/n): Y
Do you want to use the default port to access
Enterprise Edition Server (9443)? (Y/n): Y

A new installation of ZD&T Enterprise Edition will setup the web server
to use HTTPS and has a default user registry containing the user
'zdtadmin' user registry containing the user 'zdtadmin' which can be used
to login via basic access authentication. Refer to the
Starting and accessing the Enterprise Edition web server section of the
ZD&T Knowledge Center (https://www.ibm.com/support/knowledgecenter/SSTQBD)
for more information on this setup and changing to use other user
registry types.

The default password for the 'zdtadmin' account is 'password'.
Do you want to change this password?  (Y/n):Y
New Password:
Retype New Password:

Installing ibm-java-x86_64-jre +++++
Preparing...                          ################################# [100%]
Updating / installing...
   1:ibm-java-x86_64-jre-8.0-6.0      ################################# [100%]

Installing zdtliberty +++++
Preparing...                          ################################# [100%]
Updating / installing...
   1:zdtliberty-5-19.0.0.12           ################################# [100%]
User id zdt added to '0' group.

Server zDTServer created.

Installing zdtpostgresql +++++
Preparing...                          ################################# [100%]
Updating / installing...
   1:zdtpostgresql-1-10.10            ################################# [100%]

Installing zdtapp file +++++
Preparing...                          ################################# [100%]
Updating / installing...
   1:zdtapp-1-12.0.5.0.20200303003050 ################################# [100%]

Installing zsystem file +++++
Preparing...                          ################################# [100%]
Updating / installing...
   1:zsystem-1-12.0.5.0.20200303003050################################# [100%]

Installing zdtserverenv files +++++
Preparing...                          ################################# [100%]
Updating / installing...
   1:zdtserverenv-1-12.0.5.0.202003030################################# [100%]

Installing zdttoolsdb file +++++
Preparing...                          ################################# [100%]
Updating / installing...
   1:zdttoolsdb-1-12.0.5.0.20200303003################################# [100%]

Run the following command to start the IBM Z Development
and Test Environment Enterprise Edition server:
/opt/ibm/zDT/bin/startServer.sh

ZD&T Enterprise Edition install was successful.
インストール実行の途中で、管理者用のzdtadminユーザーが作成されるのでそこで新規パスワードを設定しておきます。
それとは別にzdtユーザー(Webサーバープロセス用)が作成されたのでそちらは別途コマンドでパスワード変更しておきます。
[root@zdt01 /mnt/Inst_Image/ZDT]# passwd zdt
Changing password for user zdt.
New password:
Retype new password:
passwd: all authentication tokens updated successfully.
インストール状況確認
[root@zdt01 /mnt/Inst_Image/ZDT]# yum list installed | grep zdt
zdtapp.x86_64                    1-12.0.5.0.20200303003050   installed
zdtliberty.x86_64                5-19.0.0.12                 installed
zdtpostgresql.x86_64             1-10.10                     installed
zdtserverenv.x86_64              1-12.0.5.0.20200303003050   installed
zdttoolsdb.x86_64                1-12.0.5.0.20200303003050   installed
[root@zdt01 /mnt/Inst_Image/ZDT]# yum list installed | grep zsystem
zsystem.x86_64                   1-12.0.5.0.20200303003050   installed
firewalldの変更
9443ポートを使用するようWebサーバーを構成したので、9443ポートの通信を許可するようfirewalldの設定を変更します。
[root@zdt01 ~]# firewall-cmd --zone=public --add-port=9443/tcp --permanent
success
[root@zdt01 ~]# firewall-cmd --reload
success
[root@zdt01 ~]# firewall-cmd --list-all
public
  target: default
  icmp-block-inversion: no
  interfaces:
  sources:
  services: dhcpv6-client
  ports: 2222/tcp 22/tcp 2022/tcp 1947/tcp 9450/tcp 9451/tcp 3270/tcp 1947/udp 9443/tcp
  protocols:
  masquerade: no
  forward-ports:
  source-ports:
  icmp-blocks:
  rich rules:
Webサーバー起動
参考: Starting and accessing the Enterprise Edition web server
実体はLibertyっぽいです。/opt/ibm/zDT/bin/startServer.shを実行すれば起動します。
[taguchi@zdt01 ~]$ sudo /opt/ibm/zDT/bin/startServer.sh
Creating zdtee postgresql database...
Database creation success
Starting the IBM Z Development and Test Environment Enterprise Edition server:  sudo -H -u zdt /opt/ibm/zDT/bin/zdtee_cmd.sh start

Starting server zDTServer.
Server zDTServer started with process ID 21464.
IBM Z Development and Test Environment Enterprise Edition can be accessed using the following URL: https://zdt01.ibmj-cloud-freeusage-p052.cloud:9443/ZDTMC/index.html
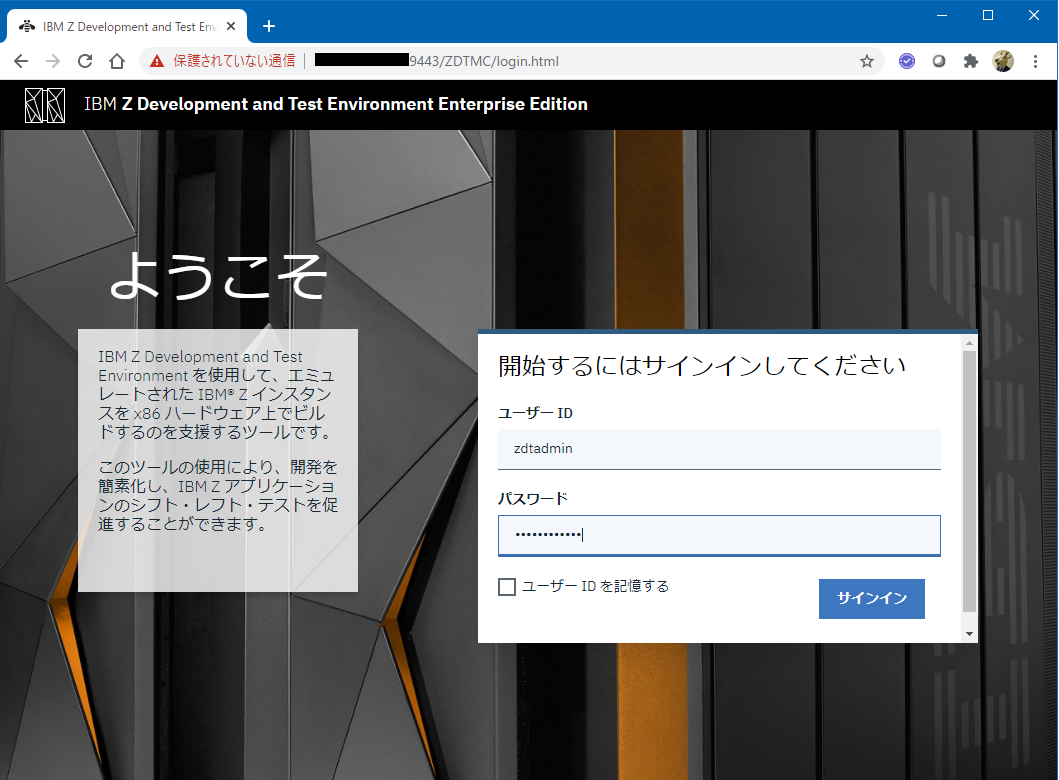
PCのブラウザからhttps://ipaddress:9443/ZDTMC/index.htmlにアクセスしてみます。
導入時に設定したzdtadminのパスワードを指定してサインインします。
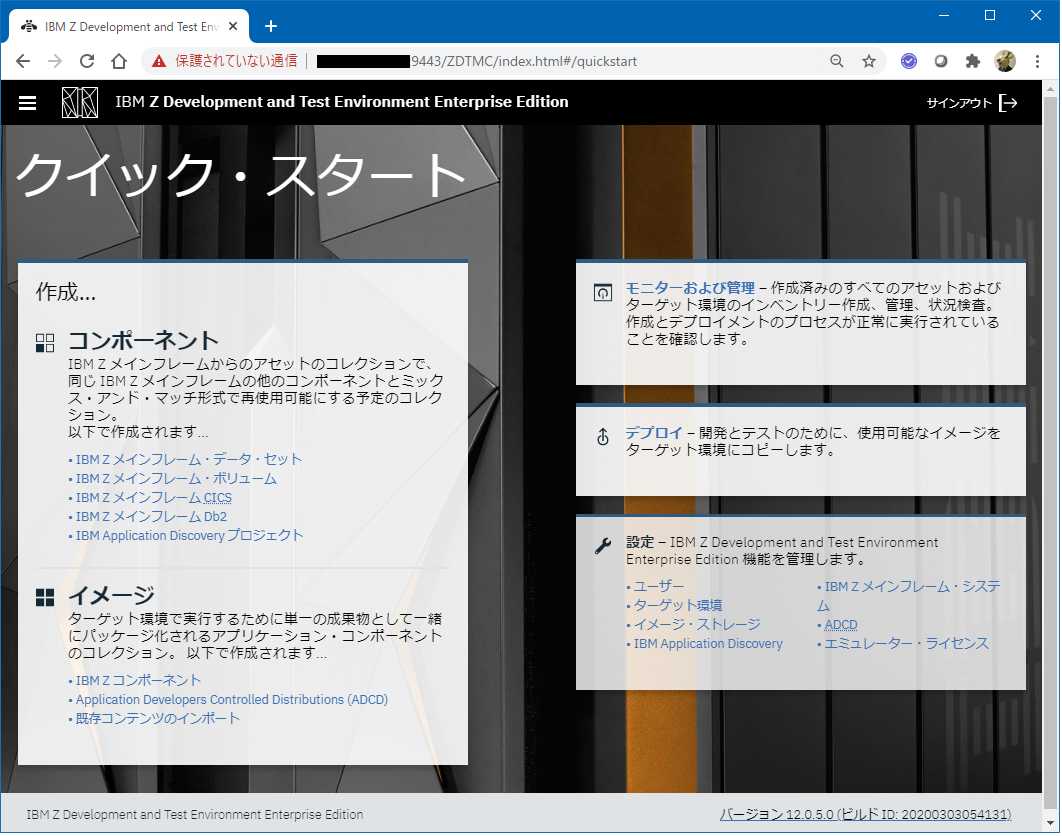
管理用アプリにアクセスできたのでOKそうです。これは一旦おいておきます。
ちなみに停止するには開始用のスクリプトと同じ場所にあるstopServer.shを実行すればOKです。
イメージ・ストレージ・サーバーのセットアップ
イメージ・ストレージ・サーバーというのは、ZD&Tインスタンスを作成する際の元となるDASDイメージファイルを管理するための役割を担うものです。機能としてはftpもしくはsftpが使えればよいです。
ZD&Tインスタンス作成時のフローを詳しく見てみると、イメージ・ストレージ・サーバーはこんな感じで使われることになりそうです。
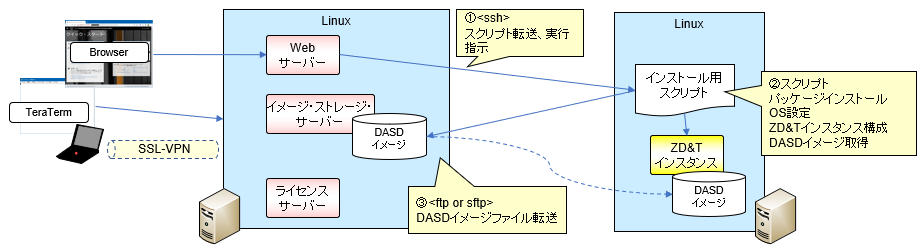
この先のZD&Tインスタンス作成時の手順を調べていると、どうやらsftp/ftp用のユーザーID/パスワードを指定する必要がありそうです。つまりパスワードでの認証しか行えず公開鍵認証方式は使えなさそうです。
sftpはsshの機能を利用したファイル転送の仕組みですが、今回クラウド上に構成しているということで、セキュリティを厳しくするためにsshではパスワード認証は無効に設定しています。イメージ・ストレージ・サーバーでsftpを使用するのであればパスワード認証を有効にしないといけなさそうです。
今回は、sshはパスワード認証は無効の状態にしておきたいので、別途FTPサーバーを立ててそちらは利用できるIPアドレスをZD&Tインスタンスのサーバーのみに限定する((同一セグメント内のIPアドレスのみFTPを許可する)という構成にしようと思います。
vsftpセットアップ
インストール
パッケージが無かったのでインストールします。
[taguchi@zdt01 ~]$ sudo yum install vsftpd
Loaded plugins: product-id, search-disabled-repos, subscription-manager

<省略>

Installed:
  vsftpd.x86_64 0:3.0.2-27.el7

Complete!
構成
この辺の記事を参考にvsftpdの設定を行います。
参考: 【CentOS7】vsftpdでパッシブモードのFTPサーバーを設定する
...
anonymous_enable=NO
userlist_enable=YES
userlist_deny=NO
use_localtime=YES
ascii_upload_enable=YES
ascii_download_enable=YES
pasv_promiscuous=NO
pasv_min_port=61000
pasv_max_port=61005
...
ftp専用ユーザー"ftpuser"作成
[taguchi@zdt01 ~]$ sudo useradd ftpuser
[taguchi@zdt01 ~]$ sudo passwd ftpuser
Changing password for user ftpuser.
New password:
Retype new password:
passwd: all authentication tokens updated successfully.
user_listにftpuserのみを指定
# vsftpd userlist
# If userlist_deny=NO, only allow users in this file
# If userlist_deny=YES (default), never allow users in this file, and
# do not even prompt for a password.
# Note that the default vsftpd pam config also checks /etc/vsftpd/ftpusers
# for users that are denied.
ftpuser
vsftpd起動
[taguchi@zdt01 ~]$ sudo systemctl start vsftpd.service
[taguchi@zdt01 ~]$ sudo systemctl status vsftpd.service
● vsftpd.service - Vsftpd ftp daemon
   Loaded: loaded (/usr/lib/systemd/system/vsftpd.service; disabled; vendor preset: disabled)
   Active: active (running) since Sat 2020-09-19 03:02:11 CDT; 5s ago
  Process: 6608 ExecStart=/usr/sbin/vsftpd /etc/vsftpd/vsftpd.conf (code=exited, status=0/SUCCESS)
 Main PID: 6609 (vsftpd)
   CGroup: /system.slice/vsftpd.service
           mq6609 /usr/sbin/vsftpd /etc/vsftpd/vsftpd.conf

Sep 19 03:02:11 zdt01.ibmj-cloud-freeusage-p052.cloud systemd[1]: Starting Vsftpd ftp daemon...
Sep 19 03:02:11 zdt01.ibmj-cloud-freeusage-p052.cloud systemd[1]: Started Vsftpd ftp daemon.
自動起動設定
[taguchi@zdt01 ~]$ sudo systemctl enable vsftpd.service
Created symlink from /etc/systemd/system/multi-user.target.wants/vsftpd.service to /usr/lib/systemd/system/vsftpd.service.
firewalld設定
FTP制御用のポート21、パッシブ用のデータ転送ポート61000-61005を、プライベートの同セグメントのIPアドレスのみ許可するよう設定を追加します。
[taguchi@zdt01 ~]$ sudo firewall-cmd --permanent --zone=public --add-rich-rule='rule family="ipv4" source address="10.132.233.192/26" port protocol="tcp" port="21" accept'
success
[taguchi@zdt01 ~]$ sudo firewall-cmd --permanent --zone=public --add-rich-rule='rule family="ipv4" source address="10.132.233.192/26" port protocol="tcp
" port="61000-61005" accept'
success

[taguchi@zdt01 ~]$ sudo firewall-cmd --reload
success

[taguchi@zdt01 ~]$ sudo firewall-cmd --list-all
public
  target: default
  icmp-block-inversion: no
  interfaces:
  sources:
  services: dhcpv6-client
  ports: 2222/tcp 22/tcp 2022/tcp 1947/tcp 9450/tcp 9451/tcp 3270/tcp 1947/udp 9443/tcp
  protocols:
  masquerade: no
  forward-ports:
  source-ports:
  icmp-blocks:
  rich rules:
        rule family="ipv4" source address="10.132.233.192/26" port port="21" protocol="tcp" accept
        rule family="ipv4" source address="10.132.233.192/26" port port="61000-61005" protocol="tcp" accept
ftp接続確認
ZD&Tインスタンス構成用のLinux(zdt02)からftpuserで接続できることを確認
[taguchi@zdt02 ~]$ ftp xxx
Connected to xxx (xxx).
220 (vsFTPd 3.0.2)
Name (xxx:taguchi): ftpuser
331 Please specify the password.
Password:
230 Login successful.
Remote system type is UNIX.
Using binary mode to transfer files.
ftp>
ローカルのPCからはFTP接続できないことも確認
まとめ
これで一通り左側の管理サーバー部分の基本的なセットアップは完了です。