目次
環境
ハード
- ディスプレイ、マウス、キーボードを繋いである Raspberry Pi 3 Model B+
- Windows10が入ったマシン
ネットワーク
- 同一ローカルネットワークに接続済み
SSHとは?
Secure Shell(セキュアシェル、SSH)は、暗号や認証の技術を利用して、安全にリモートコンピュータと通信するためのプロトコル。パスワードなどの認証部分を含むすべてのネットワーク上の通信が暗号化される。
Secure Shell - Wikipedia より引用
暗号化とか認証とかを使って安全にリモートコンピュータに接続する仕組み。
その名の通り、シェルのセキュアなやつ。
パスワードによるベーシック認証も使えるが、基本的には公開鍵暗号を使って鍵で接続することが多い。
一通り設定が済んだらベーシック認証を無効化しておくのが吉。
Raspberry PiでSSHの設定をする。
Windows 10からRaspberry PiにSSH接続してみる(公開鍵認証) - いろいろ試してみる
基本的にはここを参照する。
1. SSHディレクトリを作る
Raspberry Piで以下のコマンドを実行。
sudo mkdir /boot/ssh
フォルダは空でOK。
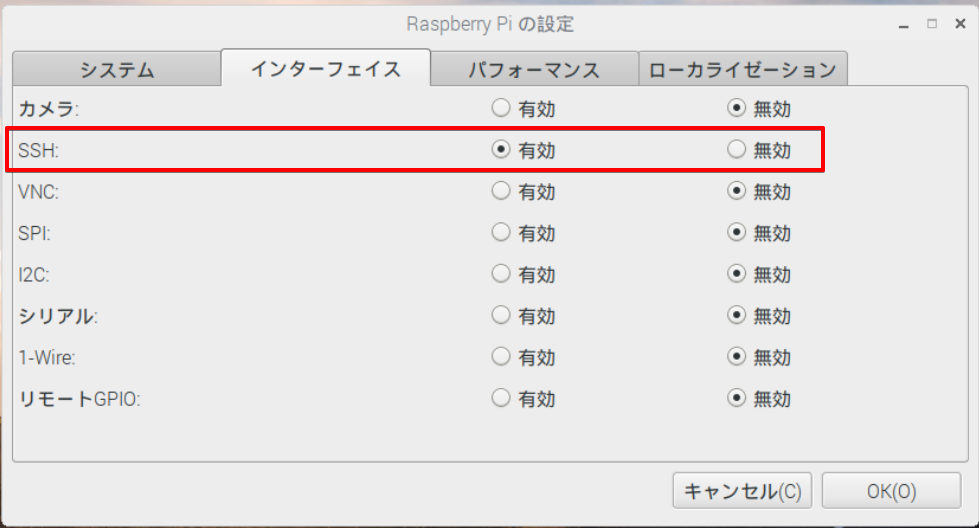
2. 「設定」→「Raspberry Piの設定」からSSHを有効に
最近のRaspbianはデフォルトだとオフになってるらしい。
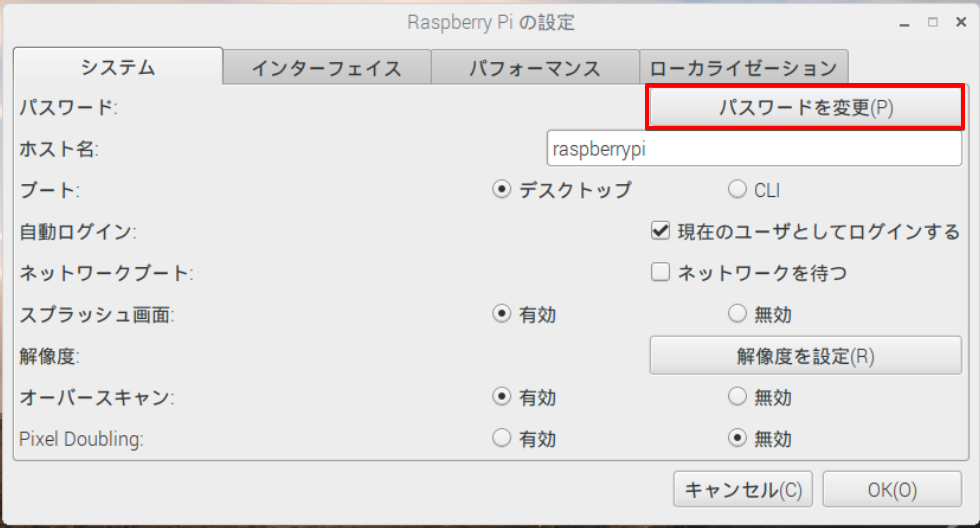
3.「設定」→「Raspberry Piの設定」からパスワードを変更
パスワードを変更する。
デフォルトは以下の通り。
| User | Password |
|---|---|
| pi | raspberry |
パスワード変更したら、一回再起動しとく
sudo reboot
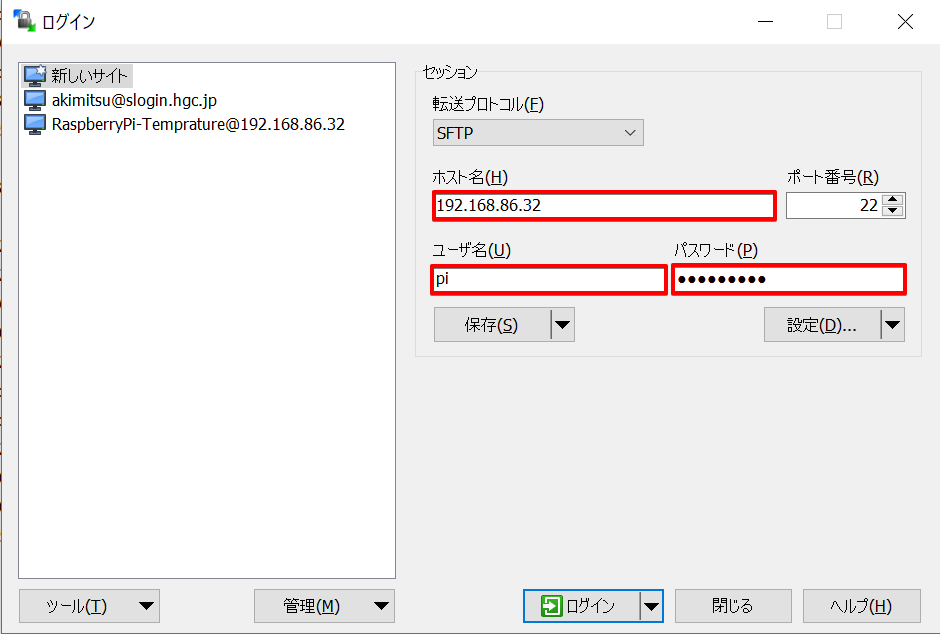
3. WinSCPから接続してみる
以下の情報を入力して接続してみる。
ホスト名:IPアドレスかホスト名
ポート番号:変更していれば入力(デフォルトは22)
ユーザー名:pi
パスワード:さっき変えたやつ
繋がったらベーシック認証は設定完了。
4. 鍵を使って接続できるようにする
OpenSSHをインストールする。(Gitをインストールしてればついてきてるはず)
Git Bashから以下のコマンドを実行。(pathを通していればコマンドプロンプトでも可)
ssh-keygen -t rsa -b 4096 -C "your_email@example.com"
your_email@example.comは任意の値に変える。
(別にメールアドレスじゃなくてもいいけど、メールアドレスがベター)
保存先とかパスワードを求められるけど、何も入力せずEnter。
C:\Users\ユーザ名\.sshに「id_sra」(秘密鍵)と「id_rsa.pub」(公開鍵)が作られる。
WinSCPで「id_rsa.pub」(公開鍵)をRaspberry Piにアップロードする。
5. Raspberry Piに公開鍵を登録する
# ホームディレクトリへ移動
cd ~

# 公開鍵をRaspberry Pi側に登録
mkdir .ssh
cat id_rsa.pub >> .ssh/authorized_keys

# 権限を設定
chmod 700 .ssh
chmod 600 .ssh/authorized_keys
※権限の設定を間違うと接続できないので注意!
SSHの設定を変更するために設定ファイルを編集する。
編集前に設定ファイルの権限を一時的に変更する。
sudo chmod 777 /etc/ssh/sshd_config
これでWinSCPからでも編集できるようになる。
#PubkeyAuthentication yesのコメントアウトを外す。
#AuthorizedKeysFile .ssh/authorized_keys .ssh/authorized_keys2のコメントアウトを外す
# PubkeyAuthentication yes

# AuthorizedKeysFile  .ssh/authorized_keys .ssh/authorized_keys2
を
PubkeyAuthentication yes

AuthorizedKeysFile  .ssh/authorized_keys .ssh/authorized_keys2
って感じに変更する。
6. ベーシック認証を無効にする
#PasswordAuthentication yesのコメントアウトを外し、noに書きかえる。
# PasswordAuthentication yes
を
PasswordAuthentication no
って感じに変更する。
設定ファイルの編集が終わったらパーミッションを戻す。
sudo chmod 644 /etc/ssh/sshd_config
7. パーミッションを確認する。
以下のディレクトリやファイルのパーミッションを確認しておく。
1つでも間違っていると接続できないので注意!
| ディレクトリ | パーミッション |
|---|---|
| .ssh | 700 |
| .ssh/authorized_keys | 600 |
| /etc/ssh/sshd_config | 644 |
確認するのがめんどい場合は下のコマンドを流す。
cd
sudo chmod 700 .ssh
sudo chmod 600 .ssh/authorized_keys
sudo chmod 644 /etc/ssh/sshd_config
最後に再起動しておく。
sudo reboot


