はじめに
この記事は、Elixir Advent Calendar 2023 14日目となります。
前日13日目は、
@mnishiguchi さんで Elixir Erlang match_spec の文法 でした。
作るもの
今年は、Phoenix触る時間が全然なくて、ネタに困ったので、ズバリ・・・
PhoenixでもStimulusを使いたい

です。
いや、LiveView使えよというツッコミはご容赦いただきたく・・・
今年はRails7漬けになってて全然Phoenix使ってなかったのですが、いつの間にやらPhoenixが超絶洗練されておりまして・・・。
いや、ほんと私程度が言うのもなんですが、ディレクトリ構造が直感的になっているというか、以前の何処に何があんねんというのが皆無。
一言で言うとめちゃめちゃ使いやすくなってる!!!!
これは普段Rails使っている人でも違和感なくない?
ということで、せっかくなので、今年もまたRailsエンジニア目線のPhoenixやります。
なので、
Phoenix で Stimulus を使って GoogleMapApi を動かしてみようではないか え・・LiveView? 知らない子ですね。
と、こんな感じの入力補助からピン表示までの操作をやってみたいと思います。
環境
elixir
 1.15.7-otp-26
erlang
 26.1.2
Phoenix
 v1.7.10
プロジェクト作成
% mkdir google_map_phx
% cd google_map_phx
% mix phx.new . --no-mailer --no-live
ログが流れます。
(略)
* creating assets/vendor/heroicons/LICENSE.md
* creating assets/vendor/heroicons/UPGRADE.md
* extracting assets/vendor/heroicons/optimized

Fetch and install dependencies? [Yn] Y
* running mix deps.get
* running mix assets.setup
* running mix deps.compile

We are almost there! The following steps are missing:

    $ cd .

Then configure your database in config/dev.exs and run:

    $ mix ecto.create

Start your Phoenix app with:

    $ mix phx.server

You can also run your app inside IEx (Interactive Elixir) as:

    $ iex -S mix phx.server
言われた通り実行します。
% mix ecto.create
% mix phx.server
Compiling 14 files (.ex)
Generated phx_map app
The database for PhxMap.Repo has already been created
 phx_map % mix phx.server
[info] Running PhxMapWeb.Endpoint with cowboy 2.10.0 at 127.0.0.1:4000 (http)
[info] Access PhxMapWeb.Endpoint at http://localhost:4000
[debug] Downloading esbuild from https://registry.npmjs.org/@esbuild/darwin-arm64/0.17.11

Rebuilding...

Done in 240ms.
[watch] build finished, watching for changes...
[info] GET /
[debug] Processing with PhxMapWeb.PageController.home/2
  Parameters: %{}
  Pipelines: [:browser]
[info] Sent 200 in 59ms
良さそうです。
モデル作成
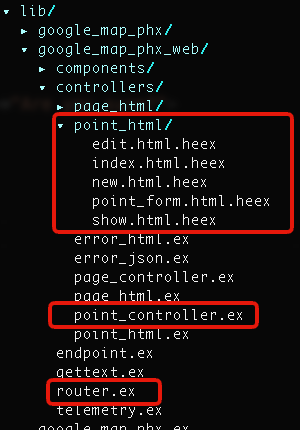
phx.gen.html
htmlでMVC作ります。Railsで言うscaffoldです。
% mix phx.gen.html Maps Point points name:string latitude:float longitude:float address:string
* creating lib/google_map_phx_web/controllers/point_controller.ex
* creating lib/google_map_phx_web/controllers/point_html/edit.html.heex
* creating lib/google_map_phx_web/controllers/point_html/index.html.heex
* creating lib/google_map_phx_web/controllers/point_html/new.html.heex
* creating lib/google_map_phx_web/controllers/point_html/show.html.heex
* creating lib/google_map_phx_web/controllers/point_html/point_form.html.heex
* creating lib/google_map_phx_web/controllers/point_html.ex
* creating test/google_map_phx_web/controllers/point_controller_test.exs
* creating lib/google_map_phx/maps/point.ex
* creating priv/repo/migrations/20231213204606_create_points.exs
* creating lib/google_map_phx/maps.ex
* injecting lib/google_map_phx/maps.ex
* creating test/google_map_phx/maps_test.exs
* injecting test/google_map_phx/maps_test.exs
* creating test/support/fixtures/maps_fixtures.ex
* injecting test/support/fixtures/maps_fixtures.ex

Add the resource to your browser scope in lib/google_map_phx_web/router.ex:

    resources "/points", PointController


Remember to update your repository by running migrations:

    $ mix ecto.migrate
また途中で何か言われますが、ルーティングの記述とマイグレーションの実行を言われているようです。
ルーティング
ですので、まずはルーティングを
(略)
  scope "/", GoogleMapPhxWeb do
    pipe_through :browser

    get "/", PageController, :home
  end
(略)
このように変更しておきます。
(略)
  scope "/", GoogleMapPhxWeb do
    pipe_through :browser

    get "/", PointController, :index
    resources "/points", PointController
  end
(略)
マイグレーション
次に、マイグレーション
% mix ecto.migrate
05:51:32.894 [info] == Running 20231213204606 GoogleMapPhx.Repo.Migrations.CreatePoints.change/0 forward

05:51:32.896 [info] create table points

05:51:32.902 [info] == Migrated 20231213204606 in 0.0s
通りました。
seeds
マストではないのですが、最初のプレビュー用にダミーデーター入れておきます。
# Script for populating the database. You can run it as:
#
#     mix run priv/repo/seeds.exs
#
# Inside the script, you can read and write to any of your
# repositories directly:
#
#     GoogleMapPhx.Repo.insert!(%GoogleMapPhx.SomeSchema{})
#
# We recommend using the bang functions (`insert!`, `update!`
# and so on) as they will fail if something goes wrong.

alias GoogleMapPhx.Repo
alias GoogleMapPhx.Maps.Point

points = [
  %Point{
    name: "都庁",
    latitude: 35.6895014,
    longitude: 139.6917337,
    address: "日本、〒163-8001 東京都新宿区西新宿2丁目8−1"
  },
  %Point{
    name: "後楽園",
    latitude: 35.7054551,
    longitude: 139.7535553,
    address: "日本、〒112-0004 東京都文京区後楽1丁目3"
  },
  %Point{
    name: "Home Taco Bar",
    latitude: 35.3076198,
    longitude: 139.4937805,
    address: "日本、〒248-0033 神奈川県鎌倉市腰越2丁目10−25"
  }
]

for point <- points, do:
  Repo.insert!(point)
ファイルに書いてあるコマンドでデーターを流します。
% mix run priv/repo/seeds.exs
[debug] QUERY OK source="points" db=4.9ms decode=2.0ms queue=1.0ms idle=6.5ms
INSERT INTO "points" ("name","address","longitude","latitude","inserted_at","updated_at") VALUES ($1,$2,$3,$4,$5,$6) RETURNING "id" ["都庁", "日本、〒163-8001 東京都新宿区西新宿2丁目8−1", 139.6917337, 35.6895014, ~U[2023-12-13 20:55:14Z], ~U[2023-12-13 20:55:14Z]]
↳ Enum."-map/2-lists^map/1-1-"/2, at: lib/enum.ex:1693
[debug] QUERY OK source="points" db=0.6ms queue=0.8ms idle=24.1ms
INSERT INTO "points" ("name","address","longitude","latitude","inserted_at","updated_at") VALUES ($1,$2,$3,$4,$5,$6) RETURNING "id" ["後楽園", "日本、〒112-0004 東京都文京区後楽1丁目3", 139.7535553, 35.7054551, ~U[2023-12-13 20:55:14Z], ~U[2023-12-13 20:55:14Z]]
↳ Enum."-map/2-lists^map/1-1-"/2, at: lib/enum.ex:1693
[debug] QUERY OK source="points" db=0.5ms queue=0.5ms idle=25.7ms
INSERT INTO "points" ("name","address","longitude","latitude","inserted_at","updated_at") VALUES ($1,$2,$3,$4,$5,$6) RETURNING "id" ["Home Taco Bar", "日本、〒248-0033 神奈川県鎌倉市腰越2丁目10−25", 139.4937805, 35.3076198, ~U[2023-12-13 20:55:14Z], ~U[2023-12-13 20:55:14Z]]
↳ Enum."-map/2-lists^map/1-1-"/2, at: lib/enum.ex:1693
通りました。確認します。

OKのようです。
JS周り
では、JS周りいきましょう。
Rails7で正式採用されたJSフレームワーク Stimulus を使います。
実は元ネタは、かなり前からあって・・・
ほんとは、LiveViewでやろうかと思ってたら、 @the_haigo さんの記事が
すでにあり・・・
この記事がかなり前なので、ちょっと検証してみようかというのが発端です。
assetsに移動
cd assets
Stimulusのインストール
% npm install --save stimulus
added 3 packages in 3s
GoogleMapApi
ついでにGooGleMapApiのライブラリも入れておきましょう。
NPM js-api-loader パッケージを使います。
% npm install @googlemaps/js-api-loader
階層を戻します。
cd ..
Stimulusコントローラーの作成
StimulusはJS階層下にコントローラーを作成しますので、そのファイルを作成します。
- 一覧表示
- 個別表示
- フォーム
用に3つ作ってみたいと思います。
これにapplication_controllerを含め、4つ新規作成します。
ディレクトリを作っておきましょう。
% mkdir assets/js/controllers
% mkdir assets/js/controllers/google_maps
controllers/ 直下でも構わないのですが、 controllers/google_map/ に纏めます。
では、それぞれ作っていきましょう。
application_controller.js
import { Controller } from "stimulus"
import { Loader } from "@googlemaps/js-api-loader"

export default class extends Controller {
  setLoader() {
    return new Loader({
      apiKey: "xxxxxxxxYOUR_API_KEYxxxxxxxxx",//GooGleのApiキー
      version: "weekly",
    });
  }
}
ここで、先程のライブラリを読んでいます。
import { Controller } from "stimulus"
import { Loader } from "@googlemaps/js-api-loader"
その他3つはこの application_controller.js を継承するようにします。
あと、GoogleのApiキーに関しては取得後、必ず各必要環境に絞って制限を掛けておきましょう。
では、残り3つです。先頭には、
import ApplicationController from "./application_controller";
と書く事で継承されます。
index_controller.js
import ApplicationController from "./application_controller";

let map
let markers = []
let infoWindows = []

// Connects to data-controller="google-map--index"
export default class extends ApplicationController {
  static values = { location: {
                        lat: 38.041184121,
                        lng: 137.1063077823
                    },
                    zoom: 5,
                    points: [] }

  static targets = [ 'map' ]

  connect() {
    this.setPoints()
    this.newMap()
  }

  newMap() {
    const loader = this.setLoader()
    loader.load().then(async () => {
      const { Map } = await google.maps.importLibrary("maps");

      map = new Map(this.mapTarget, {
        center: this.locationValue,
        zoom: this.zoomValue,
      })
      this.addMarkersToMap()
    })
  }

  addMarkersToMap() {
    this.pointsValue.forEach((o, i) => {
      this.addMarkerToMarkers(o)
      this.addInfoWindowToInfoWindows(o)
      this.addEventToMarker(i)
    })
  }

  addMarkerToMarkers(o) {
    this._marker = new google.maps.Marker({
      position: { lat: o.lat, lng: o.lng },
      map,
      name: o.name
    })
    markers.push(this._marker)
  }

  addInfoWindowToInfoWindows(o) {
    this._infoWindow = new google.maps.InfoWindow({
      content: `
        <a href="/points/${o.id}">
          ${o.name}
        </a>
      `
    })
    infoWindows.push(this._infoWindow)
  }

  addEventToMarker(i) {
    markers[i].addListener('click', () => {
      infoWindows[i].open(map, markers[i]);
    });
  }

  setPoints() {
    this.pointsValue = JSON.parse(this.mapTarget.dataset.json)
    this.getLastPointLocation()
  }

  getLastPointLocation() {
    if (this.pointsValue.length > 0) {
      this._lastPoint = this.pointsValue.sort((a, b) => { a.id - b.id }).reverse()[0]
      this.locationValue = this._lastPoint
      this.zoomValue = 12
    }
  }
}
show_controller.js
import ApplicationController from "./application_controller";

// Connects to data-controller="google-map--show"
export default class extends ApplicationController {

  static targets = [ 'map' ]

  connect() {
    this.newMap()
  }

  newMap() {
    const loader = this.setLoader()
    loader.load().then(async () => {
      const { Map } = await google.maps.importLibrary("maps");
      this._location = JSON.parse(this.mapTarget.dataset.json)
      this._map = new Map(this.mapTarget, {
        center: { lat: this._location.lat, lng: this._location.lng },
        zoom: 15,
      })
      new google.maps.Marker({
        map: this._map,
        position: this._location
      })
    })
  }
}
form_controller.js
import ApplicationController from "./application_controller";

let map
let marker

// Connects to data-controller="google-map--form"
export default class extends ApplicationController {

  static values = { location: {
                      lat: 35.6895014,
                      lng: 139.6917337
                    },
                    zoom: 15,
                    addressList: [] }

  static targets = [ 'map', 'keyword', `address`,
                     'latitude', 'longitude', 'addressList' ]

  connect() {
    this.newMap()
  }

  newMap() {
    const loader = this.setLoader()
    loader.load().then(async () => {
      const { Map } = await google.maps.importLibrary("maps");
      map = new Map(this.mapTarget, {
        center: this.locationValue,
        zoom: this.zoomValue,
      })
      this.initMarker()
      map.setCenter(this.locationValue)
      this.keywordTarget.addEventListener('change', () => {
        this.changeKeywordAction()
      })
      google.maps.event.addListener(map, 'click', (e) => {
        this.clickMapAction(e)
      });
    })
  }

  changeKeywordAction() {
    this.geoCoding(this.keywordTarget.value)
  }

  clickMapAction(e) {
    this._location = { lat: e.latLng.lat(), lng: e.latLng.lng() }
    this.clearMarker()
    this.setLocation(this._location)
    this.newMarker()
    this.keywordTarget.value = ""
    this.reverseGeoGoding()
  }

  geoCoding(keyword) {
    this._geocoder = new google.maps.Geocoder()
    this._geocoder.geocode({ address: keyword }, (results, status) => {
      if (status == 'OK') {
        this._result = results[0].geometry.location
        this._location = { lat: this._result.lat(), lng: this._result.lng() }
        this.clearMarker()
        this.setLocation(this._location)
        this.newMarker()
        map.setCenter(this._location)
        this.reverseGeoGoding()
      } else {
        this.clearLocationForm()
      }
    })
  }

  reverseGeoGoding() {
    this._geocoder = new google.maps.Geocoder()
    this._geocoder.geocode({ location: this.locationValue }, (results, status) => {
      if (status == 'OK') {
        this.setAddresList(results)
      } else {
        this.clearAddressList()
      }
    })
    this.addressTarget.value = ""
  }

  clearAddressList() {
    this.addressListValue = []
    this.addressListTarget.innerHTML = ""
  }

  setAddresList(result) {
    this.clearAddressList()
    this.setAddressListValue(result)
    this.addressListValue.forEach(address => {
      this._option = document.createElement('option')
      this._option.value = address
      this.addressListTarget.append(this._option)
    })
  }

  setAddressListValue(result) {
    this._addressList = []
    result.forEach(o => {
      this._address = o.formatted_address
      this._addressList.push(this._address)
    });
    this.addressListValue = this._addressList
  }

  clearMarker() {
    if (marker != null) {
      marker.setMap(null)
    }
  }

  newMarker() {
    marker = new google.maps.Marker({
      map: map,
      position: this.locationValue
    })
  }

  writeToLocationForm(location) {
    this.latitudeTarget.value = location.lat
    this.longitudeTarget.value = location.lng
  }

  clearLocationForm() {
    this.latitudeTarget.value = ""
    this.longitudeTarget.value = ""
  }

  initMarker() {
    this._latitude = this.latitudeTarget.value
    this._longitude = this.longitudeTarget.value
    if (this._latitude != "" && this._longitude != "") {
      this.locationValue = { lat: parseFloat(this._latitude), lng: parseFloat(this._longitude) }
      this.newMarker(this.locationValue)
    }
  }

  setLocation(location) {
    this.locationValue = location
    this.writeToLocationForm(location)
  }
}
では、最後にこれらを機能させる為にStimulusに登録する設定を書いておきます。
app.js
(略)

//*以下を末尾に追記

// Configure Stimulus development experience
import { Application } from "stimulus"
// import ApplicationController from "./controllers/google_map/application_controller"
const application = Application.start()
export { application }

// controllers
import GoogleMap__ApplicationController from "./controllers/google_map/application_controller"
application.register("google-map--application", GoogleMap__ApplicationController)

import GoogleMap__IndexController from "./controllers/google_map/index_controller"
application.register("google-map--index", GoogleMap__IndexController)

import GoogleMap__ShowController from "./controllers/google_map/show_controller"
application.register("google-map--show", GoogleMap__ShowController)

import GoogleMap__FormController from "./controllers/google_map/form_controller"
application.register("google-map--form", GoogleMap__FormController)
これでJS周りはOKです。
テンプレート
テンプレートですが、元々 gen.html で用意されているものに追加していきます。
それにしても、いつのまにかこんなものまで・・・。
では、index show form の3点を変更していきます。
変更後のみ記載していますので、そのまま置き換えましょう。
index.html.heex
ここでは、全ポイントのピンを見る事ができます。
<.header>
  Listing Points
  <:actions>
    <.link href={~p"/points/new"}>
      <.button>New Point</.button>
    </.link>
  </:actions>
</.header>

<div data-controller="google-map--index" class="mt-4">
  <div data-google-map--index-target="map" data-json={@points_json} style="height:50vh;max-width:800px;"></div>
</div>

<.table id="points" rows={@points} row_click={&JS.navigate(~p"/points/#{&1}")}>
  <:col :let={point} label="Name"><%= point.name %></:col>
  <:col :let={point} label="Latitude"><%= point.latitude %></:col>
  <:col :let={point} label="Longitude"><%= point.longitude %></:col>
  <:col :let={point} label="Address"><%= point.address %></:col>
  <:action :let={point}>
    <div class="sr-only">
      <.link navigate={~p"/points/#{point}"}>Show</.link>
    </div>
    <.link navigate={~p"/points/#{point}/edit"}>Edit</.link>
  </:action>
  <:action :let={point}>
    <.link href={~p"/points/#{point}"} method="delete" data-confirm="Are you sure?">
      Delete
    </.link>
  </:action>
</.table>
この部分がコントローラーとの接続部分となります。
<div data-controller="google-map--index"></div>
google-map--index で、
google_map ディレクトリの index.js に接続です。
data-google-map--index-target の部分は、該当のDomを static targets として登録できるようにしている部分です。
また、使用するデーターは、 @points_json として渡されています。
show.html.heex
ここでは、個別のピンを見る事ができます。
<.header>
  Point <%= @point.id %>
  <:subtitle>This is a point record from your database.</:subtitle>
  <:actions>
    <.link href={~p"/points/#{@point}/edit"}>
      <.button>Edit point</.button>
    </.link>
  </:actions>
</.header>

<div data-controller="google-map--show">
  <div data-google-map--show-target="map" data-json={@point_json} style="height:30vh;max-width:400px;"></div>
</div>

<.list>
  <:item title="Name"><%= @point.name %></:item>
  <:item title="Latitude"><%= @point.latitude %></:item>
  <:item title="Longitude"><%= @point.longitude %></:item>
  <:item title="Address"><%= @point.address %></:item>
</.list>

<.back navigate={~p"/points"}>Back to points</.back>
使用するデーターは、 @point_json として渡されています。
point_form.html.heex
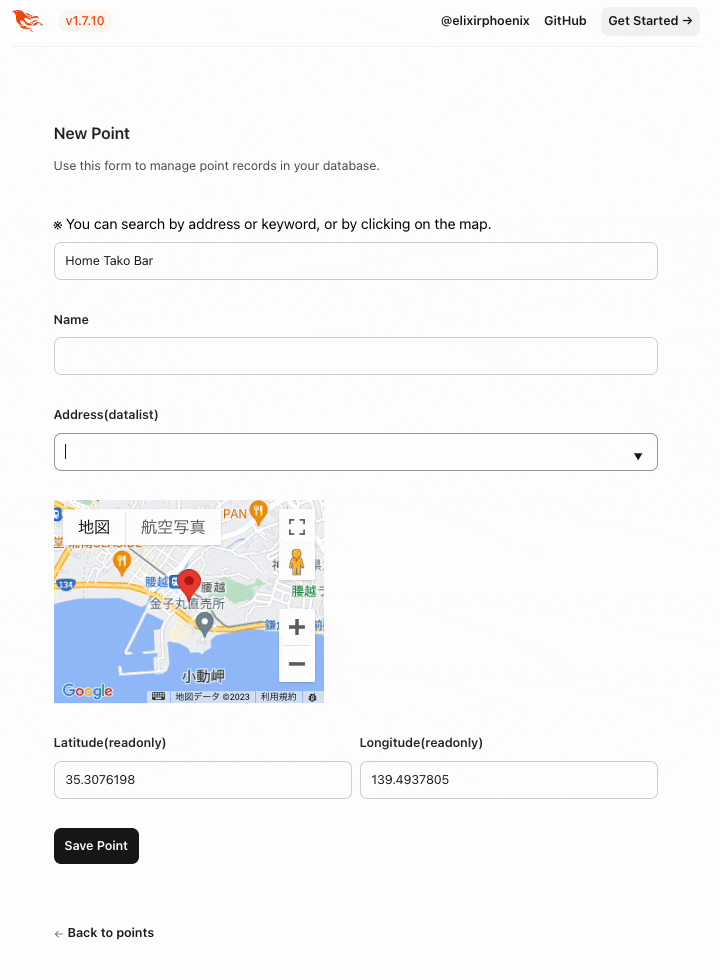
ここでは、キーワード検索や、マップをクリックする事で、緯度経度の入力を行ったり、住所データーの候補を datalist タグに出力します。
<div data-controller="google-map--form">

  <.simple_form :let={f} for={@changeset} action={@action}>
    <.error :if={@changeset.action}>
      Oops, something went wrong! Please check the errors below.
    </.error>

    <label> ※ You can search by address or keyword, or by clicking on the map.
      <input type="search" data-google-map--form-target='keyword' class="mt-2 block w-full rounded-lg text-zinc-900 focus:ring-0 sm:text-sm sm:leading-6 phx-no-feedback:border-zinc-300 phx-no-feedback:focus:border-zinc-400 border-zinc-300 focus:border-zinc-400">
    </label>

    <.input field={f[:name]} type="text" label="Name" step="any" />

    <.input field={f[:address]} type="text" label="Address(datalist)" list="address_list" data-google-map--form-target='address' />
    <datalist id="address_list" data-google-map--form-target="addressList"></datalist>

    <div data-google-map--form-target="map" style="height:20vh;max-width:300px;"></div>

    <div class="grid grid-cols-2 gap-2">
      <div class="col-span-1">
        <.input field={f[:latitude]} type="number" label="Latitude(readonly)" step="any" data-google-map--form-target='latitude' />
      </div>
      <div class="col-span-1">
        <.input field={f[:longitude]} type="number" label="Longitude(readonly)" step="any" data-google-map--form-target='longitude' />
      </div>
    </div>

    <:actions>
      <.button>Save Point</.button>
    </:actions>
  </.simple_form>
</div>
これでテンプレートはOKです。
コントローラー
それにしても、コントローラーとテンプレート、ルーターが同じ階層ってすごく扱いやすいですね。
頻度の高いものがそれぞれ固まっていて素敵です。(laravelとか触るとマジ発狂しそうになる民)
では、追記していきましょう。
ここでは、data-json に渡すデーターをゴニョゴニョします。
point_controller.ex
DBをからの情報が必要なのは index と show です。
それぞれ、 JS側が要求する形にしていきます。
  def index(conn, _params) do
    points = Maps.list_points()
    points_json = Jason.encode!( points |> Enum.map( fn o -> %{ id: o.id, name: o.name, lat: o.latitude, lng: o.longitude } end ) )
    render(conn, :index, points: points, points_json: points_json)
  end
  def show(conn, %{"id" => id}) do
    point = Maps.get_point!(id)
    point_json = %{ id: point.id, name: point.name, lat: point.latitude, lng: point.longitude }
      |> Jason.encode!
    render(conn, :show, point: point, point_json: point_json)
  end
全体だとこのような感じになります。
defmodule GoogleMapPhxWeb.PointController do
  use GoogleMapPhxWeb, :controller

  alias GoogleMapPhx.Maps
  alias GoogleMapPhx.Maps.Point

  def index(conn, _params) do
    points = Maps.list_points()
    points_json = Jason.encode!( points |> Enum.map( fn o -> %{ id: o.id, name: o.name, lat: o.latitude, lng: o.longitude } end ) )
    render(conn, :index, points: points, points_json: points_json)
  end

  def new(conn, _params) do
    changeset = Maps.change_point(%Point{})
    render(conn, :new, changeset: changeset)
  end

  def create(conn, %{"point" => point_params}) do
    case Maps.create_point(point_params) do
      {:ok, point} ->
        conn
        |> put_flash(:info, "Point created successfully.")
        |> redirect(to: ~p"/points/#{point}")

      {:error, %Ecto.Changeset{} = changeset} ->
        render(conn, :new, changeset: changeset)
    end
  end

  def show(conn, %{"id" => id}) do
    point = Maps.get_point!(id)
    point_json = %{ id: point.id, name: point.name, lat: point.latitude, lng: point.longitude }
      |> Jason.encode!
    render(conn, :show, point: point, point_json: point_json)
  end

  def edit(conn, %{"id" => id}) do
    point = Maps.get_point!(id)
    changeset = Maps.change_point(point)
    render(conn, :edit, point: point, changeset: changeset)
  end

  def update(conn, %{"id" => id, "point" => point_params}) do
    point = Maps.get_point!(id)

    case Maps.update_point(point, point_params) do
      {:ok, point} ->
        conn
        |> put_flash(:info, "Point updated successfully.")
        |> redirect(to: ~p"/points/#{point}")

      {:error, %Ecto.Changeset{} = changeset} ->
        render(conn, :edit, point: point, changeset: changeset)
    end
  end

  def delete(conn, %{"id" => id}) do
    point = Maps.get_point!(id)
    {:ok, _point} = Maps.delete_point(point)

    conn
    |> put_flash(:info, "Point deleted successfully.")
    |> redirect(to: ~p"/points")
  end
end
完成です。
確認してみましょう。
% mix phx.server
はい、完了です。お疲れ様でした。
最後に
今回実はRailsで動かしたStimulusをほぼコピペ状態で移植してみました。
Webアプリの移植でJSのフレームワーク周りがネックだったりするのですが、この手間なら全然良いよなぁ・・という感じでした。
明日15日は、
@g_kenkun さんで、
「3年ぶりにElixirのAtCoder用Mixタスクライブラリを更新しました」
です。よろしくお願いいたします。
最後までご覧いただき、ありがとうございます。