FirebaseとFlutterを用いて開発することが多いのですが、毎回リリース直前になってFLAVORを分けたくなったり、セキュリティルールを検討し始めたりしてしまいます。
とくに複数人で開発していると、FLAVOR分けは他の人の開発の手を止めてしまう原因にもなってしまいますので、この辺の初期設定を脳死で出来るように手順化しておきます。
筆者は普段からWindowsとMacOSの両方で開発していますが、iOSのリリースも考えているなら、Macで全てやってしまうのがいいと思います。
今回使用したリポジトリは以下です。
この記事でやってること
- FirebaseプロジェクトをFlavor毎(Development/Production)に作成し、Flutterプロジェクトと紐づける
- セキュリティルールやCloud Functions、Hostingのための環境構築をDockerで行う
- LPやプライバシーポリシーをデプロイするためのFirebase Hostingの設定
- Lint(pedantic)の導入方法
- Flutter SDKのバージョン固定(fvmを使用)
筆者の環境
Windows
> flutter doctor
Doctor summary (to see all details, run flutter doctor -v):
[√] Flutter (Channel stable, 1.22.5, on Microsoft Windows [Version 10.0.19041.867], locale ja-JP)
[√] Android toolchain - develop for Android devices (Android SDK version 30.0.1)
[!] Android Studio (version 4.1.0)
    X Flutter plugin not installed; this adds Flutter specific functionality.
    X Dart plugin not installed; this adds Dart specific functionality.
[!] VS Code (version 1.54.3)
    X Flutter extension not installed; install from
      https://marketplace.visualstudio.com/items?itemName=Dart-Code.flutter
[!] Connected device
    ! No devices available

! Doctor found issues in 3 categories.
MacOS
Doctor summary (to see all details, run flutter doctor -v):
[✓] Flutter (Channel stable, 1.22.4, on macOS 11.2.3 20D91 darwin-x64, locale ja-JP)

[✓] Android toolchain - develop for Android devices (Android SDK version 30.0.2)
[✓] Xcode - develop for iOS and macOS (Xcode 12.4)
[!] Android Studio (version 4.1)
    ✗ Flutter plugin not installed; this adds Flutter specific functionality.
    ✗ Dart plugin not installed; this adds Dart specific functionality.
[!] VS Code (version 1.53.0)
    ✗ Flutter extension not installed; install from
      https://marketplace.visualstudio.com/items?itemName=Dart-Code.flutter
[!] Connected device
    ! No devices available

! Doctor found issues in 3 categories.
2021/09/17 Null Safety版の場合の手順を追記
Null Safety版の場合の手順を追記しました。
バージョンはそれぞれ以下のようになっています。
 {
  "flutterSdkVersion": "2.5.0",
  "flavors": {}
}
  firebase_core: ^1.6.0
  firebase_analytics: ^8.3.2
  firebase_auth: ^3.1.1
  cloud_firestore: ^2.5.3
  firebase_storage: ^10.0.3
事前準備
以下のことを事前に行っている前提で進めます
- Firebaseのスキーマ設計
- Android StudioとXCodeのインストールおよびFlutterでの環境構築
- VSCodeのインストール(Flutter extensionsは必須ではない)
- Android StudioからFlutterプロジェクト作成
- Dockerが使える環境が整っている
※プロジェクト作成時にパッケージ名を決めるが、com.example のドメインは予め避けておいたほうが良い。自分が取得しているドメイン名や、GitHubのドメイン名(io.github.<ユーザー名>)に変更しておく。
また、このパッケージ名は設定を行う際によく使用するので控えておく。Firebaseに登録する際に躓かないように、英字、数字、ピリオドのみを使用して決めておく方が良い(_アンダースコアと-ハイフンはそれぞれiOSなら_、Androidなら-が使用不可なので、OS毎に別のパッケージ名となってしまうことに注意する)
今回はDevelopmentという開発環境と、Productionという本番環境の2環境を用意することにする。
Flavorごとのビルド設定
主に以下を参考に手順化しました。本記事では解説は行わないので、理由が知りたくなったらご参考ください。
環境設定 - KosukeSaigusa/recipe-app
Flutterで環境ごとにビルド設定を切り替える — iOS編 - medium
iOS側の設定
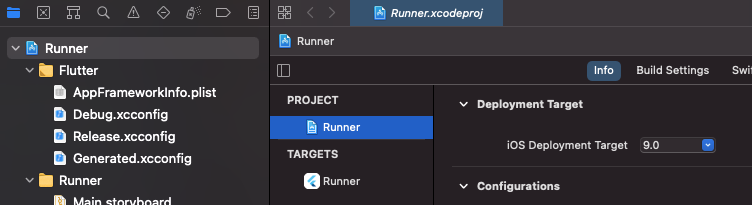
open ios/Runner.xcworkspaceでXCodeからプロジェクトを開く
Runner>PROJECT>RunnerのDeployment Targetを10.0以上に変更しておく(現在のfirebase_coreのバージョンだと、ここが低いとビルドに失敗する)
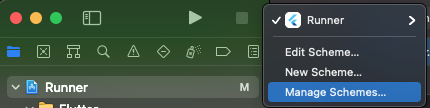
XCodeのRunnerの部分をクリックし、Manage Schemes...をクリックする
出てきた画面の左下の「+」をクリックしてTarget,Nameが以下のようなものを追加する
| Target | Name |
|---|---|
| Runner | Development |
| Runner | Production |
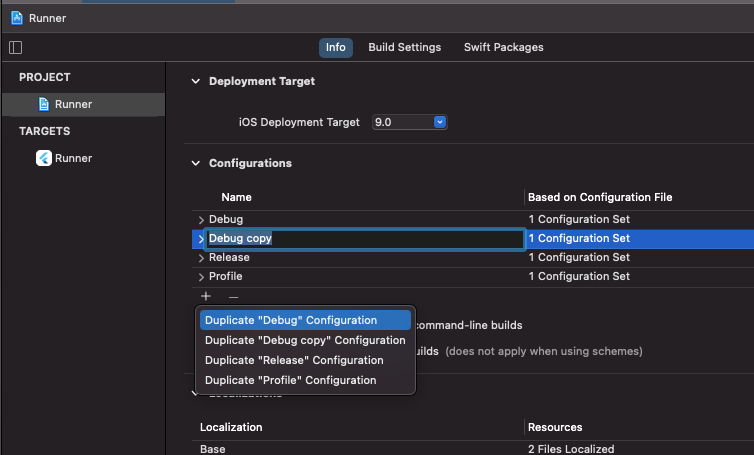
次にRunner>PROJECT>RunnerのConfigurationの下部の「+」をクリックし、設定を追加する。
Duplicate "Debug" ConfigurationをクリックしてDebug-Developmentを追加し、Duplicate "Release" ConfigurationをくりっくしてRelease-Productionを追加する。
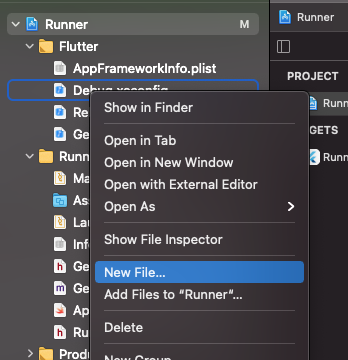
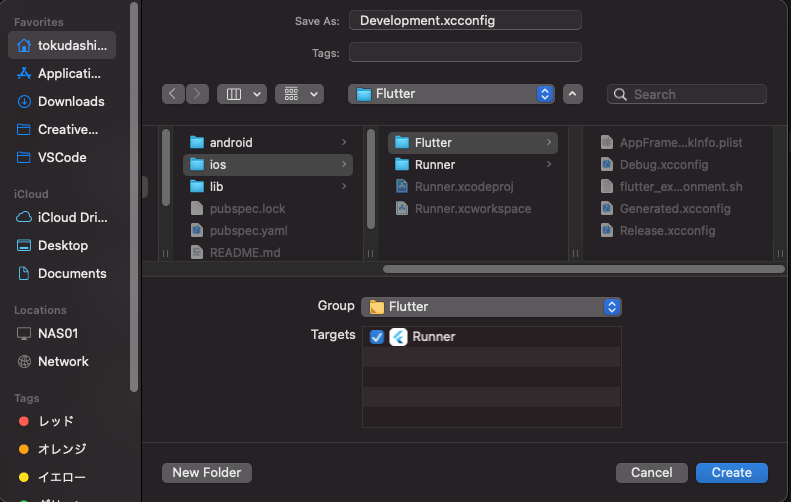
次に左ペインで右クリックしNew File...をクリックする。Configuration Setting Fileを選択し、NEXTをクリックする。
Configuration Setting Fileの内容は以下の通り。2回繰り返す。
| ファイル名 | 保存場所 | Group | Target |
|---|---|---|---|
| Development.xcconfig | ios/Flutter | Flutter | Runnerにチェック |
| Production.xcconfig | ios/Flutter | Flutter | Runnerにチェック |
| Debug-Development.xcconfig | ios/Flutter | Flutter | Runnerにチェック |
| Release-Production.xcconfig | ios/Flutter | Flutter | Runnerにチェック |
各ファイルを以下のように編集する
FLUTTER_FLAVOR=Development
PRODUCT_BUNDLE_IDENTIFIER=<パッケージ名>.development
DISPLAY_NAME=<開発環境のアプリ名>
FLUTTER_TARGET=lib/main.dart
FLUTTER_FLAVOR=Production
PRODUCT_BUNDLE_IDENTIFIER=<パッケージ名>
DISPLAY_NAME=<アプリ名>
FLUTTER_TARGET=lib/main.dart
# include "Release.xcconfig"
# include "Production.xcconfig"
# include "Debug.xcconfig"
# include "Development.xcconfig"
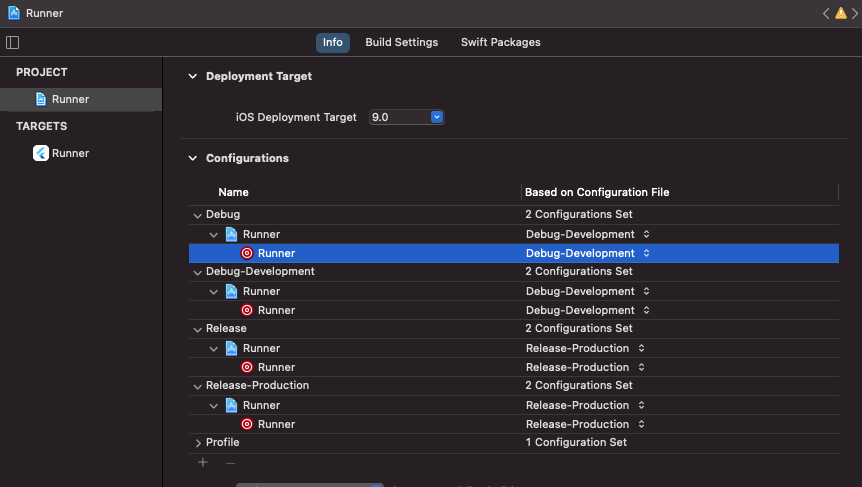
Runner>PROJECT>RunnerのConfigurationsを以下のように設定します。
その後、Runner > PROJECT > Runner > Build Settings > Packaging の中の Product Bundle Identifierを以下のように、正しいパッケージ名を設定しておきます。
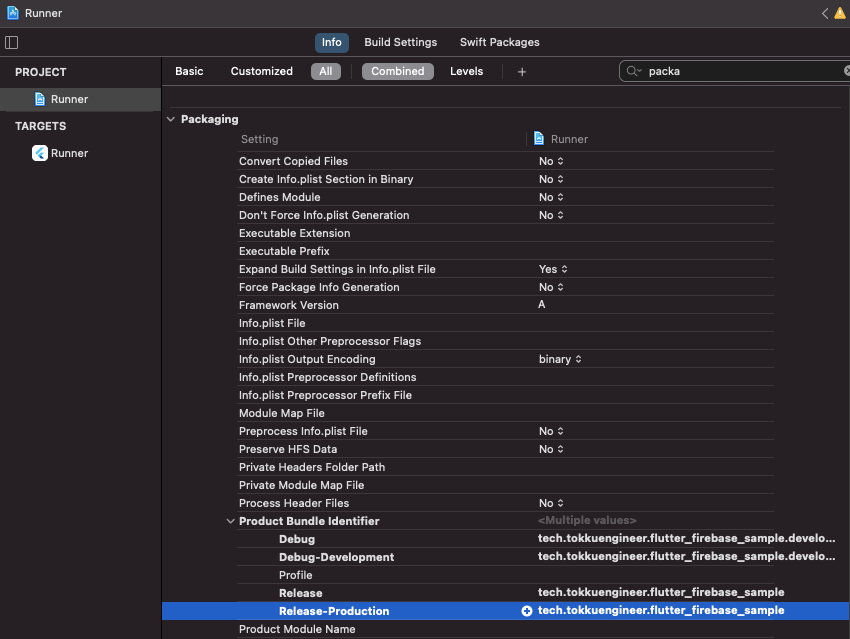
Runner > TARGET > Runner も同様に設定しておく。
次にAndroid Studioからinfo.plistを開き最後の行(</dict>と</plist>)の手前に以下を追記する。
<key>FlutterFlavor</key>
<string>$(FLUTTER_FLAVOR)</string>
<key>CFBundleDisplayName</key>
<string>$(DISPLAY_NAME)</string>
XCodeに戻り、Runner>Runner>Info.plistをクリックし、Bundle nameをリリースする際のアプリ名に変更する。(これはリリース前に行っても良い)
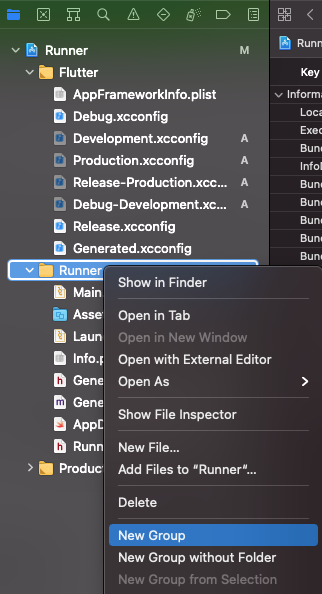
FirebaseのGoogleService-Info.plistを追加する前に先に設定を行う。
Runner>Runnerで右クリックし、New Groupをクリック 名前をFirebaseとしておく
Runner > Targets > Runner > Build Phases を開きNew Run Script Phaseをクリックする
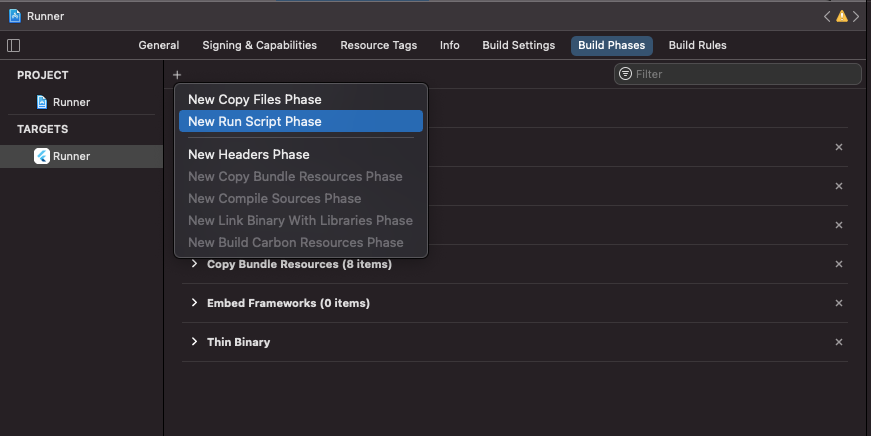
作成されたRun Scriptをダブルクリックし、適当な名前に変更しておく(例えばRun Script for Firebase)
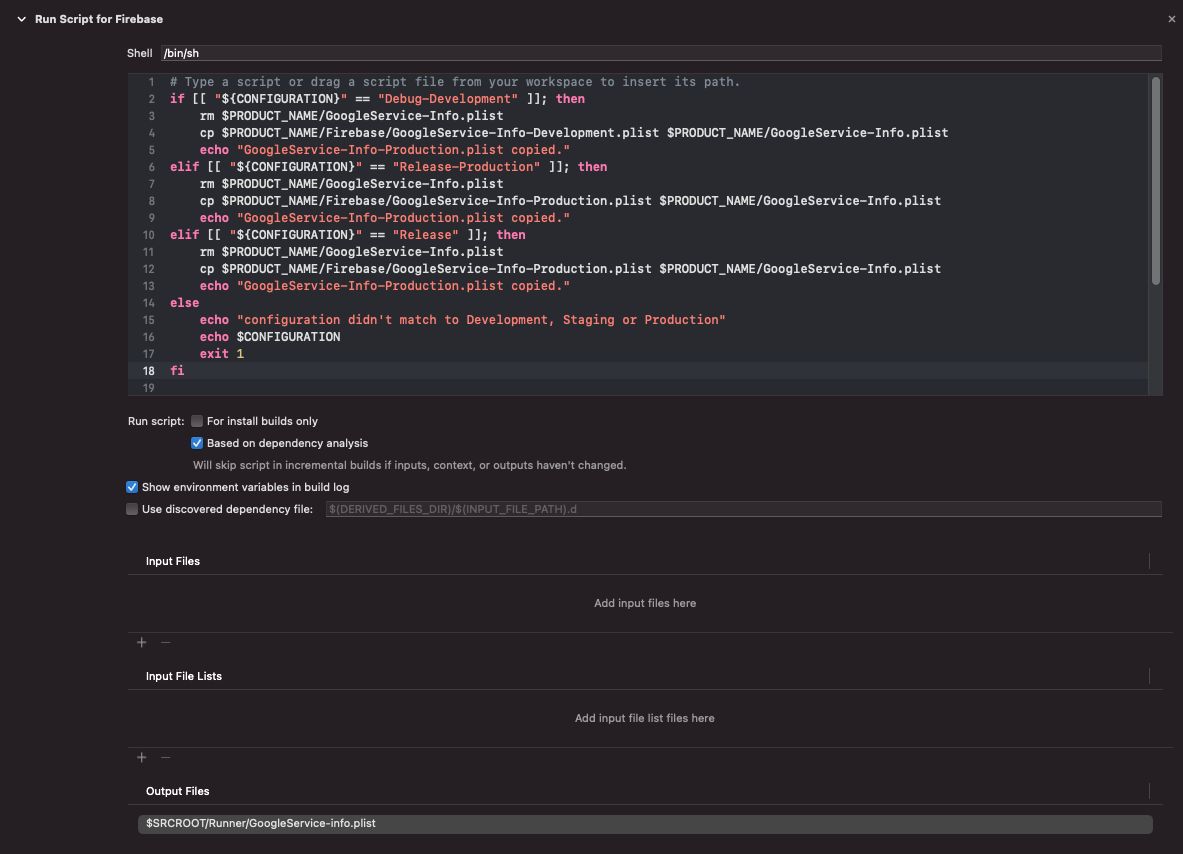
以下をコピーしてスクリプト欄に貼り付ける。
if [[ "${CONFIGURATION}" == "Debug-Development" ]]; then
    rm $PRODUCT_NAME/GoogleService-Info.plist
    cp $PRODUCT_NAME/Firebase/GoogleService-Info-Development.plist $PRODUCT_NAME/GoogleService-Info.plist
    echo "GoogleService-Info-Development.plist copied."
elif [[ "${CONFIGURATION}" == "Release-Production" ]]; then
    rm $PRODUCT_NAME/GoogleService-Info.plist
    cp $PRODUCT_NAME/Firebase/GoogleService-Info-Production.plist $PRODUCT_NAME/GoogleService-Info.plist
    echo "GoogleService-Info-Production.plist copied."
elif [[ "${CONFIGURATION}" == "Release" ]]; then
    rm $PRODUCT_NAME/GoogleService-Info.plist
    cp $PRODUCT_NAME/Firebase/GoogleService-Info-Production.plist $PRODUCT_NAME/GoogleService-Info.plist
    echo "GoogleService-Info-Production.plist copied."
else
    echo "configuration didn't match to Development, Staging or Production"
    echo $CONFIGURATION
    exit 1
fi
また、Output Fileに$SRCROOT/Runner/GoogleService-Info.plistを追加しておく。
2021/10/31追記
- コメントからの情報
- 上記の手順で作成したRun Script for Firebaseの順序をCopy Bundle Resourcesの上に持ってこないとエラーが発生する場合があるようです。
Cycle inside Runner; building could produce unreliable results.
Cycle details:
→ Target 'Runner': CodeSign /Users/***/Library/Developer/Xcode/DerivedData/Runner-hcjkadykbvpqppdvadncqkaqgakj/Build/Products/Debug-iphoneos/Runner.app
○ That command depends on command in Target 'Runner': script phase “[CP] Embed Pods Frameworks”
○ That command depends on command in Target 'Runner': script phase “Thin Binary”
○ Target 'Runner' has copy command from '/Users/***/projects/***/ios/Runner/GoogleService-Info.plist' to '/Users/***/Library/Developer/Xcode/DerivedData/Runner-hcjkadykbvpqppdvadncqkaqgakj/Build/Products/Debug-iphoneos/Runner.app/GoogleService-Info.plist'
○ That command depends on command in Target 'Runner': script phase “Run Script for Firebase”
該当コメントはこちら
Android側の設定
   buildTypes {
        debug {
            debuggable true
            // 後の鍵の設定のために追加。現状はコメントアウトしておく
            // signingConfig signingConfigs.debug
        }
        release {
            // 後の鍵の設定のために追加。現状はコメントアウトしておく
            // signingConfig signingConfigs.release
        }
    }

    flavorDimensions "app"

    productFlavors {
        development {
            dimension "app"
            resValue "string", "app_name", "<開発環境のアプリ名>"
            applicationIdSuffix ".development"
        }
        production {
            dimension "app"
            resValue "string", "app_name", "<本番環境のアプリ名>"
        }
    }
Android Studioでのbuild構成の編集
この項目は複数人での開発を行う場合には全員が行う必要がある項目です。
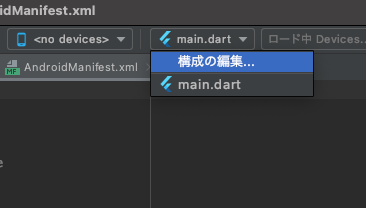
下図の「構成の編集」をクリックします
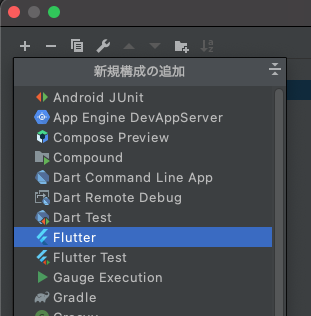
出てきたダイアログの左上にある「+」をクリックし、新規構成の追加からFlutterを選択します。
すでに存在するmain.dartのDart entrypointをコピーして新規作成した名称未設定のDart Entrypointにペーストします。
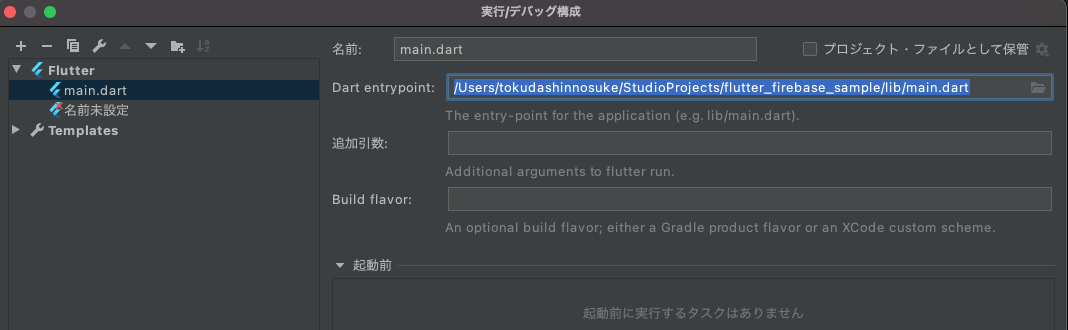
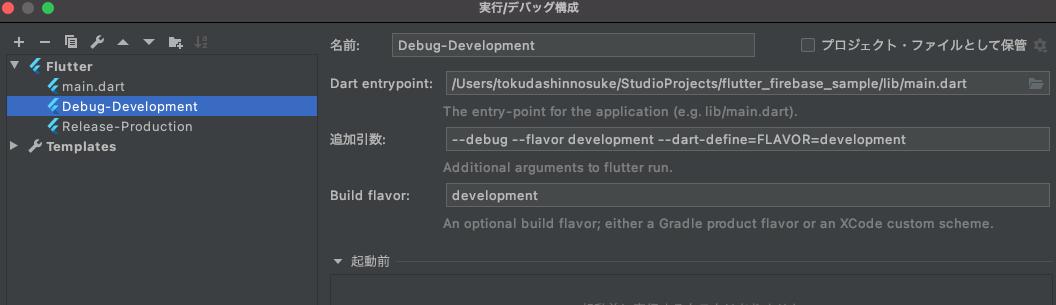
以下のように設定します。
| 名前(Name) | 追加引数(Additional Arguments) | Build flavor |
|---|---|---|
| Debug-Development | --debug --flavor development --dart-define=FLAVOR=development | development |
| Release-Production | --release --flavor production --dart-define=FLAVOR=production | production |
Firebase Projectの作成
Firebase ProjectをFlavor毎に作成します。
プロジェクト名-dev、プロジェクト名-prod などと分けておくとわかりやすいです。
iOSアプリの追加
下図のiOSをクリックします。
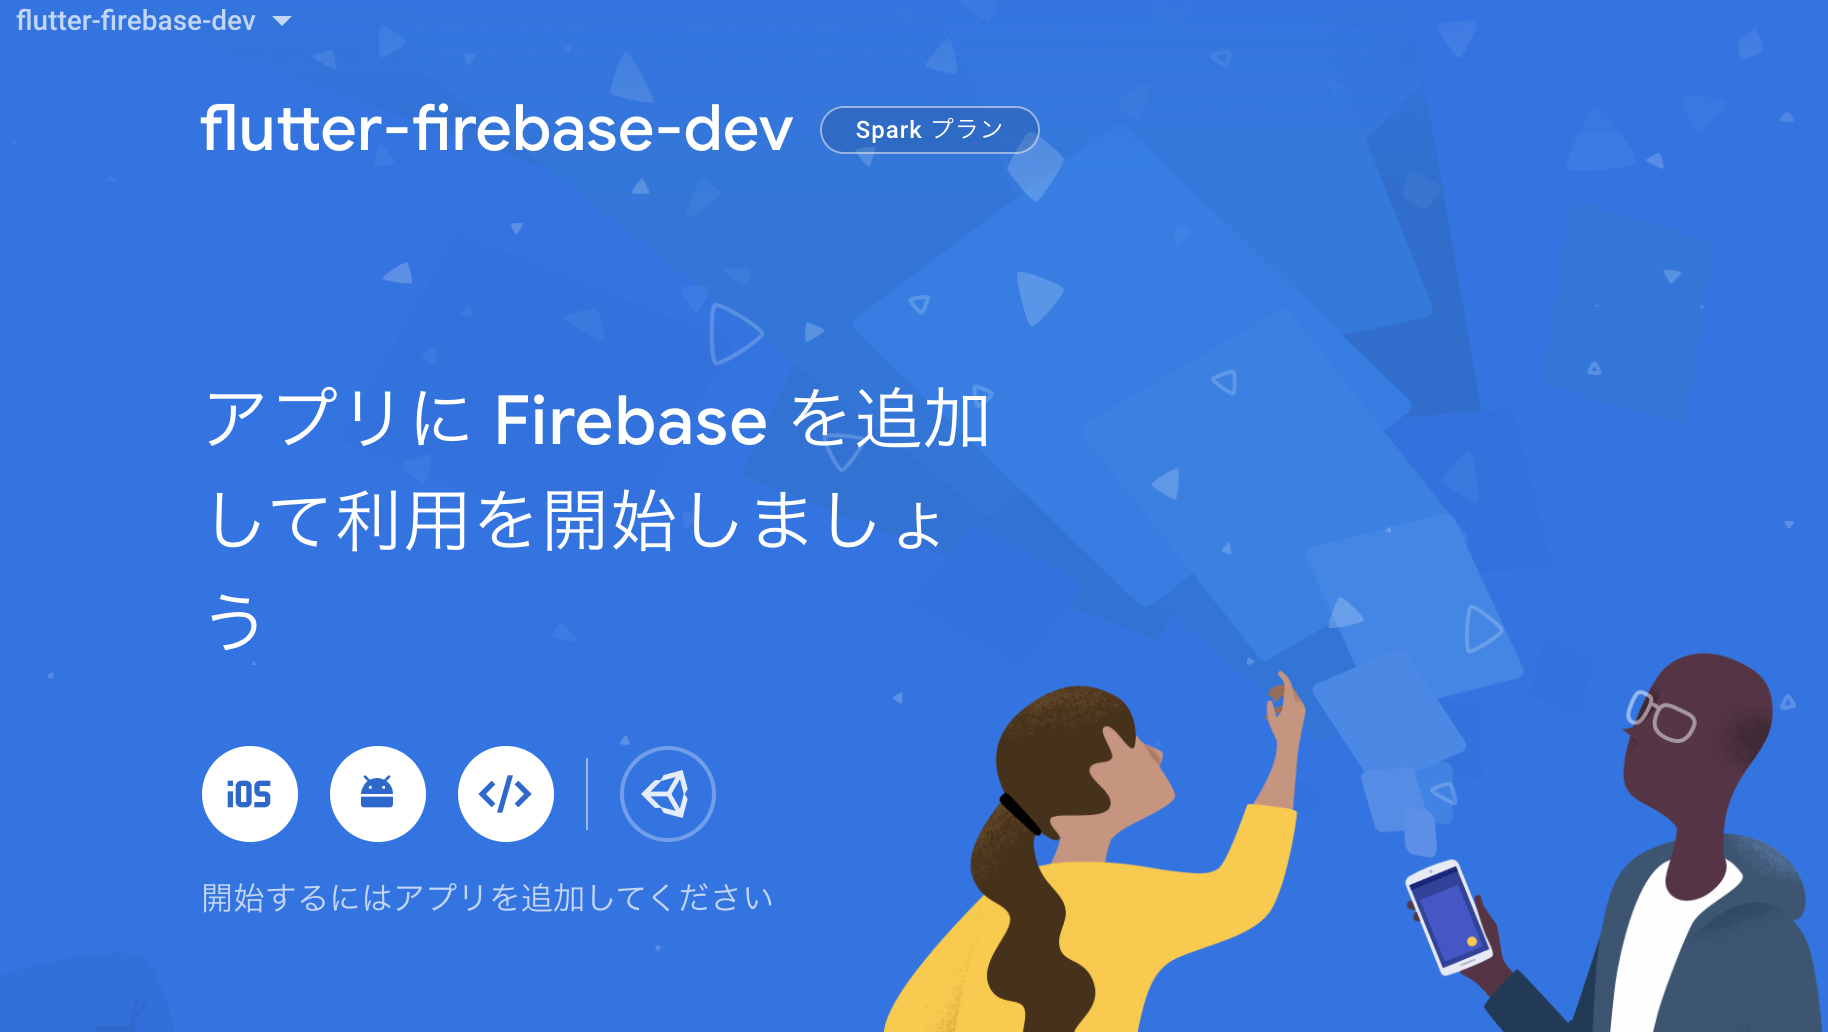
dev側はiOSのバンドルIDをパッケージ名.development、本番側はパッケージ名を入力し、アプリのニックネームはわかりやすい名前を入力しておきます。

アプリを登録 をクリックすると、GoogleService-Info.plistをダウンロードできるので、GoogleService-Info-Development.plistにリネームし、XCodeから Runner>Runner>Firebaseへコピーする
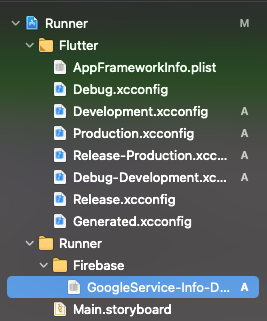
本番環境もプロジェクトを作成し、同様にiOSアプリを追加し、GoogleService-Info.plistをダウンロードしたのちに、GoogleService-Info-Production.plistにリネームし、XCodeから Runner>Runner>Firebaseへコピーしておく。
この時点でAndroid StudioからiOSでDebug-Developmentでデバッグビルドできることを確認しておく。
2021/09/17追記
iOSでのビルドが失敗する場合は以下を試してみましょう。
- Podfileにplatform:ios, '10.0'を追加する
- iosフォルダで
pod installを実行する -
flutter clean->flutter pub getを実行する
could not find included file ‘Pods/Target Support Files/Pods-Runner/Pods-Runner.debug.xcconfig’ in search paths
Error output from CocoaPods:
↳
[!] Automatically assigning platform `iOS` with version `9.0` on target `Runner` because no platform was
specified. Please specify a platform for this target in your Podfile. See
`https://guides.cocoapods.org/syntax/podfile.html#platform`.

Error running pod install
以下のようなエラーの場合はPodfileにIPHONEOS_DEPLOYMENT_TARGETを書き換える処理を追記してあげます。
   1 error generated.
    note: Using new build system
    note: Building targets in parallel
    note: Planning build
    note: Analyzing workspace
    note: Constructing build description
    note: Build preparation complete
    /Users/<UserName>/StudioProjects/sansen/ios/Pods/Pods.xcodeproj: warning: The iOS Simulator deployment target 'IPHONEOS_DEPLOYMENT_TARGET' is set to 8.0, but the range of supported deployment target versions is 9.0 to 14.5.99. (in target 'leveldb-library' from project 'Pods')
    /Users/<UserName>/StudioProjects/sansen/ios/Pods/Pods.xcodeproj: warning: The iOS Simulator deployment target 'IPHONEOS_DEPLOYMENT_TARGET' is set to 8.0, but the range of supported deployment target versions is 9.0 to 14.5.99. (in target 'gRPC-Core' from project 'Pods')
    /Users/<UserName>/StudioProjects/sansen/ios/Pods/Pods.xcodeproj: warning: The iOS Simulator deployment target 'IPHONEOS_DEPLOYMENT_TARGET' is set to 8.0, but the range of supported deployment target versions is 9.0 to 14.5.99. (in target 'gRPC-C++-gRPCCertificates-Cpp' from project 'Pods')
    /Users/<UserName>/StudioProjects/sansen/ios/Pods/Pods.xcodeproj: warning: The iOS Simulator deployment target 'IPHONEOS_DEPLOYMENT_TARGET' is set to 8.0, but the range of supported deployment target versions is 9.0 to 14.5.99. (in target 'gRPC-C++' from project 'Pods')
    /Users/<UserName>/StudioProjects/sansen/ios/Pods/Pods.xcodeproj: warning: The iOS Simulator deployment target 'IPHONEOS_DEPLOYMENT_TARGET' is set to 8.0, but the range of supported deployment target versions is 9.0 to 14.5.99. (in target 'abseil' from project 'Pods')
    /Users/<UserName>/StudioProjects/sansen/ios/Pods/Pods.xcodeproj: warning: The iOS Simulator deployment target 'IPHONEOS_DEPLOYMENT_TARGET' is set to 8.0, but the range of supported deployment target versions is 9.0 to 14.5.99. (in target 'BoringSSL-GRPC' from project 'Pods')

Could not build the application for the simulator.
Error launching application on iPhone 12 Pro Max.
- Podfileの修正内容
もともとpost_install do |installer|のブロックがある場合は内部に追加してください。(ブロックが2つあるとエラーになります。)
post_install do |installer|
  installer.pods_project.targets.each do |target|
    target.build_configurations.each do |config|
      config.build_settings['IPHONEOS_DEPLOYMENT_TARGET'] = '10.0'
    end
  end
end
- さらにXX/Flutter.h file not foundがいくつも出たので以下を実施
Xcode's output:
↳
    In file included from /Users/<UserName>/.pub-cache/hosted/pub.dartlang.org/firebase_core-1.6.0/ios/Classes/FLTFirebasePluginRegistry.m:5:
    In file included from /Users/<UserName>/.pub-cache/hosted/pub.dartlang.org/firebase_core-1.6.0/ios/Classes/FLTFirebasePluginRegistry.h:6:
    /Users/<UserName>/.pub-cache/hosted/pub.dartlang.org/firebase_core-1.6.0/ios/Classes/FLTFirebasePlugin.h:15:9: fatal error: 'Flutter/Flutter.h' file not found
    #import <Flutter/Flutter.h>
            ^~~~~~~~~~~~~~~~~~~
    1 error generated.
    In file included from /Users/<UserName>/.pub-cache/hosted/pub.dartlang.org/firebase_core-1.6.0/ios/Classes/FLTFirebasePlugin.m:5:
    /Users/<UserName>/.pub-cache/hosted/pub.dartlang.org/firebase_core-1.6.0/ios/Classes/FLTFirebasePlugin.h:15:9: fatal error: 'Flutter/Flutter.h' file not found
    #import <Flutter/Flutter.h>
            ^~~~~~~~~~~~~~~~~~~
    1 error generated.
    note: Using new build system
    note: Building targets in parallel
    note: Planning build
    note: Analyzing workspace
    note: Constructing build description
    note: Build preparation complete
以下を実施する
flutter pub cache repair
rm ios/Flutter/Flutter.podspec
rm -rf ~/Library/Caches/CocoaPods
rm -rf ios/Pods
flutter clean
flutter pub get
cd ios
pod install
Androidアプリの追加
同様にしてAndroidアプリも追加しておく。
Androidパッケージ名を、dev側はパッケージ名.development、本番側は単にパッケージ名を入力し、アプリのニックネームを適当に入力する。
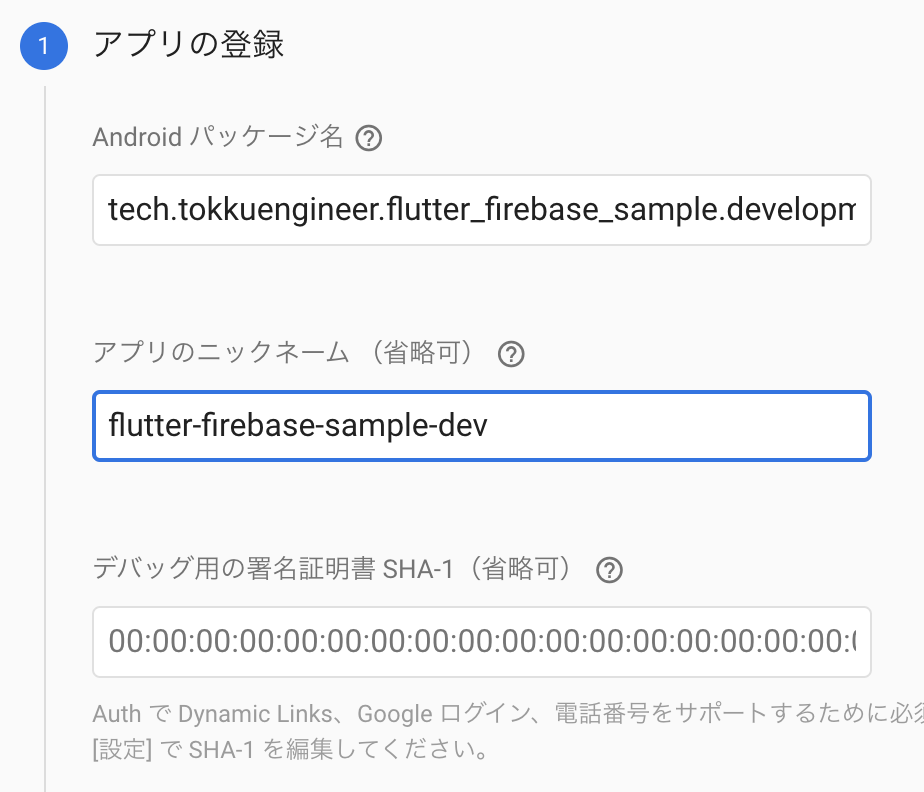
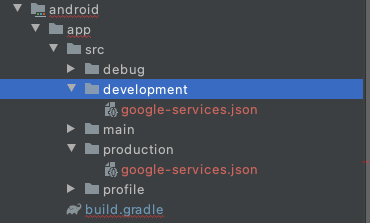
アプリを追加をクリックすると、google-service.jsonがダウンロードできるので、ダウンロードし、Android Studio から以下のようにフォルダを切って格納しておく。
またこのタイミングでAndroid側のFirebaseを使う設定と、flutterのパッケージの設定をしておきます。
Firebaseの指示に従って、以下をandroid/build.gradleに追加します。
・・・
buildscript {
    ext.kotlin_version = '1.3.50'
    repositories {
        google() // なければ追加する
        jcenter()
    }

    dependencies {
        classpath 'com.android.tools.build:gradle:3.5.0'
        classpath "org.jetbrains.kotlin:kotlin-gradle-plugin:$kotlin_version"
        classpath 'com.google.gms:google-services:4.3.4' // なければ追加する
    }
}

allprojects {
    repositories {
        google() // なければ追加する
        jcenter()
    }
}
・・・
加えて、android/app/build.gradleにも以下を追加します。
・・・
apply plugin: 'com.android.application'
apply plugin: 'kotlin-android'
apply from: "$flutterRoot/packages/flutter_tools/gradle/flutter.gradle"
apply plugin: 'com.google.gms.google-services' // 追加する
・・・
そして、Firestore/Authenticationを使う前提として、pubspec.yamlに以下を追加します。
※バージョンは公式ページを参照してください。
dependencies:
  flutter:
    sdk: flutter
  firebase_core: ^0.4.5
  firebase_analytics: ^5.0.16
  firebase_auth: ^0.14.0+9
  cloud_firestore: ^0.12.11
2021/09/17追記
Null SafetyバージョンのFlutterを使用している場合は、公式ページのバージョンだとエラーとなるので、下記のFlutterFireを参考にする。
追加したらpub getを実行してください。(私はいつも何故か2回実行しないとうまくいきません。)
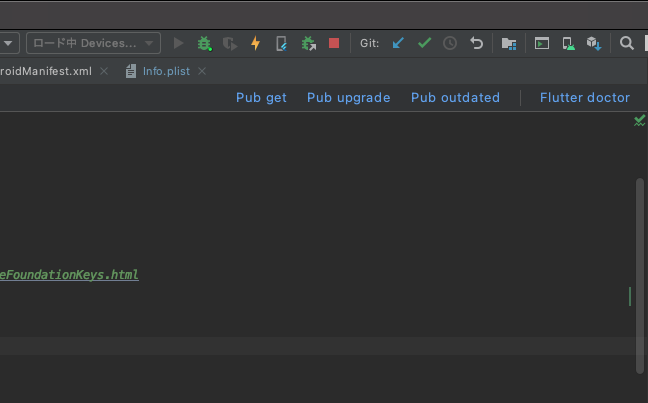
下図のようにpubspec.yamlを開くと、右上にPub getの文字があるのでそちらをクリックします。
Firebaseのパッケージを追加したあと
現在のバージョンではflutterのfirebaseパッケージを組み込むと必ずエラーが発生しますので、以下の対処をしておきます。
-
minSdkVersionを16から23に変更しておく -
defaultConfigにmultiDexEnabled trueの行を追加する。
参考:アプリの圧縮、難読化、最適化 - Android Developpers (公式)
2021/09/17追記
下記のエラーが出るため、minSdkVersionは21ではなく23にしておく。
注意:/Users/<UserName>/development/flutter/.pub-cache/hosted/pub.dartlang.org/firebase_admob-0.9.0+10/android/src/main/java/io/flutter/plugins/firebaseadmob/AdRequestBuilderFactory.javaは非推奨のAPIを使用またはオーバーライドしています。
注意:詳細は、-Xlint:deprecationオプションを指定して再コンパイルしてください。
注意:/Users/<UserName>/development/flutter/.pub-cache/hosted/pub.dartlang.org/firebase_core-0.4.3+1/android/src/main/java/io/flutter/plugins/firebase/core/FirebaseCorePlugin.javaは非推奨のAPIを使用またはオーバーライドしています。
注意:詳細は、-Xlint:deprecationオプションを指定して再コンパイルしてください。
注意:/Users/<UserName>/development/flutter/.pub-cache/hosted/pub.dartlang.org/cloud_firestore-0.13.0+1/android/src/main/java/io/flutter/plugins/firebase/cloudfirestore/CloudFirestorePlugin.javaの操作は、未チェックまたは安全ではありません。
注意:詳細は、-Xlint:uncheckedオプションを指定して再コンパイルしてください。
注意:/Users/<UserName>/development/flutter/.pub-cache/hosted/pub.dartlang.org/firebase_analytics-5.0.9/android/src/main/java/io/flutter/plugins/firebaseanalytics/FirebaseAnalyticsPlugin.javaは非推奨のAPIを使用またはオーバーライドしています。
注意:詳細は、-Xlint:deprecationオプションを指定して再コンパイルしてください。
注意:/Users/<UserName>/development/flutter/.pub-cache/hosted/pub.dartlang.org/package_info-0.4.0+13/android/src/main/java/io/flutter/plugins/packageinfo/PackageInfoPlugin.javaは非推奨のAPIを使用またはオーバーライドしています。
注意:詳細は、-Xlint:deprecationオプションを指定して再コンパイルしてください。
/Users/<UserName>/development/flutter/.pub-cache/hosted/pub.dartlang.org/shared_preferences-0.5.6/android/src/main/java/io/flutter/plugins/sharedpreferences/SharedPreferencesPlugin.java:25: 警告: [deprecation] FlutterPluginBindingのgetFlutterEngine()は非推奨になりました
    setupChannel(binding.getFlutterEngine().getDartExecutor(), binding.getApplicationContext());
                        ^
警告1個
注意:一部の入力ファイルは非推奨のAPIを使用またはオーバーライドしています。
注意:詳細は、-Xlint:deprecationオプションを指定して再コンパイルしてください。
参考:
app/build.gradleはこちら
    defaultConfig {
        // TODO: Specify your own unique Application ID (https://developer.android.com/studio/build/application-id.html).
        applicationId "tech.tokkuengineer.flutter_firebase_sample"
        minSdkVersion 23
        targetSdkVersion 29
        versionCode flutterVersionCode.toInteger()
        versionName flutterVersionName
        multiDexEnabled true
    }
- setting.gradleに以下を追加
参考:【flutter】firebase登録時にsetting.gradeでのエラー - Qiita
def flutterProjectRoot = rootProject.projectDir.parentFile.toPath()

def plugins = new Properties()
def pluginsFile = new File(flutterProjectRoot.toFile(), '.flutter-plugins')
if (pluginsFile.exists()) {
    pluginsFile.withReader('UTF-8') { reader -> plugins.load(reader) }
}

plugins.each { name, path ->
    def pluginDirectory = flutterProjectRoot.resolve(path).resolve('android').toFile()
    include ":$name"
    project(":$name").projectDir = pluginDirectory
}
ここまで出来たら、エミュレータをAndroidのイメージに変えてDebug-Developmentでビルドできるか確認します。
Dockerでのfirebase環境の構築
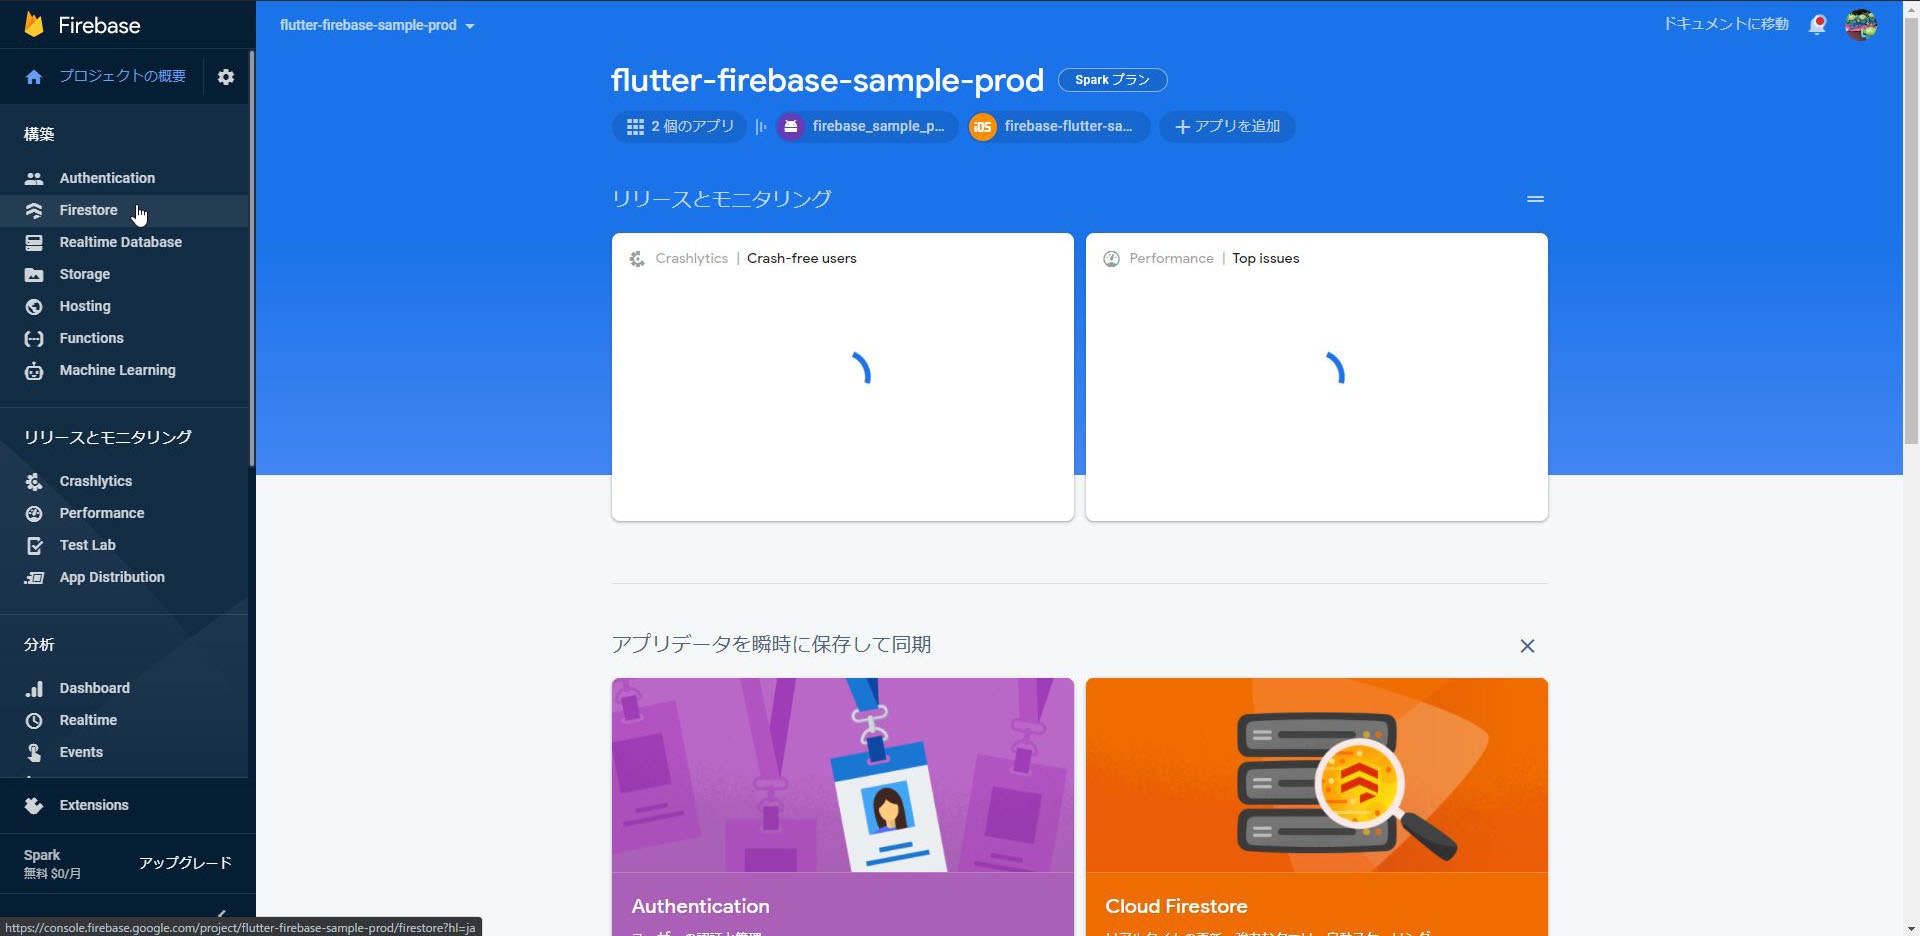
に入る前に、Firebaseプロジェクトの設定を行っておきます。
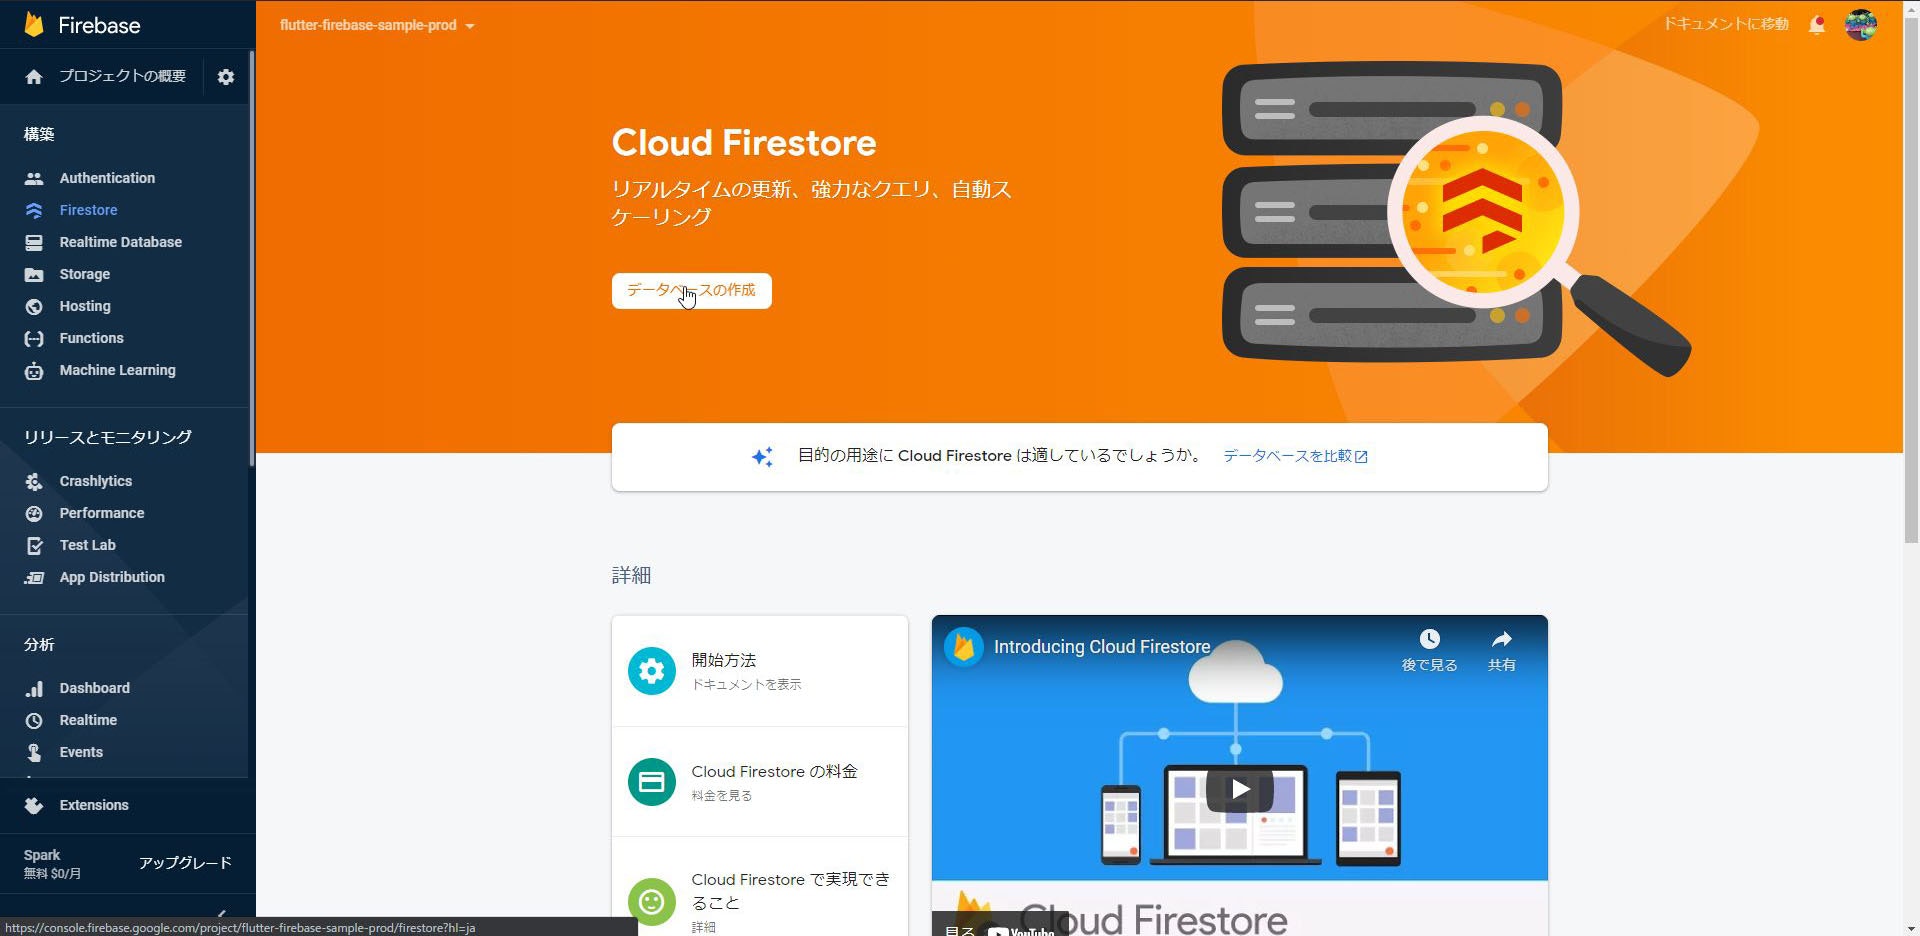
Firebase プロジェクトの画面からFirestoreをクリック
Cloud Firestoreの画面からデータベースの作成をクリック
データベースの作成画面でモードを選択
※本番環境モードで開始すると、セキュリティルールを適切に設定するまでFirestoreの書き込みが全て拒否されます。開発環境であれば、まずはテストモードで開始することをお勧めします。
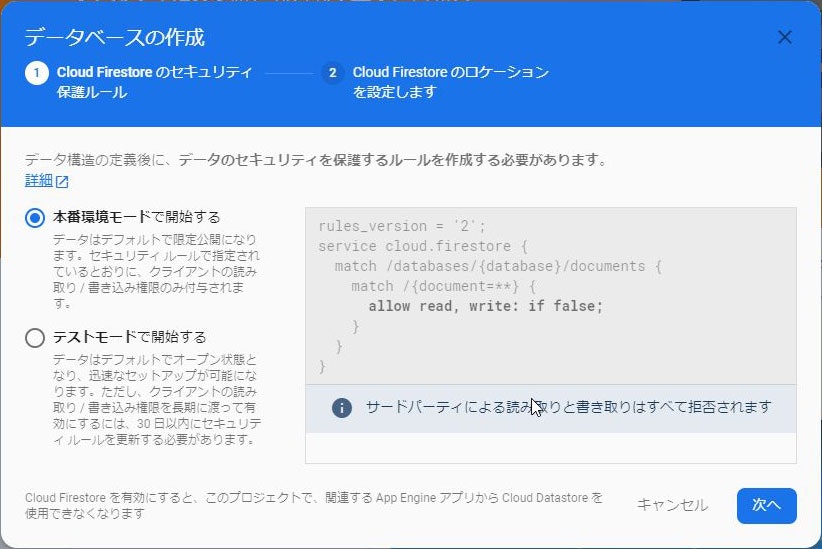
Cloud Firestoreのロケーションを選択する。好みではありますが、asia-northeast1を選択しておけば良いかと思います。

Dockerを使った環境構築
ここからはVSCodeで作業していきます。
firebase/Dockerfile
Dockerfileとdocker-compose.yamlファイルを作成し、以下のように記載します。
GitHubリポジトリに用意してあります。
FROM node:latest

# Define working directory
WORKDIR /workdir

# Firebase toolsのインストール
RUN apt-get -y update && apt-get install -y sudo openjdk-11-jdk
RUN npm install -g firebase-tools

# Expose ports
ENV HOST 0.0.0.0
EXPOSE 4000
EXPOSE 5000
EXPOSE 5001
EXPOSE 8080
EXPOSE 9005
version: "3"
services:
  firebase-cli-container:
    build: ./firebase-cli
    container_name: firecli-container
    volumes:
      - ../firebase:/workdir
これらの準備が出来たら、cd firebaseでフォルダを移動し、docker-compose upコマンドでコンテナをビルドします。
PS C:\Users\XXXX\AndroidStudioProjects\flutter_firebase_sample\firebase> docker-compose up
Building firebase-cli-container
failed to get console mode for stdout: The handle is invalid.
 => [internal] load build definition from Dockerfile                       0.0s
 => => transferring dockerfile: 32B                                        0.0s
 => [internal] load .dockerignore                                          0.0s
 => => transferring context: 2B                                            0.0s
 => [internal] load metadata for docker.io/library/node:latest             1.0s
 => [1/3] FROM docker.io/library/node:latest@sha256:096cbc2667f5d1507d59d  0.0s
 => CACHED [2/3] WORKDIR /workdir                                          0.0s
 => CACHED [3/3] RUN npm install -g firebase-tools                         0.0s
 => exporting to image                                                     0.0s
 => => exporting layers                                                    0.0s
 => => writing image sha256:9e31128f3f52b134c129a9f91f13f5bb91c3c9cd482f3  0.0s
 => => naming to docker.io/library/firebase_firebase-cli-container         0.0s
Successfully built a9f91f13fc9e311c31128f32fb1349c9cd482f3525bb9c15ecb15b874b35c88a
WARNING: Image for service firebase-cli-container was built because it did not already exist. To rebuild this image you must use `docker-compose build` or `docker-compose up --build`.
Creating firecli ... done
Attaching to firecli
firecli exited with code 0
成功したら、以下のコマンドでコンテナを起動します。
docker-compose run -p 4000:4000 -p 5000:5000 -p 5001:5001 -p 8080:8080 -p 9005:9005 firebase-cli-container /bin/bash
起動したら、コンテナ内に接続されているので、そのままfirebaseの初期設定をします。
まずはfirebaseにログインします。
> firebase login
i  Firebase optionally collects CLI usage and error reporting information to help improve our products. Data is collected in accordance with Google's privacy policy (https://policies.google.com/privacy) and is not used to identify you.

? Allow Firebase to collect CLI usage and error reporting information? (Y/n)
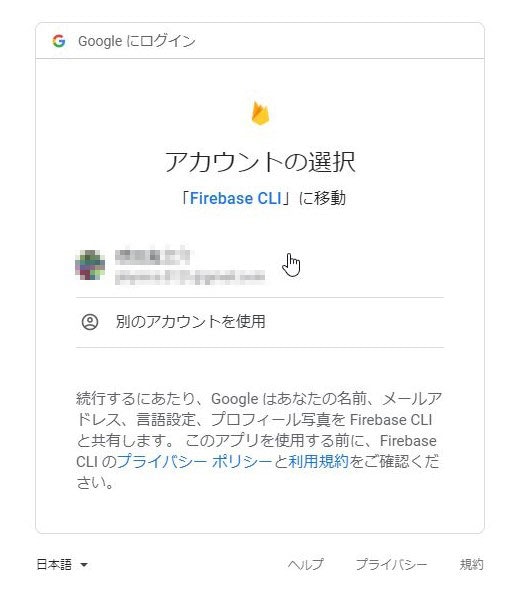
そのままEnterを押すとURLが表示されるので、Ctrlを押しながらクリックして開きます。
アカウント選択の画面で、ログインするユーザをクリックします。
Firebase CLIからのアカウントアクセスのリクエスト画面が出るので、許可をクリックします。
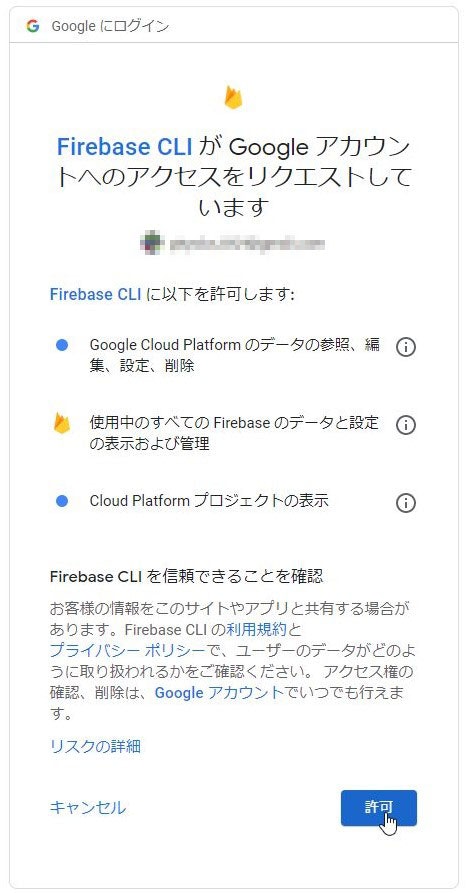
以下のような画面が出たら成功です。
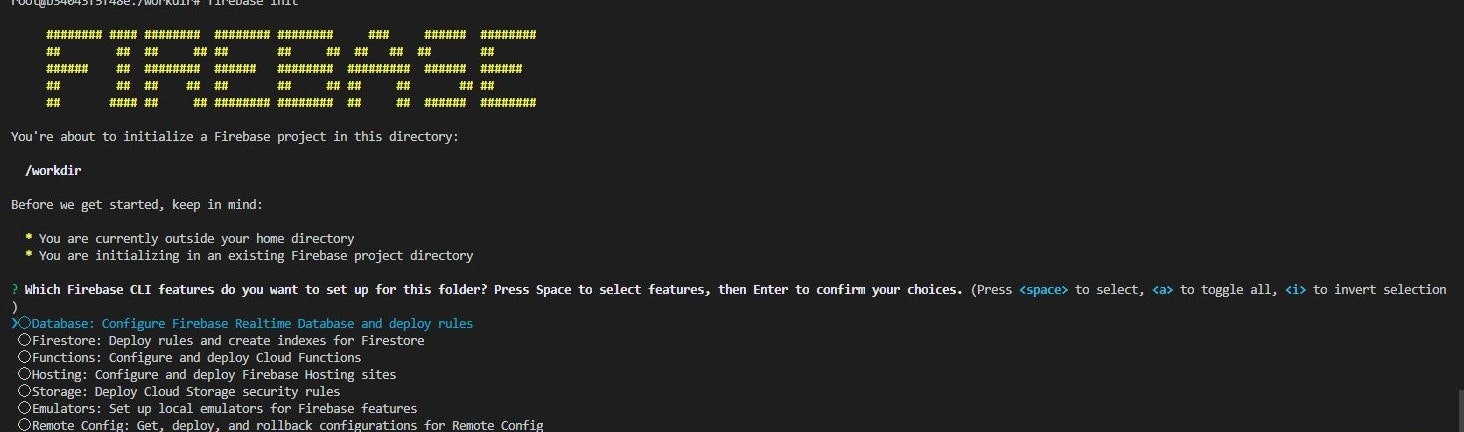
VSCodeに戻って(コンテナ内のコンソールに戻って)firebase initを実行します。
以下のような画面でFiresotre、Functions、Hosting、Emulatorsを選択します。
※選択するにはスペースを押します。
後は基本的にデフォルトで進めます。
途中Firebaseプロジェクトを聞かれるので、先の手順で作成したプロジェクトのdev側を選択しておきます。
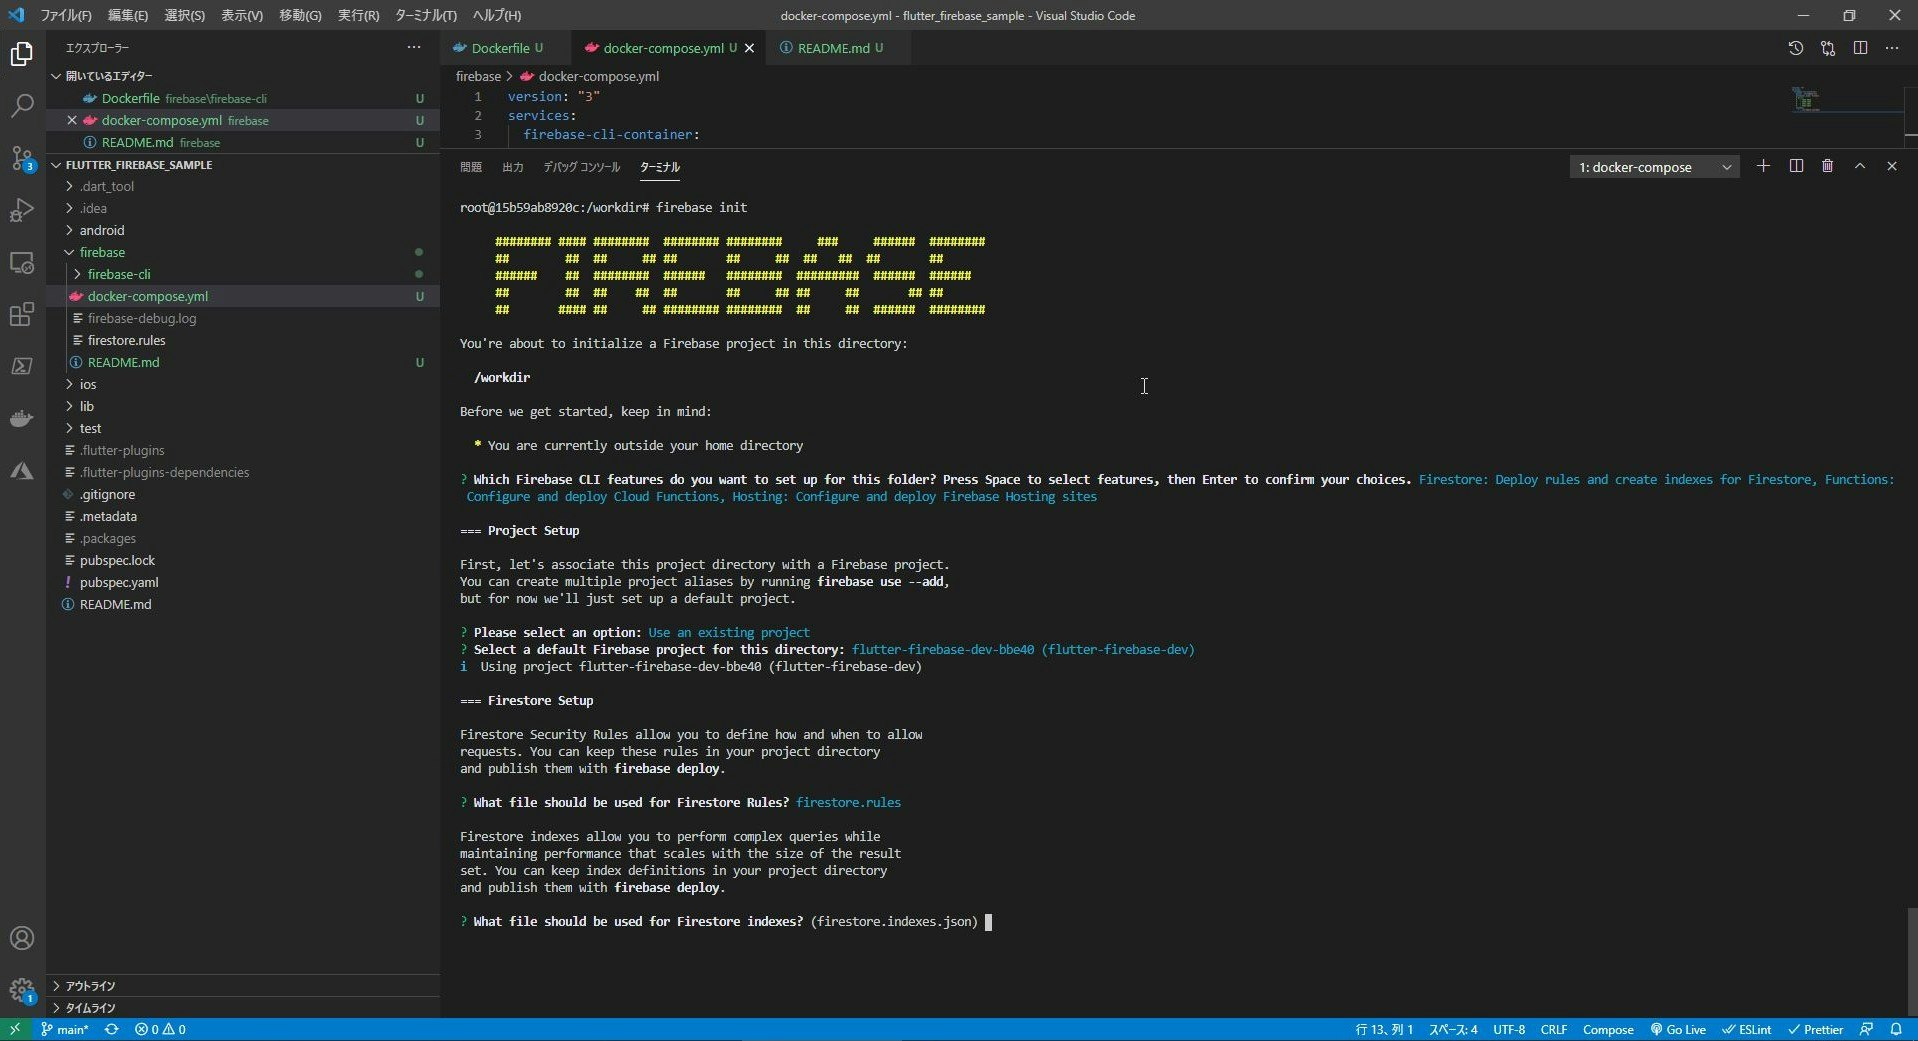
firebase initが完了したらfirebase.jsonを以下のように修正します。
{
  "firestore": {
    "rules": "firestore.rules",
    "indexes": "firestore.indexes.json"
  },
  "functions": {
    "predeploy": [
      "npm --prefix \"$RESOURCE_DIR\" run lint",
      "npm --prefix \"$RESOURCE_DIR\" run build"
    ],
    "source": "functions"
  },
  "hosting": {
    "public": "public",
    "ignore": [
      "firebase.json",
      "**/.*",
      "**/node_modules/**"
    ]
  },
  "emulators": {
    "functions": {
      "host":"0.0.0.0",
      "port": 5001
    },
    "firestore": {
      "host":"0.0.0.0",
      "port": 8080
    },
    "hosting": {
      "host":"0.0.0.0",
      "port": 5000
    },
    "ui": {
      "enabled": true,
      "host":"0.0.0.0",
      "port":4000
    }
  }
}
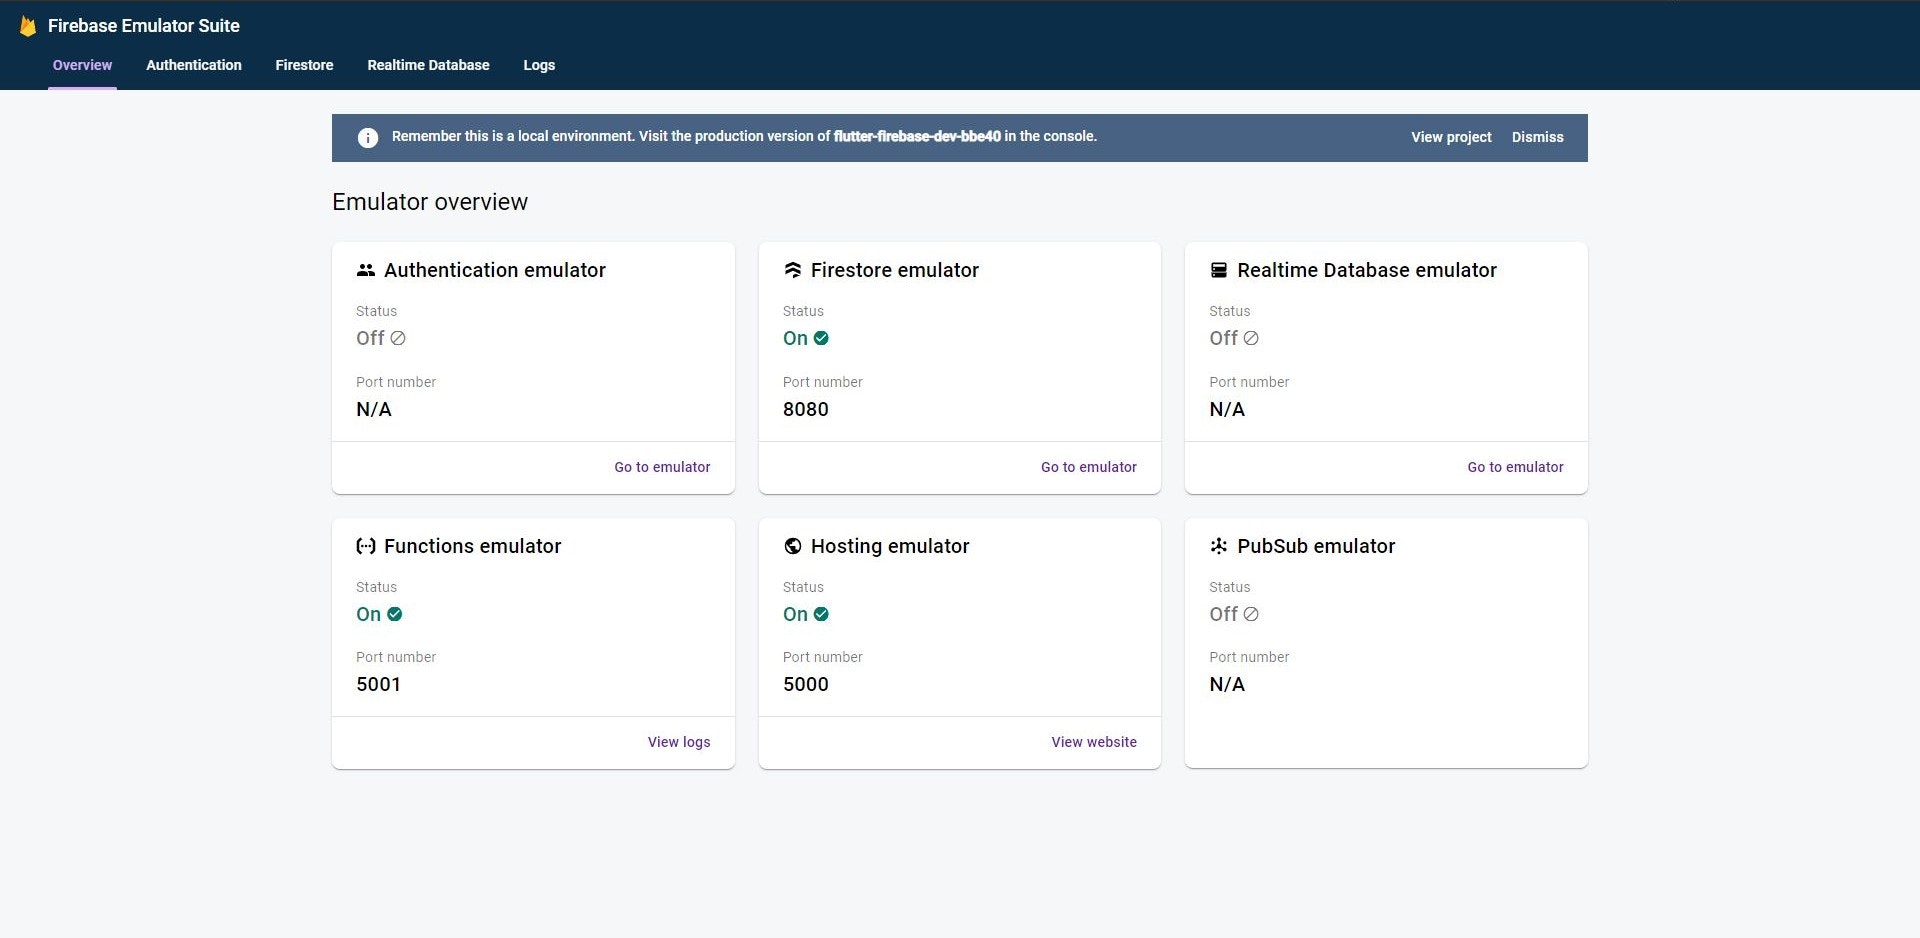
ここまで出来たらエミュレータを起動してみます。
コンテナ上で以下のコマンドを実行します。
firebase emulators:start
ブラウザでhttp://localhost:4000 にアクセスし、以下のような画面が表示されたら成功です。
Firebase Hostingの設定
Firebase Authenticationを使ってユーザー認証を行っていると、App Storeへの申請時にプライバシーポリシーが必要となります。
せっかくFirebaseを使っているので、プライバシーポリシーとついでにアプリのLPをFirebase Hostingで用意しましょう。
- プライバシーポリシー、利用規約作成
- ついでにLP作成
とはいえ、上記のDockerでの環境構築の手順で環境構築は済んでいます。
firebase/publicがドキュメントルートになりますので、ここにLPなりプライバシーポリシーなりを作成して、デプロイすればOKです。
実際のコンテンツ作成はこの記事では割愛しますが、デプロイは以下のコマンドを用いて可能です。
firebase deploy --only hosting
また別のFirebaseプロジェクトにデプロイする場合は、
firebase projects:list
でプロジェクトの一覧を表示したあと、表示されたProject IDを指定して以下のコマンドを実行するとプロジェクトを切り替える事ができます
firebase use <Project ID>
この後firebase deployコマンドでデプロイすればプロジェクトが切り替わった状態でデプロイされます。
その他の初期設定
Lintの追加
これも後から入れるよりも最初に入れた方が良いので、pedanticを導入します。
pubspec.yamlに以下を追加します。
dev_dependencies:
  pedantic: ^1.11.0
こちら(公式リポジトリ)にある最新のanalysis_options.yamlをコピーしてプロジェクトの直下に置いておきます。
本記事執筆時点では1.11が最新でした。
analysis_options.yaml
もちろんお好みでカスタムてOKです。(私はいつもこの方法でコピーするだけにしてます。)
Flutter SDKのバージョン固定
共同開発を行っていると、Flutter SDKのバージョンを固定したくなる場合があります。これもプロジェクトの初期の段階で導入を済ませてしまった方が良いです。
バージョン固定するためにfvmというパッケージを使います。
fvmを導入するために、FlutterにバンドルされているDartとは別にDartをインストールします。
公式のインストール方法
Windows
管理者権限でPowerShellを開き、Chocolatoryを以下のコマンドでインストールします
Set-ExecutionPolicy Bypass -Scope Process -Force; [System.Net.ServicePointManager]::SecurityProtocol = [System.Net.ServicePointManager]::SecurityProtocol -bor 3072; iex ((New-Object System.Net.WebClient).DownloadString('https://chocolatey.org/install.ps1'))
インストールされたらchoco -vでバージョンが表示されるか確認しておきましょう。
そのままdart-sdkをインストールします。
choco install dart-sdk
choco upgrade dart-sdk
インストールと同時にPATHも通っていると思いますが念のため以下のコマンドで確認します。
PS C:\WINDOWS\system32> dart --version
Dart SDK version: 2.10.4 (stable) (Wed Nov 11 13:35:58 2020 +0100) on "windows_x64"
インストール時のメッセージに従って一度PowerShellのプロンプトを再起動しておきます。
※またPub Cacheの方のPATHが正常に通らないので、手動で該当のフォルダを開いた後、パスを手でコピーしてインストール時に追加された環境変数のPATHを上書いておきましょう。
MacOS
Terminalを開いて以下のコマンドを実行します
brew tap dart-lang/dart
brew install dart
また各shellに合わせてPATHを通しておきます。
インストール時のメッセージに従って.zshrcなどに追記してください。
MacでのPATHの通し方が分からない方はこちらのような記事を参考にしてください。
fvmの導入
WindowsならPowerShell、MacOSならTerminalを開いて以下のコマンドを実行します。
pub global activate fvm
次にプロジェクトのルートに行き、以下のコマンドを実行します
stableとなっているところを好きなバージョンに変更してもかまいません
fvm install stable
fvm use <version>
このようにすると、Windowsなら.fvmフォルダの下に以下のようなファイルが出来上がります。
{
  "flutterSdkVersion": "2.0.4"
}
これをgitの管理下にして共有しておくことで、他の共同開発者は、fvmをインストールした後にプロジェクトルートで
fvm install
とだけ打てば指定したバージョンがインストールされます。
MacOSの場合、.fvmの下にfvm_config.jsonに加えてflutter_sdkというシンボリックリンクが作成されます。
これをAndroid StudioのPreferences -> Languages & Frameworks -> Flutter -> SDKに指定すれば、pub getやビルドする際に、このflutter sdkを使うようになります。
共同開発者にWindowsユーザーがいる場合はこのシンボリックリンクは.gitignoreに追加して共有しないようにしておきます。(Windowsマシンでプロジェクトを開けなくなります)
Windowsの場合は、シンボリックリンクが作成されないので、以下のような手順で手動でSDKを変更します。
-
C:\Users\XXXX\fvm\versionsの下に、インストールされたバージョン名のフォルダがありますのでコピーしてAndroid StudioのPreferences -> Languages & Frameworks -> Flutter -> SDKに指定します。 -
Android Studioの
Preferences -> Languages & Frameworks -> Dartを開き、C:\Users\XXXX\fvm\versions\<指定したバージョン>\bin\cache\dart-sdkを指定し「OK」を押します。
これで、WindowsでもfvmのFlutter SDKを見に行くようになります。
まとめ
長々と手順化しましたが、これらはプロジェクトを作成して初期のタイミングで行った方が良いかと思います。
下手したらこれだけで1日潰れそうですね・・・
参考
- Flutter アプリに Firebase を追加する(公式)
- 環境設定 - KosukeSaigusa/recipe-app
- 開発者ごとでなく、プロジェクトごとにFlutterのバージョンを管理する
- fvmを使ってFlutter SDKのバージョンを切り替える - Qiita
- [BUG] Can't load Kernel binary: Invalid kernel binary format version.
- アプリの圧縮、難読化、最適化 - Android Developpers (公式)
- docker でfirebaseを試したメモ - Qiita
- Docker入門(第六回)〜Docker Compose〜
- Docker compose ことはじめハンズオン - Qiita
- Firebase CLI の設定 - KosukeSaigusa/recipe-app
- Flutterに関する記事まとめ | インフラエンジニアがもがくブログ