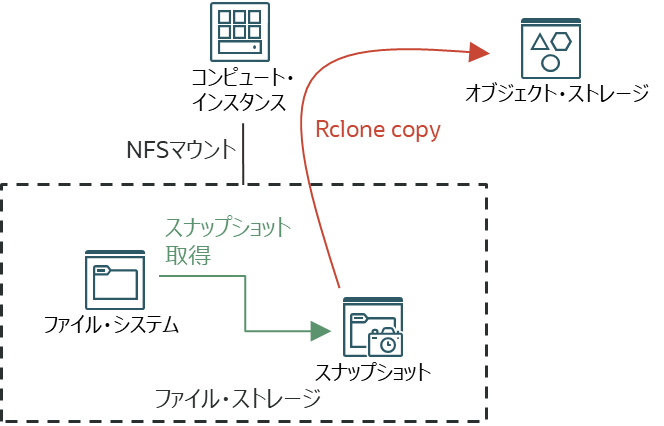
OCIのファイル・ストレージ・サービス(FSS)はNFSの共有ファイルシステムを簡単に利用できるマネージドサービスのストレージです。
FSSの機能としてクローンやレプリケーションなどの機能もありますが、今回は、FSSとは別のストレージ領域にデータをバックアップしたり移行するようなケースを想定します。
いくつかの方法が考えられますが、今回はファイル・システムのスナップショットからrcloneを使ってオブジェクト・ストレージにデータをコピーしていきます。
-
FSSのファイル・システムのスナップショットは一貫性のあるポイントインタイムのスナップショットで、Copy-on-write方式のためスナップショット取得は非常に短時間で可能です。(Copy-on-write:スナップショット取得時点では実データはコピーされず、更新があった際に元データを複製していく仕組み。)
- たとえばアプリケーションの問題やオペミスによって、ファイル・システム内のデータをある時点に戻したいという場合には、過去のスナップショットを取得していた時点のデータに戻す(スナップショットからファイル・システム側にデータをコピーしなおしてくる)ことが可能です。ただし、元のファイル・システム自体がなんらかの要因で利用できなくなったりした場合にはスナップショット単体では成り立ちません。そのような場合にも備えたい場合は、ファイル・ストレージ以外の領域や別リージョンへ物理的にバックアップを取得するケースがありえます。
- 製品ドキュメント:スナップショットの管理
-
rcloneは、オープンソースのコマンドラインで、各種のクラウド・ストレージに対応したストレージ間でのファイル同期・コピー等を実施できるツールです。OCIのオブジェクト・ストレージもrcloneにネイティブに対応しているので、簡単にセットアップ出来て便利です。
- オブジェクト・ストレージでrcloneを利用する方法については、以下の記事も参照してください。
製品ドキュメントでは、rcloneを使用したオブジェクト・ストレージへのスナップショットのバックアップ に手順があるので、これを参考に実施していきます。
環境準備
-
今回はTokyoリージョンにあらかじめ作成済みのFSSのファイル・システムとマウント・ターゲット(標準タイプ)を使います。また、オブジェクト・ストレージのバケットも作成済みの状態です。
-
コンピュート・インスタンスを作成。
- VM.Standard.E4.Flexのインスタンスを作成しました。インスタンスのネットワーク帯域のボトルネックをなるべく排除したいので、4 OCPU(= 最大ネットワーク帯域が4 Gbps)で作成しました。Oracle Linux 9のプラットフォームイメージを利用しています。
-
OCI CLIのインストールと構成。以下のコマンドで簡単にインストールと設定ができます。ユーザーのAPIキー認証でセットアップしておきます。configファイルの場所はデフォルトのままにしました。ここで設定したOCI CLIの認証設定をrcloneでも利用することが可能です。
-
sudo dnf -y install oraclelinux-developer-release-el9
sudo dnf install python39-oci-cli
oci setup config
-
-
rcloneインストール。以下のコマンドでインストールできます。
-
curl https://rclone.org/install.sh | sudo bash
実施中の様子の例
[opc@tk-tokyo-4ocpu ~]$ curl https://rclone.org/install.sh | sudo bash % Total % Received % Xferd Average Speed Time Time Time Current Dload Upload Total Spent Left Speed 100 4734 100 4734 0 0 5485 0 --:--:-- --:--:-- --:--:-- 5479 Archive: rclone-current-linux-amd64.zip creating: tmp_unzip_dir_for_rclone/rclone-v1.71.2-linux-amd64/ inflating: tmp_unzip_dir_for_rclone/rclone-v1.71.2-linux-amd64/README.txt [text] inflating: tmp_unzip_dir_for_rclone/rclone-v1.71.2-linux-amd64/README.html [text] <<中略>> Updating index cache for path `/usr/local/share/man/mann'. Wait...done. Checking for stray cats under /usr/local/share/man... Checking for stray cats under /var/cache/man/local... 126 man subdirectories contained newer manual pages. 9020 manual pages were added. 0 stray cats were added. 0 old database entries were purged. rclone v1.71.2 has successfully installed. Now run "rclone config" for setup. Check https://rclone.org/docs/ for more details. [opc@tk-tokyo-4ocpu ~]$ -
-
rclone configを使ってセットアップしていきます。プロンプトに従って必要な項目を入力していきます。
[opc@tk-tokyo-4ocpu ~]$ rclone config 2025/11/07 00:47:00 NOTICE: Config file "/home/opc/.config/rclone/rclone.conf" not found - using defaults No remotes found, make a new one? n) New remote s) Set configuration password q) Quit config n/s/q> n Enter name for new remote. name> objectstorage ←★★今回設定するオブジェクトストレージに対して任意の名前を付ける Option Storage. Type of storage to configure. Choose a number from below, or type in your own value. 1 / 1Fichier \ (fichier) 2 / Akamai NetStorage \ (netstorage) 3 / Alias for an existing remote \ (alias) 4 / Amazon S3 Compliant Storage Providers including AWS, Alibaba, ArvanCloud, Ceph, ChinaMobile, Cloudflare, DigitalOcean, Dreamhost, Exaba, FlashBlade, GCS, HuaweiOBS, IBMCOS, IDrive, IONOS, LyveCloud, Leviia, Liara, Linode, Magalu, Mega, Minio, Netease, Outscale, OVHcloud, Petabox, RackCorp, Rclone, Scaleway, SeaweedFS, Selectel, StackPath, Storj, Synology, TencentCOS, Wasabi, Qiniu, Zata and others \ (s3) <<中略>> 38 / Microsoft OneDrive \ (onedrive) 39 / OpenDrive \ (opendrive) 40 / OpenStack Swift (Rackspace Cloud Files, Blomp Cloud Storage, Memset Memstore, OVH) \ (swift) 41 / Oracle Cloud Infrastructure Object Storage ←★★OCIのオブジェクトストレージの番号を確認する。アルファベット順に並んでいるのでrcolneのバージョンによって番号は変動する。 \ (oracleobjectstorage) 42 / Pcloud \ (pcloud) <<中略>> Storage> 41 ←★★ここでは41番だったので41と入力。 Option provider. Choose your Auth Provider Choose a number from below, or type in your own value of type string. Press Enter for the default (env_auth). 1 / automatically pickup the credentials from runtime(env), first one to provide auth wins \ (env_auth) / use an OCI user and an API key for authentication. 2 | you’ll need to put in a config file your tenancy OCID, user OCID, region, the path, fingerprint to an API key. | https://docs.oracle.com/en-us/iaas/Content/API/Concepts/sdkconfig.htm \ (user_principal_auth) / use instance principals to authorize an instance to make API calls. 3 | each instance has its own identity, and authenticates using the certificates that are read from instance metadata. | https://docs.oracle.com/en-us/iaas/Content/Identity/Tasks/callingservicesfrominstances.htm \ (instance_principal_auth) / use workload identity to grant OCI Container Engine for Kubernetes workloads policy-driven access to OCI resources using OCI Identity and Access Management (IAM). 4 | https://docs.oracle.com/en-us/iaas/Content/ContEng/Tasks/contenggrantingworkloadaccesstoresources.htm \ (workload_identity_auth) 5 / use resource principals to make API calls \ (resource_principal_auth) 6 / no credentials needed, this is typically for reading public buckets \ (no_auth) provider> 2 ←★★今回はOCI CLIでセットアップ済みのAPIキーによる認証を行うので2番を選択。もしインスタンス・プリンシパルでの認証を行う場合は3。 Option namespace. Object storage namespace Enter a value. namespace> xxxxxxxxxxxxx ←★★テナンシのオブジェクト・ストレージ・ネームスペースを入力。ネームスペース名はOCIコンソールのテナンシ詳細のページで確認可能。 Option compartment. Specify compartment OCID, if you need to list buckets. List objects works without compartment OCID. Enter a value. Press Enter to leave empty. compartment> ocid1.compartment.oc1..xxxxxxxxxxxxxxxxxx ←★★バケットがあるコンパートメントOCIDを入力 Option region. Object storage Region Enter a value. region> ap-tokyo-1 ←★★バケットがあるリージョンを入力 Option endpoint. Endpoint for Object storage API. Leave blank to use the default endpoint for the region. Enter a value. Press Enter to leave empty. endpoint> ←★★何も入力せずEnter Option config_file. Path to OCI config file Choose a number from below, or type in your own value of type string. Press Enter for the default (~/.oci/config). 1 / oci configuration file location \ (~/.oci/config) config_file> ←★★OCI CLIもデフォルト設定なのでconfigファイルの位置は同じ。何も入力せずEnter Option config_profile. Profile name inside the oci config file Choose a number from below, or type in your own value of type string. Press Enter for the default (Default). 1 / Use the default profile \ (Default) config_profile> ←★★何も入力せずEnter Edit advanced config? y) Yes n) No (default) y/n> ←★★何も入力せずEnter Configuration complete. Options: - type: oracleobjectstorage - provider: user_principal_auth - namespace: orasejapan - compartment: ocid1.compartment.oc1..aaaaaaaaq5ddbxmfda4afryulzszwvbd7ym3xkidpizq7qo66h4nfhlxw27q - region: ap-tokyo-1 Keep this "objectstorage" remote? y) Yes this is OK (default) e) Edit this remote d) Delete this remote y/e/d> ←★★何も入力せずEnter Current remotes: Name Type ==== ==== objectstorage oracleobjectstorage e) Edit existing remote n) New remote d) Delete remote r) Rename remote c) Copy remote s) Set configuration password q) Quit config e/n/d/r/c/s/q> ←★★qで終了。 -
rcloneのコマンドで、オブジェクト・ストレージのバケットの中身が見えることを確認します。
- もし問題があった場合のため、--vvオプションでデバッグ情報も表示しています。
[opc@tk-tokyo-4ocpu ~]$ rclone ls -vv objectstorage:/tk_iaas_test_bucket 2025/11/07 00:59:47 DEBUG : rclone: Version "v1.71.2" starting with parameters ["rclone" "ls" "-vv" "objectstorage:/tk_iaas_test_bucket"] 2025/11/07 00:59:47 DEBUG : Creating backend with remote "objectstorage:/tk_iaas_test_bucket" 2025/11/07 00:59:47 DEBUG : Using config file from "/home/opc/.config/rclone/rclone.conf" 2025/11/07 00:59:47 DEBUG : fs cache: renaming cache item "objectstorage:/tk_iaas_test_bucket" to be canonical "objectstorage:tk_iaas_test_bucket" 1748 FSS_Rclone.md 2025/11/07 00:59:47 DEBUG : 6 go routines active [opc@tk-tokyo-4ocpu ~]$ -
続いて、もしインストールされていない場合はNFSをインストールし、コピー元となるファイル・システムをマウントします。今回は特別なオプションなどはつけませんでした。
sudo yum install nfs-utils sudo mkdir -p /mnt/tkfilesystem20250620 sudo mount 10.0.0.186:/tkfilesystem20250620 /mnt/tkfilesystem20250620 -
ファイル・システム上にddでファイルを生成しておきます。このファイル・システムには仮想フォルダもあり、ファイルはすべて1GBや10GBのファイル。合計して124GBの容量になっています。
スナップショットの取得
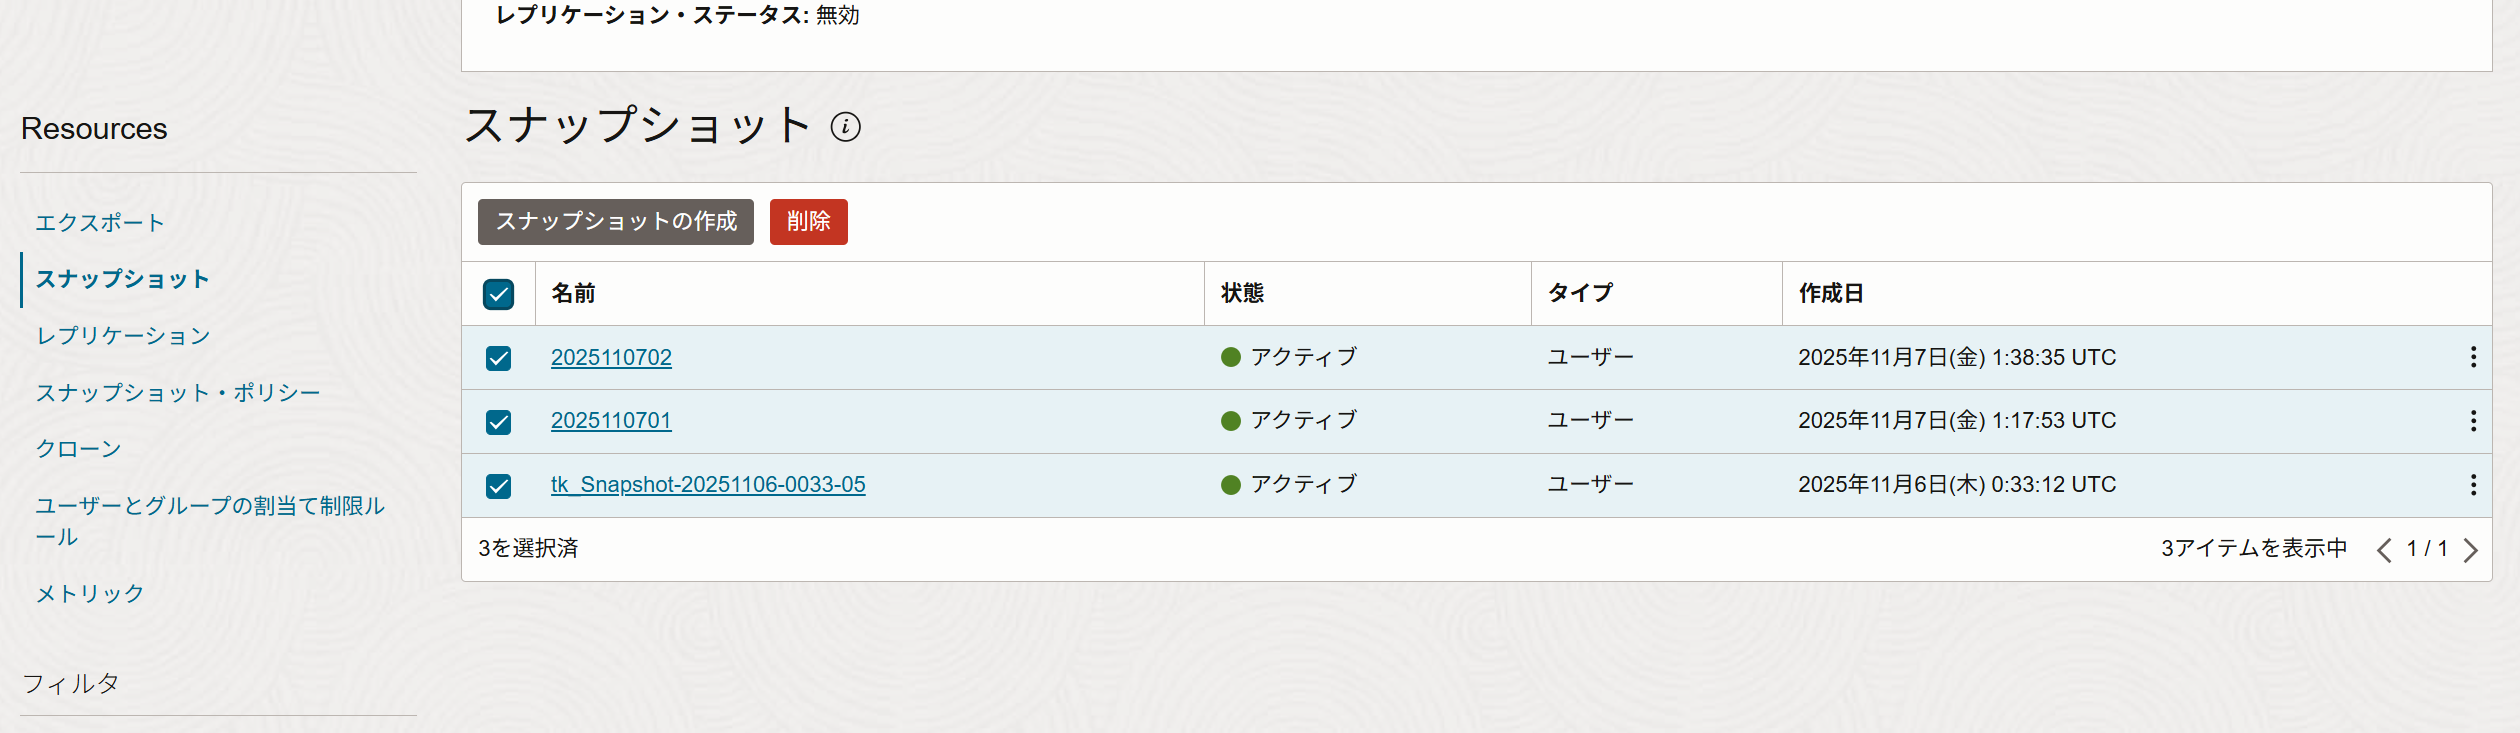
さて、準備ができたのでファイル・システムのスナップショットを作成します。スナップショットは、OCIコンソールからでも作成できますし、NFSマウントしたOS上で .snapshot という隠しディレクトリの中にあらたにディレクトリを作成するだけでもスナップショット取得が可能です。
今回はOS上から実施しました。
-
スナップショット作成。.snapshotディレクトリの中にmkdirするだけです。わりとすぐにプロンプトが返ってきます。
[opc@tk-tokyo-4ocpu tkfilesystem20250620]$ sudo mkdir /mnt/tkfilesystem20250620/.snapshot/2025110701 -
作成したディレクトリに移動すると、スナップショット取得時点の実際のファイルシステム上と同じファイルが見えることがわかります。
[opc@tk-tokyo-4ocpu tkfilesystem20250620]$ cd .snapshot/
[opc@tk-tokyo-4ocpu .snapshot]$ ls
2025110701  tk_Snapshot-20251106-0033-05
[opc@tk-tokyo-4ocpu .snapshot]$ cd 2025110701/
[opc@tk-tokyo-4ocpu 2025110701]$ ls
randomreadwrite.0.0  randomreadwrite.4.0  rw300.0.0   rw300.12.0  rw300.2.0  rw300.6.0  work
randomreadwrite.1.0  randomreadwrite.5.0  rw300.1.0   rw300.13.0  rw300.3.0  rw300.7.0
randomreadwrite.2.0  randomreadwrite.6.0  rw300.10.0  rw300.14.0  rw300.4.0  rw300.8.0
randomreadwrite.3.0  randomreadwrite.7.0  rw300.11.0  rw300.15.0  rw300.5.0  rw300.9.0
[opc@tk-tokyo-4ocpu 2025110701]$
スナップショット取得は非常に簡単です。これで一貫性のあるスナップショットが取得できましたので、ここからデータをコピーしていきます。
rcloneでコピー実施
続いてrcloneを使ってスナップショットからオブジェクト・ストレージのバケットにコピーを開始していきます。
-
色々とオプションもありますが、まずは特別なチューニングなどはせずにcopyを実施します。以下のパラメータのみつけています。
- --progress:進捗の表示を行います。
- --metadata:ファイルのメタデータも一緒にコピーします。
- --copy-links:シンボリック・リンクがある場合はリンクをコピーするのみでリンク先のファイルはコピーしません。
進捗を見ていると、デフォルトだと4ファイル並列でコピーが進行するようです。同時実行するファイル数などはパラメータで調整もできるので、環境に応じて最適化もできそうです。
-
[opc@tk-tokyo-4ocpu ~]$ rclone copy --progress --metadata --copy-links /mnt/tkfilesystem20250620/.snapshot/2025110702 objectstorage:/tk_iaas_test_bucket/2025110702/
Transferred:        2.225 GiB / 124 GiB, 2%, 122.522 MiB/s, ETA 16m57s
Checks:                 0 / 0, -, Listed 35
Transferred:            0 / 34, 0%
Elapsed time:        18.5s
Transferring:

 *                           randomreadwrite.0.0: 58% /1Gi, 55.037Mi/s, 7s
 *                           randomreadwrite.1.0: 48% /1Gi, 52.776Mi/s, 9s
 *                           randomreadwrite.2.0: 58% /1Gi, 55.524Mi/s, 7s
 *                           randomreadwrite.3.0: 56% /1Gi, 54.277Mi/s, 8s
途中の進捗を見ていると、最大でだいたい217MiB/sくらいの性能が出ていました。

-
今回のケースでは合計124GiBのコピーが14m36.2sで完了しました。
- 注)性能は合計容量だけではなくファイルサイズやファイル数などにも依存するので実際のファイルシステムの特性に応じて確認するのが良いと思います。
[opc@tk-tokyo-4ocpu ~]$ rclone copy --progress --metadata --copy-links /mnt/tkfilesystem20250620/.snapshot/2025110702 objectstorage:/tk_iaas_test_bucket/2025110702/
Transferred:          124 GiB / 124 GiB, 100%, 206.440 MiB/s, ETA 0s
Checks:                 0 / 0, -, Listed 35
Transferred:           34 / 34, 100%
Elapsed time:     14m36.2s
[opc@tk-tokyo-4ocpu ~]$
-
オブジェクトストレージのバケットを確認すると正しくすべてのファイルやフォルダがアップロードされていました。
これでrcloneでのオブジェクトストレージへのバックアップ取得は完了です。
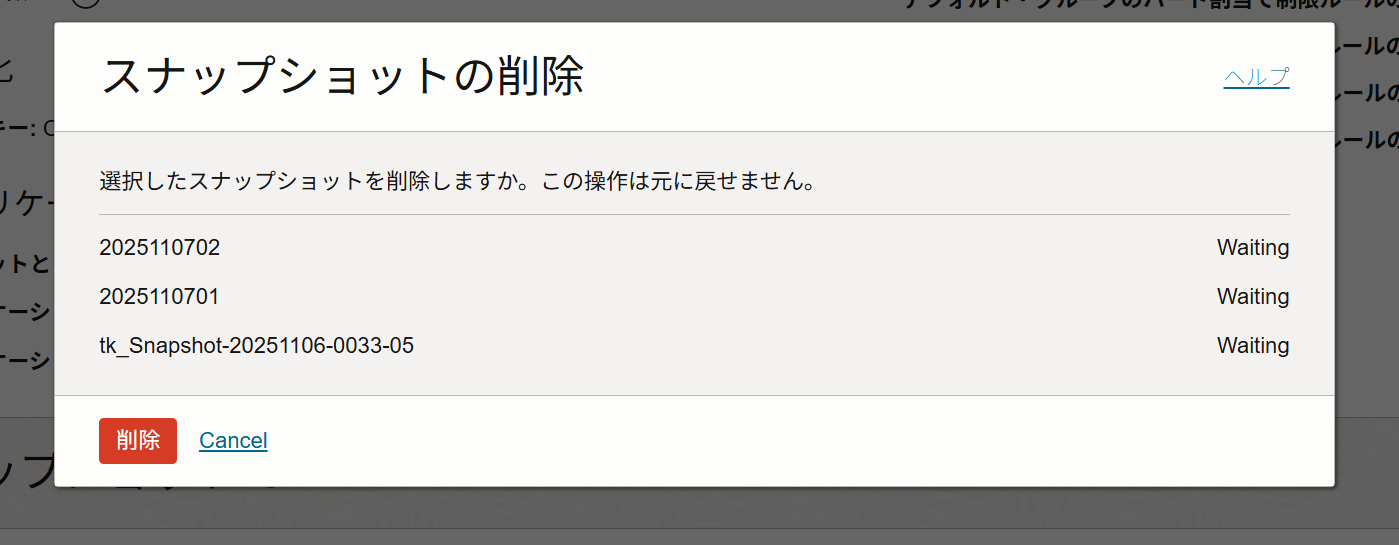
おまけ:実ファイルシステムからrcloneしてみる
一貫性のあるスナップショットからデータをコピーしてくることができるのはわかりましたが、比較のため、実ファイルシステムから直接rclone copyしてみます。実際には更新の可能性があるファイルシステムから直接コピーすることはないかもしれませんが、性能面などで何か違いがあるかを確認するために実施しておきます。
-
わかりやすくするため、スナップショットを全て削除しておきます。スナップショットの削除はOSコマンドでは実施できないので、OCIコンソールからスナップショットの削除を行います。
-
ファイルシステム本体からrclone copyを実施します。オプションなどはさきほどと同じです。コピー元のディレクトリ指定を、.snapshotの下のディレクトリではなくNFSマウントしたディレクトリそのものにしています。

-
14.32.2sで完了しました。先ほどとほぼ同じ時間だったので、ファイルシステムから実行しても、スナップショットからコピーしてもさほど時間の違いはないことがわかりました。
