はじめに
意外と情報が少なそうだったので、ここに記しておきます。個人のPC上など、なるべく省リソースでルーティングを試したい、という時に、Docker+FRRoutingはよい選択肢になるのではと思います。
※私自身初学者のため間違いなどあればコメントいただけると幸いです。
前提
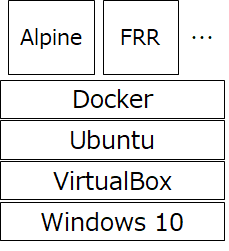
下記図のように、VirtualBox上のUbuntuの上にDockerコンテナとしてFRRouting、および端末としてAlpine Linuxを建てます。
使用したバージョンは以下の通り。
VirtualBox 6.1
Ubuntu 18.04
Docker 19.03.13
FRRouting 7.5
- Dockerまではインストールされていることを前提とします。
- Dockerネットワークの詳細についてはあまり触れません。必要に応じて参考ページを参照してください。
- FRRoutingのビルド方法はいろいろありますが、今回はなるべく手間をかけずに、dockerhubにあるものを使います。
- FRRoutingのルーティング設定方法として、/etc/frr/配下の設定ファイルに書き込む方法と、vtyshというCiscoライクなCLIで設定する方法があります。今回はよりルータを操作している感を出すために、(最大限)vtyshを使う方針とします。
- Ubuntu VMのスペックは、CPU 2 Core, メモリ4GB, ディスク10GBとしています。CPU、メモリは今回の構成ではそんなに必要なかったです。
作りたいネットワーク構成
このような最低限のネットワークを作り、OSPFを動かすところまでやってみます。
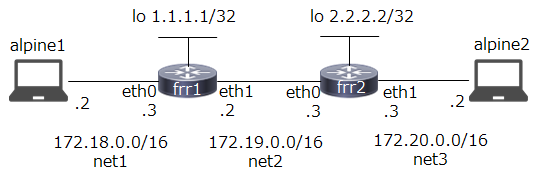
frr1, frr2でOSPFを動かし、alpine1→alpine2にpingが通ることを目指します。
Dockerネットワークとコンテナの作成
まずこちらのページを参考に、ネットワーク(ブリッジ)を作っていきます。
https://qiita.com/BooookStore/items/5862515209a31658f88c
# docker network create net1 --subnet=172.18.0.0/16
# docker network create net2 --subnet=172.19.0.0/16
# docker network create net3 --subnet=172.20.0.0/16
# docker network ls
NETWORK ID          NAME                DRIVER              SCOPE
f7691e525fcd        bridge              bridge              local
5df12997a7cf        host                host                local
ad914b22edf4        net1                bridge              local
e7366bce6e2f        net2                bridge              local
9b0317dba894        net3                bridge              local
315847e7b1fe        none                null                local
net1~net3ができました。
次に、alpine1, alpine2を作ります。
ルーティングテーブルを編集するため、--privilegedをつけます。
# docker run -dit --name alpine1 --hostname alpine1 --privileged --net net1 alpine
# docker run -dit --name alpine2 --hostname alpine2 --privileged --net net3 alpine
frr1, frr2を作り、それぞれnet1とnet2、net2とnet3に接続します。
--privilegedをつけないと動かないようです。
# docker run -dit --name frr1 --hostname frr1 --privileged --net net1 frrouting/frr:v7.5.0
# docker network connect net2 frr1
# docker run -dit --name frr2 --hostname frr2 --privileged --net net2 frrouting/frr:v7.5.0
# docker network connect net3 frr2
Alpineの設定
alpine1に入り、ルーティングテーブルを確認します。
# docker exec -it alpine1 /bin/sh
/ # route -n
Kernel IP routing table
Destination     Gateway         Genmask         Flags Metric Ref    Use Iface
0.0.0.0         172.18.0.1      0.0.0.0         UG    0      0        0 eth0
172.18.0.0      0.0.0.0         255.255.0.0     U     0      0        0 eth0
デフォルトゲートウェイがブリッジ(172.18.0.1)になっているため、frr1に変更します。
/ # route add default gw 172.18.0.3
/ # route del default gw 172.18.0.1
/ # route -n
Kernel IP routing table
Destination     Gateway         Genmask         Flags Metric Ref    Use Iface
0.0.0.0         172.18.0.3      0.0.0.0         UG    0      0        0 eth0
172.18.0.0      0.0.0.0         255.255.0.0     U     0      0        0 eth0

/ # exit
alpine2も同様にデフォルトゲートウェイを変更します。
# docker exec -it alpine2 /bin/sh
/ # route -n
Kernel IP routing table
Destination     Gateway         Genmask         Flags Metric Ref    Use Iface
0.0.0.0         172.20.0.1      0.0.0.0         UG    0      0        0 eth0
172.20.0.0      0.0.0.0         255.255.0.0     U     0      0        0 eth0

/ # route add default gw 172.20.0.3
/ # route del default gw 172.20.0.1
/ # route -n
Kernel IP routing table
Destination     Gateway         Genmask         Flags Metric Ref    Use Iface
0.0.0.0         172.20.0.3      0.0.0.0         UG    0      0        0 eth0
172.20.0.0      0.0.0.0         255.255.0.0     U     0      0        0 eth0

/ # exit
まだalpine1→alpine2へpingが通らないことを確認しておきます。
# docker exec -it alpine1 /bin/sh
/ # ping 172.20.0.2
PING 172.20.0.2 (172.20.0.2): 56 data bytes
^C
--- 172.20.0.2 ping statistics ---
6 packets transmitted, 0 packets received, 100% packet loss
FRRoutingの設定
frr1の設定
frr1に入り、ルーティングの設定をしていきます。
# docker exec -it frr1 /bin/sh
/ # ps
PID   USER     TIME  COMMAND
    1 root      0:00 /sbin/tini -- /usr/lib/frr/docker-start
    6 root      0:00 tail -f /dev/null
   21 root      0:00 /usr/lib/frr/watchfrr -d -F traditional zebra staticd
   33 frr       0:00 /usr/lib/frr/zebra -d -F traditional -A 127.0.0.1 -s 90000000
   38 frr       0:00 /usr/lib/frr/staticd -d -F traditional -A 127.0.0.1
   40 root      0:00 /bin/sh
   46 root      0:00 ps
既にwatchfrr, zebra, staticdが動いているのが確認できます。ospfは初期状態では動いていません。
この後、vtyshを使ってルータの設定をしていきますが、その前に事前設定として/etc/frr/vtysh.confを作っておきます。このファイルがないと、vtyshを起動したときに、
/ # vtysh
% Can't open configuration file /etc/frr/vtysh.conf due to 'No such file or directory'.
のように怒られます。
/ # cp /etc/frr/vtysh.conf.sample /etc/frr/vtysh.conf
ついでに、integrated-vtysh-configの設定もしておきます。FRRoutingでは、設定ファイルとして各デーモンごとの/etc/frr/*.confを使うのか、/etc/frr/frr.confにまとめるのか、を選べます。今回はまとめていきたいので、integrated-vtysh-configを設定します。公式docsでもintegratedが推奨されているようです。
!
! Sample configuration file for vtysh.
!
!service integrated-vtysh-config
!hostname quagga-router
!username root nopassword
!
service integrated-vtysh-config
最終行を追加しました。
vtyshに入り、各種設定を確認しておきます。
/ # vtysh

Hello, this is FRRouting (version 7.5_git).
Copyright 1996-2005 Kunihiro Ishiguro, et al.

frr1# show run
Building configuration...

Current configuration:
!
frr version 7.5_git
frr defaults traditional
hostname frr1
no ipv6 forwarding
service integrated-vtysh-config
!
line vty
!
end

frr1# show int brief
Interface       Status  VRF             Addresses
---------       ------  ---             ---------
eth0            up      default         172.18.0.3/16
eth1            up      default         172.19.0.2/16
lo              up      default

frr1# show ip route
Codes: K - kernel route, C - connected, S - static, R - RIP,
       O - OSPF, I - IS-IS, B - BGP, E - EIGRP, N - NHRP,
       T - Table, v - VNC, V - VNC-Direct, A - Babel, D - SHARP,
       F - PBR, f - OpenFabric,
       > - selected route, * - FIB route, q - queued, r - rejected, b - backup

K>* 0.0.0.0/0 [0/0] via 172.18.0.1, eth0, 00:01:54
C>* 172.18.0.0/16 is directly connected, eth0, 00:01:54
C>* 172.19.0.0/16 is directly connected, eth1, 00:01:49
設定ファイル(/etc/frr/daemons)を編集し、ospfd=yesとしてospfdを起動するようにします。
# ATTENTION:
#
# When activating a daemon for the first time, a config file, even if it is
# empty, has to be present *and* be owned by the user and group "frr", else
# the daemon will not be started by /etc/init.d/frr. The permissions should
# be u=rw,g=r,o=.
# When using "vtysh" such a config file is also needed. It should be owned by
# group "frrvty" and set to ug=rw,o= though. Check /etc/pam.d/frr, too.
#
# The watchfrr, zebra and staticd daemons are always started.
#
bgpd=no
ospfd=yes
ospf6d=no
ripd=no
以下略
設定反映のため、一度frr1を抜けてFRRを再起動します。(コンテナ内で/etc/init.d/frr restartではないことに注意)
(追記:コンテナ内で/usr/lib/frr/frrinit.sh restartでも全プロセスの再起動ができるようです。)
/ # exit
# docker restart frr1
frr1
再度frr1に入り確認します。
# docker exec -it frr1 /bin/sh
/ # ps
PID   USER     TIME  COMMAND
    1 root      0:00 /sbin/tini -- /usr/lib/frr/docker-start
    7 root      0:00 tail -f /dev/null
   14 root      0:00 /usr/lib/frr/watchfrr -d -F traditional zebra ospfd staticd
   32 frr       0:00 /usr/lib/frr/zebra -d -F traditional -A 127.0.0.1 -s 90000000
   37 frr       0:00 /usr/lib/frr/ospfd -d -F traditional -A 127.0.0.1
   40 frr       0:00 /usr/lib/frr/staticd -d -F traditional -A 127.0.0.1
   42 root      0:00 /bin/sh
   48 root      0:00 ps
ospfdが起動しています。
それではvtysh上でospfの設定をしていきます。
/ # vtysh

Hello, this is FRRouting (version 7.5_git).
Copyright 1996-2005 Kunihiro Ishiguro, et al.

frr1# conf t
frr1(config)# interface lo
frr1(config-if)# ip address 1.1.1.1/32
frr1(config-if)# exit
frr1(config)# router ospf
frr1(config-router)# router-info area 0.0.0.0
frr1(config-router)# network 172.18.0.0/16 area 0.0.0.0
frr1(config-router)# network 172.19.0.0/16 area 0.0.0.0
frr1(config-router)# end
frr1# show run
Building configuration...

Current configuration:
!
frr version 7.5_git
frr defaults traditional
hostname frr1
no ipv6 forwarding
service integrated-vtysh-config
!
interface lo
 ip address 1.1.1.1/32
!
router ospf
 network 172.18.0.0/16 area 0.0.0.0
 network 172.19.0.0/16 area 0.0.0.0
 router-info area
!
line vty
!
end
設定されました。show ip routeも確認しておきます。
frr1# show ip route
Codes: K - kernel route, C - connected, S - static, R - RIP,
       O - OSPF, I - IS-IS, B - BGP, E - EIGRP, N - NHRP,
       T - Table, v - VNC, V - VNC-Direct, A - Babel, D - SHARP,
       F - PBR, f - OpenFabric,
       > - selected route, * - FIB route, q - queued, r - rejected, b - backup

K>* 0.0.0.0/0 [0/0] via 172.18.0.1, eth0, 00:03:30
C>* 1.1.1.1/32 is directly connected, lo, 00:01:54
O   172.18.0.0/16 [110/10] is directly connected, eth0, weight 1, 00:00:43
C>* 172.18.0.0/16 is directly connected, eth0, 00:03:30
O   172.19.0.0/16 [110/10] is directly connected, eth1, weight 1, 00:00:37
C>* 172.19.0.0/16 is directly connected, eth1, 00:03:30
(必要に応じて)設定を永続化しておきます。
frr1# write mem
Note: this version of vtysh never writes vtysh.conf
Building Configuration...
Integrated configuration saved to /etc/frr/frr.conf
[OK]
/ # cat /etc/frr/frr.conf
frr version 7.5_git
frr defaults traditional
hostname frr1
no ipv6 forwarding
service integrated-vtysh-config
!
interface lo
 ip address 1.1.1.1/32
!
router ospf
 network 172.18.0.0/16 area 0.0.0.0
 network 172.19.0.0/16 area 0.0.0.0
 router-info area
!
line vty
!
frr.confに書き込まれました。
frr2の設定
frr2も同様に設定します。(/etc/frr/vtysh.conf, /etc/frr/daemonsの設定→FRR再起動の部分の記載は省略)
/ # vtysh

Hello, this is FRRouting (version 7.5_git).
Copyright 1996-2005 Kunihiro Ishiguro, et al.

frr2# conf t
frr2(config)# interface lo
frr2(config-if)# ip address 2.2.2.2/32
frr2(config-if)# exit
frr2(config)# router ospf
frr2(config-router)# router-info area 0.0.0.0
frr2(config-router)# network 172.19.0.0/16 area 0.0.0.0
frr2(config-router)# network 172.20.0.0/16 area 0.0.0.0
frr2(config-router)# end
frr2の設定も(必要に応じて)永続化します。
ここまで設定した状態で、frr1に入りip routeを確認すると、OSPFで172.20.0.0/16が追加されています。
frr1# show ip route
Codes: K - kernel route, C - connected, S - static, R - RIP,
       O - OSPF, I - IS-IS, B - BGP, E - EIGRP, N - NHRP,
       T - Table, v - VNC, V - VNC-Direct, A - Babel, D - SHARP,
       F - PBR, f - OpenFabric,
       > - selected route, * - FIB route, q - queued, r - rejected, b - backup

K>* 0.0.0.0/0 [0/0] via 172.18.0.1, eth0, 00:49:06
C>* 1.1.1.1/32 is directly connected, lo, 00:47:30
O   172.18.0.0/16 [110/10] is directly connected, eth0, weight 1, 00:46:19
C>* 172.18.0.0/16 is directly connected, eth0, 00:49:06
O   172.19.0.0/16 [110/10] is directly connected, eth1, weight 1, 00:46:13
C>* 172.19.0.0/16 is directly connected, eth1, 00:49:06
O>* 172.20.0.0/16 [110/20] via 172.19.0.3, eth1, weight 1, 00:04:26
neighborもちゃんと認識されています。
frr1# show ip ospf neighbor

Neighbor ID     Pri State           Dead Time Address         Interface                        RXmtL RqstL DBsmL
2.2.2.2           1 Full/Backup       34.411s 172.19.0.3      eth1:172.19.0.2                      0     0     0
alpine1→alpine2にpingが通るか試してみます。
# docker exec -it alpine1 /bin/sh
/ # ping 172.20.0.2
PING 172.20.0.2 (172.20.0.2): 56 data bytes
64 bytes from 172.20.0.2: seq=0 ttl=62 time=0.386 ms
64 bytes from 172.20.0.2: seq=1 ttl=62 time=0.468 ms
64 bytes from 172.20.0.2: seq=2 ttl=62 time=0.467 ms
64 bytes from 172.20.0.2: seq=3 ttl=62 time=0.464 ms
^C
--- 172.20.0.2 ping statistics ---
4 packets transmitted, 4 packets received, 0% packet loss
round-trip min/avg/max = 0.386/0.446/0.468 ms
通りました!
追記
docker-compose化しました。一瞬で作りたい方はどうぞ。
https://github.com/tkna/docker_frrouting
参考
- FRRouting User Guide
- Dockerで経路制御によりブリッジネットワーク間で通信してみる!
- [Getting Started - Simple OSPF/BGP Topology]
(https://iprouteget.net/posts/2020/12/getting-started-simple-ospf/bgp-topology/)