1. 対象読者
・Java/Spring Boot/Thymeleafを学んでいる
・練習のために簡単なWebアプリを作成したい
2. ゴール
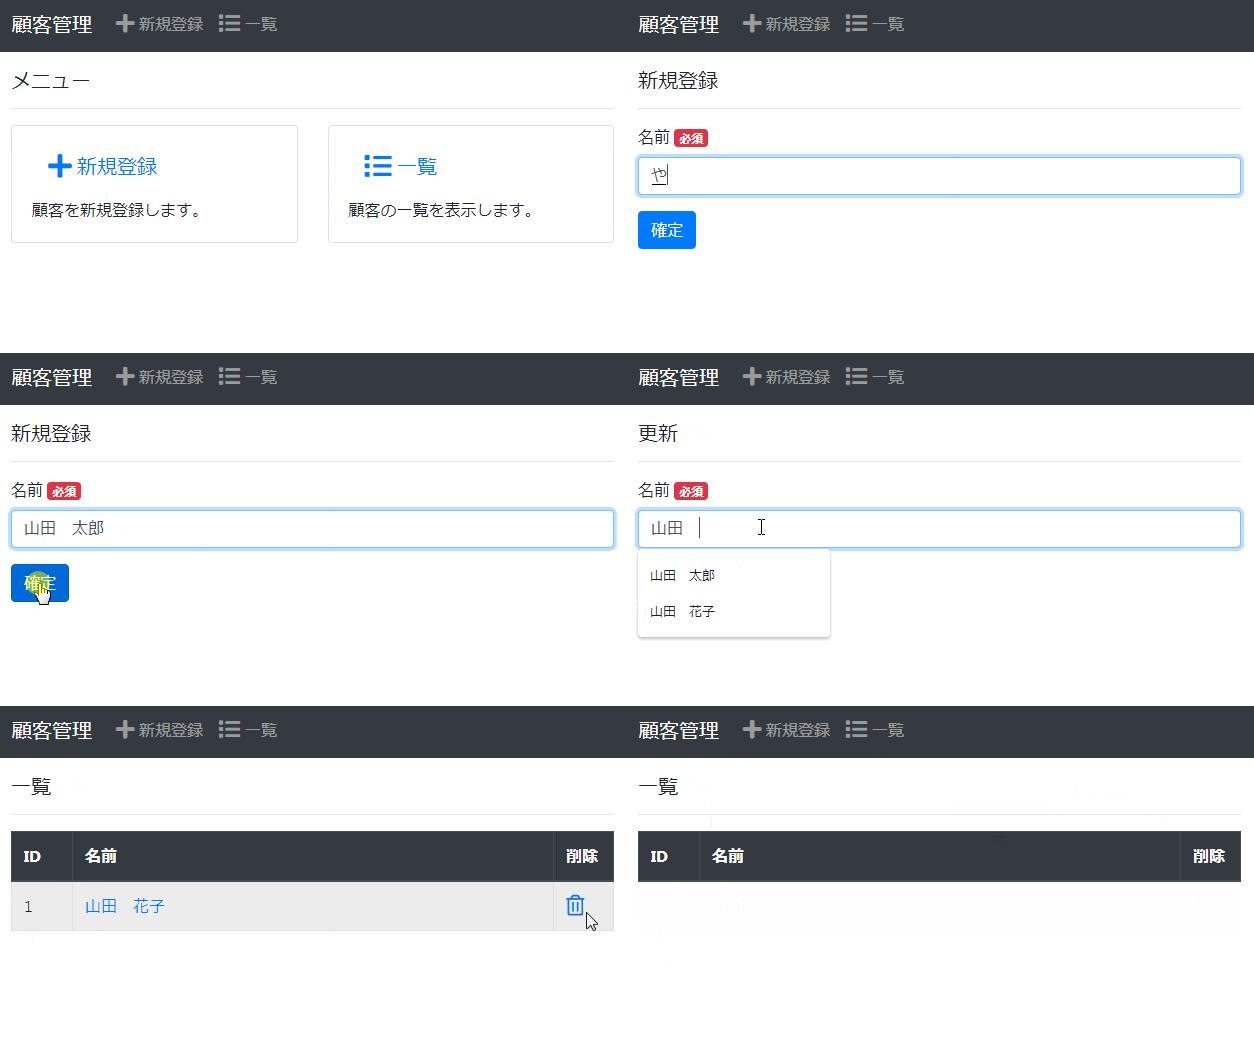
顧客管理(登録/更新/削除/一覧)ができる、簡単なWebアプリを作成します。
認証認可/単体テストとかは、盛り沢山になっちゃうので省略です。
でも単体テストは時間があったら追記した方が良いかもしれない。
3. 完成品
完成品を先に見たい方はどうぞ。
ソースはこちら。
※application.ymlのDB接続情報はご自身の環境に合わせて変えてください。
動くものはこちら。
※Heroku無償版なので初期表示に時間が掛かります。
4. 前提
開発環境とPostgreSQLのインストールは実施済みとします。
インストールしていない場合は、以下のリンクからどうぞ。
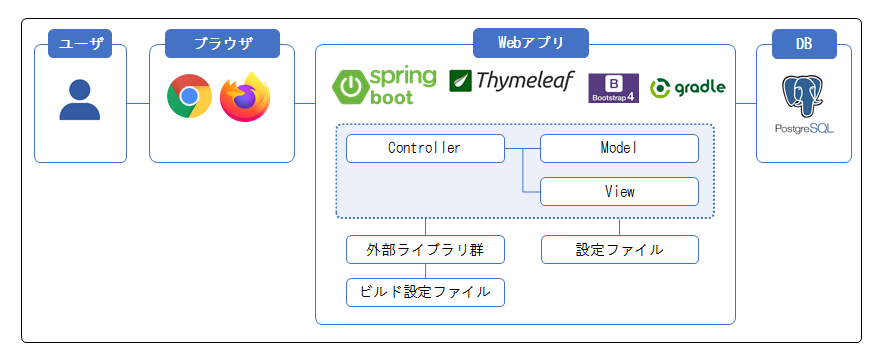
5. 全体構成
5.1 利用技術
ざっくり説明すると・・・
- Spring Boot
- Webアプリ等を簡単に作成できるJavaのフレームワーク。
- Thymeleaf
- 画面(HTML+JS+CSS)を作成できるテンプレートエンジン。
- Bootstrap
- CSSのフレームワーク。デザインに使う。
- Gradle
- ビルドツール。
- PostgreSQL
- オープンソースのデータベース。
5.2 構成
- Model
-
DBデータを操作する役割のクラス。以下の2種類がある。
(1) Entityクラス
DBのテーブル定義に対応するクラス。
基本的には、クラス名=テーブル名、フィールド名=列名が対応する。
(2) Repositoryクラス
DBの参照/登録/更新/削除をするメソッドを持つクラス。
- View
-
ユーザに表示する画面。
具体的には、Thymeleafで定義したHTMLのテンプレートのこと。
ControllerによってModelのデータが流し込まれる。
- Controller
-
ユーザからの入力を受け取り、次画面を返す役割のクラス。
具体的には、HTTPリクエストに応じてModelにDB参照/更新等を指示し、
Viewにデータを渡して、次画面のHTTPレスポンスを作成する。
- 設定ファイル
-
DB接続情報等の設定を保持する。
- 外部ライブラリ群
-
Spring Boot/JPA/JDBC等の様々なライブラリ群。
- ビルド設定ファイル(build.gradle)
-
使用する外部ライブラリ等の設定を保持する。
6. 機能設計
開発がメインテーマなので、機能設計は簡単に書きます。
6.1 画面設計
画面一覧
| No | 画面名 | 説明 |
|---|---|---|
| 1 | トップ画面 | 各画面への入口となる画面。 |
| 2 | 新規登録画面 | 顧客情報を新規登録する画面。 |
| 3 | 更新画面 | 顧客情報を変更する画面。 |
| 4 | 一覧画面 | 顧客情報を一覧表示、削除する画面。 |
画面レイアウト/画面遷移
2. ゴールの通り。
画面項目定義/インタラクション
分かると思うので省略。
6.2 URL設計
| No | URL | HTTPメソッド | 説明 |
|---|---|---|---|
| 1 | / | GET | トップ画面 |
| 2 | /customers | GET | 一覧画面 |
| 3 | /customers/create | GET | 新規登録画面 |
| 4 | /customers/create | POST | 新規登録実行 |
| 5 | /customers/{id}/update | GET | 更新画面 |
| 6 | /customers/{id}/update | POST | 更新実行 |
| 7 | /customers/{id}/delete | GET | 削除実行 |
ここを参考に設計。
6.3 DB設計
テーブル一覧
| No | テーブル名 | 説明 |
|---|---|---|
| 1 | customer | 顧客情報を管理する。 |
テーブル定義(customer)
| No | 列名 | PK | 非Null | 説明 |
|---|---|---|---|---|
| 1 | id | ○ | ○ | 顧客ID。シーケンスで自動採番。 |
| 2 | name | ○ | 顧客名。 |
※シーケンス名は「customer_id_seq」
※列を増やしたければ後から簡単に増やせるし、
盛り沢山にならないようシンプルにしました。
7. 開発
それでは本題の開発に進んでいきます。
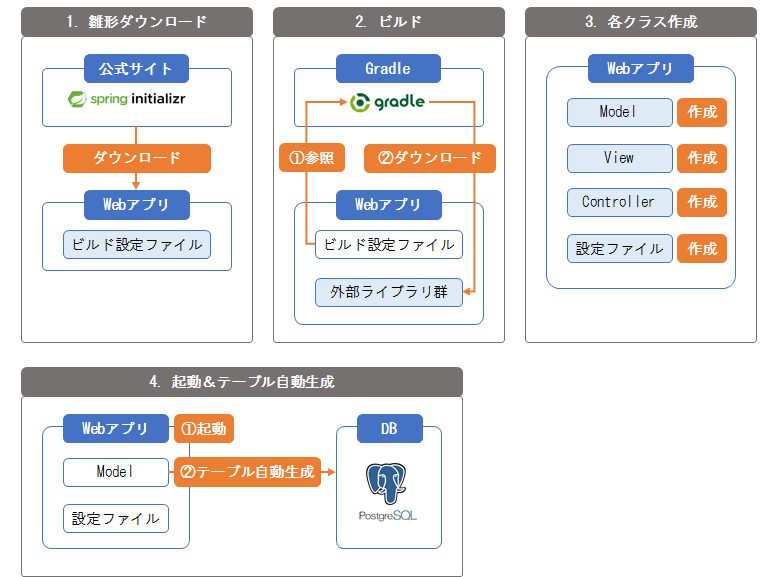
7.0 全体の流れ
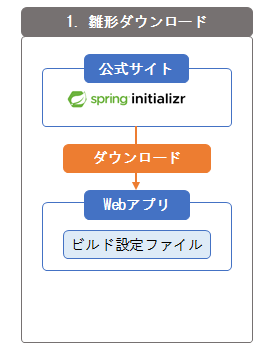
Spring公式サイトから雛形をダウンロードして、開発します。
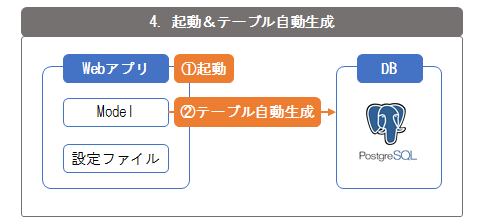
テーブルは、Spring JPAの機能でModelから自動生成します。
7.1 雛形ダウンロード
Webアプリのプロジェクトの雛形を作成します。
Spring Initializrからダウンロードするのが簡単です。
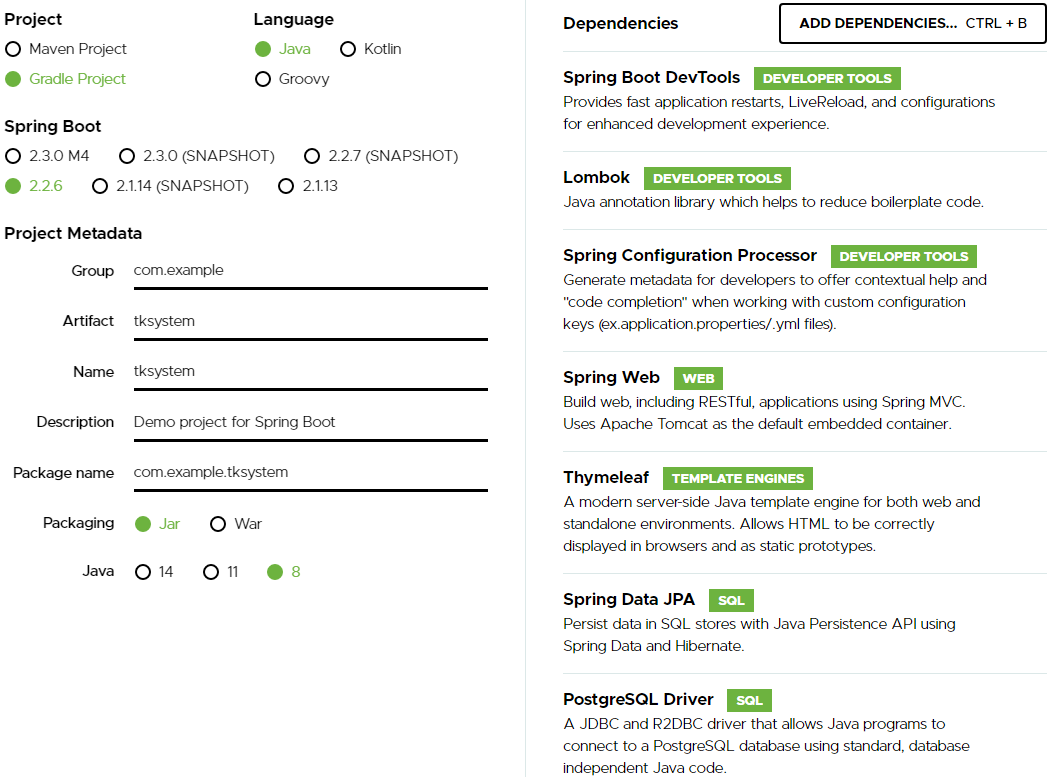
以下のように入力して、「Generate」ボタンを押すとダウンロードできます。
7.1.1 入力内容の説明
- Project
- Gradleを選びます。Mavenが好きな方はMavenでもOKです。
- Group / Artifact / Name
- プロジェクト名とパッケージ名です。練習なので適当でOKです。
- Dependencies
- 使用するライブラリを指定します。
7.1.2 Dependenciesの説明
使用する外部ライブラリ群を設定します。
- Spring Boot DevTools
-
開発効率向上のためのライブラリです。
ソース変更の都度、自動でビルド&再起動して変更内容を反映してくれます。
- lombok
-
開発効率向上のためのライブラリです。
getter/setter/equals等の定型的なメソッドをアノテーションでスッキリ記述できます。
- Spring Configuration Processor
-
開発効率向上のためのライブラリです。
設定ファイル(application.yml)でコード補完ができるようになり、記述ミスを抑止できます。
- Spring Web
-
Webアプリ/WebAPIのためのライブラリです。
- Thymeleaf
-
HTMLのテンプレートエンジンです。前述の通りViewの役割ですね。
- Spring Data JPA
-
DB関連のライブラリです。JPAベースのDB操作ができます。
JPAをざっくり説明すると、SQLを書かなくても簡単なDB操作ができる仕組みです。
- PostgreSQL Driver
-
PostgreSQLのJDBCドライバです。これがないとPostgreSQL使えません。
7.1.3 補足
Eclipseのメニューからでも同様に作成できます。
具体的には、「ファイル」「新規」「その他」「Spring Boot」「Spring スターター・プロジェクト」です。
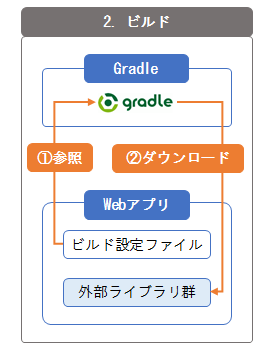
7.2 ビルド
ダウンロードした雛形をEclipseにインポートします。
具体的な手順は以下の通りです。
- ダウンロードした雛形(zip)を、Eclipseのワークスペースがあるフォルダに解凍。
- Eclipseを起動。
- 「ファイル」「インポート」「Gradle」「既存のGradleプロジェクト」「次へ」
- 「プロジェクト・ルート・ディレクトリ」に1のフォルダを指定して「完了」
インポートすると自動的にビルドされ、build.gradleのdependenciesの通りに、
外部ライブラリ群がダウンロードされます。
7.2.1 外部ライブラリ追加
Spring Initializrでは入らない外部ライブラリがあります。
具体的には、bootstrapのjava用ライブラリが入りません。
Eclipseでbuild.gradleファイルを開き、以下の通り追加します。
dependencies {
	implementation 'org.springframework.boot:spring-boot-starter-data-jpa'
	implementation 'org.springframework.boot:spring-boot-starter-thymeleaf'
	implementation 'org.springframework.boot:spring-boot-starter-web'
	implementation 'org.webjars:jquery:3.3.1'        // 追加
	implementation 'org.webjars:bootstrap:4.3.1'     // 追加
	implementation 'org.webjars:font-awesome:5.13.0' // 追加
// 省略。完全版はhttps://github.com/tk230to/tksystem
【補足】追加した外部ライブラリの説明
- org.webjars:jquery
- jQueryのjava用ライブラリ。
- org.webjars:bootstrap
- Bootstrapのjava用ライブラリ。
- org.webjars:font-awesome
- Font Awesome(アイコンを利用)のjava用ライブラリ。
【補足】外部ライブラリの探し方
こういうライブラリはMaven Repositoryで探します。
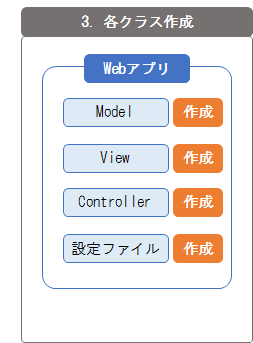
7.3 各クラス作成
各クラスや設定ファイルを作成します。
7.3.1 作成対象
Model/View/Controller/設定ファイルを作成します。
このファイル何だったっけ?という場合は、5.2 構成を読み直してください。
7.3.2 Model(Entityクラス)作成
Customerクラス
customerテーブルに対応するクラスを作成します。
クラス名=テーブル名、フィールド名=列名になります。
package com.example.tksystem.model;

import javax.persistence.Entity;
import javax.persistence.GeneratedValue;
import javax.persistence.GenerationType;
import javax.persistence.Id;
import javax.persistence.SequenceGenerator;
import javax.validation.constraints.NotBlank;

import lombok.Data;

/**
 * 顧客クラス。
 */
@Entity
@Data
public class Customer {

  /** シーケンス名 */
  private static final String SEQUENCE_NAME = "customer_id_seq";

  /** ID */
  @Id
  @GeneratedValue(strategy = GenerationType.SEQUENCE, generator = SEQUENCE_NAME)
  @SequenceGenerator(name = SEQUENCE_NAME, sequenceName = SEQUENCE_NAME, allocationSize = 1)
  private Long id;

  /** 名前 */
  @NotBlank
  private String name;
}
- @Entity
- Entityクラスであることを示すアノテーション。
- @Data
- getter/setter等を自動生成してくれるlombokのアノテーション。
- @Id
- PK列であることを示すアノテーション。
- @GeneratedValue
- シーケンスで自動採番することを示すアノテーション。
- @SequenceGenerator
- シーケンスを作成するためのアノテーション。
7.3.3 Model(Repositoryクラス)作成
CustomerRepositoryクラス
customerテーブルへのCRUD操作をするクラスを作成します。
JpaRepositoryを継承するだけです。
package com.example.tksystem.model;

import org.springframework.data.jpa.repository.JpaRepository;

/**
 * 顧客リポジトリクラス。
 */
public interface CustomerRepository extends JpaRepository<Customer, Long> {

}
以下のメソッド(抜粋)が使えるようになります。
- List<Customer> findAll()
- テーブルの全レコードを参照(SELECT)し、リストで返す。
- Customer getOne(Long id)
- 顧客IDに該当するレコードを参照(SELECT)し、結果を返す。
- Customer save(Customer entity)
- 引数の顧客情報を登録/更新(INSERT/UPDATE)し、結果レコードを返す。
- void deleteById(Long id)
- 顧客IDに該当するレコードを削除(DELETE)する。
7.3.4 View作成
各画面のHTMLテンプレートを作成します。
上部のナビゲーションバーは全画面共通なので、共通レイアウトとして共通化します。
共通レイアウト
<!DOCTYPE html>
<html xmlns:th="http://www.thymeleaf.org">

<head th:fragment="head(title)">

  <title th:text="'顧客管理 - ' + ${title}">tksystem</title>
  <meta name="viewport" content="width=device-width, initial-scale=1">
  <meta http-equiv="Content-Type" content="text/html; charset=UTF-8" />

  <link rel="stylesheet" th:href="@{/webjars/bootstrap/4.3.1/css/bootstrap.min.css}" />
  <link rel="stylesheet" th:href="@{/webjars/font-awesome/5.13.0/css/all.min.css}" />

  <script th:src="@{/webjars/jquery/3.3.1/jquery.min.js}"></script>
  <script th:src="@{/webjars/bootstrap/4.3.1/js/bootstrap.min.js}"></script>

</head>

<body>
  <nav class="navbar navbar-dark bg-dark navbar-expand-sm mb-3" th:fragment="navbar">

    <a class="navbar-brand" href="/">顧客管理</a>

    <button type="button" class="navbar-toggler" data-toggle="collapse" data-target="#Navbar" aria-controls="Navbar" aria-expanded="false" aria-label="ナビゲーションの切替">
      <span class="navbar-toggler-icon"></span>
    </button>

    <div id="Navbar" class="collapse navbar-collapse">
      <ul class="navbar-nav">
        <li class="nav-item">
          <a class="nav-link" th:href="@{/customers/create/}">
            <i class="fas fa-plus fa-lg" aria-hidden=”true”></i> 新規登録
          </a>
        </li>
        <li class="nav-item">
          <a class="nav-link" th:href="@{/customers/}">
            <i class="fas fa-list fa-lg" aria-hidden=”true”></i> 一覧
          </a>
        </li>
      </ul>
    </div>

  </nav>
</body>

</html>
- th:fragment
- 他の画面でth:replaceで差し替えられるようにします。
- その他のThymeleafの文法
- こちらを参考にしてください。
- Bootstrapの文法
- 公式ドキュメントを参考にしてください。
トップ画面
<!DOCTYPE html>
<html xmlns:th="http://www.thymeleaf.org">

<head th:replace="fragments/layout :: head('Home')">
</head>

<body>
  <div th:replace="fragments/layout :: navbar"></div>

  <div class="container-fluid">
    <h5>メニュー</h5>
    <hr>

    <div class="row">
      <div class="col-sm-6">
        <div class="card">
          <div class="card-body">
            <h5 class="card-title">
              <a class="nav-link" th:href="@{/customers/create}">
                <i class="fas fa-plus fa-lg" aria-hidden=”true”></i> 新規登録
              </a>
            </h5>
            <p class="card-text">顧客を新規登録します。</p>
          </div>
        </div>
      </div>

      <div class="col-sm-6">
        <div class="card">
          <div class="card-body">
            <h5 class="card-title">
              <a class="nav-link" th:href="@{/customers/}">
                <i class="fas fa-list fa-lg" aria-hidden=”true”></i> 一覧
              </a>
            </h5>
            <p class="card-text">顧客の一覧を表示します。</p>
          </div>
        </div>
      </div>

    </div>
  </div>

</body>

</html>
新規登録画面
<!DOCTYPE html>
<html xmlns:th="http://www.thymeleaf.org">

<head th:replace="fragments/layout :: head('新規登録')">
</head>

<body>
  <div th:replace="fragments/layout :: navbar"></div>

  <div class="container-fluid">
    <h5>新規登録</h5>
    <hr>

    <div class="row">
      <div class="col-sm-12">
        <form action="#" th:action="@{/customers/create/}" th:object="${customer}" method="post">
          <div class="form-group">
            <label for="name">名前 <span class="badge badge-danger">必須</span></label>
            <input type="text" id="name" class="form-control" placeholder="(例) 山田 太郎" th:field="*{name}" />
            <span th:if="${#fields.hasErrors('name')}" th:errors="*{name}" style="color: red"></span>
          </div>

          <button type="submit" class="btn btn-primary">確定</button>
        </form>
      </div>
    </div>
  </div>
</body>
</html>
更新画面
登録画面とほぼ同様です。完成品はこちら
一覧画面
<!DOCTYPE html>
<html xmlns:th="http://www.thymeleaf.org">

<head th:replace="fragments/layout :: head('一覧')">
</head>

<body>
  <div th:replace="fragments/layout :: navbar"></div>

  <div class="container-fluid">
    <h5>一覧</h5>
    <hr>

    <div class="row">
      <div class="col-sm-12">

        <table class="table table-bordered table-hover">
          <thead class="thead-dark">
            <tr>
              <th width="10%">ID</th>
              <th width="80%">名前</th>
              <th width="10%">削除</th>
            </tr>
          </thead>
          <tbody>
            <tr th:each="customer:${customer}">
              <td th:text="${customer.id}"></td>
              <td>
                <a th:text="${customer.name}" th:href="@{/customers/{id}/update/(id=${customer.id})}">
                </a>
              </td>
              <td>
                <a th:href="@{/customers/{id}/delete/(id=${customer.id})}" onClick="return window.confirm('削除してよろしいですか?')">
                  <i class="far fa-trash-alt fa-lg" aria-hidden=”true”></i>
                </a>
              </td>
            </tr>
          </tbody>
        </table>
      </div>
    </div>
  </div>
</body>

</html>
7.3.5 Controllerの作成
IndexControllerクラス
トップ画面のリクエストを処理するクラスを作成します。
package com.example.tksystem.controller;

import org.springframework.stereotype.Controller;
import org.springframework.ui.Model;
import org.springframework.web.bind.annotation.RequestMapping;

/**
 * index画面のコントローラクラス。
 */
@Controller
@RequestMapping("/")
public class IndexController {

  /**
   * index画面
   *
   * @param model モデル
   * @return 遷移先
   */
  @RequestMapping("index")
  public String index(Model model) {
    return "index";
  }
}
- @Controller
- Controllerクラスであることを示すアノテーションです。
- @RequestMapping
-
HTTPリクエストのURLとクラス/メソッドをマッピングします。
この例だと、URLが"/index/"のとき、index(Model model)メソッドが呼ばれます。
- メソッドの返り値
-
戻り値の文字列は、次画面のThymeleafのHTMLファイル名を示します。
"index"の場合、/src/main/resources/templates/index.htmlを示します。
CustomerControllerクラス
顧客画面(新規登録/更新/一覧画面)のリクエストを処理するクラスを作成します。
package com.example.tksystem.controller;

import org.springframework.beans.factory.annotation.Autowired;
import org.springframework.data.domain.Sort;
import org.springframework.stereotype.Controller;
import org.springframework.ui.Model;
import org.springframework.validation.BindingResult;
import org.springframework.validation.annotation.Validated;
import org.springframework.web.bind.annotation.GetMapping;
import org.springframework.web.bind.annotation.ModelAttribute;
import org.springframework.web.bind.annotation.PathVariable;
import org.springframework.web.bind.annotation.PostMapping;
import org.springframework.web.bind.annotation.RequestMapping;

import com.example.tksystem.model.Customer;
import com.example.tksystem.model.CustomerRepository;

/**
 * 顧客画面のコントローラクラス。
 */
@Controller
@RequestMapping("/customers")
public class CustomerController {

  /** 登録/更新/削除完了後のリダイレクト先URL */
  private static final String REDIRECT_URL = "redirect:/customers/";

  /** HTMLパス */
  private static final String PATH_LIST = "customer/list";
  private static final String PATH_CREATE = "customer/create";
  private static final String PATH_UPDATE = "customer/update";

  /** Modelの属性名 */
  private static final String MODEL_ATTRIBUTE_NAME = "customer";

  /** 顧客リポジトリ */
  @Autowired
  private CustomerRepository customerRepository;

  /**
   * 一覧画面を表示。
   *
   * @param model モデル
   * @return 遷移先
   */
  @GetMapping(value = "/")
  public String list(Model model) {
    model.addAttribute(MODEL_ATTRIBUTE_NAME, customerRepository.findAll(Sort.by("id")));
    return PATH_LIST;
  }

  /**
   * 登録画面を表示。
   *
   * @param model モデル
   * @return 遷移先
   */
  @GetMapping(value = "/create")
  public String create(Model model) {
    model.addAttribute(MODEL_ATTRIBUTE_NAME, new Customer());
    return PATH_CREATE;
  }

  /**
   * 登録を実行。
   *
   * @param customer 顧客画面入力値
   * @param result 入力チェック結果
   * @return 遷移先
   */
  @PostMapping(value = "/create")
  public String create(@Validated @ModelAttribute(MODEL_ATTRIBUTE_NAME) Customer customer,
      BindingResult result) {

    if (result.hasErrors()) {
      return PATH_CREATE;
    }

    customerRepository.save(customer);
    return REDIRECT_URL;
  }

  /**
   * 更新画面を表示。
   *
   * @param id 顧客ID
   * @param model モデル
   * @return 遷移先
   */
  @GetMapping(value = "/{id}/update")
  public String update(@PathVariable("id") Long id, Model model) {
    model.addAttribute(MODEL_ATTRIBUTE_NAME, customerRepository.getOne(id));
    return PATH_UPDATE;
  }

  /**
   * 更新を実行。
   *
   * @param customer 顧客画面入力値
   * @param result 入力チェック結果
   * @return 遷移先
   */
  @PostMapping(value = "/{id}/update")
  public String update(@Validated @ModelAttribute(MODEL_ATTRIBUTE_NAME) Customer customer,
      BindingResult result) {

    if (result.hasErrors()) {
      return PATH_UPDATE;
    }

    customerRepository.save(customer);
    return REDIRECT_URL;
  }

  /**
   * 削除を実行。
   *
   * @param id 顧客ID
   * @return 遷移先
   */
  @GetMapping(value = "/{id}/delete")
  public String list(@PathVariable("id") Long id) {
    customerRepository.deleteById(id);
    return REDIRECT_URL;
  }
}
- @GetMapping/@PostMapping
- @RequestMappingと同様です。
- @Validated
- 入力チェックをすることを示すアノテーションです。
- BindingResult result
- 入力チェック結果が入っています。
7.3.6 設定ファイルの作成
application.yml
DB接続情報等を設定するファイルです。
url/username/passwordは、PostgreSQLのデフォルトにしてあります。
デフォルトと違う場合は変更してください。
spring:
  datasource:

    # PostgresのIPアドレス/ポート番号/DB名
    url: jdbc:postgresql://localhost:5432/postgres

    # Postgresのユーザ名
    username: postgres

    # Postgresのパスワード
    password: postgres

    # PostgresのJDBCドライバ
    driver-class-name: org.postgresql.Driver

  jpa:
    hibernate:

      # @Entityに対応するテーブルを常にdrop&createする。
      ddl-auto: create-drop
- spring.jpa.hibernate.ddl-auto
- ここを参照してください。
hibernate.properties
PostgreSQL×Spring JPAで発生する例外を回避する設定です。
無くても動作上問題無いですが、毎回例外出るのが気持ち悪いので設定した方がベターです。
例外の詳細はこちら
# PgConnection.createClob()メソッドの警告を回避
hibernate.jdbc.lob.non_contextual_creation = true
ValidationMessages.properties
入力チェックエラーメッセージのメッセージ定義です。
まだ日本語メッセージが提供されていないため自作します。
ここでプルリクエストが取り込まれているので、そのうち提供されると思います。
javax.validation.constraints.AssertFalse.message     = false にしてください
javax.validation.constraints.AssertTrue.message      = true にしてください
javax.validation.constraints.DecimalMax.message      = {value} ${inclusive == true ? '以下の値にしてください' : 'より小さな値にしてください'}
javax.validation.constraints.DecimalMin.message      = {value} ${inclusive == true ? '以上の値にしてください' : 'より大きな値にしてください'}
javax.validation.constraints.Digits.message          = 値は次の範囲にしてください (<整数 {integer} 桁>.<小数点以下 {fraction} 桁>)
javax.validation.constraints.Email.message           = 電子メールアドレスとして正しい形式にしてください
javax.validation.constraints.Future.message          = 未来の日付にしてください
javax.validation.constraints.FutureOrPresent.message = 現在もしくは未来の日付にしてください
javax.validation.constraints.Max.message             = {value} 以下の値にしてください
javax.validation.constraints.Min.message             = {value} 以上の値にしてください
javax.validation.constraints.Negative.message        = 0 より小さな値にしてください
javax.validation.constraints.NegativeOrZero.message  = 0 以下の値にしてください
javax.validation.constraints.NotBlank.message        = 空白は許可されていません
javax.validation.constraints.NotEmpty.message        = 空要素は許可されていません
javax.validation.constraints.NotNull.message         = null は許可されていません
javax.validation.constraints.Null.message            = null にしてください
javax.validation.constraints.Past.message            = 過去の日付にしてください
javax.validation.constraints.PastOrPresent.message   = 現在もしくは過去の日付にしてください
javax.validation.constraints.Pattern.message         = 正規表現 "{regexp}" にマッチさせてください
javax.validation.constraints.Positive.message        = 0 より大きな値にしてください
javax.validation.constraints.PositiveOrZero.message  = 0 以上の値にしてください
javax.validation.constraints.Size.message            = {min} から {max} の間のサイズにしてください
WebConfig
上記ValidationMessages.propertiesを使う設定をします。
詳細はここを参照してください。
package com.example.tksystem;

import java.nio.charset.StandardCharsets;

import org.hibernate.validator.messageinterpolation.AbstractMessageInterpolator;
import org.springframework.context.annotation.Configuration;
import org.springframework.context.support.ReloadableResourceBundleMessageSource;
import org.springframework.validation.Validator;
import org.springframework.validation.beanvalidation.LocalValidatorFactoryBean;
import org.springframework.web.servlet.config.annotation.WebMvcConfigurer;

/**
 * Web設定クラス。
 *
 */
@Configuration
public class WebConfig implements WebMvcConfigurer {

  @Override
  public Validator getValidator() {

    // ValidationMessages.propertiesをUTF-8で設定できるようにする。
    ReloadableResourceBundleMessageSource messageSource =
        new ReloadableResourceBundleMessageSource();
    messageSource.setBasename(AbstractMessageInterpolator.USER_VALIDATION_MESSAGES);
    messageSource.setDefaultEncoding(StandardCharsets.UTF_8.name());

    LocalValidatorFactoryBean validator = new LocalValidatorFactoryBean();
    validator.setValidationMessageSource(messageSource);

    return validator;
  }
}
7.4 起動&テーブル自動生成
全てのファイルが完成しましたので、Eclipseでプロジェクトを実行します。
手順は、プロジェクトを選択して「右クリック」「実行」「Spring Boot アプリケーション」です。
application.ymlで設定したddl-autoの設定により、
作成したEntityクラスの通りにテーブルが自動生成されます。
http://localhost:8080にアクセスして動作確認してみてください。
2. ゴールのように動作すれば成功です。
以上、お疲れ様でした。
