はじめに
本記事は Qiita AdventCalendar2022 Elixir vol2 13日目の記事です
Evisionシリーズの4つ目の記事になります
このシリーズは技術評論社のOpenCVではじめよう ディープラーニングによる画像認識の7章の内容を参考にElixirとEvisionで書き換えて行っています
- Livebook + Evision基本編
- EvisionのCascadeClassifierで顔認識
- EvisionのDNN.ClassificationModelを使ってクラス分類
- EvisionのDNN.TextDetectionModelDBでテキスト検出
- EvisionのDNN.DetectionModelでYOLOv4を使って物体検知 12/14公開
- EvisionのDNN.SegmentationModelでセグメンテーション 12/14公開
- YOLOv4の結果を切り取ってEfficientnetで更に分類するシステムをEvisionで書く
Livebook上で画像処理ライブラリOpenCVのElixirラッパーのEvisionのDNN.TextDetectionModelDBを使ってクラス分類を行う方法を紹介します
Livebookについて
Livebook is a web application for writing interactive and collaborative code notebooks.
LivebookはコラボレーションもできるElixir対話的実行環境を提供するWebアプリケーションです
Evisionについて
- OpenCVのElixirラッパー
- Port等を使わずに直にElixirから使うことができる
- Nxのバックエンドとして使用でき、行列演算の高速化(CPU,GPU)ができる
- Nxデータに相互に変換できる
- 膨大な画像処理の関数を使用できる
- DNNモジュールでCV分野の多くの学習済みモデルを使用できる
テキスト検出について
テキスト検出(TextDetection)とは、画像に映っている文字の領域を検出するタスクです。
OpenCVではじめよう ディープラーニングによる画像認識 (p.430)
使用するモジュールはDNN.TextDetectionMoelになります
使用するモデル
DB_IC15_resnet18.onnx を使用します
学習済みデータはこちらの7.6をダウンロードしてください
直リンク
https://gihyo.jp/assets/files/book/2022/978-4-297-12775-6/download/7.6.zip
setup
livebookは公式サイトを参考にインストールしてください
livebookを起動してノートブックを作成したらsetupセルに以下を追加して実行してください
Mix.install([
  {:evision, "~> 0.1.21"},
  {:kino, "~> 0.7.0"},
])
データの準備
aliasでモジュール名を短くしています import numpy as npと同じですね
weigthsで学習済みデータのファイルパスを定義します
baseでダウンロードしたフォルダパスを貼っておくと便利です
alias Evision, as: Ev
base = "7.6をダウンロードしたフォルダの絶対パスを貼り付けてください"
weights = base <> "7.6/db/DB_IC15_resnet18.onnx"
モデルの読み込み
学習済みデータを読み込んで、モデルを構築します
textDetectionModelDB/1で先程の学習済みデータのパスを渡します
モデルの次はsetInputParams/2でハイパーパラメータを設定します
パラメーターはそれぞれ以下を設定しています
- scale -> 画像のRGB値を0~1.0の範囲に変換
- size -> 入力画像サイズを736x1280にする
- mean -> 各RGB値から指定した平均値を引いて照度変化に強くする
- swapRB -> BGR形式をRGBに入れ替えない
- crop -> アスペクト比をせずにリサイズ
最後はテキスト検出のパラメーターをセットします
- setBinaryThreshold(0.3) -> 2値化のしきい値
- setPolygonThreshold(0.5) -> テキスト輪郭スコアのしきい値
- setMaxCandidates(200) -> テキスト候補領域の上限値
- setUnclipRatio(2.0) -> アンクリップ率
model =
  Ev.DNN.TextDetectionModelDB.textDetectionModelDB(weights)
  |> Ev.DNN.TextDetectionModelDB.setInputParams(
    scale: 1.0 / 255.0,
    size: {736, 1280},
    mean: {122.67891434, 116.66876762, 104.00698793},
    swapRB: false,
    crop: false
  )
  |> Ev.DNN.TextDetectionModelDB.setBinaryThreshold(0.3)
  |> Ev.DNN.TextDetectionModelDB.setPolygonThreshold(0.5)
  |> Ev.DNN.TextDetectionModelDB.setMaxCandidates(200)
  |> Ev.DNN.TextDetectionModelDB.setUnclipRatio(2.0)
推論の実行
画像を読み込みます
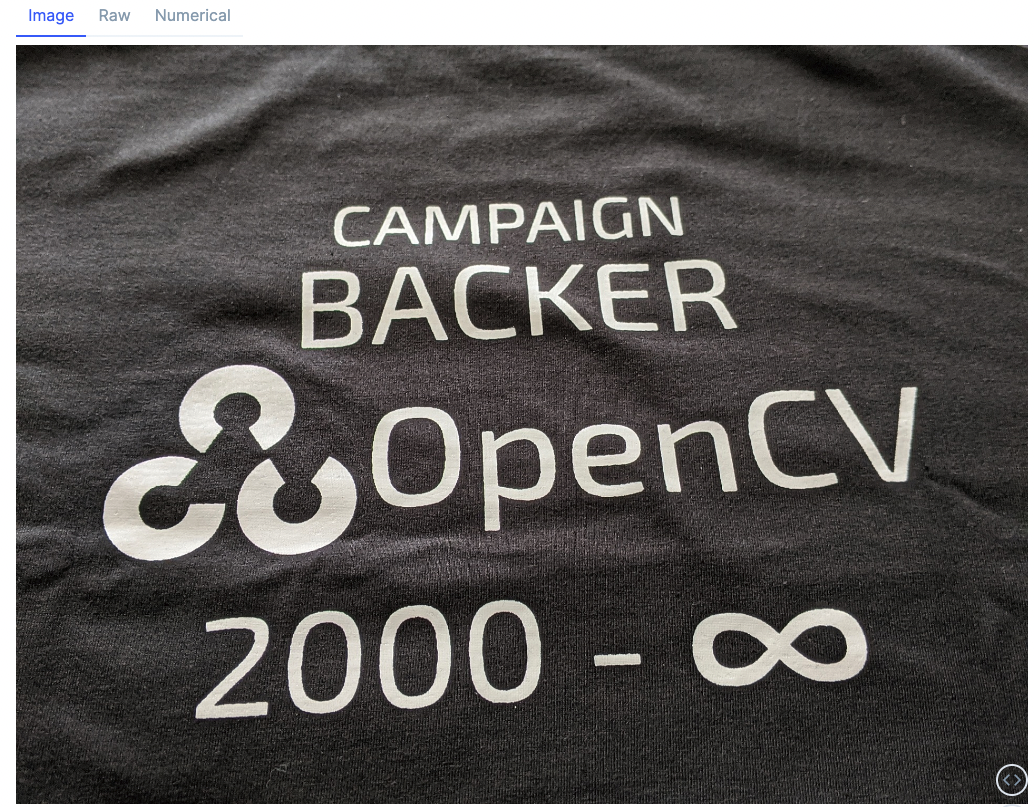
書籍でも使用していたOpenCVと書かれている画像を使います
image = base <> "7.6/text.jpg" |> Ev.imread
detectTextRectangles/2で推論を実行します
{vertices, confidences} = Ev.DNN.TextDetectionModelDB.detectTextRectangles(model, image)
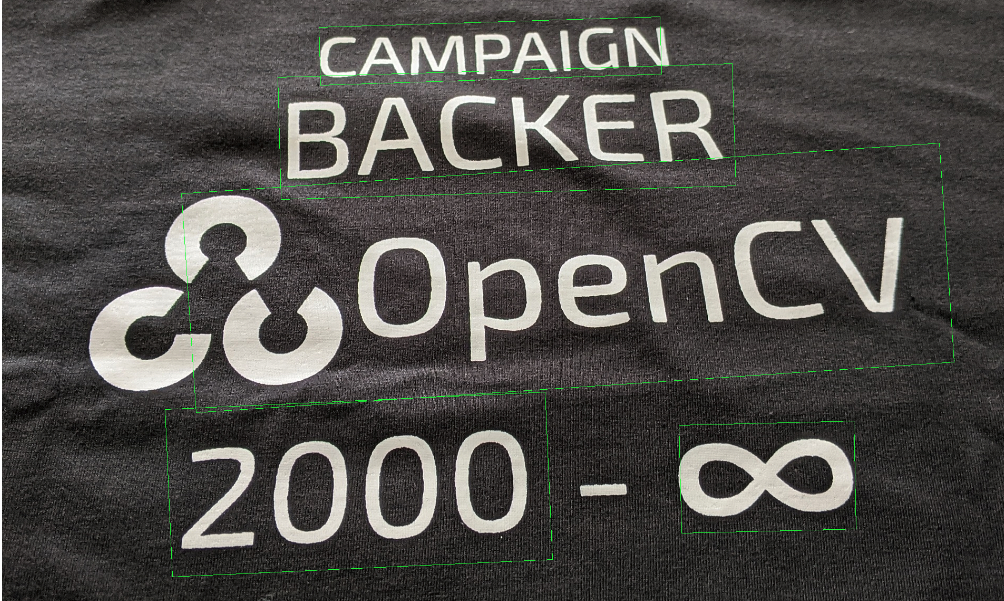
実行すると検出したテキスト領域の回転矩形(中心座標、領域サイズと回転角度)と信頼度のリストを返します。
{[
   {{1452.3603515625, 1141.4761962890625}, {331.3262634277344,204.6001434326172},-1.3639297485351562},
   {{676.5, 1155.5}, {721.5119018554688, 317.935302734375}, -2.6274032592773438},
   {{1073.000244140625, 762.9999389648438}, {1441.3055419921875, 416.9986877441406},-3.8075942993164062},
   {{957.3272705078125, 484.9888916015625}, {863.0692749023438, 231.91671752929688}, -1.6870346069335938},
   {{926.2108154296875, 331.9464111328125}, {647.4521484375, 109.35784149169922},-1.7930221557617188}
 ],
 [1.0, 1.0, 1.0, 1.0, 1.0, 1.0, 1.0, 1.0, 1.0, 1.0, 1.0, 1.0, 1.0, 1.0, 1.0, 1.0, 1.0, 1.0, 1.0,1.0, 1.0, 1.0, 1.0, 1.0, 1.0, 1.0, 1.0, 1.0, 1.0, 1.0, 1.0, 1.0, 1.0, 1.0, 1.0, 1.0, 1.0, 1.0,1.0, 1.0, 1.0, 1.0, 1.0, 1.0, 1.0, 1.0, 1.0, 1.0, ...]}
推論結果を画像に描画
Enum.reduceで推論結果を描画していきます
boxPoints/1を使って回転矩形から4隅の座標を取得します
書籍だとdetect/2が無加工で使えるので良いとありますが、返ってくるのが4隅の座標ですがタプルのリストなので使いにくいためdetectTextRectangles/2のデータをboxPointsで変換して使用します
polylinesですが Matがs32でないとエラーになるので s8からs32に変換します
引数は以下になります
- 画像
- 座標データMat(s32)のリスト
- closeフラグ
- 色
Enum.reduce(vertices, image, fn vertex, img ->
  points = Ev.boxPoints(vertex) |> Ev.Mat.as_type(:s32)
  Ev.polylines(img,[points], true, {0,255,0})
end)
最後に
TextDetectionModelDBを使用して簡単にテキスト検出ができました
本記事は以上になりますありがとうございました
全コード
alias Evision, as: Ev
base = "/Users/shou/livebook_samples/"

image = base <> "7.6/text.jpg" |> Ev.imread
weights = base <> "7.6/db/DB_IC15_resnet18.onnx"
model =
  Ev.DNN.TextDetectionModelDB.textDetectionModelDB(weights)
  |> Ev.DNN.TextDetectionModelDB.setInputParams(
    scale: 1.0 / 255.0,
    size: {736, 1280},
    mean: {122.67891434, 116.66876762, 104.00698793},
    swapRB: false,
    crop: false
  )
  |> Ev.DNN.TextDetectionModelDB.setBinaryThreshold(0.3)
  |> Ev.DNN.TextDetectionModelDB.setPolygonThreshold(0.5)
  |> Ev.DNN.TextDetectionModelDB.setMaxCandidates(200)
  |> Ev.DNN.TextDetectionModelDB.setUnclipRatio(2.0)

#{vertices, confidences} = Ev.DNN.TextDetectionModelDB.detect(model, image)
{vertices, confidences} = Ev.DNN.TextDetectionModelDB.detectTextRectangles(model, image)
Enum.reduce(vertices, image, fn vertex, img ->
  points = Ev.boxPoints(vertex) |> Ev.Mat.as_type(:s32)
  Ev.polylines(img,[points], true, {0,255,0})
end)

