概要
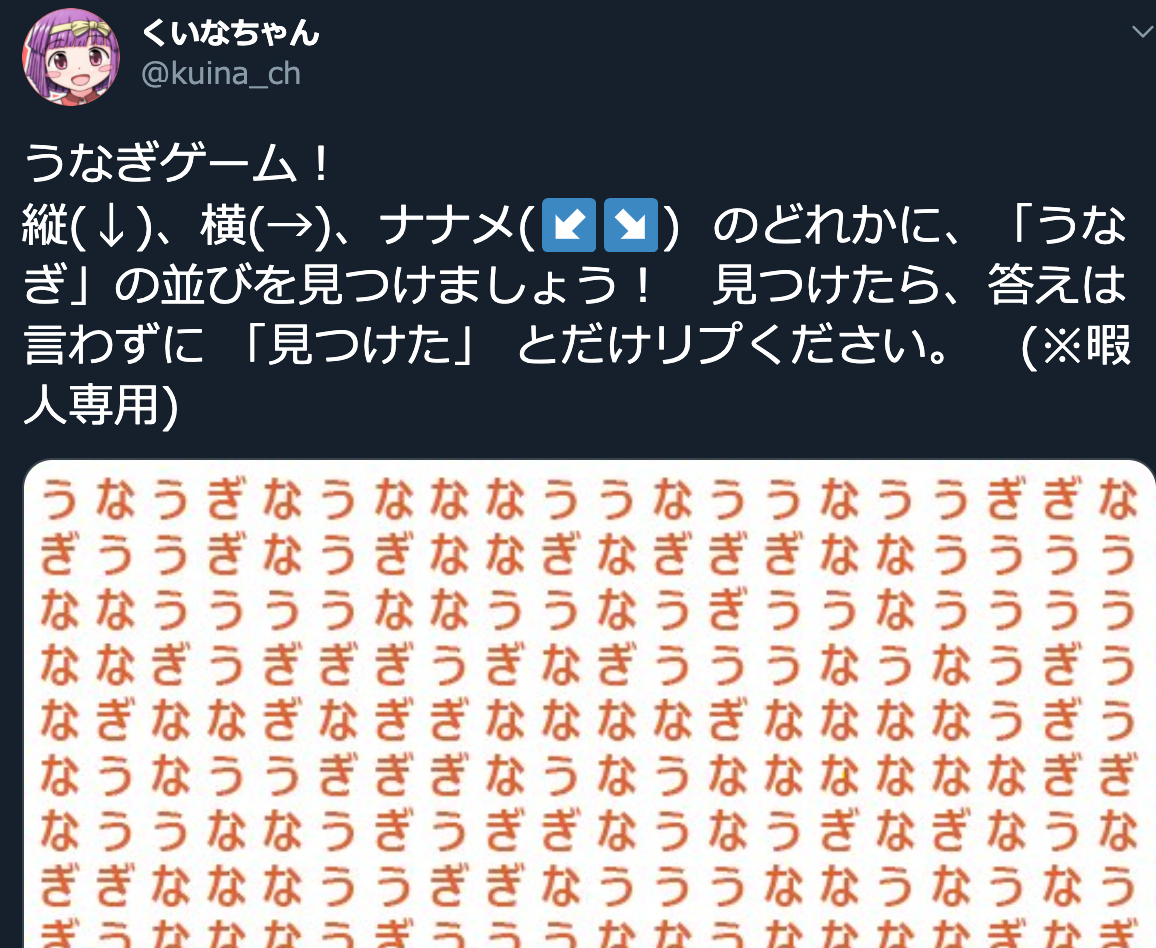
こんな問題が出ていたのです。

この問題をどうやったら画像解析で解けるか?にチャレンジしてみました。その備忘録です。
まずはopenCV+Python環境を作ります。
tensorflowとかいろいろまとめて使いたかったのでいつもこんな感じのDockerfileからイメージを利用しています。
FROM continuumio/miniconda3
ENV DEBCONF_NOWARNINGS yes

RUN apt-get update -y

RUN conda update conda \
  && conda update --all \
  && conda install jupyter numpy numexpr pandas matplotlib scipy statsmodels scikit-learn tensorflow keras  && conda clean --all && conda install -c menpo opencv=3.4.2
※ 実は社内の勉強会でKerasを使ってVGGのディープラーニングの勉強会をするとのことだったので、その準備をしようとしていたらこの問題に出会ってしまい解くことにしました。
ここで使ったOpenCVの基本
画像の読み書きとグレースケール化
import cv2
import numpy as np

im = cv2.imread('img/unagi.jpeg')
gray = cv2.cvtColor(im, cv2.COLOR_BGR2GRAY)

print(im, gray)
(base) root@27117ac02af7:/data# python sample.py
[[[255 255 242]
  [255 255 245]
  [255 255 248]
  ...
  [251 254 255]
  [253 251 255]
  [255 249 255]]

 [[255 255 254]
  [255 255 254]
  [255 255 254]
  ...
  [251 255 255]
  [253 252 255]
  [255 251 255]]

 [[241 253 255]
  [241 253 255]
  [241 255 255]
  ...
  [253 255 254]
  [253 255 255]
  [255 254 255]]

 ...

 [[255 255 254]
  [255 255 251]
  [255 255 249]
  ...
  [255 254 255]
  [255 255 254]
  [255 255 249]]

 [[255 254 255]
  [255 255 255]
  [255 255 252]
  ...
  [255 255 254]
  [255 255 249]
  [255 255 247]]

 [[250 255 255]
  [250 255 255]
  [251 255 252]
  ...
  [255 255 251]
  [255 255 247]
  [255 255 247]]] [[251 252 253 ... 254 252 251]
 [255 255 255 ... 255 253 253]
 [252 252 253 ... 254 255 254]
 ...
 [255 254 253 ... 254 255 253]
 [254 255 254 ... 255 253 253]
 [254 254 254 ... 254 253 253]]
テンプレートマッチ
複数物体のテンプレートマッチング が最高に参考になりました。
切り出した画像「う」をテンプレートファイルにします。
解像度は同じものを作らないとピクセル比較を行うテンプレートマッチでは発見することができないので注意しましょう。
import cv2
import numpy as np

# 問題の画像
im = cv2.imread("img/unagi.jpeg")
gray = cv2.cvtColor(im, cv2.COLOR_BGR2GRAY)
# 切り出した画像「う」をグレースケールに
tpl = cv2.imread("template/u.jpg", 0)
w,h = tpl.shape[::-1]

# テンプレートマッチ
res = cv2.matchTemplate(gray, tpl, cv2.TM_CCOEFF_NORMED)
# しきい値以上のものだけを残す
loc = np.where (res > 0.9)
for pt in zip(*loc[::-1]):
    # pt[0], pt[1] がそれぞれ検出された画像の左上のx,y座標となるので
    # テンプレートを一致させた分の幅・高さを足して、1pixelの赤線で矩形を書く
    cv2.rectangle(im, pt, (pt[0] + w, pt[1] + h), (255, 0, 0), 1)

cv2.imwrite("result.png", im)
結果
ここで注意したいのが、左上のほうにある「う」などが太い線で囲われていることです。
先のコードを下記のようにすると
for pt in zip(*loc[::-1]):
    cv2.rectangle(im, pt, (pt[0] + w, pt[1] + h), (255, 0, 0), 1)
    print( "({}, {}) => ({}, {})".format(pt[0], pt[0]+w, pt[1], pt[1]+h))
(6, 26) => (6, 29)
(56, 76) => (6, 29)
(57, 77) => (6, 29)
(132, 152) => (6, 29)
...
のように、同じ文字が二回検出され、少し座標がずれた状態となっています。
この問題もあり、「縦に並んでいるかどうか」などを判別するのがちょっと難しいなと思いました。
縦横斜めに並んでいるかどうかを調べる
ここからはOpenCVは関係ありません。ここからはかなり乱暴なのですが、とりあえず、「画像の中心同士を比較して、距離が長すぎないこと・角度が斜め45度に近いこと」 を条件とすることにしました。
画像の中心点座標は
    for pt in zip(*loc[::-1]):
        cv2.rectangle(im, pt, (pt[0] + w, pt[1] + h), template["color"], 1)
        centers[template["name"]].append((pt[0] + w//2, pt[1] + h//2))
のようにして左上から幅の半分、高さの半分を足した値としてます(厳密でなくていいので整数として扱っています)
点の距離と角度
はじめ、座標 c1(x1, y1)と c2(x2, y2) なので、 三平方の定理で math.sqrt((x2-x1)**2 + (y2-y1)**2) としかけましたが、
def distance(c1, c2):
    d = math.hypot(c2[0]-c1[0], c2[1]-c1[1])
    return d
どうせmathモジュールを使うのであれば hypot を使えばよかったようです。
同じく角度は
def direction(c1, c2):
    # c1から見たときの点c2の位置が右か右下か下かを調べる
    theta = math.atan2(c2[0]-c1[0], c2[1]-c1[1])
    # 90: 右, -90:左。真下が0になる座標系
    return math.degrees(theta)
で求めることができます。thetaはラジアンなのでdegrees変換しておきました。
最終形
- 「う」「な」「ぎ」のテンプレートを探索し、中心座標を全件リストにして持っておく
- 座標同士を比較。距離はテンプレートの幅の2倍を超えない
- 最初に「う」「な」を比較して、「な」「ぎ」がほぼ同様の角度に存在するかチェックする
という条件を書き効率が悪いですが全件検索をして
import cv2
import numpy as np
import math
threshold = 0.9

im = cv2.imread('img/unagi.jpeg')
gray = cv2.cvtColor(im, cv2.COLOR_BGR2GRAY)

templates = [
        {"name": "u", "path": "template/u.jpg", "color": (0,0,255)},
        {"name": "na", "path": "template/na.jpg", "color": (255,0,0)},
        {"name": "gi", "path": "template/gi.jpg", "color": (0,255,0)},
]
points = {}
centers = {"u": [], "na":[], "gi": [] }

def distance(c1, c2):
    d = math.hypot(c2[0]-c1[0], c2[1]-c1[1])
    return d

def direction(c1, c2):
    # c1から見たときの点c2の位置が右か右下か下かを調べる
    theta = math.atan2(c2[0]-c1[0], c2[1]-c1[1])
    # 90: 右?, -90:左
    return math.degrees(theta)

for template in templates:
    tpl = cv2.imread(template["path"], 0)
    w,h = tpl.shape[::-1]

    res = cv2.matchTemplate(gray, tpl, cv2.TM_CCOEFF_NORMED)
    loc = np.where (res > threshold)
    for pt in zip(*loc[::-1]):
        cv2.rectangle(im, pt, (pt[0] + w, pt[1] + h), template["color"], 1)
        centers[template["name"]].append((pt[0] + w//2, pt[1] + h//2))


for u in centers["u"]:
    # uを用いて naの中から距離が一定以下のものを抽出する
    for na in centers["na"]:
        if distance(u, na) < 50 and direction(u,na) > -90 and direction(u, na) < 90:
            for gi in centers["gi"]:
                if distance(na, gi) < 50 and abs(direction(u, na) - direction(na, gi)) < 10:
                    # 見つかったら中心同士を5pixelの黒線でつなぐ
                    cv2.line(im, u, na, (0, 0, 0), 5)
                    cv2.line(im, na, gi, (0, 0, 0), 5)

cv2.imwrite("result.png", im)
下記のように該当する部分に線を引くことができました(もちろん下記に線を引いた答えは大嘘です)
もっと効率よく探索する方法などもあると思いますが、とりあえず。


