前回、ブログ詳細をマークダウン形式に対応させました。
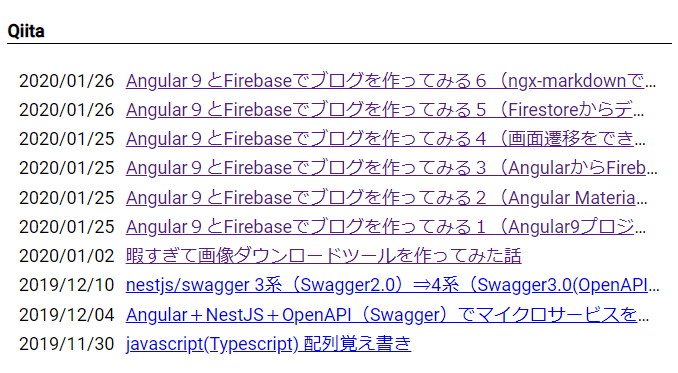
今回はレスポンシブ対応をしようと思ったんですが、angular/flex-layoutがまだAngular9に対応しておらずエラーになるため、TOPページにQiitaの投稿履歴を表示してみようかと思います。
ブログ:https://teracy-blog.firebaseapp.com/
Qiita API
QiitaにはQiita APIがあるため、これを使って投稿履歴を取得してみようと思います。
自分の投稿履歴の取得方法
-
/users/{user name}/itemsで指定ユーザーの投稿を取得できます- 取得する投稿はデフォルトで最新20件です
- 参考
https://qiita.com/api/v2/users/teracy55/items
AngularでQiitaAPIを使う
QiitaModuleを作成する
Qiitaモジュールを作ります
- HttpClientを使うため、HttpClientModuleをインポートします。
- QiitaServiceをProvideします
src/services/qiita/qiita.module.ts
import { NgModule } from '@angular/core';
import { HttpClientModule } from '@angular/common/http';
import { QiitaService } from './qiita.service';

@NgModule({
    imports: [HttpClientModule],
    providers: [QiitaService],
})
export class QiitaModule { }
- QiitaServiceを作ります
- 固定値をプロパティで定義しておきます
- APIのベース(
/api/v2)パスを定義しておきます - 自分のユーザー名も定義します
- APIのベース(
- 汎用的なgetメソッドを作っておきます
-
getMyItemsで投稿一覧を取得します- とりあえず
?per_page=10で10件のみ取るようにします
- とりあえず
- 固定値をプロパティで定義しておきます
src/service/qiita/qiita.service.ts
import { Injectable } from '@angular/core';
import { HttpClient } from '@angular/common/http';
import { QiitaItem } from 'src/types/qiita.interface';

@Injectable()
export class QiitaService {
    private readonly apiHost = 'https://qiita.com/api/v2';
    private readonly myUserName = 'teracy55';

    constructor(private http: HttpClient) {}

    private get<T>(path: string) {
        return this.http.get<T>(this.apiHost + path).toPromise();
    }

    /**
     * 参考:https://qiita.com/api/v2/docs#get-apiv2usersuser_iditems
     */
    getMyItems() {
        return this.get<QiitaItem[]>('/users/' + this.myUserName + '/items?per_page=10');
    }
}
- 型定義しておきます
- 投稿:戻り値情報
- ユーザーは使うときに定義します
src/types/qiita.interface.ts
export interface QiitaUser {
    // TODO
}

/**
 * 投稿
 * 参考:https://qiita.com/api/v2/docs#%E6%8A%95%E7%A8%BF
 */
export interface QiitaItem {
    rendered_body: string;
    body: string;
    coediting: boolean;
    comments_count: number;
    created_at: string;
    group: any;
    id: string;
    likes_count: number;
    private: boolean;
    reactions_count: number;
    tags: { name: string, version: string[] }[];
    title: string;
    updated_at: string;
    url: string;
    user: QiitaUser;
    page_views_count: number;
}
ComponentでQiitaServiceを使う
src/app/top/qiita/qiita.component.ts
import { Component, OnInit } from '@angular/core';
import { QiitaService } from '../../../services/qiita/qiita.service';
import { QiitaItem } from 'src/types/qiita.interface';

@Component({
  selector: 'app-top-qiita',
  templateUrl: './qiita.component.html',
  styleUrls: ['./qiita.component.scss'],
})
export class TopQiitaComponent implements OnInit {
  news: QiitaItem[];

  constructor(private qiitaService: QiitaService) {}

  async ngOnInit() {
    this.news = await this.qiitaService.getMyItems();
  }
}
- HTMLも作成します
- ngForで一覧を表示します
- タイトルはリンクにして、押下時にQiitaに飛ぶようにしてます
src/app/top/qiita/qiita.component.html
<div class="top-contents">
  <h4 class="title">Qiita</h4>
  <div *ngFor="let item of news" class="item">
    <span class="date">{{item.created_at | date: 'yyyy/MM/dd'}}</span>
    <a target="_blank" [href]="item.url" class="item-title" [title]="item.title">{{item.title}}</a>
  </div>
</div>
こんな感じになりました
ちなみに利用制限の関係で1時間に60回までしか取得できないみたいです。
https://qiita.com/api/v2/docs#%E5%88%A9%E7%94%A8%E5%88%B6%E9%99%90
まとめ
簡単にQiitaの投稿をとれました。
最終的にはこのサイトでブログを投稿したらQiitaにも投稿できるような機能も実装したいですね。
