もくじ
https://tera1707.com/entry/2022/02/06/144447
やりたいこと
MCPサーバーを自作したくていろいろ調べていると、チャットクライアントを自分で作ればMCPサーバーの実験もやりやすいのでは?と思ったので、チャットクライアントの作り方を調べてみる。
前提
- AIモデルサービスはGithubModelsを使用
- VisualStudio2022 17.14.11
- net9
- WPFで画面作成
- VSCodeは使ってない
- 2025年8月28頃に実験
nugetに入れるライブラリ
チャットクライアント側
- Microsoft.Extensions.AI(9.8.0-preview.1.25412.6)
- Microsoft.Extensions.AI.OpenAI(9.8.0-preview.1.25412.6)
- ModelContextProtocol(0.3.0-preview.4)
MCPサーバー側
- Microsoft.Extensions.DependencyInjection(9.0.8)
- Microsoft.Extensions.Hosting(9.0.8)
- ModelContextProtocol(0.3.0-preview.4)
今回作成したコード
↑のrepoのreadmeにも書いたが、自作のAIチャットクライアントアプリから、自作のMCPサーバーを使うためのサンプルアプリ。
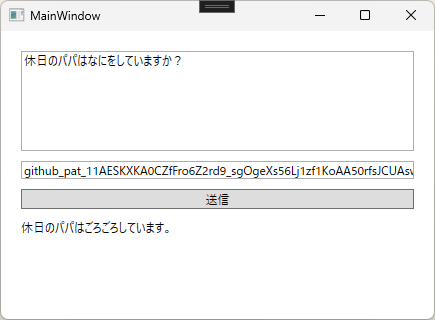
パパは休みの日になにをしている?ということを聞くと、MCPサーバーに直書きしたパパの休日の過ごし方を返してくれる。
前回記事に細かい調べたことがある
github-modelsのエンドポイントが何か、とか、トークン(キー)をどうやってとるかなどは下記参照。
コード
MCPサーバー
MCPサーバーの起動部分。
using Microsoft.Extensions.DependencyInjection;
using Microsoft.Extensions.Hosting;
using ModelContextProtocol.Server;

[McpServerToolType]
internal class Program
{
    static async Task Main(string[] args)
    {
        var builder = Host.CreateEmptyApplicationBuilder(settings: null);

        builder.Services.AddMcpServer()
            .WithStdioServerTransport()
            //.WithResourcesFromAssembly()
            //.WithPromptsFromAssembly()
            .WithToolsFromAssembly();

        var app = builder.Build();

        await app.RunAsync();
    }
}
MCPサーバーのツールの定義部分。
ここで、パパがなにをしているか、ママがなにをしているか、というのを返すように書いている。
using ModelContextProtocol.Server;
using System.ComponentModel;

namespace MyMcpServer;

[McpServerToolType]
internal static class HowToSpendHoliday
{
    [McpServerTool, Description("Get how to spend holiday. 休日の過ごし方を取得する。")]
    internal static string GetHowToSpendHoliday(
        [Description("休日の過ごし方を取得したい家族の呼称")] string target) => target switch
        {
            "パパ" => "ごろごろしています。",
            "ママ" => "ショッピングしています。",
            "息子" => "走り回っています。",
            "娘" => "歌を歌っています。",
            _ => "どうしてるんでしょう?",
        };
}
MCPサーバーはこれだけ。
AIチャットアプリ(WPF)
画面の部分。
指示の入力欄と、AIモデルサービスのgithub modelsのキーの入力欄、指示の送信ボタン、応答表示欄があるのみ。
<Window x:Class="AIChatJikken.MainWindow"
        xmlns="http://schemas.microsoft.com/winfx/2006/xaml/presentation"
        xmlns:x="http://schemas.microsoft.com/winfx/2006/xaml"
        xmlns:d="http://schemas.microsoft.com/expression/blend/2008"
        xmlns:mc="http://schemas.openxmlformats.org/markup-compatibility/2006"
        xmlns:local="clr-namespace:AIChatJikken"
        mc:Ignorable="d"
        Title="MainWindow" Height="450" Width="800">
    <Grid Margin="20">
        <StackPanel>
            <TextBox x:Name="PromptBox" Height="100" TextWrapping="Wrap" AcceptsReturn="True"/>
            <TextBox x:Name="Key" Margin="0, 10, 0, 0"/>
            <Button x:Name="SendButton" Content="送信" Click="Button_Click"  Margin="0,10,0,0"/>
            <TextBlock x:Name="ResponseBlock" TextWrapping="Wrap" Margin="0,10,0,0"/>
        </StackPanel>
    </Grid>

</Window>
画面の処理。
画面の中に、ベターっといろいろ処理を書いている。
using Microsoft.Extensions.AI;
using ModelContextProtocol.Client;
using OpenAI;
using System.ClientModel;
using System.Diagnostics;
using System.Windows;

namespace AIChatJikken;

public partial class MainWindow : Window
{
    public MainWindow()
    {
        InitializeComponent();

        PromptBox.Text = "休日のパパはなにをしていますか?";
        Key.Text = "ここにgithub modelsのキーを入れてください";
    }

    private async void Button_Click(object sender, RoutedEventArgs e)
    {
        SendButton.IsEnabled = false;
        var prompt = PromptBox.Text;

        if (prompt is null)
            return;

        ResponseBlock.Text = await GetCompletionAsync(prompt, Key.Text);
        SendButton.IsEnabled = true;
    }

    public async Task<string> GetCompletionAsync(string prompt, string key)
    {
        // MCPサーバー起動時のパラメータの設定
        var clientTransport = new StdioClientTransport(new()
        {
            // MCPサーバーのexeは、@"C:\Program Files\MyMcpServer\MyMcpServer.exe"に置くことにする。引数は無し。
            Command = @"C:\Program Files\MyMcpServer\MyMcpServer.exe",
            Arguments = [],
            Name = "My Mcp Server",
        });

        // MCPクライアントを作成(ここで、MCPサーバーが起動する)
        var mcpClient = await McpClientFactory.CreateAsync(clientTransport!);

        // ツールの名前を列挙
        var mcpTools = await mcpClient.ListToolsAsync();
        foreach (var tool in mcpTools)
        {
            Debug.WriteLine($"MCPサーバーのツール名:{tool.Name}");
        }

        //-------------------------------

        var chatOption = new ChatOptions
        {
            ToolMode = ChatToolMode.Auto,
            Tools = [.. mcpTools]
        };

        // github modelsのキーを入れる
        var credential = new ApiKeyCredential(key);

        // github modelsのエンドポイントを指定
        var openAIOptions = new OpenAIClientOptions()
        {
            Endpoint = new Uri("https://models.github.ai/inference")
        };

        // LLMのモデルを指定
        var aiClient = new OpenAIClient(credential, openAIOptions)
                            .GetChatClient("openai/gpt-4o")
                            .AsIChatClient();

        var chatClient = aiClient.AsBuilder()
                                    .UseFunctionInvocation()
                                    .Build();

        var chatmsg = new ChatMessage(ChatRole.User, prompt);

        // チャットを送信
        var res = await chatClient.GetResponseAsync([chatmsg], chatOption);

        //-------------------------

        // MCPクライアントを終了(ここで、MCPサーバーが終了する)
        await mcpClient.DisposeAsync();

        return res.Text;
    }
}
以上で、コードは終わり。
所感
知ってしまえば、凄く簡単に、チャットアプリまで出来てしまった。すごい。
ただ、AIやらチャットクライアント、LLMのモデルサービス(今回使ったgithub modelsとか、AzureOpenAIとか)とは何なのか、AI(LLM)を使えるようにするにはどこでどういうことをすればよいのか、など、コードを書く前に知っておかないとコード書けない部分を調べるのが大変だった。
※そもそも、MCPサーバーを作って動かしたいだけだったところ、いろいろ都合がありチャットクライアントを作るところまで調べた。おかげでよい勉強になった。
参考
MCPサーバーの公式サンプル
※チャットクライアントにmcpサーバーを食わせる方法の参考のベース
かずきさん記事(MCPサーバーをchatcliendに食わせる方法を参考にさせて頂いた)
自分の記事(MCPサーバーを作る)
github models のキー取得ページ