GoogleHome(mini)を購入したので、聞き取ったキーワードから
PCのブラウザにGoogleの検索結果1位のサイトを表示して、そのサイトのタイトルを読み上げるアプリを作成しました。検索したキーワードがDBに無かった場合はキーワードとURLとタイトルを登録します。
最終的に出来たアプリ

ワタシがやったこと
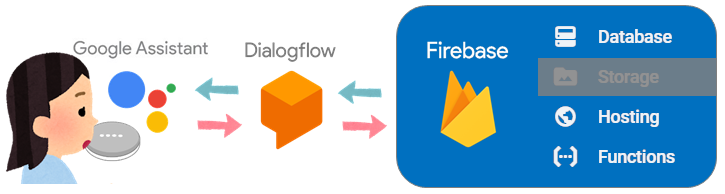
極力Googleさんのサービスだけで完結したいなーということで、DialogflowとFirebaseを使用
Firebaseがホスティングサーバーとデータベースと関数の管理と色々サービスを担ってくれているので
全部お任せしました。

![]() Dialogflowを使用して簡単なチャットボットを作成
Dialogflowを使用して簡単なチャットボットを作成
![]() FirebaseのFunctions(cloud functions)を使用して、
FirebaseのFunctions(cloud functions)を使用して、![]() で作ったボットが適切な返事するように設定
で作ったボットが適切な返事するように設定
![]()
![]() を実行する際にFirebaseのDatabaseにデータを追加するように設定
を実行する際にFirebaseのDatabaseにデータを追加するように設定
![]()
![]() のデータ追加をトリガーにFirebaseのHostingで作成したページ(htmlファイル)にパラメータを渡し、
のデータ追加をトリガーにFirebaseのHostingで作成したページ(htmlファイル)にパラメータを渡し、
windowopenで対象のページを開くように設定
![]() Google検索で一番上に表示されてるページを一発で表示させてみる(I'm feeling luckey!)
Google検索で一番上に表示されてるページを一発で表示させてみる(I'm feeling luckey!)
![]() データ登録時にページタイトルとサイトURLはオリジナルのものを保存する
データ登録時にページタイトルとサイトURLはオリジナルのものを保存する
(webスクレイピングには**cheerio-httpcliを使用しました )
![]() フリーのMP3データをFirebaseのStorage**に入れてレスポンスに音声データを返す(SSML)
フリーのMP3データをFirebaseのStorage**に入れてレスポンスに音声データを返す(SSML)
 スクレイピングして検索結果のタイトルとURLを登録する##
前回までで、○○を表示してって言ったら、そのページを検索してページが一発で表示されるようになりました。しかーし!せっかくDBに登録しているのに登録したURLが全部http://www.google.com/search?btnI=I%27m+Feeling+Lucky&lr=lang_ja&ie=UTF-8&oe=UTF-8&q=○○って、検索ワードを保存しているのにURLでも二重で登録してるみたいで嫌ですよね。それにいつまでも○○の検索結果を表示します なんて、全然知的じゃないので、ページのタイトルを読み上げてもらったらいいんじゃないかと思います。ということで、
今回はwebスクレイピングをします。#####
webスクレイピングって?? Webページのデータを収集情報を抽出することです。
到底、ワタシにはそんな難しいのは書けないので、Node.js用のWEBスクレイピングモジュールというのを使用しました。当初、別のモジュールで作成してましたが諸事情で躓いてcheerio-httpcliを使ってみたら、すんなり出来たので使いやすさは抜群だと思います。
**cheerio-httpcli**のページにも書いてますが、念のためこちらでも説明します。
今回はNode.jsのモジュールを追加するので
functionsディレクトリに移動してから下記のコマンドを実行します。
npm install cheerio-httpcli
はい、パッケージが追加されました。
functionsのnode_modulesにcheerioとcheerio-httpcliが追加されています。

丁寧にcheerio-httpcliのディレクトリの中にサンプルファイルを置いて下さっているので
それで早速スクレイピングを体感してみます。

google.jsの中身はこんなことが書いてあります。検索ワードがqに入ってて、
その検索結果一覧からリンクやらタイトルやらを取得してくれるようです。

まずは実行してみましょう。cheerio-httpcli/exampleディレクトリに移動してからgoogle.jsを実行します
 cd functions/node_modules/cheerio-httpcli/example

 node google.js
すると、うわー!いっぱい出てきた!!これを使えばいけそうですね。

cheerio-httpcliの概要はこんな感じです。特にこのコールバックの部分が肝です。

では、さっそくindex.jsにコードを追加していきます。#####
前回までのindex.js
const functions = require("firebase-functions");
const admin = require("firebase-admin");
admin.initializeApp(functions.config().firebase);

exports.hoyatalk = functions.https.onRequest((request, response) => {
    const dialogflow_param = request.body.queryResult.parameters.keyword;
    const dialogflow_user_say = request.body.queryResult.queryText;
    const keyword = dialogflow_param.join(" ");

    const nd = new Date();
    nd.setTime(nd.getTime() + 1000*60*60*9);
    const year = nd.getFullYear(),month = nd.getMonth()+1,day =nd.getDate(),hour = nd.getHours(),minute = nd.getMinutes();
    const time = year + "年" + month + "月" + day + "日" + hour +  "時" + minute + "分" ;

    const hoyapath = "/hoya/boya"
    const musubipath = "/musubi/maru"

    admin.database().ref(hoyapath).once("value", function(snapshot) {
        response.setHeader("Content-Type", "application/json");
        response.send(JSON.stringify({"fulfillmentText": "はい、"+keyword+"の検索結果を表示します"}));
        admin.database().ref(hoyapath).push({url: "http://www.google.com/search?btnI=I%27m+Feeling+Lucky&lr=lang_ja&ie=UTF-8&oe=UTF-8&q=" + keyword, param_value:keyword , timestamp: time });
        admin.database().ref(musubipath).set({timestamp: time, tx:keyword , url: "http://www.google.com/search?btnI=I%27m+Feeling+Lucky&lr=lang_ja&ie=UTF-8&oe=UTF-8&q=" + keyword });
    });
});
コメントで★追加となっている箇所が追加したところです。
コールバックの引数(err, $, res)で上の1、2、3の引数を受け取っています。
ログはまた後で解説するために書いているだけなので実行時に不要であれば消してくださいね。
const functions = require("firebase-functions");
const admin = require("firebase-admin");
const client = require('cheerio-httpcli');//★追加
admin.initializeApp(functions.config().firebase);

exports.hoyatalk = functions.https.onRequest((request, response) => {
    const dialogflow_param = request.body.queryResult.parameters.keyword;
    const dialogflow_user_say = request.body.queryResult.queryText;
    const keyword = dialogflow_param.join(" ");

    const nd = new Date();
    nd.setTime(nd.getTime() + 1000*60*60*9);
    const year = nd.getFullYear(),month = nd.getMonth()+1,day =nd.getDate(),hour = nd.getHours(),minute = nd.getMinutes();
    const time = year + "年" + month + "月" + day + "日" + hour +  "時" + minute + "分" ;

    const hoyapath = "/hoya/boya"
    const musubipath = "/musubi/maru"

    admin.database().ref(hoyapath).once("value", function(snapshot) {

        client.fetch('http://www.google.com/search?btnI=I%27m+Feeling+Lucky&lr=lang_ja&ie=UTF-8&oe=UTF-8&q=', { q: keyword }, function (err, $, res){ //★追加
            var pagetitle = $('title').text(); //★追加
            var pageurl = res.request.uri.href;//★追加
            console.log(pagetitle);//★追加
            console.log(pageurl);//★追加

            response.setHeader("Content-Type", "application/json");
            response.send(JSON.stringify({"fulfillmentText": "はい、"+keyword+"の検索結果を表示します"}));
            admin.database().ref(hoyapath).push({url: "http://www.google.com/search?btnI=I%27m+Feeling+Lucky&lr=lang_ja&ie=UTF-8&oe=UTF-8&q=" + keyword, param_value:keyword , timestamp: time });
            admin.database().ref(musubipath).set({timestamp: time, tx:keyword , url: "http://www.google.com/search?btnI=I%27m+Feeling+Lucky&lr=lang_ja&ie=UTF-8&oe=UTF-8&q=" + keyword });
        });//★追加
    });
});
さて、ではdeployしていつものようにテストします。えー!うそでしょー?返信がこなくなっちゃった!!![]()
firebaseのログを確認すると…請求先アカウントを設定して下さいと…
請求なんて嫌だねー!無視無視!!![]() とかやってるといつまでも解決しないのです。
とかやってるといつまでも解決しないのです。

Googleの請求先アカウントを設定します#####
firebaseの左下にSpark 無料$0円/月 と書いてあるところのアップグレードをクリック
立ち上がったFirebaseの料金プランの画面でプランの詳細を参照をクリック

無料プランのアウトバウンド ネットワーキングがGoogle専用になっています。
この設定をされているが故にGoogle以外で提供されているAPIが使えない状態になっているのです。
だから便利なことしようと思ったらプランの変更は必須

観念して有料プランにアップグレードします。ワタシはBlazeプランにしました。プランを選択…と

プロジェクトを選んで

次へを押します。

利用規約を順守するのチェックをはいにして同意するをクリック

確認を押します。

ちょっと抵抗ありますがクレジットカードの情報も必要です。入力したら購入を確定ボタンを押します。

アップグレードされました。んじゃ再度テストしてみますー!

おー!今度は返事してくれましたー。じゃあfirebaseのログも確認しますよー。
やったー!ページのタイトルとオリジナルのURLが出力されていますー![]()

ここまでくればもう出来あがったも同然ですね。DialogflowへのresponseとDBへの登録につけかえるだけ★
ワタシはちょっとアレンジして、今まで検索されたことがない場合は「はい、〇〇を表示します」
検索されたことがある場合は「はいはーい、〇〇を表示します」ということにしました。
☟最終的なコードはこんな感じです。
const functions = require("firebase-functions");
const admin = require("firebase-admin");
const client = require('cheerio-httpcli');
admin.initializeApp(functions.config().firebase);

exports.hoyatalk = functions.https.onRequest((request, response) => {
    const dialogflow_param = request.body.queryResult.parameters.keyword;
    const dialogflow_user_say = request.body.queryResult.queryText;
    const keyword = dialogflow_param.join(" ");

    const nd = new Date();
    nd.setTime(nd.getTime() + 1000*60*60*9);
    const year = nd.getFullYear(),month = nd.getMonth()+1,day =nd.getDate(),hour = nd.getHours(),minute = nd.getMinutes();
    const time = year + "年" + month + "月" + day + "日" + hour +  "時" + minute + "分" ;

    const hoyapath = "/hoya/boya"
    const musubipath = "/musubi/maru"

    admin.database().ref(hoyapath).orderByChild('param_value').startAt(keyword).endAt(keyword).once("value", function(snapshot) {

        if(snapshot.val()==null){//同じワードで検索したことがない場合 (DBのhoya/boyaのparam_valueにkeywordがnullなら)
            console.log(keyword);
            client.fetch('http://www.google.com/search?btnI=I%27m+Feeling+Lucky&lr=lang_ja&ie=UTF-8&oe=UTF-8&q=', { q: keyword }, function (err, $, res){
              var pagetitle = $('title').text();
              var pageurl = res.request.uri.href;

              response.setHeader("Content-Type", "application/json")
              response.send(JSON.stringify({"fulfillmentText": "はい、"+ pagetitle +"を表示します"}));
              admin.database().ref(hoyapath).push({url: pageurl, param_value:keyword , timestamp: time,title : pagetitle  });
              admin.database().ref(musubipath).set({timestamp: time, param_value:keyword , url: pageurl ,title : pagetitle});
            });
        }else{//同じワードで検索したことがある場合 (DBのparam_valueにkeywordが既にある)
            admin.database().ref(hoyapath).orderByChild('param_value').startAt(keyword).endAt(keyword).once("child_added", function(snapshot, prevChildKey) {
                var db =snapshot.val();
                response.setHeader("Content-Type", "application/json");
                response.send(JSON.stringify({"fulfillmentText": "はいはーい、"+ db.title +"を表示します"}));//DBのtitleを参照している
                admin.database().ref(musubipath).set({timestamp: time, tx:keyword , url: db.url ,title : db.title});
            });
        }
    });
});
ではテストしてみます。1回目~

同じワードで2回目~ はいはーい と言ってます。
そしてDBのmusubi/maruにはhoya/boya以下から参照した情報がセットされています。

以上です。今回も長めでしたが最後まで読んで頂きありがとうございました。
次回はオマケ的な機能なのですが、レスポンスに音声ファイルとかも再生できるよーというのをやります。
次回の記事:❼レスポンスで音声データを返す
以前の記事:❶Dialogflowで簡単なチャットボットを作成
❷FirebaseのFunctionsでボットに返事をさせる(Dialogflow V2 API)
❸FirebaseのFunctions実行時 Databaseにデータを追加する
❹Databaseへのデータ追加をトリガーに特定のページへ遷移させる
❺Google検索で一番上のページを表示させる