Introduction
This is a beginner's record of setting up the Genesis environment on a laptop with RTX3060. I'm leaving this as a memo so I won't get lost during reinstallation.
I learned about Genesis at the end of December 2024 and wanted to install it right away, but due to various busy schedules, I was finally able to work on it.
The laptop specifications are as follows, and I started with Ubuntu 22.04 LTS already installed:
NVIDIA GeForce RTX3060
RAM 16G
SSD 500G
I found todateman's Qiita article very helpful. Thank you very much.
Running Genesis on Ubuntu 22.04 + NVIDIA RTX 5080
https://qiita.com/todateman/items/df1c13a6a85e699dfd36
Start with CUDA Environment Setup
Line 1: Ubuntu update and upgrade
Line 2: To manage kernel module source code and provide a mechanism that automatically rebuilds and installs modules for new kernels when updated to a new version
dkms stands for Dynamic Kernel Module Support.
sudo apt update && sudo apt upgrade -y
sudo apt install build-essential dkms
As preparation for installing NVIDIA's proprietary (official) driver,
disable Ubuntu's default nouveau driver to avoid conflicts.
Line 2: Update the initial RAM disk to reflect the changes.
sudo sh -c "echo 'blacklist nouveau options nouveau modeset=0' > /etc/modprobe.d/blacklist-nouveau.conf"
sudo update-initramfs -u
Reboot the system
sudo reboot
Enable the Universe repository which is not in Ubuntu's standard
sudo add-apt-repository universe
sudo apt update
Display available drivers and their recommended versions. Make a note of the one marked as recommended.
ubuntu-drivers devices
Install with the recommended driver name.
sudo apt install nvidia-driver-580
After rebooting, check the driver
sudo reboot
nvidia-smi
NVIDIA-SMI 580.95.05 Driver Version 580.95.05 CUDA version: 13.0
...
...
Download and install the debian package containing the GPG public key required for accessing the CUDA repository. Then update.
wget https://developer.download.nvidia.com/compute/cuda/repos/ubuntu2204/x86_64/cuda-keyring_1.1-1_all.deb
sudo dpkg -i cuda-keyring_1.1-1_all.deb
sudo apt update
Install CUDA Toolkit 12.8
sudo apt install cuda-toolkit-12-8
echo 'export PATH=/usr/local/cuda-12.8/bin${PATH:+:${PATH}}' >> ~/.bashrc
echo 'export LD_LIBRARY_PATH=/usr/local/cuda-12.8/lib64${LD_LIBRARY_PATH:+:${LD_LIBRARY_PATH}}' >> ~/.bashrc
source ~/.bashrc
nvcc --version
Get the local installation package for cuDNN library 9.8.0
wget https://developer.download.nvidia.com/compute/cudnn/9.8.0/local_installers/cudnn-local-repo-ubuntu2204-9.8.0_1.0-1_amd64.deb
Line 1: Install the cuDNN library repository configuration package on Ubuntu
Line 2: Copy the key (GPG key) required for connecting to the cuDNN software repository to the system
Line 4: Install the cuDNN library itself (runtime package)
Line 5: Install the cuDNN library development package
sudo dpkg -i cudnn-local-repo-ubuntu2204-9.8.0_1.0-1_amd64.deb
sudo cp /var/cudnn-local-repo-ubuntu2204-9.8.0/cudnn-*-keyring.gpg /usr/share/keyrings/
sudo apt update
sudo apt install libcudnn9-cuda-12
sudo apt install libcudnn9-dev-cuda-12
Install Python 3.11. The reference literature mentioned installing python3.11-pip as well, but when I executed sudo apt install python3.11-pip, I got a message saying "does not exist". This was not a problem even if it couldn't be executed.
sudo apt update
sudo apt install software-properties-common
sudo add-apt-repository ppa:deadsnakes/ppa
sudo apt update
sudo apt install python3.11 python3.11-dev python3.11-venv
Line 1: Set up a virtual environment. The environment name is rtx3060-env (you can use any name you like)
Line 2: Activate the virtual environment. The environment name will be displayed at the beginning of the command line
Line 3: Upgrade pip
python3.11 -m venv .rtx3060-env
source .rtx3060-env/bin/activate
pip install --upgrade pip
Install PyTorch. At https://pytorch.org/get-started/locally/, I selected Pytorch Build: Stable(2.9.0), OS: Linux, Package: pip, Language: Python, Compute Platform: CUDA 12.8, and the following command was displayed, so I executed it as instructed. When I checked just now, the Pytorch Build section has been updated to Stable(2.9.1).
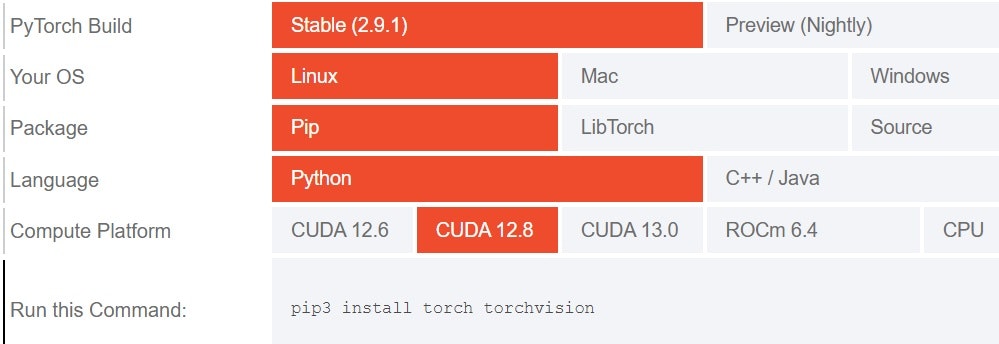
pip install torch torchvision
Check if PyTorch was installed correctly
python -c "
import torch
print(f'PyTorch version: {torch.__version__}')
print(f'CUDA available: {torch.cuda.is_available()}')
print(f'CUDA version: {torch.version.cuda}')
print(f'Device count: {torch.cuda.device_count()}')
if torch.cuda.is_available():
    print(f'Current device: {torch.cuda.current_device()}')
    print(f'Device name: {torch.cuda.get_device_name(0)}')
"
Preparation before Genesis installation
sudo apt update
sudo apt install -y libgl1-mesa-glx libgl1-mesa-dri libegl1-mesa \
    libglib2.0-0 libglfw3 libglfw3-dev freeglut3 freeglut3-dev \
    mesa-utils xvfb
Confirm that the OpenGL version is 4.4 or higher with the following
glxinfo | grep "OpenGL version"
Set various environment variables and register them in .bashrc
export __GL_SYNC_TO_VBLANK=0
export __GL_THREADED_OPTIMIZATIONS=1
export LIBGL_ALWAYS_INDIRECT=0
export __NV_PRIME_RENDER_OFFLOAD=1
export __GLX_VENDOR_LIBRARY_NAME=nvidia
echo 'export __GL_SYNC_TO_VBLANK=0' >> ~/.bashrc
echo 'export __GL_THREADED_OPTIMIZATIONS=1' >> ~/.bashrc
echo 'export LIBGL_ALWAYS_INDIRECT=0' >> ~/.bashrc
echo 'export __NV_PRIME_RENDER_OFFLOAD=1' >> ~/.bashrc
echo 'export __GLX_VENDOR_LIBRARY_NAME=nvidia' >> ~/.bashrc
source ~/.bashrc
Line 1: Check the active (in-use) graphics card mode
Line 2: Switch the system default graphics processor (GPU) to NVIDIA GPU
Line 3: Reboot
sudo prime-select query
sudo prime-select nvidia
sudo reboot
Line 1: Extract and display NVIDIA information from the X.Org server log file that controls the desktop environment
Line 2: Launch the GUI app for configuring the NVIDIA graphics driver
cat /var/log/Xorg.0.log | grep -i nvidia
nvidia-settings
After rebooting, execute the following to verify.
Line 1: Display OpenGL vendor, renderer, and version
Line 2: Verify that EGL (Embedded-System Graphics Library) recognizes the NVIDIA driver
glxinfo | grep -E "(OpenGL vendor|OpenGL renderer|OpenGL version)"
eglinfo | grep -i nvidia
Enable virtualization. Continue with it enabled from this point on. (Note: to disable, use deactivate with no arguments)
source .rtx3060-env/bin/activate
Line 1: Install the Python library for Genesis (robotics and physics simulation platform)
Line 2: Install Python libraries for image processing, data visualization, and video processing
pip install genesis-world
pip install opencv-python matplotlib imageio imageio-ffmpeg
Line 1: Configure OpenGL rendering to use direct rendering mode
Line 2: Ensure that NVIDIA is used as the default GPU
export LIBGL_ALWAYS_INDIRECT=0
export MESA_D3D12_DEFAULT_ADAPTER_NAME=NVIDIA
echo 'export LIBGL_ALWAYS_INDIRECT=0' >> ~/.bashrc
echo 'export MESA_D3D12_DEFAULT_ADAPTER_NAME=NVIDIA' >> ~/.bashrc
source ~/.bashrc
Lines 1-2: Create a folder for sample programs and move there.
mkdir ~/genesis_ws
cd genesis_ws
Save an appropriate sample program (refer to the official tutorial) in ~/genesis_ws with a name like genesis_ws_01.py. Note that there is an initialization command at the beginning of the program that specifies the GPU. If you don't want to use GPU, use line 2.
gs.init(backend=gs.gpu)
# gs.init(backend=gs.cpu)
You can run it with the following.
python genesis_ws_001.py
Sometimes the window displaying calculation results doesn't open, but adding the following 2 lines after scene.build() in the program made it display.
import time
time.sleep(2)
If it still doesn't display, rewriting the scene = gs.Scene() line as follows sometimes makes it display.
# scene = gs.Scene()
scene = gs.Scene(show_viewer=True)
The Tutorial's happy_genesis.py didn't display as is, but it displayed after modifying a few lines as follows.
import genesis as gs

gs.init(backend=gs.cpu)

# scene = gs.Scene()
scene = gs.Scene(show_viewer=True)

plane = scene.add_entity(
    gs.morphs.Plane(),
)
franka = scene.add_entity(
    # gs.morphs.URDF(
    #     file='urdf/panda_bullet/panda.urdf',
    #     fixed=True,
    # ),
    gs.morphs.MJCF(file="xml/franka_emika_panda/panda.xml"),
)

scene.build()
#
import time
time.sleep(2)
# modified (1000 -> 200)
for i in range(200):
    scene.step()
Conclusion
Installation takes a very long time as it downloads several gigabytes of files. I was worried when the window didn't open on the first run, but I was relieved when it displayed after making the modifications ChatGPT suggested. From now on, I plan to explore it as there are many reference materials available.
References
Running Genesis on Ubuntu 22.04 + NVIDIA RTX 5080
https://qiita.com/todateman/items/df1c13a6a85e699dfd36
Introduction to Genesis (1) - Getting Started
https://note.com/npaka/n/n07b448c74613#43520045-15fd-4f60-9315-324e638bc071
Introduction to Genesis (2) - Visualization and Rendering
https://note.com/npaka/n/n76962bed44f6
Introduction to Genesis (3) - Robot Manipulation
https://note.com/npaka/n/n423437e5b168
Introduction to Genesis (4) - Parallel Simulation
https://note.com/npaka/n/n5aa2c9969d61
Introduction to Genesis (5) - Inverse Kinematics and Motion Planning
https://note.com/npaka/n/n3b06df2458c1
Introduction to Genesis (6) - Flexible IK and Parallel IK
https://note.com/npaka/n/n90e8b986fe1c
Introduction to Genesis (7) - Beyond Rigid Bodies
https://note.com/npaka/n/n2dea411b6920
Introduction to Genesis (8) - Accessing Interactive Information and Debugging
https://note.com/npaka/n/n689b4e1d4799
Introduction to Genesis (9) - Learning Locomotion Policies with Reinforcement Learning
https://note.com/npaka/n/n4f0eed668510
Sim2Real of Gait Acquired with Genesis on Unitree Go2 Real Robot
https://note.com/b_sky_lab/n/n7c8bfc300041
Genesis-Embodied-AI/Genesis
https://github.com/Genesis-Embodied-AI/Genesis
User Guide
https://genesis-world.readthedocs.io/ja/latest/user_guide/index.html