segmentation_models_pytorchというsegmention用のライブラリについて、基本的な使い方を解説後に、VOC2012データを使用して実際に実装していきます。
なお、VOC2012データでの実装コードはgitにもコードを上げています(このあとの記事と同じ内容)。大した精度が出ているわけではありませんが、実行結果を見ながら進めたい方はこちらもご参照ください。
https://github.com/tchih11/qiita/blob/main/notebooks/segmentation_models_pytorch/segmentation_models_pytorch_VOC.ipynb
基本的な使い方
まずはモデル定義~学習の実行までの方法について記載します。パラメータやインスタンスを少し調整するだけで様々なモデルが簡単に作成できます。
Dataset/DataLoaderの作成
まずはDataset/DataLoaderの作成です。基本は普通にpytorchでモデルを作成する際の手順と同じですが、正解ラベルはsegmentationを行うラベル毎にOne-hotになるように作成するのがポイントです。Batchの形は[batchサイズ, 正解ラベル数, height, width]になります。イメージは下記の画像の通りです。
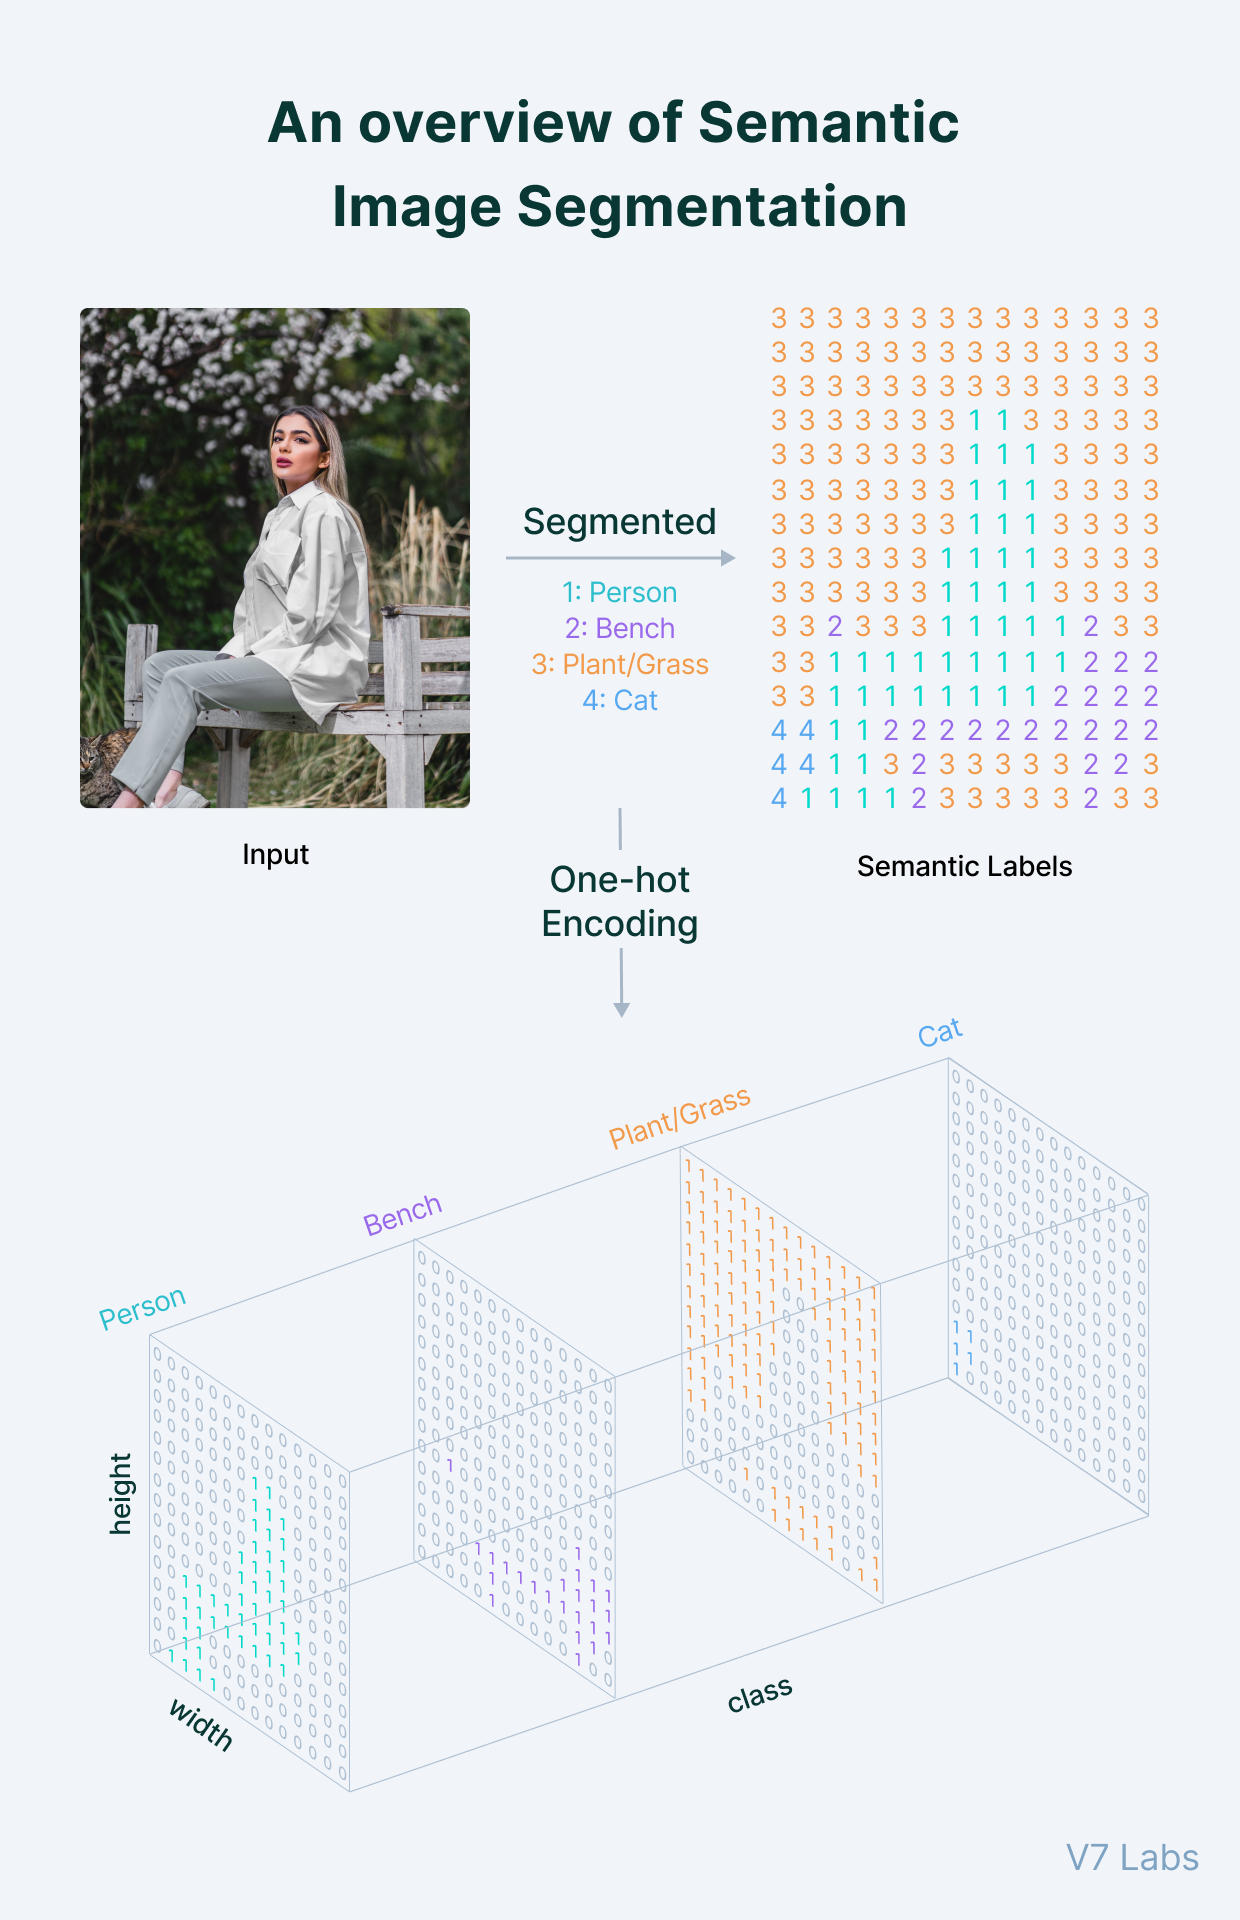
(参照:https://www.v7labs.com/blog/semantic-segmentation-guide)
Dataset/DataLoaderの作成方法はデータセットによってまちまちなので、ここではDataloaderの中身がどうなっているかだけ確認し、コードの詳細は後半の実装編に譲ることにします。
BATCH_SIZE = 8
CLASS_NUM = 4 # segmentationの正解ラベル数

# Batchを取り出す
batch = next(iter(train_dataloader))

# 1つ目の要素は元画像:Batch数×channel数×height×width
img = batch[0]
print(img.shape) # torch.Size([8, 3, 128, 128])

# 2つ目の要素はmask(正解ラベル):Batch数×正解ラベル数×height×width
mask = batch[1]
print(mask.shape) # [8, 4, 128, 128]
モデルの定義
DataLoaderの作成が終わったらモデルの作成に移ります。使用するモデルやEncoderの種類/重みなどを指定します。使用できるモデルとEncoderは本家gitを参照しましょう。今回はUnet++にしましたが、例えばPSPNetに変更したい場合はsmp.UnetPlusPlusをsmp.PSPNetとします。
(参考)使用できるモデルとEncoderの種類:https://github.com/qubvel/segmentation_models.pytorch#architectures
import segmentation_models_pytorch as smp

# パラメーター
ENCODER = "efficientnet-b4"
ENCODER_WEIGHTS = "imagenet"
ACTIVATION = "softmax2d"
CLASS_NUM = 3 # segmentationの正解ラベル数

# モデル定義
model = smp.UnetPlusPlus(
    encoder_name=ENCODER,
    encoder_weights=ENCODER_WEIGHTS,
    classes=CLASS_NUM,
    activation=ACTIVATION,
)
学習時の設定を定義
続いて学習時の各種設定を定義します。segmention時によく使用されるDicelossやIoUも簡単に指定できます。
# 学習時の設定
DEVICE = "cuda"
BATCH_SIZE = 8
loss = smp.utils.losses.DiceLoss()
metrics = [smp.utils.metrics.IoU(threshold=0.5)]
optimizer = torch.optim.Adam([dict(params=model.parameters(), lr=0.0001)])

train_epoch = smp.utils.train.TrainEpoch(
    model,
    loss=loss,
    metrics=metrics,
    optimizer=optimizer,
    device=DEVICE,
    verbose=True,
)

valid_epoch = smp.utils.train.ValidEpoch(
    model,
    loss=loss,
    metrics=metrics,
    device=DEVICE,
    verbose=True,
)
学習の実行、モデルの保存
ここまで来たら事前に作成したDataloaderを入れてfor文で回すだけです。簡単ですね。
# 学習実行
for i in range(50):
    print(f"Epoch:{i+1}")
    train_logs = train_epoch.run(train_dataloader)
    valid_logs = valid_epoch.run(val_dataloader)

    # IoUスコアが最高値が更新されればモデルを保存
    if max_score < valid_logs["iou_score"]:
        max_score = valid_logs["iou_score"]
        torch.save(model, "./best_model.pth")
実行過程の様子はこんな感じ。

作成したモデルでの推論
作成したモデルはロードして使用することができます。
# モデルのロード
best_model = torch.load("./best_model.pth")
best_model.eval()

# 前処理済みの画像imgをミニバッチ化:torch.Size([1, 3, 128, 128])
x = torch.tensor(img).unsqueeze(0)

# 推論の実施
y = best_model(x.to(DEVICE))
VOCデータでの実装
ここからはVOCデータでの実装となります。環境はGoogle Colaboratoryです。
データの内容や構造については下記の記事が大変参考になるのでご参照ください。
ポイントはmaskデータがインデクスカラーを使って作成されている点です。
U-NetでPascal VOC 2012の画像をSemantic Segmentationする (TensorFlow)
事前準備
まずはインポートやデータをDLなどの下準備です。
# 必要なライブラリのinstall
!pip install opencv-python-headless==4.1.2.30
!pip install -U git+https://github.com/albu/albumentations --no-cache-dir
!pip install segmentation-models-pytorch==0.2.1
import os
import tarfile
import urllib.request

import albumentations as albu
import matplotlib.pyplot as plt
import numpy as np
import segmentation_models_pytorch as smp
import torch
import torch.utils.data as data
from PIL import Image
# 使用データのDL
data_dir = "./data/"
if not os.path.exists(data_dir):
    os.mkdir(data_dir)

url = "http://host.robots.ox.ac.uk/pascal/VOC/voc2012/VOCtrainval_11-May-2012.tar"
target_path = os.path.join(data_dir, "VOCtrainval_11-May-2012.tar")

if not os.path.exists(target_path):
    urllib.request.urlretrieve(url, target_path)
    tar = tarfile.TarFile(target_path)
    tar.extractall(data_dir)
    tar.close()
augmentation、前処理関連の関数定義
Datasetを作成するにあたり、事前にaugmentationと前処理関連の関数を定義しておきます。
def get_augmentation(phase):
    if phase == "train":
        train_transform = [
            albu.HorizontalFlip(p=0.5),
            albu.ShiftScaleRotate(scale_limit=0.5, rotate_limit=0, shift_limit=0.1, p=1, border_mode=0),
            albu.RandomBrightnessContrast()
        ]
        return albu.Compose(train_transform)

    if phase=="valid":
        return None

def to_tensor(x, **kwargs):
    return x.transpose(2, 0, 1).astype("float32")

def get_preprocessing(preprocessing_fn):
    _transform = [
        albu.Lambda(image=preprocessing_fn),
        albu.Lambda(image=to_tensor, mask=to_tensor),
    ]
    return albu.Compose(_transform)

def crop_to_square(image):
    size = min(image.size)
    left, upper = (image.width - size) // 2, (image.height - size) // 2
    right, bottom = (image.width + size) // 2, (image.height + size) // 2
    return image.crop((left, upper, right, bottom))
Datasetの定義
前段で作成した関数を使いながら、Datasetを定義します。
基本的な使い方でも記載しましたが、maskデータはOne-hotに整形するのがポイントです。また、VOCデータにはbackgroundを含めると21クラス存在しますが、そのうち事前にリストで指定したクラスのみをモデリング対象とする形で今回は実装を行いました。
class VOCDataset(data.Dataset):

    # VOCデータセットのクラス名
    # http://host.robots.ox.ac.uk/pascal/VOC/voc2012/segexamples/index.html
    CLASSES = ["background","aeroplane","bicycle","bird","boad","bottle",
                "bus","car","cat","chair","cow","dining table","dog","horse",
                "motor bike","person","potted plant","sheep","sofa","train",
                "tv/monitor","void"]

    def __init__(self, images_path, masks_path, segment_class,
                 augmentation=None, preprocessing=None):

        self.images_path = images_path
        self.masks_path = masks_path
        self.segment_class = segment_class
        self.augmentation = augmentation
        self.preprocessing = preprocessing

    def __len__(self):
        return len(self.images_path)

    def __getitem__(self, i):

        # 元画像の読み込み、整形
        image = Image.open(self.images_path[i])
        image = crop_to_square(image)
        image = image.resize((128,128), Image.ANTIALIAS)
        image = np.asarray(image)

        # maskの読み込み、整形
        masks = Image.open(self.masks_path[i])
        masks = crop_to_square(masks)
        masks = masks.resize((128,128), Image.ANTIALIAS)
        masks = np.asarray(masks)

        # maskデータの境界線を表す255は扱いにくいので21に変換
        masks = np.where(masks == 255, 21, masks)

        # maskデータを正解ラベル毎のOne-hotに変換
        cls_idx = [self.CLASSES.index(cls) for cls in self.segment_class]
        masks = [(masks == idx) for idx in cls_idx]
        mask = np.stack(masks, axis=-1).astype("float")

        # augmentationの実行
        if self.augmentation:
            sample = self.augmentation(image=image, mask=mask)
            image, mask = sample["image"], sample["mask"]

        # 前処理の実行
        if self.preprocessing:
            sample = self.preprocessing(image=image, mask=mask)
            image, mask = sample["image"], sample["mask"]

        return image, mask
モデル定義
関数の定義が終わったら、続いてモデルを定義します。
今回はUnet++を使って、ご覧の各種パラメータにてモデリングを行いました。また、segmentationを行うクラスは下記の通りリスト化します。今回はbackground,person,catの3つだけですが、必要に応じてPREDICT_CLASSのリストに加えたり減らしたりすることで変更します。
# モデルの各種設定
ENCODER = "efficientnet-b4"
ENCODER_WEIGHTS = "imagenet"
ACTIVATION = "softmax2d"
PREDICT_CLASS = ["background","person", "cat"]
DEVICE = "cuda"
BATCH_SIZE = 8

# Unet++でモデル作成
model = smp.UnetPlusPlus(
    encoder_name=ENCODER,
    encoder_weights=ENCODER_WEIGHTS,
    classes=len(PREDICT_CLASS),
    activation=ACTIVATION,
)
モデリングで使用するデータ周りの作成
続いてモデリングで使用するデータ周りの作成を行います。
具体的にはtrain/valid別に画像のpath取得→Dataset作成→Dataloader作成の流れとなります。基本的な使い方では解説がありませんでしたが、smp.encoders.get_preprocessing_fnで各Encoderが学習したときと同じ前処理を実施してくれる関数を呼び出しています。
# encoderに合わせた前処理の取得
preprocessing_fn = smp.encoders.get_preprocessing_fn(ENCODER, ENCODER_WEIGHTS)

# データ周りを格納する辞書
data_info = {}
rootpath = r"./data/VOCdevkit/VOC2012/"

for phase in ["train", "val"]:
    # 画像のpath
    id_names = rootpath + rf"ImageSets/Segmentation/{phase}.txt"
    data_info[f"{phase}_img_path"] = [rootpath + rf"JPEGImages/{file.strip()}.jpg" for file in open(id_names)]
    data_info[f"{phase}_mask_path"] = [rootpath + rf"SegmentationClass/{file.strip()}.png" for file in open(id_names)]

    # Dataset
    data_info[f"{phase}_dataset"] = VOCDataset(
            data_info[f"{phase}_img_path"],
            data_info[f"{phase}_mask_path"],
            segment_class=PREDICT_CLASS,
            augmentation=get_augmentation(phase),
            preprocessing=get_preprocessing(preprocessing_fn)
            )

    # DataLoader
    shuffle = True if phase=="train" else False
    data_info[f"{phase}_dataloader"] = data.DataLoader(
        data_info[f"{phase}_dataset"],
        batch_size=BATCH_SIZE,
        shuffle=shuffle)
学習の実行
ここまで準備ができたらあとは回すだけです。
TrainEpochとValidEpochで学習/検証時の設定を行い、for文で学習を実行します。今回はついでに
- Early Stopping
- 10Epochを超えたタイミングでの学習率の変更
を実装してみました。今回はvalidのIoUは0.69程度でしたが、ここら辺をもう少し調整することで精度向上が望めるかもしれません。
# 学習時の各種設定
loss = smp.utils.losses.DiceLoss()
metrics = [smp.utils.metrics.IoU(threshold=0.5)]
optimizer = torch.optim.Adam([dict(params=model.parameters(), lr=0.0001)])

train_epoch = smp.utils.train.TrainEpoch(
    model,
    loss=loss,
    metrics=metrics,
    optimizer=optimizer,
    device=DEVICE
)

valid_epoch = smp.utils.train.ValidEpoch(
    model,
    loss=loss,
    metrics=metrics,
    device=DEVICE
)
patience = 5 # 5Epcoch以上連続でモデル精度が向上しなければEarly Stopping

max_score = 0
for i in range(50):

    print(f"Epoch:{i+1}")
    train_logs = train_epoch.run(data_info["train_dataloader"])
    valid_logs = valid_epoch.run(data_info["val_dataloader"])

    # IoUスコアが最高値が更新されればモデルを保存
    if max_score < valid_logs["iou_score"]:
        max_score = valid_logs["iou_score"]
        torch.save(model, "./best_model.pth")
        print("Model saved!")
        early_stop_counter = 0

    else:
        early_stop_counter += 1
        print(f"not improve for {early_stop_counter}Epoch")
        if early_stop_counter==patience:
            print(f"early stop. Max Score {max_score}")
            break

    # 適当なタイミングでlearning rateの変更
    if i == 10:
        optimizer.param_groups[0]["lr"] = 1e-5
        print("Decrease decoder learning rate to 1e-5")
推論と可視化による検証
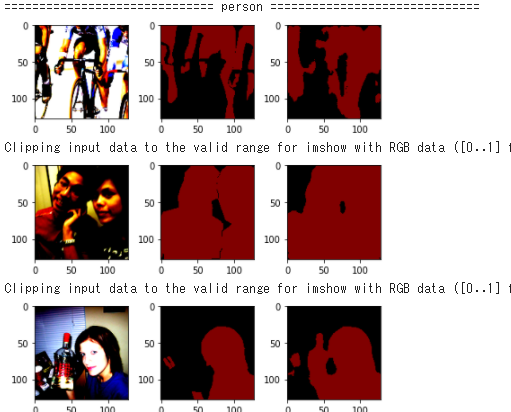
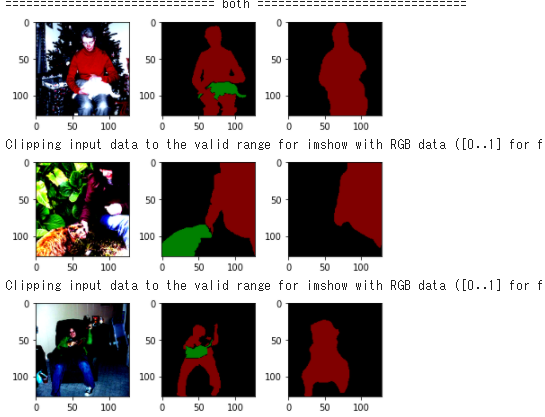
最後にモデリングが上手くいっているかを定性的にも評価するため、可視化による検証を実施します。検証データから今回のモデリング対象であるpersonとcatが含まれる画像を抽出した後に、作成した関数を可視化を行います。
# モデルのロード
best_model = torch.load("./best_model.pth")
best_model.eval()

# 可視化用のpalette取得
image_sample_palette = Image.open(data_info["val_mask_path"][0])
PALETTE = image_sample_palette.getpalette()
# 検証データから"cat","person"を含む画像を取得
idx_dict = {"person":[],"cat":[],"both":[]}

# 該当の対象物があればpathをリストに加える
for i, path in enumerate(data_info["val_mask_path"]):

    img = np.asarray(Image.open(path))
    unique_class = np.unique(img)

    if 8 in unique_class and 15 in unique_class:
        idx_dict["both"].append(i)

    elif 8 in unique_class:
        idx_dict["cat"].append(i)

    elif 15 in unique_class:
        idx_dict["person"].append(i)
# 検証用の関数を作成
def check_prediction(n):

    # 前処理後の画像とmaskデータを取得
    img, mask = data_info["val_dataset"][n]

    fig, ax = plt.subplots(1, 3, tight_layout=True)

    # 前処理後の画像を表示
    ax[0].imshow(img.transpose(1,2,0))

    # DataloaderのmaskはOne-Hotになっているので元に戻してパレット変換
    mask = np.argmax(mask, axis=0)
    mask = Image.fromarray(np.uint8(mask), mode="P")
    mask.putpalette(PALETTE)
    ax[1].imshow(mask)

    # 推論結果の表示
    x = torch.tensor(img).unsqueeze(0) # 推論のためミニバッチ化:torch.Size([1, 3, 128, 128])

    # 推論結果は各maskごとの確率、最大値をその画素の推論値とする
    y = best_model(x.to(DEVICE))
    y = y[0].cpu().detach().numpy()
    y = np.argmax(y, axis=0)

    # パレット変換後に表示
    predict_class_img = Image.fromarray(np.uint8(y), mode="P")
    predict_class_img.putpalette(PALETTE)
    ax[2].imshow(predict_class_img)

    plt.show()
# ラベル毎に実行して結果を確認
for label, idx_list in idx_dict.items():
    print("="*30 , label, "="*30)
    for i, idx in enumerate(idx_list):
        check_prediction(idx)
        if i==2:
            break
推論結果
結果は下記の通りとなりました。学習データが多いpersonはまぁギリギリセーフかな?と思う一方で、catの精度は悪いです。もう少しチューニングやらデータの水増しやらで工夫が必要そうですが、ざっくり作った一手目としてはこんなもんなのかなとも思います。

感想
Dataset/Dataloaderさえできてしまえば、あとは比較的簡単に色々なモデル/パラメータを試せる点がとても良いですね。一方で、segmentationをやったのは初めてですが中々思い通りの精度を出すのは難しいことも分かりました。良いモデルを作るためにはもう少し細かいチューニングやaugmentationの方法などを考える必要があり、その方法については別途勉強をする必要があるなと感じます。
参考
公式gitのexample
画像データ拡張ライブラリ ~ albumentations ~
PyTorchによるMulticlass Segmentation - 車載カメラ画像のマルチクラスセグメンテーションについて.