編集・更新(2022.2.15)
これまでに紹介した方法では、マルチクラスのセグメンテーションに適したlossではなかったため、正確なマルチクラスのセグメンテーションが実行できていませんでした。
そのため、同じPytorch版のSemantic Segmentation modelを用いて、マルチクラスのセグメンテーションの実装方法をご紹介します。
参考:
kaggle: Semantic Segmentation is Easy with Pytorch
1. 概要
航空写真から建物のセグメンテーションをPytorchにて実行する方法を紹介しました。
Pytorchによる航空画像の建物セグメンテーションの作成方法.
本記事では,同じくPytorchを用いて,複数のクラスを対象としたセグメンテーションの方法について紹介します。
対象とする画像の準備などは、関心のあるかたそれぞれお持ちかと思いますので、そちらをご準備いただければと思います。
今回は、以前紹介したSegmentation-modelsを用いてセグメンテーションを行います
ここで用いたコードはGithubにアップしましたので,ご興味のある方は試してみてください.Jupyter lab(notebook)で実行できます.ご参考になれば幸いです.
環境
本記事の実装環境は以下となります.
OS:Ubuntu: 18.04LTS
GPU:RTX 3080
Python: 3.7
Pytorch: 1.1.0
GPUは、以前はGeoforce GTX1070を使っていましたが、メモリ不足になることが多々あり、年末に思い切ってRTX3080を購入しました。だいぶ背伸びしましたが、これでストレス少なくDeep Learningの勉強ができます。
2. セグメンテーションモデル
セグメンテーション(正確には,Semantic Segmentation)に関する記事は多数あります.犬や猫、もしくは建物などの単クラスのセグメンテーションの方法は多く紹介されていますが、複数のマルチクラスのモデルの紹介が見つからなかったため、私と同じような経験をされてる方もいるのでは、と思いました。
前回の記事と同様に,今回も複数のセグメンテーションを試すことができる以下のモジュールを使ってみました.
Segmentation Models
MIT license
exampleに実行例が紹介されていますが、単クラスのモデルであるため、マルチクラス(多クラス)のモデル構築、および実行例を作りました。
このモジュールはPytorchをベースとした複数のSegmentationのモデルが準備されており,そのモデルには,Unet, Linknet, FPN, PSPNet, PAN, DeepLabV3があります.
また,それぞれのモデルの重み付けのパラメータも用意されており,転移学習やFine tuningができるため,比較的少ない学習データであっても高い精度のモデルが構築できることが期待されます.
さらに,このモジュールを用いた機械学習のコンペティションであるKaggleでの好成績の実績が紹介されており,その使い方についても学ぶことができます.
ここでは,セグメンテーションのモデル例として、最新のU-Net++による車載カメラの撮像画像より車、道路、歩道などのマルチクラスのセグメンテーションのモデルの構築例を紹介します.
3. 車載カメラの取得
ここで用いる画像データは,前回と同様に以下のサイトより取得します.
Motion-based Segmentation and Recognition Dataset
ここには,車載カメラから撮像された画像と、車、歩行者、道路を含む 32 個のラベル画像が提供されています。このサイトから画像を取得し、それをベースに実行してもよいのですが、今回はSegmentaion-modelsで紹介されている方法より画像を取得します。
# モジュールのimport
import os
os.environ['CUDA_VISIBLE_DEVICES'] = '0'

import numpy as np
import cv2
import matplotlib.pyplot as plt

from sklearn.model_selection import train_test_split

import torch
import torch.nn as nn
from torch.utils.data import Dataset, DataLoader
from torch.utils.data import Dataset as BaseDataset
from torchvision import transforms as T
import torchvision
import torch.nn.functional as F
from torch.autograd import Variable

from PIL import Image
import cv2
import albumentations as albu

import time
import os
from tqdm.notebook import tqdm

from torch.utils.data import Dataset as BaseDataset
import segmentation_models_pytorch as smp
モジュールのimport後、こちらのサイトからCamVidの車載カメラの画像とラベル画像を取得します。
DATA_DIR = './data/CamVid/'

# load repo with data if it is not exists
if not os.path.exists(DATA_DIR):
    print('Loading data...')
    os.system('git clone https://github.com/alexgkendall/SegNet-Tutorial ./data')
    print('Done!')
次に、取得した画像のアドレスを設定します。
x_train_dir = os.path.join(DATA_DIR, 'train')
y_train_dir = os.path.join(DATA_DIR, 'trainannot')

x_valid_dir = os.path.join(DATA_DIR, 'val')
y_valid_dir = os.path.join(DATA_DIR, 'valannot')

x_test_dir = os.path.join(DATA_DIR, 'test')
y_test_dir = os.path.join(DATA_DIR, 'testannot')
取得した画像の枚数を確認します。
print('the number of image/label in the train: ',len(os.listdir(x_train_dir)))
print('the number of image/label in the validation: ',len(os.listdir(x_valid_dir)))
print('the number of image/label in the test: ',len(os.listdir(x_test_dir)))
出力
the number of image/label in the train:  367
the number of image/label in the validation:  101
the number of image/label in the test:  233
学習画像が367枚、評価用画像が101枚、テスト画像が233枚とそれほど多くありません。画像サイズは、480 pixel X 360 piexelとそれほど大きくないため、今回はリサイズせずにそのまま用います。GPUによってはメモリ不足のエラーがでるかもしれませんので、そのときは撮影画像およびラベル画像ともにリサイズしてください。
次に画像の確認、およびpytorchによる学習のためのDataを準備します。
4. セグメンテーションの実行
4.1 取得データの前処理
取得した撮像画像およびアノテーション画像を確認します.
from torch.utils.data import DataLoader
from torch.utils.data import Dataset as BaseDataset
class Dataset(BaseDataset):
    """CamVid Dataset. Read images, apply augmentation and preprocessing transformations.

    Args:
        images_dir (str): path to images folder
        masks_dir (str): path to segmentation masks folder
        class_values (list): values of classes to extract from segmentation mask
        augmentation (albumentations.Compose): data transfromation pipeline
            (e.g. flip, scale, etc.)
        preprocessing (albumentations.Compose): data preprocessing
            (e.g. noralization, shape manipulation, etc.)

    """

    mean=[0.485, 0.456, 0.406]
    std=[0.229, 0.224, 0.225]

    CLASSES = ['sky', 'building', 'pole', 'road', 'pavement',
               'tree', 'signsymbol', 'fence', 'car',
               'pedestrian', 'bicyclist', 'unlabelled']

    def __init__(
            self,
            images_dir,
            masks_dir,
            classes=None,
            augmentation=None,
            preprocessing=None,
    ):
        self.ids = os.listdir(images_dir)
        self.images_fps = [os.path.join(images_dir, image_id) for image_id in self.ids]
        self.masks_fps = [os.path.join(masks_dir, image_id) for image_id in self.ids]

        # convert str names to class values on masks
        self.class_values = [self.CLASSES.index(cls.lower()) for cls in classes]

        self.augmentation = augmentation
        self.preprocessing = preprocessing

    def __getitem__(self, i):

        # read data
        image = cv2.imread(self.images_fps[i])
        image = cv2.cvtColor(image, cv2.COLOR_BGR2RGB)
        mask = cv2.imread(self.masks_fps[i], 0)


        # apply augmentations
        if self.augmentation:
            sample = self.augmentation(image=image, mask=mask)
            image, mask = sample['image'], sample['mask']

        # apply preprocessing
        if self.preprocessing:
            sample = self.preprocessing(image=image, mask=mask)
            image, mask = sample['image'], sample['mask']

        t = T.Compose([T.ToTensor(), T.Normalize(self.mean, self.std)])
        image = t(image)
        mask = torch.from_numpy(mask).long()

        return image, mask

    def __len__(self):
        return len(self.ids)
取得した画像は12クラス['sky', 'building', 'pole', 'road', 'pavement', 'tree', 'signsymbol', 'fence', 'car', 'pedestrian', 'bicyclist', 'unlabelled']であり、これらのクラスと、それ以外を背景として13クラスでセグメンテーションを行います。
では、車載画像とラベル画像をみてみます。
画像表示用の関数を設定します。
# helper function for data visualization
def visualize(**images):
    """PLot images in one row."""
    n = len(images)
    plt.figure(figsize=(16, 5))
    for i, (name, image) in enumerate(images.items()):
        plt.subplot(1, n, i + 1)
        plt.xticks([])
        plt.yticks([])
        plt.title(' '.join(name.split('_')).title())
        plt.imshow(image)
    plt.show()
では、実行します。
# Lets look at data we have

dataset = Dataset(x_train_dir, y_train_dir, classes=['car', 'pedestrian'])


image, mask = dataset[0] # get some sample
visualize(
    image=image.permute(1, 2, 0), #To tensorでchannel, h, wが画像表示用と異なるため、配列変換
    mask=mask
)
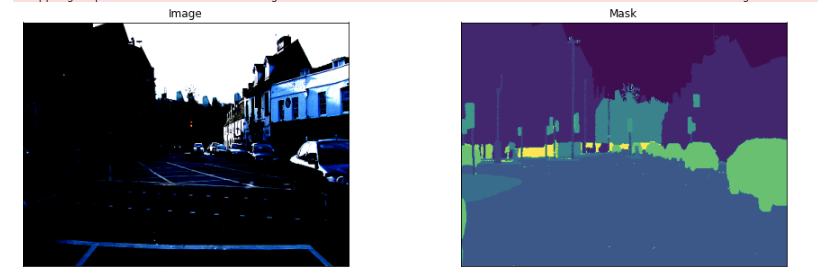
ここでは、車、建物と街を表示させてみました。画像が普通の表示よりも明るい部分と暗い部分がことなりは、dataset実行時に、Normalization処理をしているためです。これより、ラベル画像がきちんと分離できているのがわかりますね。
これでDatasetが準備できました。次に、前回と同じく、画像の拡張処理を行います。
4.2 画像データの拡張処理
学習用画像の水増しのためのAugmentationを実行します.
Augmentationはいくつかの方法はありますが,Segmentation Modelsで例として紹介されているalbumentationsを用いました.albumentationsについては以下の記事で詳しく紹介されていますので,こちらをご参考にしてください.
画像データ拡張ライブラリ ~ albumentations ~
まず,albumentationsをインストールします.pip install albumentationsでもよいそうですが,私の環境ではエラーが発生したため,以下の方法でインストールしました.エラーが発生する場合は試してみてください.
!pip install -U git+https://github.com/albu/albumentations --no-cache-dir
import albumentations as albu

def get_training_augmentation():
    train_transform = [

        albu.HorizontalFlip(p=0.5),

        albu.ShiftScaleRotate(scale_limit=0.5, rotate_limit=0, shift_limit=0.1, p=1, border_mode=0),

        albu.PadIfNeeded(min_height=320, min_width=320, always_apply=True, border_mode=0),
        albu.RandomCrop(height=320, width=320, always_apply=True),

        albu.IAAAdditiveGaussianNoise(p=0.2),
        albu.IAAPerspective(p=0.5),

        albu.OneOf(
            [
                albu.CLAHE(p=1),
                albu.RandomBrightness(p=1),
                albu.RandomGamma(p=1),
            ],
            p=0.9,
        ),

        albu.OneOf(
            [
                albu.IAASharpen(p=1),
                albu.Blur(blur_limit=3, p=1),
                albu.MotionBlur(blur_limit=3, p=1),
            ],
            p=0.9,
        ),

        albu.OneOf(
            [
                albu.RandomContrast(p=1),
                albu.HueSaturationValue(p=1),
            ],
            p=0.9,
        ),
    ]
    return albu.Compose(train_transform)


def get_validation_augmentation():
    """Add paddings to make image shape divisible by 32"""
    test_transform = [
        albu.PadIfNeeded(384, 480)
    ]
    return albu.Compose(test_transform)


def to_tensor(x, **kwargs):
    return x.transpose(2, 0, 1).astype('float32')


def get_preprocessing(preprocessing_fn):
    """Construct preprocessing transform

    Args:
        preprocessing_fn (callbale): data normalization function
            (can be specific for each pretrained neural network)
    Return:
        transform: albumentations.Compose

    """

    _transform = [
        albu.Lambda(image=preprocessing_fn),
        albu.Lambda(image=to_tensor, mask=to_tensor),
    ]
    return albu.Compose(_transform)
多くの機能がありますが,まずは例で紹介されているAugmentationを実行しました.実行後の画像は以下で確認できます.
# Augumentation処理後の画像の確認

dataset = Dataset(x_train_dir, y_train_dir, classes=['car', 'pedestrian'], augmentation=get_training_augmentation())

image, mask = dataset[12] # get some sample
visualize(
    image=image.permute(1, 2, 0),
    cars_mask=mask
)
出力
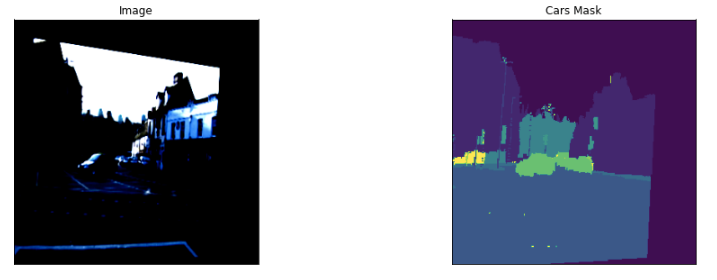
変形された撮像画像に対して,アノテーション画像も同様に変形しているがわかります.
これで,画像の拡張を含めたDatasetの設定が終了です.
4.3 DataloaderとModelの作成
次に学習モデルと,モデルに入力するDataloaderを設定します.
今回は学習モデルにUnet++を用いた転移学習を行います.
# 画像のクラスを設定
CLASSES = ['sky', 'building', 'pole', 'road', 'pavement', 'tree', 'signsymbol', 'fence', 'car', 'pedestrian', 'bicyclist', 'unlabelled']

# Semantic Segmentationのモデルを設定
model = smp.Unet('efficientnet-b4', encoder_weights='imagenet', classes=len(CLASSES), activation=None)
Segmentation Modelsで利用できるモデルおよび学習済みモデルのリストは公式のGithubに記載されていますのでご参考ください.
次にDataloaderを設定します.
# Train, Validationのデータセットを作成

train_dataset = Dataset(
    x_train_dir,
    y_train_dir,
    augmentation=get_training_augmentation(),
    classes=CLASSES,
)

valid_dataset = Dataset(
    x_valid_dir,
    y_valid_dir,
    augmentation=get_validation_augmentation(),
    classes=CLASSES,
)

train_loader = DataLoader(train_dataset, batch_size=8, shuffle=True, num_workers=4)
valid_loader = DataLoader(valid_dataset, batch_size=1, shuffle=False, num_workers=4)
ここで設定したモデルを確認するには、以下を実行します。
model
次は,損失係数です.ここでは、ピクセル単位の精度と多クラスのIoUを求めます。
それぞれの関数を設定します。
def pixel_accuracy(output, mask):
    with torch.no_grad():
        output = torch.argmax(F.softmax(output, dim=1), dim=1)
        correct = torch.eq(output, mask).int()
        accuracy = float(correct.sum()) / float(correct.numel())
    return accuracy
def mIoU(pred_mask, mask, smooth=1e-10, n_classes=len(CLASSES)):
    with torch.no_grad():
        pred_mask = F.softmax(pred_mask, dim=1)
        pred_mask = torch.argmax(pred_mask, dim=1)
        pred_mask = pred_mask.contiguous().view(-1)
        mask = mask.contiguous().view(-1)

        iou_per_class = []
        for clas in range(0, n_classes): #loop per pixel class
            true_class = pred_mask == clas
            true_label = mask == clas

            if true_label.long().sum().item() == 0: #no exist label in this loop
                iou_per_class.append(np.nan)
            else:
                intersect = torch.logical_and(true_class, true_label).sum().float().item()
                union = torch.logical_or(true_class, true_label).sum().float().item()

                iou = (intersect + smooth) / (union +smooth)
                iou_per_class.append(iou)
        return np.nanmean(iou_per_class)
学習率はoptimizerにて最適化します。
def get_lr(optimizer):
    for param_group in optimizer.param_groups:
        return param_group['lr']
次に学習ループの設定です.今回は参考としたコードの一部を変更(学習向上時のモデルの適宜保存。lossの変化よりEarly stopするタイミングの変更(7 -> 20)
def fit(epochs, model, train_loader, val_loader, criterion, optimizer, scheduler, patch=False):
    torch.cuda.empty_cache()
    train_losses = []
    test_losses = []
    val_iou = []; val_acc = []
    train_iou = []; train_acc = []
    lrs = []
    min_loss = np.inf
    decrease = 1 ; not_improve=0

    model.to(device)
    fit_time = time.time()
    for e in range(epochs):
        since = time.time()
        running_loss = 0
        iou_score = 0
        accuracy = 0
        #training loop
        model.train()
        for i, data in enumerate(tqdm(train_loader)):
            #training phase
            image_tiles, mask_tiles = data
            if patch:
                bs, n_tiles, c, h, w = image_tiles.size()

                image_tiles = image_tiles.view(-1,c, h, w)
                mask_tiles = mask_tiles.view(-1, h, w)

            image = image_tiles.to(device); mask = mask_tiles.to(device);
            #forward
            output = model(image)
            loss = criterion(output, mask)
            #evaluation metrics
            iou_score += mIoU(output, mask)
            accuracy += pixel_accuracy(output, mask)
            #backward
            loss.backward()
            optimizer.step() #update weight
            optimizer.zero_grad() #reset gradient

            #step the learning rate
            lrs.append(get_lr(optimizer))
            scheduler.step()

            running_loss += loss.item()

        else:
            model.eval()
            test_loss = 0
            test_accuracy = 0
            val_iou_score = 0
            #validation loop
            with torch.no_grad():
                for i, data in enumerate(tqdm(val_loader)):
                    #reshape to 9 patches from single image, delete batch size
                    image_tiles, mask_tiles = data

                    if patch:
                        bs, n_tiles, c, h, w = image_tiles.size()

                        image_tiles = image_tiles.view(-1,c, h, w)
                        mask_tiles = mask_tiles.view(-1, h, w)

                    image = image_tiles.to(device); mask = mask_tiles.to(device);
                    output = model(image)
                    #evaluation metrics
                    val_iou_score +=  mIoU(output, mask)
                    test_accuracy += pixel_accuracy(output, mask)
                    #loss
                    loss = criterion(output, mask)
                    test_loss += loss.item()

            #calculatio mean for each batch
            train_losses.append(running_loss/len(train_loader))
            test_losses.append(test_loss/len(val_loader))


            if min_loss > (test_loss/len(val_loader)):
                print('Loss Decreasing.. {:.3f} >> {:.3f} '.format(min_loss, (test_loss/len(val_loader))))
                min_loss = (test_loss/len(val_loader))
                decrease += 1
                if decrease % 5 == 0:
                    print('saving model...')
                    #torch.save(model, 'Unet-_mIoU-{:.3f}.pt'.format(val_iou_score/len(val_loader))) #Train途中もモデルを保存するときは実行する


            if (test_loss/len(val_loader)) > min_loss:
                not_improve += 1
                min_loss = (test_loss/len(val_loader))
                print(f'Loss Not Decrease for {not_improve} time')
                if not_improve == 20:
                    print('Loss not decrease for 20 times, Stop Training')
                    break

            #iou
            val_iou.append(val_iou_score/len(val_loader))
            train_iou.append(iou_score/len(train_loader))
            train_acc.append(accuracy/len(train_loader))
            val_acc.append(test_accuracy/ len(val_loader))
            print("Epoch:{}/{}..".format(e+1, epochs),
                  "Train Loss: {:.3f}..".format(running_loss/len(train_loader)),
                  "Val Loss: {:.3f}..".format(test_loss/len(val_loader)),
                  "Train mIoU:{:.3f}..".format(iou_score/len(train_loader)),
                  "Val mIoU: {:.3f}..".format(val_iou_score/len(val_loader)),
                  "Train Acc:{:.3f}..".format(accuracy/len(train_loader)),
                  "Val Acc:{:.3f}..".format(test_accuracy/len(val_loader)),
                  "Time: {:.2f}m".format((time.time()-since)/60))

    history = {'train_loss' : train_losses, 'val_loss': test_losses,
               'train_miou' :train_iou, 'val_miou':val_iou,
               'train_acc' :train_acc, 'val_acc':val_acc,
               'lrs': lrs}
    print('Total time: {:.2f} m' .format((time.time()- fit_time)/60))
    return history
最後に学習の実行です.以下にて学習をスタートします.
ここでは,画像数が少ないので、エポックを100としました。その他は、参考にしたコードの値そのままです。機会がありましたら、ここのパラメータを変えることで学習がどうなるのか、試してみてください。
max_lr = 1e-3
epoch = 100
weight_decay = 1e-4

criterion = nn.CrossEntropyLoss()
optimizer = torch.optim.AdamW(model.parameters(), lr=max_lr, weight_decay=weight_decay)
sched = torch.optim.lr_scheduler.OneCycleLR(optimizer, max_lr, epochs=epoch,
                                            steps_per_epoch=len(train_loader))

history = fit(epoch, model, train_loader, valid_loader, criterion, optimizer, sched)
私の環境では,50エポックでEartly Stopとなりました。学習時間は12分ほどです。(RTX3080の恩恵!)
最後に学習したモデルを保存します。
torch.save(model, 'Unet-efficientb4_qiita.pt')
4.4 モデルの検証.
学習したモデルを検証する.
まず,学習時のlossおよびmIoUの推移を確認する.
def plot_loss(history):
    plt.plot(history['val_loss'], label='val', marker='o')
    plt.plot( history['train_loss'], label='train', marker='o')
    plt.title('Loss per epoch'); plt.ylabel('loss');
    plt.xlabel('epoch')
    plt.legend(), plt.grid()
    plt.show()

def plot_score(history):
    plt.plot(history['train_miou'], label='train_mIoU', marker='*')
    plt.plot(history['val_miou'], label='val_mIoU',  marker='*')
    plt.title('Score per epoch'); plt.ylabel('mean IoU')
    plt.xlabel('epoch')
    plt.legend(), plt.grid()
    plt.show()

def plot_acc(history):
    plt.plot(history['train_acc'], label='train_accuracy', marker='*')
    plt.plot(history['val_acc'], label='val_accuracy',  marker='*')
    plt.title('Accuracy per epoch'); plt.ylabel('Accuracy')
    plt.xlabel('epoch')
    plt.legend(), plt.grid()
    plt.show()
plot_loss(history)
plot_score(history)
plot_acc(history)
出力.
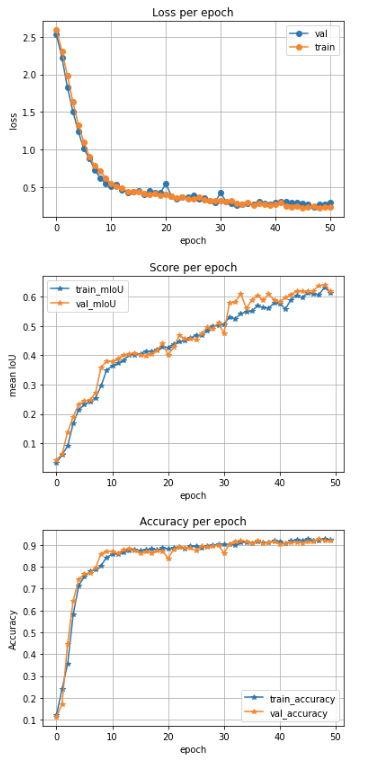
学習時はエポック数に応じて損失は低下し,またmIoUが向上しているのがわかります.損失(loss)の減少はよくある傾向ですが、mIoUの向上が傾きがつづいているのが気になります。Early Stopの条件をかえることで、mIoUがどのように変更するのか、実験してみるのも面白いかもしれません。理解が深まりますね。色々試してみることがありそうです。
学習したモデルを以下でロードし,モデルの確認を行います.
# load best saved checkpoint
model = torch.load('Unet-efficientb4_qiita.pt')
上記を実行すると,以下のようなモデルの詳細が閲覧できます.ここでは,一部のみ記載します.
では,構築したモデルでどこまで建物のセグメンテーションができているか,確認していきます.
class testDataset(BaseDataset):
    """CamVid Dataset. Read images, apply augmentation and preprocessing transformations.

    Args:
        images_dir (str): path to images folder
        masks_dir (str): path to segmentation masks folder
        class_values (list): values of classes to extract from segmentation mask
        augmentation (albumentations.Compose): data transfromation pipeline
            (e.g. flip, scale, etc.)
        preprocessing (albumentations.Compose): data preprocessing
            (e.g. noralization, shape manipulation, etc.)

    """

    CLASSES = ['sky', 'building', 'pole', 'road', 'pavement',
               'tree', 'signsymbol', 'fence', 'car',
               'pedestrian', 'bicyclist', 'unlabelled']

    def __init__(
            self,
            images_dir,
            masks_dir,
            classes=None,
            augmentation=None,
            preprocessing=None,
    ):
        self.ids = os.listdir(images_dir)
        self.images_fps = [os.path.join(images_dir, image_id) for image_id in self.ids]
        self.masks_fps = [os.path.join(masks_dir, image_id) for image_id in self.ids]

        # convert str names to class values on masks
        self.class_values = [self.CLASSES.index(cls.lower()) for cls in classes]

        self.augmentation = augmentation
        self.preprocessing = preprocessing

    def __getitem__(self, i):

        # read data
        image = cv2.imread(self.images_fps[i])
        image = cv2.cvtColor(image, cv2.COLOR_BGR2RGB)
        mask = cv2.imread(self.masks_fps[i], 0)


        # apply augmentations
        if self.augmentation:
            sample = self.augmentation(image=image, mask=mask)
            image, mask = sample['image'], sample['mask']

        # apply preprocessing
        if self.preprocessing:
            sample = self.preprocessing(image=image, mask=mask)
            image, mask = sample['image'], sample['mask']

        #t = T.Compose([T.ToTensor()])
        #image = t(image)
        mask = torch.from_numpy(mask).long()

        return image, mask

    def __len__(self):
        return len(self.ids)
テストデータセットを作成します。
# create test dataset
test_dataset = testDataset(
    x_test_dir,
    y_test_dir,
    augmentation=get_validation_augmentation(),
    #preprocessing=get_preprocessing(preprocessing_fn),
    classes=CLASSES,
)

test_dataloader = DataLoader(test_dataset)
次に、テスト結果の評価関数を定義します。
def predict_image_mask_miou(model, image, mask, mean=[0.485, 0.456, 0.406], std=[0.229, 0.224, 0.225]):
    model.eval()
    t = T.Compose([T.ToTensor(), T.Normalize(mean, std)])
    image = t(image)
    model.to(device); image=image.to(device)
    mask = mask.to(device)
    with torch.no_grad():

        image = image.unsqueeze(0)
        mask = mask.unsqueeze(0)

        output = model(image)
        score = mIoU(output, mask)
        masked = torch.argmax(output, dim=1)
        masked = masked.cpu().squeeze(0)
    return masked, score
def predict_image_mask_pixel(model, image, mask, mean=[0.485, 0.456, 0.406], std=[0.229, 0.224, 0.225]):
    model.eval()
    t = T.Compose([T.ToTensor(), T.Normalize(mean, std)])
    image = t(image)
    model.to(device); image=image.to(device)
    mask = mask.to(device)
    with torch.no_grad():

        image = image.unsqueeze(0)
        mask = mask.unsqueeze(0)

        output = model(image)
        acc = pixel_accuracy(output, mask)
        masked = torch.argmax(output, dim=1)
        masked = masked.cpu().squeeze(0)
    return masked, acc
def miou_score(model, test_set):
    score_iou = []
    for i in tqdm(range(len(test_set))):
        img, mask = test_set[i]
        pred_mask, score = predict_image_mask_miou(model, img, mask)
        score_iou.append(score)
    return score_iou
では、まずはテストデータのmIoUを求めます。以下を実行します。
mob_miou = miou_score(model, test_dataset)
print('Test Set mIoU', np.mean(mob_miou))
出力
HBox(children=(HTML(value=''), FloatProgress(value=0.0, max=233.0), HTML(value='')))

Test Set mIoU 0.5398935530940476
最終結果を確認します.IoUが0.54程度であることがわかりました。
CamVidの画像データ集すべてを使っているのではないのですが、報告されているCamVidのIoUと比べると、あまり高くないですね。まだまだ工夫が必要です。 このサイトでの上位を目指して、モデルや前処理を工夫するのは面白いかもしれませんね。
Semantic Segmentation on CamVid
次にピクセルレベルでの精度を確認します。
def pixel_acc(model, test_set):
    accuracy = []
    for i in tqdm(range(len(test_set))):
        img, mask = test_set[i]
        pred_mask, acc = predict_image_mask_pixel(model, img, mask)
        accuracy.append(acc)
    return accuracy

mob_acc = pixel_acc(model, test_dataset)
print('Test Set Pixel Accuracy', np.mean(mob_acc))
出力
HBox(children=(HTML(value=''), FloatProgress(value=0.0, max=233.0), HTML(value='')))

Test Set Pixel Accuracy 0.8658704678558655
それなりに高い精度であることがわかりました。
最後にテスト画像を確認します。まずは、参考したコードの手法で表示します。
image2, mask2 = test_dataset[15]
pred_mask2, score2 = predict_image_mask_miou(model, image2, mask2)

fig, (ax1, ax2, ax3) = plt.subplots(1,3, figsize=(20,10))
ax1.imshow(image2)
ax1.set_title('Picture');

ax2.imshow(mask2)
ax2.set_title('Ground truth')
ax2.set_axis_off()

ax3.imshow(pred_mask2)
ax3.set_title('UNet-MobileNet | mIoU {:.3f}'.format(score2))
ax3.set_axis_off()
mIoUが0.562と高いことも会って、うまく識別できていますね。歩道と道路の区別がうまくできていないのが、残念です。ここが課題ですね。

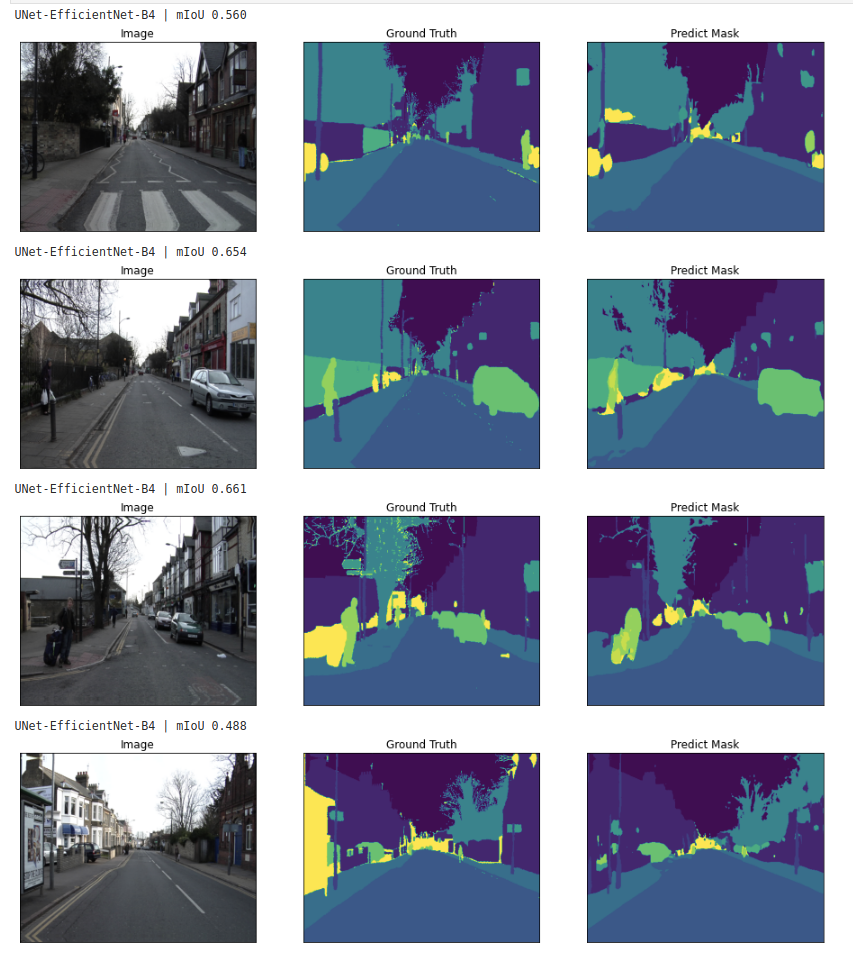
最後に多数の画像とセグメンテーション結果を並べて表示させてみます。
for i in range(4):
    n = np.random.choice(len(test_dataset))

    image2, mask2 = test_dataset[n]

    pred_mask2, score2 = predict_image_mask_miou(model, image2, mask2)

    print('UNet-EfficientNet-B4 | mIoU {:.3f}'.format(score2))

    visualize(
        image=image2,
        ground_truth=mask2,
        predict_mask = pred_mask2,
    )
出力.

結果をみると、それなりにも思えますが、人やポールなど、建物と比べて小さい部分のセグメンテーションがうまくできていないようにも見えます。まだまだ、工夫が必要ですね。
5. まとめ
Pytorchによる車載画像のマルチクラスのセグメンテーションの方法を紹介しました.
学習モデルをイチから作ることで理解が深まり,応用が広がりますが,まずは広く用いられているモデルを参考に簡易に構築できる方法として,Segmentation Modelsを利用しました.このモデルは設定できるパラメータが多いので,実験的にいろいろ試し,理解を深めるのによいツールと思います.
セグメンテーションは多くの応用が可能と思っています。私の関心の一つが変化抽出であり、例えば 以前紹介しました衛星画像のマルチクラスのセグメンテーションにより、建物だけでなく、森、耕作地、道路、河川などを区分し、異なる時期の衛星画像のセグメンテーション結果とを比較することで、それぞれがどのように変換しているのか、知ることができます。例えば、建物状況を知ることができれば、その都市の開発状況がわかりますね。
長文記事を最後までご覧いただきありがとうございました.私はこの分野の専門ではないため,間違って解釈しているところがあるかと思います.ご指摘いただければ幸いです.
また,コメント等ありましたらいただけると嬉しいです.励みになります。
6. 参考記事
衛星画像のSegmentation(セグメンテーション)により建物地図を作成する.
Pytorchによる航空画像の建物セグメンテーションの作成方法.
U-NetでPascal VOC 2012の画像をSemantic Segmentationする (TensorFlow)
Segmentation Models
画像データ拡張ライブラリ ~ albumentations ~
Deep Learning等の精度評価において、F値(Dice)とIoU(Jaccard)のどちらを選択するべきか?
Semantic Segmentation on CamVid
kaggle: Semantic Segmentation is Easy with Pytorch