はじめに
この記事では Ruby on Rails と Vue.js を使って WEB アプリケーションを作成しながら、必要な技術について説明しています。
私自身は Rails を使う機会が多いのですが、Vue.js を勉強する目的で学んだことをまとめたものです。
そのため Rails は既に触ったことがあり、Vue.js を初めて使ってみたいという人に向けて入門となる情報です。
ここで紹介したコードはGitHubに公開しています。
またRuby on Rails, Vue.js によるモダン WEB アプリケーション 実践編 (その1)を執筆しているので、興味がありましたら合わせてご覧ください。
この記事で作成するアプリケーションについて
この記事では以下の環境で動作することを確認しました。
- Ruby on Rails: 5.2.2 (Rails: 6.0.0 でも確認済)
- Ruby: 2.5.3
- Node.js: 8.14.0 (webpackerは 6.44+ が必要)
- npm: 6.4.1
- yarn: 1.12.3
- Vue.js: 2.6.2
Vue.js とは
Vue.js とは Javascript のフレームワークです。
以下の特徴があります。
- 親しみやすい
- HTML, CSS, JavaScript を知っている人は親しみやすい
- 融通が効く
- ライブラリから、完全な機能を備えたフレームワークまでの間でスケールできる
- 徐々に適用できるエコシステム
- 高性能
- 20KB min+gzip コンパクトなランタイム
- 猛烈に速い Virtual DOM
- 最小限の成果で最適化が可能
Ruby on Rails を初期化する(Vue.js 利用)
Rails を初期化する方法は rails new です。
今回は Vue.js を使いたいので --webpack=vue オプションを追加します。
※ Rails 5.1 から Webpacker がサポートされ Rails で Webpack が利用できるようになりました。(参考)
尚、既に作成した Rails で Vue を使いたい場合は ./bin/rails webpacker:install:vue を実行すればよい。
Rails を初めて学ぶ方は、Ruby on Rails 事始め、Ruby on Rails 事始め - その2 も参考にしてみてください。
rails new コマンドを実行すると次のファイルとディレクトリが作成されます。
(開発を進める上で意識する必要があるディレクトリには説明文を載せました)
.
├── Gemfile
├── Gemfile.lock
├── README.md
├── Rakefile
├── app/
│   ├── assets/
│   ├── channels/
│   ├── controllers/       ... MVC の Controller 用のコードを配置するディレクトリ
│   ├── helpers/
│   ├── javascript/        ... Sprocket を使ってコンパイルする Javascript を配置するディレクトリ
│   ├── jobs/
│   ├── mailers/
│   ├── models/            ... MVC の Model 用のコードを配置するディレクトリ
│   └── views/             ... MVC の View 用のコードを配置するディレクトリ
├── bin/
│   ├── bundle             ... bundle コマンド用 stub ファイル
│   ├── rails              ... rails コマンド用 stub ファイル
│   ├── rake
│   ├── setup
│   ├── spring
│   ├── update
│   ├── webpack            ... webpack コマンド用 stub ファイル
│   ├── webpack-dev-server ... webpack-dev-server コマンド用 stub ファイル
│   └── yarn               ... yarn コマンド用 stub ファイル
├── config/
│   ├── application.rb
│   ├── boot.rb
│   ├── cable.yml
│   ├── credentials.yml.enc
│   ├── database.yml
│   ├── environment.rb
│   ├── environments
│   ├── initializers
│   ├── locales/
│   ├── master.key
│   ├── puma.rb
│   ├── routes.rb
│   ├── spring.rb
│   ├── storage.yml
│   ├── webpack/           ... webpacker 用の設定ファイルを配置するディレクトリ
│   └── webpacker.yml      ... webpacker 用の設定ファイル
├── config.ru
├── db/
├── lib/
├── log/
├── node_modules/          ... バンドルする npm パッケージが保存されるディレクトリ
├── package.json
├── public/
├── storage/
├── test/
├── tmp/
├── vendor
├── yarn-error.log         ... yarn コマンド実行時のエラーログが記述されるファイル
└── yarn.lock              ... yarn 用の npm パッケージのバージョンを管理するファイル
Webpacker を使うよう指定して初期化したことで Rails が動作するために必要なファイルやディレクトリに加えて、npm を使うためのファイルやディレクトリが作成されているのが分かると思います。
npm パッケージを管理するためには yarn を使うことになります。
※ パッケージをインストールする方法や削除する方法は yarn の使い方(公式)を参照してください。
アプリケーションの全体像
Vue.js は view に特化したアプリケーションです。
そこで DB の O/R マッピングは Rails で行い、Rails 側に API を用意し、Vue.js からは AJAX を使って API 経由でデータを取得して、ブラウザに表示するようにします。
便宜上、Vue.js で実装する機能を Frontend と呼び、Rails で実装する機能を Backend と呼ぶことにします。
モデルを作成する
まずは Backend 側でモデルを作成していきます。
$ ./bin/rails g model employee name:string department:string gender:integer birth:date joined_date:date payment:bigint note:text
作成したモデルファイルは適宜 default 値や null: false を設定しておきます。
class CreateEmployees < ActiveRecord::Migration[5.2]
  def change
    create_table :employees do |t|
      t.string :name, null: false, default: ""
      t.string :department, null: false, default: ""
      t.integer :gender, null: false, default: 0
      t.date :birth, null: true
      t.date :joined_date, null: true
      t.bigint :payment, null: false, default: 0
      t.text :note, null: false, default: ""

      t.timestamps
      t.integer :lock_version
    end
  end
end
generate が終わったらマイグレーションを行います。
$ ./bin/rails db:create db:migrate
モデルにもバリデーションを追加しておくことにします。
class Employee < ApplicationRecord
  GENDERS = { other: 0, male: 1, female: 2 }

  enum gender: GENDERS

  validates :gender, inclusion: { in: GENDERS.keys.concat(GENDERS.keys.map(&:to_s)) }, exclusion: { in: [nil] }
  validates :name, exclusion: { in: [nil, ""] }
  validates :department, exclusion: { in: [nil] }
  validates :payment, numericality: true, exclusion: { in: [nil] }
  validates :note, exclusion: { in: [nil] }
end
ActiveAdmin を導入する
モデル作成は終わりましたが、都度モデルを作成・編集するときに DB の操作が必要になるのは手間なので、開発がしやすくなるよう ActiveAdmin を導入しておくことにします。
ActiveAdmin を導入すると WEB でモデルを CRUD 操作できるようになり scaffold で用意しなくて済みます。
ActiveAdmin のインストール方法は公式を参照してください。ここでは user 認証無で導入します。(もし認証が必要になったらその時に追加してください)
gem 'activeadmin'
$ rails g active_admin:install --skip-users
終わったらマイグレーションを行います。
$ ./bin/rails db:create db:migrate
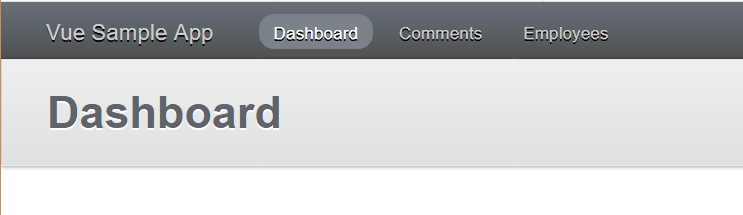
これで http://localhost:3000/admin にアクセスすると ActiveAdmin の Dashboard 画面が表示されます。
Employee モデルを ActiveAdmin を使って編集できるようにするためには次のコマンドを実行します。
$ ./bin/rails generate active_admin:resource Employee
最後に ActiveAdmin 経由で操作を許可する attribute を設定します。
ID や lock_version 等の自動で設定される値以外は全て許可すればよいでしょう。
ActiveAdmin.register Employee do
  permit_params :name, :department, :gender, :birth, :joined_date, :payment, :note
end
API を作成する
API では作成した Employee モデルの一覧と詳細を取得できるようにします。
まずは ActionController::API を継承した ApiController を定義してから Employee モデル用の API Controller を作成することにします。
class ApiController < ActionController::API
end
class Api::V1::EmployeesController < ApiController
  before_action :set_employee, only: [:show]

  # ActiveRecordのレコードが見つからなければ404 not foundを応答する
  rescue_from ActiveRecord::RecordNotFound do |exception|
    render json: { error: '404 not found' }, status: 404
  end

  def index
    employees = Employee.all
    render json: employees
  end

  def show
    render json: @employee
  end

  private

    def set_employee
      @employee = Employee.find(params[:id])
    end
end
これでひとまず API コントローラの設定は終わりです。
最後に API コントローラへのルーティングを追加します。
Rails.application.routes.draw do
    : <snip>
  # APIコントローラへのルーティング
  namespace :api, {format: 'json'} do
    namespace :v1 do
      resources :employees, only: [:index, :show]
    end
  end
end
rails server を立ち上げたら ActiveAdmin で Employee モデルを追加してから http://localhost:3000/api/v1/employees にアクセスして一覧が JSON 形式で取得できること、 http://localhost:3000/api/v1/employees/1 等 Employee モデルの ID を指定すると該当するモデルデータが JSON 形式で表示できることを確認してみてください。
Vue.js で Hello Vue! を表示する
backend 側で TOP ページに Vue.js を表示する
まずは ./bin/rails new 又は ./bin/rails webpacker:install:vue により Vue がインストールされるとデフォルトで追加される hello_vue.js を表示させることにします。
TOP 画面に hello_vue を表示することにします。
具体的には HomeController を追加し、HomeControlelr#index を root にします。
class HomeController < ApplicationController
  def index
  end
end
Rails.application.routes.draw do
  root to: 'home#index'
    : <snip>
end
<%= javascript_pack_tag 'hello_vue' %>
<%= stylesheet_pack_tag 'hello_vue' %>
HomeController と routes の内容は Rails を学んだことがあれば理解できるものだと思います。
ここで、 app/views/home/index.html.erb に書かれた <%= javascript_pack_tag 'hello_vue' %> が Webpacker を使うために必要な設定となります。(※)
javascript_pack_tag により webpacker により生成された javascript が script タグにより読み込まれるようになります。
※ javascript_pack_tag は内部的に javascript_include_tag を呼び出しています。(参考)
※ webpacker は app/javascript/packs/ 配下に設置されたファイルをコンパイルします。(参考)
frontend で Hello Vue! を表示する
frontend となる Vue 側のコードは hello_vue.js, app.vue です。
import Vue from 'vue'
import App from '../app.vue'

document.addEventListener('DOMContentLoaded', () => {
  const el = document.body.appendChild(document.createElement('hello'))
  const app = new Vue({
    el,
    render: h => h(App)
  })

  console.log(app)
})
<template>
  <div id="app">
    <p>{{ message }}</p>
  </div>
</template>

<script>
export default {
  data: function () {
    return {
      message: "Hello Vue!"
    }
  }
}
</script>

<style scoped>
p {
  font-size: 2em;
  text-align: center;
}
</style>
app.vue が Vue.js で記述されたスクリプトファイルです。
ここで書かれた内容が hello_vue.js の new Vue({ el, render: h => h(App) }) によりインスタンス化されて実行されることになります。
app.vue は template, script, style の 3 つのセクションがあります。
template は仮想 DOM を構成する DOM を定義します。
つまりブラウザで表示させる内容です。
script は仮想 DOM に関連する JavaScript を記述します。
詳細は Vue.js の公式を見て頂くことになりますが、 data が仮想 DOM が保持するデータです。
return されるハッシュがそのデータを表し、これにより key である message が Vue.js で利用できるようになります。(関数として定義するのは Vue.js のルールです)
template に書かれた {{ message }} はこのデータを指しています。
style は仮想 DOM に適用するスタイルを css で定義します。
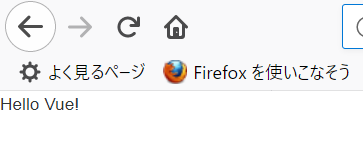
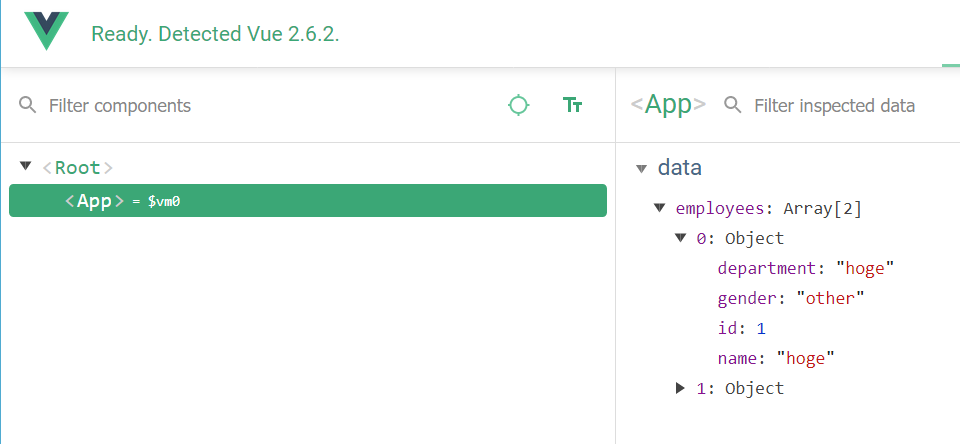
http://localhost:3000/ にアクセスしてみると、次のように Hello Vue! が表示されたことが分かります。
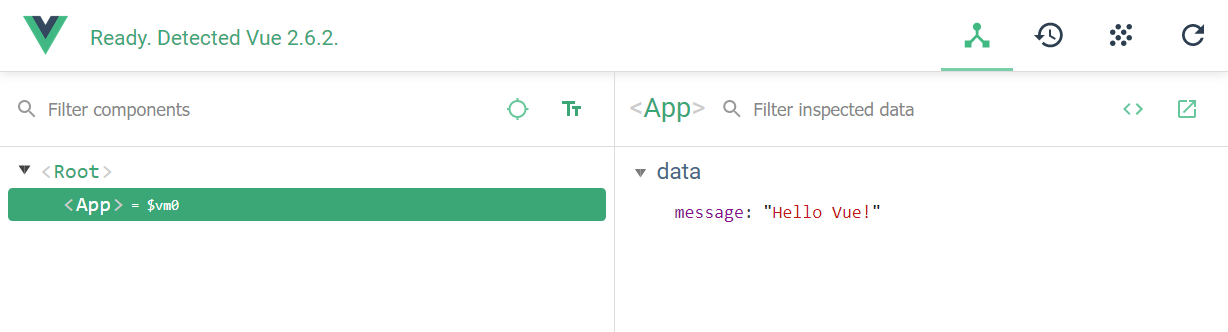
※ FireFox addon - Vue.js devtools
Vue.js でモデルを表示する
frontend と backend を連携させていきます。
Vue.js で API を利用するための方法として、公式ページでも紹介されている axios を使うことにします。(参考)
これを参考にして、先ほど作成した Employee モデルの一覧を取得する API http://localhost:3000/api/v1/employees から一覧を取得し、それを列挙してみることにします。
まずは axios をインストールします。
$ yarn add axios
次に app.vue で axios を使ってモデル一覧を取得するように修正します。
<template>
  <div id="app">
    <table>
      <tbody>
        <tr>
          <th>ID</th>
          <th>name</th>
          <th>birth</th>
          <th>department</th>
          <th>gender</th>
          <th>joined_date</th>
          <th>payment</th>
          <th>note</th>
        </tr>
        <tr v-for="e in employees" :key="e.id">
          <td>{{ e.id }}</td>
          <td>{{ e.name }}</td>
          <td>{{ e.birth }}</td>
          <td>{{ e.department }}</td>
          <td>{{ e.gender }}</td>
          <td>{{ e.joined_date }}</td>
          <td>{{ e.payment }}</td>
          <td>{{ e.note }}</td>
        </tr>
      </tbody>
    </table>
  </div>
</template>

<script>
import axios from 'axios';

export default {
  data: function () {
    return {
      employees: []
    }
  },
  mounted () {
    axios
      .get('/api/v1/employees.json')
      .then(response => (this.employees = response.data))
  }
}
</script>

<style scoped>
p {
  font-size: 2em;
  text-align: center;
}
</style>
script ではまず axios を import しています。これで script 内で axios を使えるようになります。
次に data を見てみると先と同様の書き方で仮想 DOM のデータとして employees が定義されていることが分かります。
初期値として空配列を設定しておき、AJAX を使ってモデル一覧が取得出来たら上書きすることにします。
次に mounted を見てみます。
mounted は Vue.js におけるライフサイクル(参考)において、仮想 DOM が DOM に置き換わるタイミングを指します。
つまりまずは employees が空配列の状態で template を使って生成された DOM が表示されることになります。(table のヘッダ行のみが存在して、内容が空)
このタイミングで API にアクセスしてモデルの取得を試みます。(axios.get('/api/v1/employees.json') の部分)
そして正常に応答が返って来た場合に employees に受け取ったデータを格納します。(.then(response => (this.employees = response.data)) の部分)
※ this は Vue コンポーネントのインスタンスを指します。this.employees により data で定義したデータを読み書き出来ます
※ response.data は JSON 形式の配列データが返る(そのようにAPIを定義したため)ため、配列として管理するための this.employees にそのまま代入しています
最後に template を見てみます。
div, table, tbody, tr, th 等は通常の DOM ですが、v-for と :key や、Hello Vue! と同様に {{ e.name }} のように {{ }} で括られた内容が書かれていることが分かると思います。
v-XXX, :YYY は Vue.js のディレクティブ(参考)です。
例えば v-for ディレクティブは配列を使って DOM 要素を繰り返し表示できるといった機能があります。
また、:YYY は省略記法で v-bind:YYY ディレクティブの場合に使える書き方です。(参考)
:key を v-for と組み合わせることにより、繰り返し作成される各 DOM 要素に一意の ID をつけています。
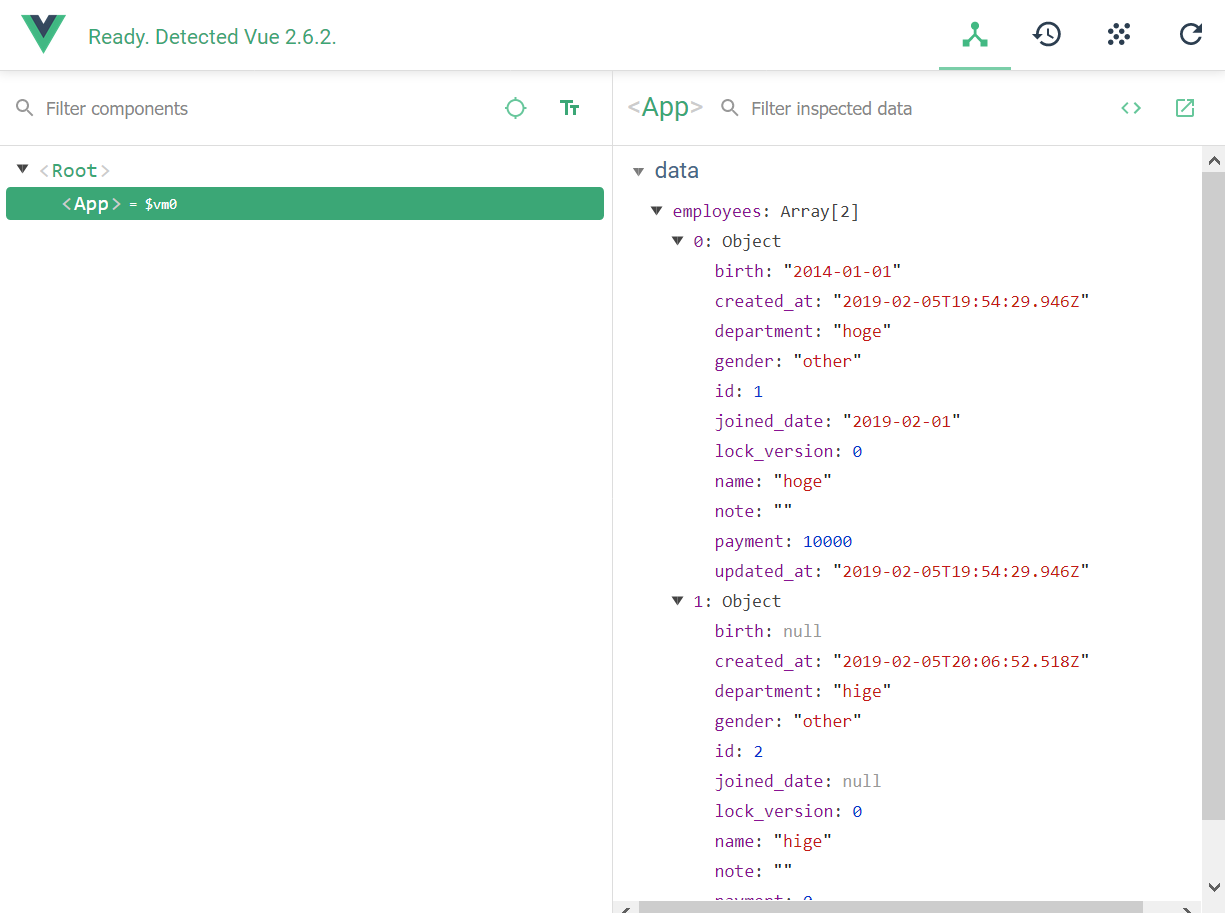
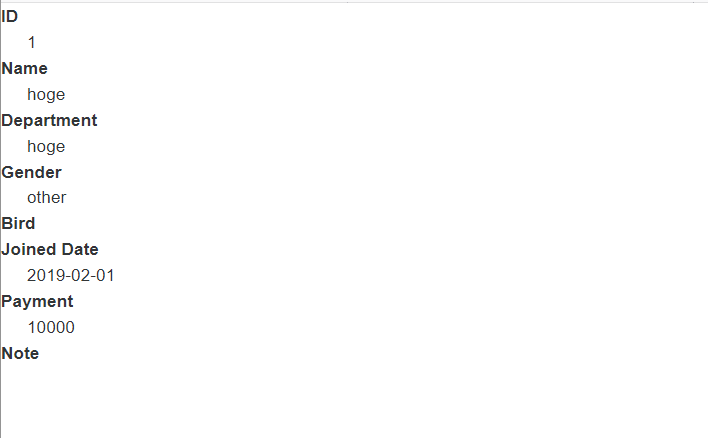
では TOP ページを開いて見ましょう。次の画面のように取得したデータが table 形式で表示できていると思います。

アプリケーションをカスタマイズする
一覧画面でモデルが持つ全ての attributes を表示すると見づらいので、一覧画面は概要表示に留めて詳細を確認したい場合は詳細ページに遷移して、その画面内で全ての attributes を表示するようカスタマイズしていくことにします。
一覧画面では概要のみを表示させるようにする
frontend 側で表示する attributes を制限するには、先ほど作成した template から不要な項目を削除するだけです。
<template>
  <div id="app">
    <table>
      <tbody>
        <tr>
          <th>ID</th>
          <th>name</th>
          <th>department</th>
          <th>gender</th>
        </tr>
        <tr v-for="e in employees" :key="e.id">
          <td>{{ e.id }}</td>
          <td>{{ e.name }}</td>
          <td>{{ e.department }}</td>
          <td>{{ e.gender }}</td>
        </tr>
      </tbody>
    </table>
  </div>
</template>
  : <snip>
次に backend 側で frontend に一覧を返す API を修正して、必要な項目のみ渡すようにします。
class Api::V1::EmployeesController < ApiController
  : <snip>
  def index
    employees = Employee.select(:id, :name, :department, :gender)
    render json: employees
  end
  : <snip>
end
以上で、一覧画面を概要表示にするための修正は終わりです。

ブラウザで表示してみると、上記のように表示されている内容も、モデル一覧のデータ(frontendが受け取る employees の値)も修正されたことが分かると思います。
詳細画面を作成して一覧画面から遷移する
詳細画面を作成していきます。
画面遷移には Vue.js 公式ルータの vue-router (参考)を使うことにしました。
まずは vue-router をインストールします。
$ yarn add vue-router
次にこれまで app.vue に記述していた内容を EmployeeIndexPage.vue にコピーし、app.vue ではルーティング設定を書くことにます。
<template>
  <div id="app">
    <table>
      <tbody>
        <tr>
          <th>ID</th>
          <th>name</th>
          <th>department</th>
          <th>gender</th>
        </tr>
        <tr v-for="e in employees" :key="e.id">
          <td>{{ e.id }}</td>
          <td>{{ e.name }}</td>
          <td>{{ e.department }}</td>
          <td>{{ e.gender }}</td>
        </tr>
      </tbody>
    </table>
  </div>
</template>

<script>
import axios from 'axios';

export default {
  data: function () {
    return {
      employees: []
    }
  },
  mounted () {
    axios
      .get('/api/v1/employees.json')
      .then(response => (this.employees = response.data))
  }
}
</script>

<style scoped>
p {
  font-size: 2em;
  text-align: center;
}
</style>
<template>
  <div>
    <router-view></router-view>
  </div>
</template>

<script>
import Vue from 'vue'
import VueRouter from 'vue-router'

import EmployeeIndexPage from 'EmployeeIndexPage.vue'

const router = new VueRouter({
  routes: [
    { path: '/',
      component: EmployeeIndexPage  }
  ]
})

// ref. https://jp.vuejs.org/v2/guide/plugins.html#%E3%83%97%E3%83%A9%E3%82%B0%E3%82%A4%E3%83%B3%E3%81%AE%E4%BD%BF%E7%94%A8
Vue.use(VueRouter)

export default {
  router
}
</script>

<style scoped>
</style>
vue-router を使うためには Vue component に VueRouter のインスタンスを引数とするコンポーネントを作成します。
また、コンポーネントが表示する内容は router-view に書かれるので template に <router-view></router-view> を記述しておきます。
ルーティング設定は VueRouter をインスタンス化する時の routes 設定に記述し、path, component をそれぞれ設定することになります。
(名前のとおりですが、path はルーティングにマッチする URL のパスを示し、component はそのパスにアクセスした時に利用する Vue コンポーネントを示します)
また、CommonJS 環境では Vue.use を使って VueRouter を指定する必要があるとのことなので設定しておくことを忘れないようにしましょう。(参考)
次に、詳細ページを追加してルーティング設定まで行うことにします。
EmployeeIndexPage と同じ要領です。
<template>
  <dl>
    <dt>ID</dt>
    <dd>{{ employee.id }}</dd>
    <dt>Name</dt>
    <dd>{{ employee.name }}</dd>
    <dt>Department</dt>
    <dd>{{ employee.department }}</dd>
    <dt>Gender</dt>
    <dd>{{ employee.gender }}</dd>
    <dt>Birth</dt>
    <dd>{{ employee.birth }}</dd>
    <dt>Joined Date</dt>
    <dd>{{ employee.joined_date }}</dd>
    <dt>Payment</dt>
    <dd>{{ employee.payment }}</dd>
    <dt>Note</dt>
    <dd>{{ employee.note }}</dd>
  </dl>
</template>

<script>
import axios from 'axios';

export default {
  data: function () {
    return {
      employee: {}
    }
  },
  mounted () {
    axios
      .get(`/api/v1/employees/${this.$route.params.id}.json`)
      .then(response => (this.employee = response.data))
  }
}
</script>

<style scoped>
</style>
<template>
  <div>
    <router-view></router-view>
  </div>
</template>

<script>
import Vue from 'vue'
import VueRouter from 'vue-router'

import EmployeeIndexPage from 'EmployeeIndexPage.vue'
import EmployeeDetailPage from 'EmployeeDetailPage.vue'

const router = new VueRouter({
  routes: [
    { path: '/',
      component: EmployeeIndexPage  },
    { path: '/employees/:id(\\d+)',  // :id は数値のみに制限する
      component: EmployeeDetailPage  }
  ]
})

// ref. https://jp.vuejs.org/v2/guide/plugins.html#%E3%83%97%E3%83%A9%E3%82%B0%E3%82%A4%E3%83%B3%E3%81%AE%E4%BD%BF%E7%94%A8
Vue.use(VueRouter)

export default {
  router
}
</script>

<style scoped>
</style>
EmployeeDetailPage.vue に書かれた this.$route.params.id は /employees/:id における :id として設定された値を参照しています。(例: /employees/1 の場合は this.$route.params.id が 1 になる)
http://localhost:3000/#/ と http://localhost:3000/#/employees/1 にそれぞれアクセスしてみてください。一覧ページがこれまで通り表示され、詳細ページが表示できるようになっていることが確認できると思います。(/#/ って何だ?と思った方は調べてみて下さい)
最後に一覧ページから詳細ページへ遷移するリンクを追加します。
<script>
  : <snip>
const router = new VueRouter({
  routes: [
    { path: '/',
      component: EmployeeIndexPage  },
    { path: '/employees/:id(\\d+)',
      name: 'EmployeeDetailPage',  // ルートに名前を付けている ref. https://router.vuejs.org/ja/guide/essentials/named-routes.html#%E5%90%8D%E5%89%8D%E4%BB%98%E3%81%8D%E3%83%AB%E3%83%BC%E3%83%88
      component: EmployeeDetailPage  }
  ]
})
  : <snip>
</script>
<template>
  <table>
    <tbody>
      <tr>
        <th>ID</th>
        <th>name</th>
        <th>department</th>
        <th>gender</th>
      </tr>
      <tr v-for="e in employees" :key="e.id">
        <td><router-link :to="{ name: 'EmployeeDetailPage', params: { id: e.id } }">{{ e.id }}</router-link></td>
        <td>{{ e.name }}</td>
        <td>{{ e.department }}</td>
        <td>{{ e.gender }}</td>
      </tr>
    </tbody>
  </table>
</template>
  : <snip>
<router-link> によりルータを使って遷移できるリンクを作成できます。
to オプションで遷移先を指定するのですが、パラメータを渡したい時などは上記のように、ルートに名前を付けてパラメータを渡すようにします。
ブラウザで表示させてみると、一覧画面の ID にリンクが付いており、クリックすると詳細ページに遷移できることが確認できると思います。
モデルの新規作成が出来るようにする
frontend にモデルの新規作成画面を作成する
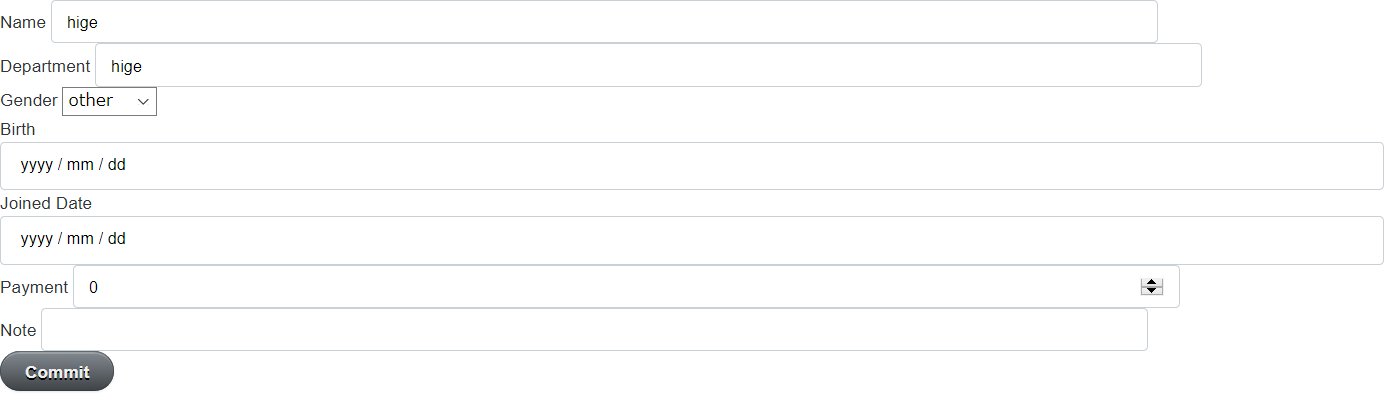
まずはモデルを新規作成する画面を作っていきます。

画面は上記のようにフォームと Commit ボタンがあるのみです。
Commit ボタンが押されたらモデルの登録を行い、作成したモデルの詳細画面に遷移するようにしてみます。
作り方としてはこれまでと同様にモデルの新規作成画面用の .vue ファイルを作成して、app.vue に routing 情報を追加することになります。
<template>
  <form @submit.prevent="createEmployee">
    <div v-if="errors.length != 0">
      <ul v-for="e in errors" :key="e">
        <li><font color="red">{{ e }}</font></li>
      </ul>
    </div>
    <div>
      <label>Name</label>
      <input v-model="employee.name" type="text">
    </div>
    <div>
      <label>Department</label>
      <input v-model="employee.department" type="text">
    </div>
    <div>
      <label>Gender</label>
      <select v-model="employee.gender">
        <option>other</option>
        <option>male</option>
        <option>female</option>
      </select>
    </div>
    <div>
      <label>Birth</label>
      <input v-model="employee.birth" type="date">
    </div>
    <div>
      <label>Joined Date</label>
      <input v-model="employee.joined_date" type="date">
    </div>
    <div>
      <label>Payment</label>
      <input v-model="employee.payment" type="number" min="0">
    </div>
    <div>
      <label>Note</label>
      <input v-model="employee.note" type="text">
    </div>
    <button type="submit">Commit</button>
  </form>
</template>

<script>
import axios from 'axios';

export default {
  data: function () {
    return {
      employee: {
        name: '',
        department: '',
        gender: '',
        birth: '',
        joined_date: '',
        payment: '',
        note: ''
      },
      errors: ''
    }
  },
  methods: {
    createEmployee: function() {
      axios
        .post('/api/v1/employees', this.employee)
        .then(response => {
          let e = response.data;
          this.$router.push({ name: 'EmployeeDetailPage', params: { id: e.id } });
        })
        .catch(error => {
          console.error(error);
          if (error.response.data && error.response.data.errors) {
            this.errors = error.response.data.errors;
          }
        });
    }
  }
}
</script>

<style scoped>
</style>
  : <snip>
<script>
import Vue from 'vue'
import VueRouter from 'vue-router'

import EmployeeIndexPage from 'EmployeeIndexPage.vue'
import EmployeeDetailPage from 'EmployeeDetailPage.vue'
import EmployeeNewPage from 'EmployeeNewPage.vue'

const router = new VueRouter({
  routes: [
    { path: '/',
      component: EmployeeIndexPage  },
    { path: '/employees/:id(\\d+)',  // :idは数値のみに制限する
      name: 'EmployeeDetailPage',
      component: EmployeeDetailPage },
    { path: '/employees/new',
      name: 'EmployeeNewPage',
      component: EmployeeNewPage    }
  ]
})
  : <snip>
</script>
  : <snip>
ルーティングの設定は詳細画面を作成した時と同様です。
EmployeeNewPage.vue では template は form で構成されています。
form の attributes に @submit.prevent とありますが、 @submit には form の submit イベントが発行されたときのイベントハンドラを処理するためのメソッドを設定します。
.prevent と続いていることで、通常の submit で処理されるページリロードを行わないようにします。これは event.preventDefault() と同じ効果です。(参考)
form 内の要素は大半が input や select 等の入力フォームで、一番上にエラーメッセージを表示するための次の要素が設定されています。
  : <snip>
    <div v-if="errors.length != 0">
      <ul v-for="e in errors" :key="e">
        <li><font color="red">{{ e }}</font></li>
      </ul>
    </div>
  : <snip>
ここでは Vue コンポーネントの errors データに要素が格納されている場合にそれらをリストアップしています。
そして、input や select 等の入力フォームでは v-model を指定しています。
これにより Vue コンポーネントのデータとフォームデータとの双方向データバインディングが行われます。例えば name に値を入力すると this.employee.name にその値が格納され、this.employee.name に値を入力すると name 用の input フォームにその値が表示されるといった具合です。
最後に、submit ボタンが押されたときの処理として定義した createEmployee メソッドについて説明しますが、axios を使って AJAX 処理を行っている点はこれまでと同様です。ただ HTTP のリクエストメソッドが GET ではなく POST になっているだけです。
モデル作成用の API(まだ作成していない) にデータを送信し、失敗したら this.errors にエラー内容を格納するようにしています。(ここで this.errors に値が格納されたら、先に紹介した template のエラー表示部にエラーメッセージが表示されることになります)
そして、モデル作成が成功したら詳細画面に遷移します。
詳細画面に遷移する処理は this.$router.push({ name: 'EmployeeDetailPage', params: { id: e.id } }); で行っています。
template で遷移先を定義する際は <router-link :to="..."> でしたが、プログラム的に行う場合は router.push(location, onComplete?, onAbort?) を使います。
これにより router の history スタックに新しいエントリが追加されます。(参考)
以上で新規作成画面は終わりです。
backend に新規作成用 API を作成する
ルーティングに create アクションを追加し、コントローラにアクションを処理するメソッドを追加することになります。(コントローラでは作成時に意図しないエラーが発生した時用に rescue_from の処理を追加しています)
Rails.application.routes.draw do
    : <snip>
  namespace :api, {format: 'json'} do
    namespace :v1 do
      resources :employees, only: [:index, :show, :create]
    end
  end
end
class Api::V1::EmployeesController < ApiController
  before_action :set_employee, only: [:show]

  # 拾えなかったExceptionが発生したら500 Internal server errorを応答する
  rescue_from Exception, with: :render_status_500

  # ActiveRecordのレコードが見つからなければ404 not foundを応答する
  rescue_from ActiveRecord::RecordNotFound, with: :render_status_404

  def index
    employees = Employee.select(:id, :name, :department, :gender)
    render json: employees
  end

  def show
    render json: @employee
  end

  def create
    employee = Employee.new(employee_params)
    if employee.save
      render json: employee, status: :created
    else
      render json: { errors: employee.errors.full_messages }, status: :unprocessable_entity
    end
  end

  private

    def set_employee
      @employee = Employee.find(params[:id])
    end

    def employee_params
      params.fetch(:employee, {}).permit(:name, :department, :gender, :birth, :joined_date, :payment, :note)
    end

    def render_status_404(exception)
      render json: { errors: [exception] }, status: 404
    end

    def render_status_500(exception)
      render json: { errors: [exception] }, status: 500
    end
end
以上でモデル作成用 API の作成は終わりです。
動作確認
frontend と backend が正常に動作するか見てみましょう。
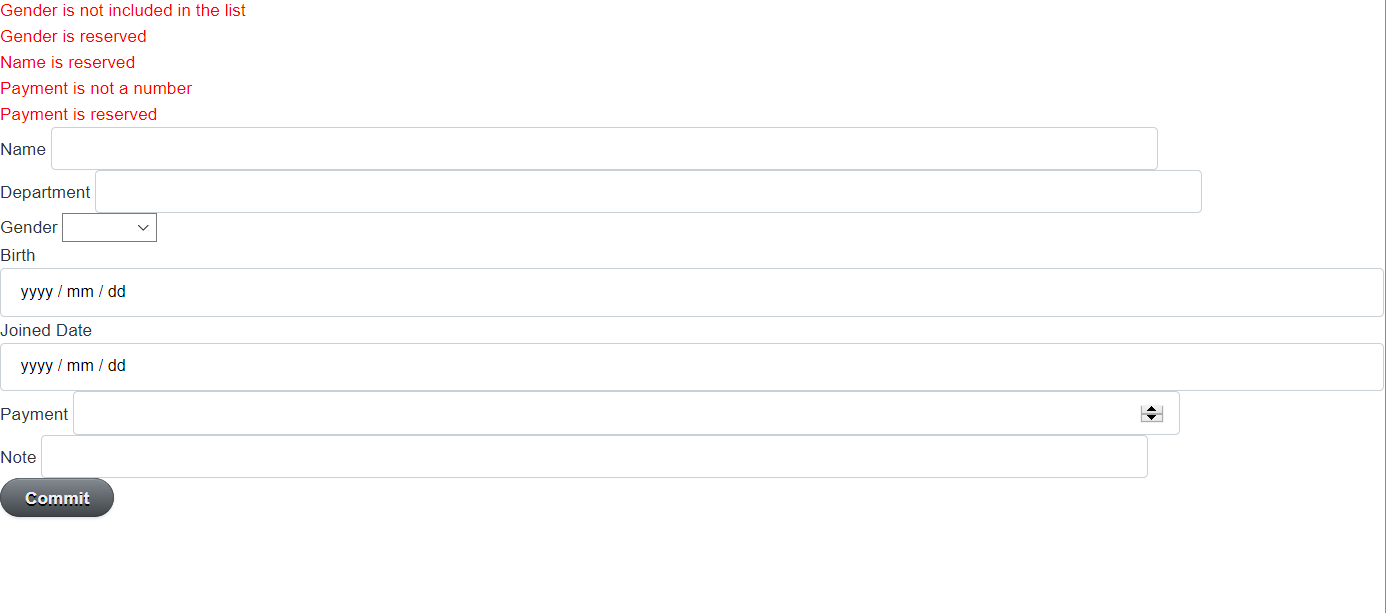
http://localhost:3000/#/employees/new にアクセスすると次のようなフォームが表示されると思います。
入力値が不十分な状態で Commit ボタンを押すと上部にエラーメッセージが表示されること、必要な情報を入力してから Commit ボタンを押すとモデルが作成されてそのモデルの詳細画面に遷移することを確認してみて下さい。
モデルの編集が出来るようにする
モデルの編集画面を作成していくことにします。
やることはモデルの新規作成とほぼ同じです。必要となる画面がほぼ同じなのでまずは新規作成画面の form 部分をコンポーネントとして新規作成画面から分離して編集画面でも再利用できるようにしましょう。
新規作成画面の form 部分を再利用可能なコンポーネントとして分離する
<template>
  <form @submit.prevent="$emit('submit')">
    <div v-if="errors.length != 0">
      <ul v-for="e in errors" :key="e">
        <li><font color="red">{{ e }}</font></li>
      </ul>
    </div>
    <div>
      <label>Name</label>
      <input v-model="employee.name" type="text">
    </div>
    <div>
      <label>Department</label>
      <input v-model="employee.department" type="text">
    </div>
    <div>
      <label>Gender</label>
      <select v-model="employee.gender">
        <option>other</option>
        <option>male</option>
        <option>female</option>
      </select>
    </div>
    <div>
      <label>Birth</label>
      <input v-model="employee.birth" type="date">
    </div>
    <div>
      <label>Joined Date</label>
      <input v-model="employee.joined_date" type="date">
    </div>
    <div>
      <label>Payment</label>
      <input v-model="employee.payment" type="number" min="0">
    </div>
    <div>
      <label>Note</label>
      <input v-model="employee.note" type="text">
    </div>
    <button type="submit">Commit</button>
  </form>
</template>

<script>
export default {
  props: {
    employee: {},
    errors: ''
  }
}
</script>

<style>
</style>
<template>
  <employee-form-pane :errors="errors" :employee="employee" @submit="createEmployee"></employee-form-pane>
</template>

<script>
import axios from 'axios';

import EmployeeFormPane from 'EmployeeFormPane.vue';

export default {
  components: {
    EmployeeFormPane
  },
  data() {
    return {
      employee: {
        name: '',
        department: '',
        gender: '',
        birth: '',
        joined_date: '',
        payment: '',
        note: ''
      },
      errors: ''
    }
  },
  methods: {
    createEmployee: function() {
      axios
        .post('/api/v1/employees', this.employee)
        .then(response => {
          let e = response.data;
          this.$router.push({ name: 'EmployeeDetailPage', params: { id: e.id } });
        })
        .catch(error => {
          console.error(error);
          if (error.response.data && error.response.data.errors) {
            this.errors = error.response.data.errors;
          }
        });
    }
  }
}
</script>

<style scoped>
</style>
コンポーネントとして再利用するためにまず form 部分を vue ファイルとして分離します。
分離するにあたって変更した点は次のとおりです。
EmployeeFormPane 側の変更点
- form の attributes の
@submit.prevent="createEmployee"が@submit.prevent="$emit('submit')"へと変更された - Vue コンポーネントの data がなくなり、代わりに props へと変更された
EmployeeNewPage 側の変更点
-
<template>に記述していた form がなくなり、代わりに<employee-form-pane></employee-form-pane>へと変更された -
<script>にimport EmployeeFormPane from 'EmployeeFormPane.vue';とcomponents: { EmployeeFormPane },が追加された
EmployeeFormPane 側の $emit('submit') では submit イベントを発行しています。これにより親コンポーネント側で submit イベントを処理することが出来ます。EmployeeNewPage 側の <employee-form-pane @submit="createEmployee"></employee-form-pane> は submit イベントを受け取って createEmployee メソッドを実行することを指しています。
また、form の初期値であり、かつ入力された値を格納する employee と、登録時のエラーを表示する errors は EmployeeFormPane 側で親から受け取れるように props で指定しています。props では親コンポーネントから受け取れる値を設定します。EmployeeNewPage 側の <employee-form-pane :errors="errors" :employee="employee"></employee-form-pane> は自身のデータ errors と employee を同名の props として子コンポーネントに渡しています。
編集画面を作成する
編集画面は詳細画面と新規作成画面の両方を合わせたような内容になります。
コンポーネントの初期化時に AJAX でコンポーネントのデータを API 経由で取得し、その値を初期値として form を表示するといった内容になります。
ルーティング設定も忘れずに行いましょう。
<template>
  <employee-form-pane :errors="errors" :employee="employee" @submit="updateEmployee"></employee-form-pane>
</template>

<script>
import axios from 'axios';

import EmployeeFormPane from 'EmployeeFormPane.vue';

export default {
  components: {
    EmployeeFormPane
  },
  data() {
    return {
      employee: {},
      errors: ''
    }
  },
  mounted () {
    axios
      .get(`/api/v1/employees/${this.$route.params.id}.json`)
      .then(response => (this.employee = response.data))
  },
  methods: {
    updateEmployee: function() {
      axios
        .patch(`/api/v1/employees/${this.employee.id}`, this.employee)
        .then(response => {
          this.$router.push({ name: 'EmployeeDetailPage', params: { id: this.employee.id } });
        })
        .catch(error => {
          console.error(error);
          if (error.response.data && error.response.data.errors) {
            this.errors = error.response.data.errors;
          }
        });
    }
  }
}
</script>

<style scoped>
</style>
  : <snip>
<script>
import Vue from 'vue'
import VueRouter from 'vue-router'

import EmployeeIndexPage from 'EmployeeIndexPage.vue'
import EmployeeDetailPage from 'EmployeeDetailPage.vue'
import EmployeeNewPage from 'EmployeeNewPage.vue'
import EmployeeEditPage from 'EmployeeEditPage.vue'

const router = new VueRouter({
  routes: [
    { path: '/',
      component: EmployeeIndexPage  },
    { path: '/employees/:id(\\d+)',  // :idは数値のみに制限する
      name: 'EmployeeDetailPage',
      component: EmployeeDetailPage },
    { path: '/employees/new',
      name: 'EmployeeNewPage',
      component: EmployeeNewPage    },
    { path: '/employees/:id(\\d+)/edit',
      name: 'EmployeeEditPage',
      component: EmployeeEditPage   }
  ]
})
  : <snip>
</script>

<style scoped>
</style>
backend 側にモデル更新用 API を作成する
ルーティングに create アクションを追加し、コントローラにアクションを処理するメソッドを追加する流れは新規作成用 API の時と同じです。
Rails.application.routes.draw do
  : <snip>
  namespace :api, {format: 'json'} do
    namespace :v1 do
      resources :employees, only: [:index, :show, :create, :update]
    end
  end
end
class Api::V1::EmployeesController < ApiController
  before_action :set_employee, only: [:show, :update]
  : <snip>
  def update
    if @employee.update_attributes(employee_params)
      head :no_content
    else
      render json: { errors: @employee.errors.full_messages }, status: :unprocessable_entity
    end
  end

  private
    def set_employee
      @employee = Employee.find(params[:id])
    end
  : <snip>
end
動作確認
frontend と backend が正常に動作するか見てみましょう。
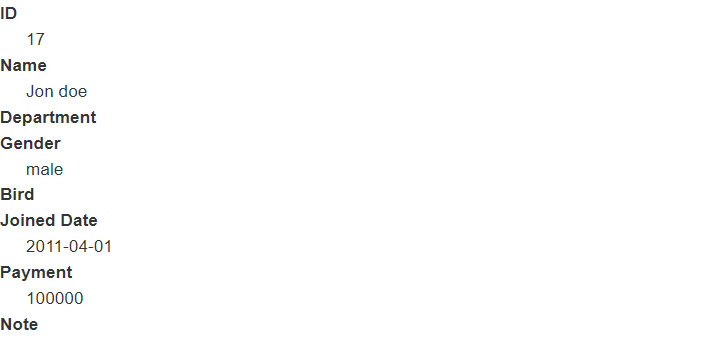
http://localhost:3000/#/employees/1/edit にアクセスすると次のようなフォームが表示されると思います。
無効な値や入力が必要な項目を空にして Commit ボタンを押すとエラーが表示されること、正しく入力すると値が更新された状態で詳細画面に遷移することを確認しましょう。
モデルを削除できるようにする
最後にモデルを削除できるようにします。
frontend 側では新しい画面は用意せずにボタンを押したら削除できるようにします。
backend 側にモデル削除用 API を作成する
Rails.application.routes.draw do
  : <snip>
  namespace :api, {format: 'json'} do
    namespace :v1 do
      resources :employees, only: [:index, :show, :create, :update, :destroy]
    end
  end
end
class Api::V1::EmployeesController < ApiController
  before_action :set_employee, only: [:show, :update, :destroy]
  : <snip>
  def destroy
    @employee.destroy!
    head :no_content
  end

  private
    def set_employee
      @employee = Employee.find(params[:id])
    end
  : <snip>
end
update アクションと同様に作成しました。
@employee.destroy! では destroy! メソッドを使うことで削除に失敗した場合に Exception を発生させて、rescue_from Exception で拾うようにしています。
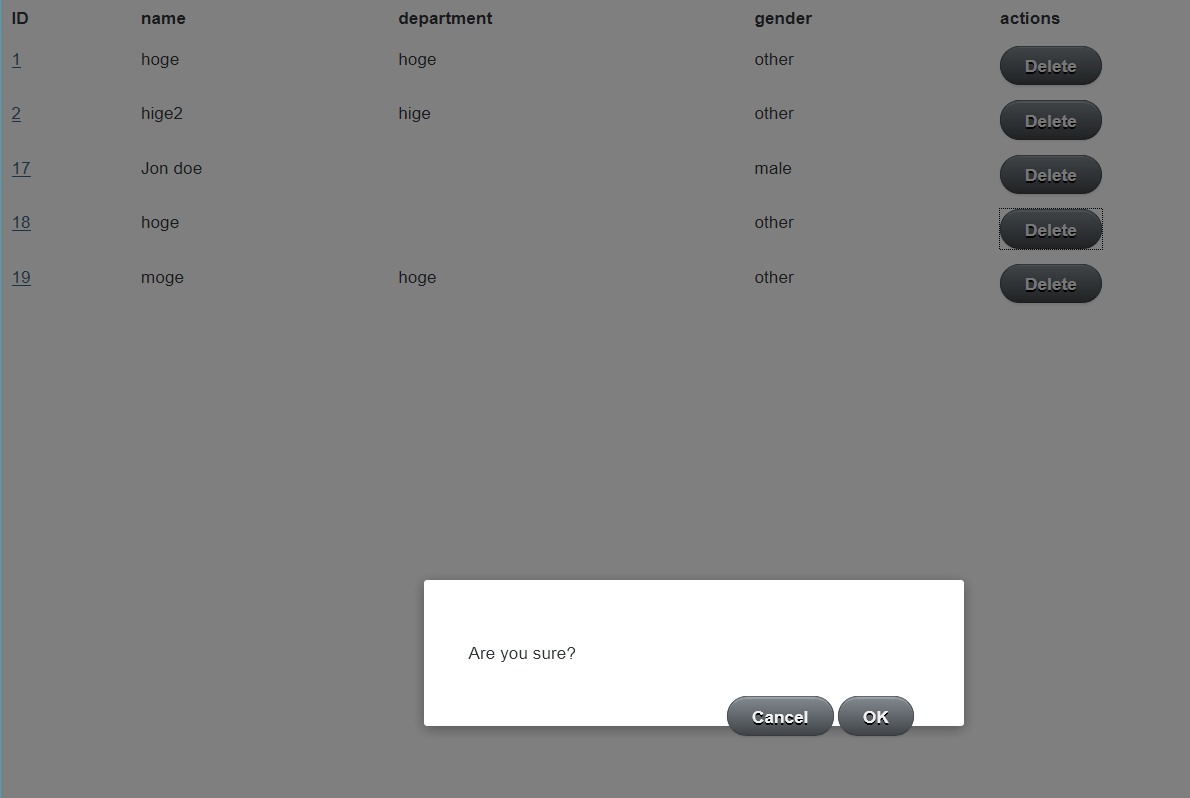
続いて削除ボタンを用意します。
ここで、削除操作を行う場合は誤ってボタンを押してしまった場合に備えて確認モーダルを用意することにしましょう。
そこでまずは確認モーダルを作成することにします。
Vue 公式の sampleを参考にしました。
<template>
  <transition name="modal">
    <div class="modal-mask">
      <div class="modal-wrapper">
        <div class="modal-container">

          <div class="modal-header">
            <slot name="header">
            </slot>
          </div>

          <div class="modal-body">
            <slot name="body">
            </slot>
          </div>

          <div class="modal-footer">
            <slot name="footer">
              <button class="modal-default-button" @click="$emit('ok')">
                OK
              </button>
              <button class="modal-default-button" @click="$emit('cancel')">
                Cancel
              </button>
            </slot>
          </div>
        </div>
      </div>
    </div>
  </transition>
</template>

<script>
export default {
}
</script>

<style scoped>
.modal-mask {
  position: fixed;
  z-index: 9998;
  top: 0;
  left: 0;
  width: 100%;
  height: 100%;
  background-color: rgba(0, 0, 0, .5);
  display: table;
  transition: opacity .3s ease;
}

.modal-wrapper {
  display: table-cell;
  vertical-align: middle;
}

.modal-container {
  width: 300px;
  margin: 0px auto;
  padding: 20px 30px;
  background-color: #fff;
  border-radius: 2px;
  box-shadow: 0 2px 8px rgba(0, 0, 0, .33);
  transition: all .3s ease;
  font-family: Helvetica, Arial, sans-serif;
}

.modal-header h3 {
  margin-top: 0;
  color: #42b983;
}

.modal-body {
  margin: 20px 0;
}

.modal-default-button {
  float: right;
}

/*
 * The following styles are auto-applied to elements with
 * transition="modal" when their visibility is toggled
 * by Vue.js.
 *
 * You can easily play with the modal transition by editing
 * these styles.
 */

.modal-enter {
  opacity: 0;
}

.modal-leave-active {
  opacity: 0;
}

.modal-enter .modal-container,
.modal-leave-active .modal-container {
  -webkit-transform: scale(1.1);
  transform: scale(1.1);
}
</style>
次に削除ボタンと作成したモーダルを一覧画面に表示させてみます。
<template>
  <div>
    <div v-if="errors.length != 0">
      <ul v-for="e in errors" :key="e">
        <li><font color="red">{{ e }}</font></li>
      </ul>
    </div>
    <table>
      <tbody>
        <tr>
          <th>ID</th>
          <th>name</th>
          <th>department</th>
          <th>gender</th>
          <th>actions</th>
        </tr>
        <tr v-for="e in employees" :key="e.id">
          <td><router-link :to="{ name: 'EmployeeDetailPage', params: { id: e.id } }">{{ e.id }}</router-link></td>
          <td>{{ e.name }}</td>
          <td>{{ e.department }}</td>
          <td>{{ e.gender }}</td>
          <td>
            <button @click="deleteTarget = e.id; showModal = true">Delete</button>
          </td>
        </tr>
      </tbody>
    </table>
    <modal v-if="showModal" @cancel="showModal = false" @ok="deleteEmployee(); showModal = false;">
      <div slot="body">Are you sure?</div>
    </modal>
  </div>
</template>

<script>
import axios from 'axios';

import Modal from 'Modal.vue'

export default {
  components: {
    Modal
  },
  data: function () {
    return {
      employees: [],
      showModal: false,
      deleteTarget: -1,
      errors: ''
    }
  },
  mounted () {
    this.updateEmployees();
  },
  methods: {
    deleteEmployee: function() {
      if (this.deleteTarget <= 0) {
        console.warn('deleteTarget should be grater than zero.');
        return;
      }

      axios
        .delete(`/api/v1/employees/${this.deleteTarget}`)
        .then(response => {
          this.deleteTarget = -1;
          this.updateEmployees();
        })
        .catch(error => {
          console.error(error);
          if (error.response.data && error.response.data.errors) {
            this.errors = error.response.data.errors;
          }
        });
    },
    updateEmployees: function() {
      axios
        .get('/api/v1/employees.json')
        .then(response => (this.employees = response.data))
    }
  }
}
</script>

<style scoped>
p {
  font-size: 2em;
  text-align: center;
}
</style>
基本的には子コンポーネントを利用する方法でモーダルを利用することが出来ます。(v-ifは値がfalseの場合にはコンポーネントを非表示にし、trueの場合には表示するためのディレクティブです)
    <modal v-if="showModal" @cancel="showModal = false" @ok="deleteEmployee(); showModal = false;">
      <div slot="body">Are you sure?</div>
    </modal>
上記に書かれた通り、モーダルを呼び出す部分で slot という属性が出てきました。
スロットとは <modal></modal> に含まれる DOM を Modal コンポーネントの template で <slot> として参照できるようにする機能で、<div slot="body"></div> のように記述すると <slot name="body"> のように名前付きで呼び出すことが出来るようになります。
これによりモーダルの中身を呼び出し側で調整できるようになります。(参考)
動作確認
http://localhost:3000/ を表示すると Delete ボタンがモデルが表示された行ごとに表示されていること、ボタンを押すとモーダル画面が表示されて Are you sure? と表示されること、Cancel を押すとモーダルが閉じること、OK を押すとモデルが削除されることを確認してみて下さい。
※ ActiveAdmin を導入したことでスタイルがずれていますが、気になる方は上書きされないように設定してみて下さい。(参考)
最後に
backend に Ruby on Rails を使い、frontend に Vue.js を使って WEB アプリケーションを作りながら必要となる情報について紹介しました。
スタイルは全く考慮していないので気になる方は Ruby on Rails, Vue.js で始めるモダン WEB アプリケーション入門(bootstrap編) を参照してみて下さい。
おまけ
応用編
Runtime build を有効にする
config/webpack/environment.js に alias をつける。
const { environment } = require('@rails/webpacker')
  : <snip>
const config = environment.toWebpackConfig()

config.resolve.alias = {
  // Vue の runtime build を有効にする
  'vue$': 'vue/dist/vue.esm.js'
}

environment.loaders.append('vue', vue)
module.exports = environment
イベントバス
子孫関係のコンポーネント間でイベントの通知と受け取りを行いたい場合、親→子→孫へとイベントの受け取りと通知処理を記述してもよいが、イベントを仲介する役割を持つ Vue コンポーネント(イベントバス)を利用するのが公式で推奨されている。(参考)
尚、$emit を使っても、呼び出した関数の戻り値を呼び出し元が受け取ることは出来ない。(参考)
Rails6
Rails5.2 と同様に rails new . --webpacker=vue で初期化します。
既に初期化されている場合は rails webpacker:install:vue を実行します。
すると次のファイルが作成されます。
.
├── Gemfile
├── Gemfile.lock
├── README.md
├── Rakefile
├── app
│   ├── assets/
│   ├── channels/
│   ├── controllers/
│   ├── helpers/
│   ├── javascript/
│   ├── jobs/
│   ├── mailers/
│   ├── models/
│   └── views/
├── babel.config.js  ... (Rails6から登場) babel の設定ファイル
├── bin/
│   ├── bundle
│   ├── rails
│   ├── rake
│   ├── setup
│   ├── spring
│   ├── (update)     ... (Rails6にはない)
│   ├── webpack
│   ├── webpack-dev-server
│   └── yarn
├── config/
│   ├── application.rb
│   ├── boot.rb
│   ├── cable.yml
│   ├── credentials.yml.enc
│   ├── database.yml
│   ├── environment.rb
│   ├── environments
│   ├── initializers
│   ├── locales/
│   ├── master.key
│   ├── puma.rb
│   ├── routes.rb
│   ├── spring.rb
│   ├── storage.yml
│   ├── webpack/
│   └── webpacker.yml
├── config.ru
├── db/
├── lib/
├── log/
├── node_modules/
├── package.json
├── postcss.config.js ... (Rails6から登場) Webpack の postcss-loader 用設定ファイル
├── public/
├── storage/
├── test/
├── tmp/
├── vendor
└── yarn.lock
尚、Rails6 はリリースされたものの JavaScript の @rails/* はまだ alpha バージョンのようです。('19/08/20時点)
{
  "name": "rails6_0_sample_app",
  "private": true,
  "dependencies": {
    "@rails/ujs": "^6.0.0-alpha",
    "turbolinks": "^5.2.0",
    "@rails/activestorage": "^6.0.0-alpha",
    "@rails/actioncable": "^6.0.0-alpha"
  },
  "version": "0.1.0"
}
お約束の Rails 起動画面を見てみます。ちゃんと Rails 6.0.0 になってます。
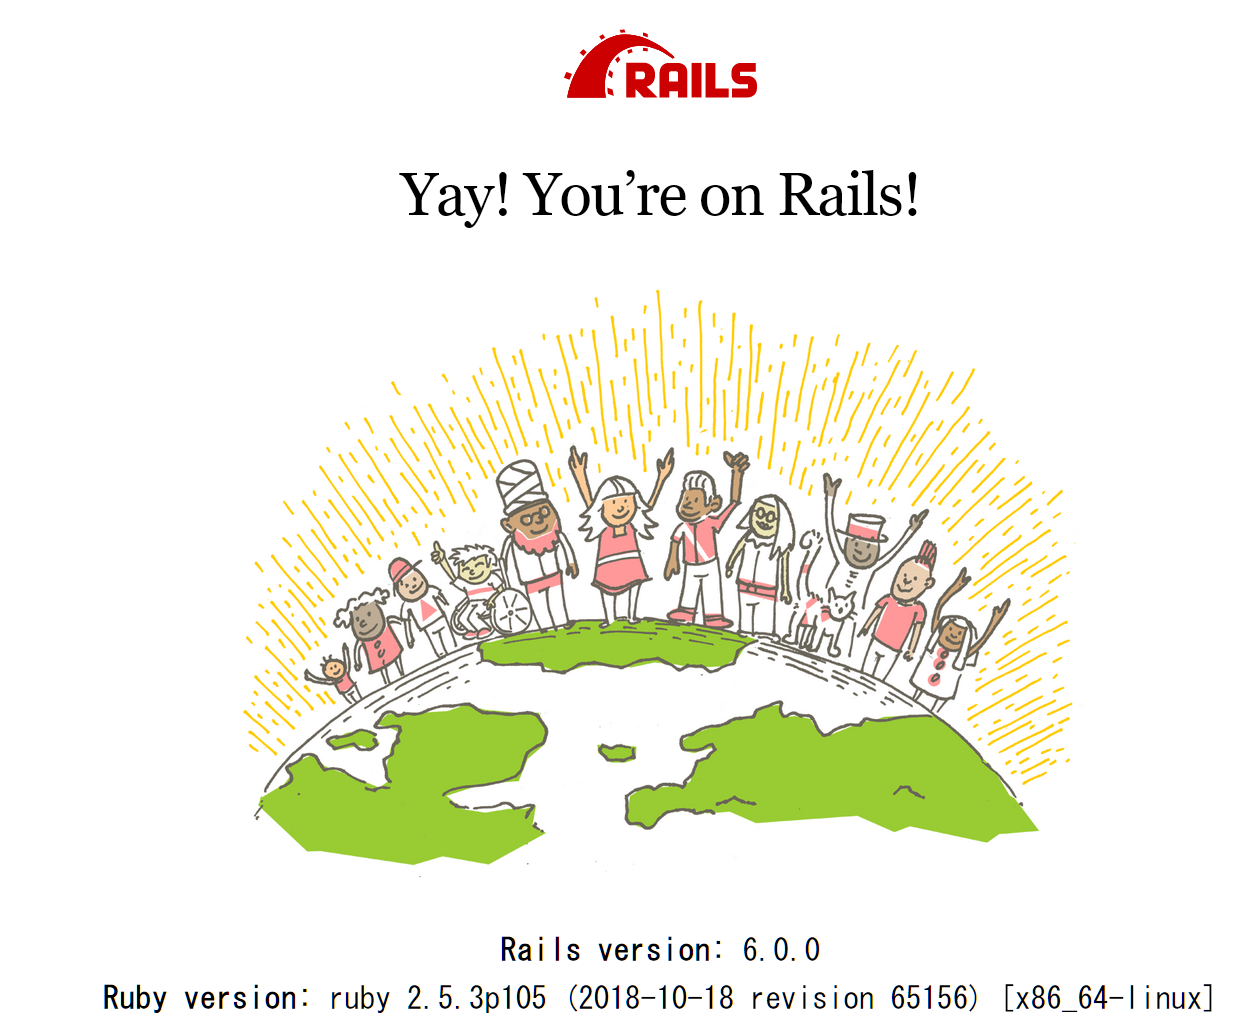
Rails6 でも本記事に記載した内容が動作することを確認できました。
(2021/02/17追記)
@raitehu さんより、update_attribute メソッドが Rails 6では非推奨 -> Rails 6.1では削除となっていると情報頂きました。参考)(記事内の該当箇所)
情報いただきましてありがとうございます。m(_ _)m(
Rails 6を使用する場合は update メソッドを使ってください。