はじめに
この記事はRuby on Railsでアップロードした画像をhotwire/stimulusを使って画像プレビューを表示させるやり方をまとめています。
Active Storageを使用した画像アップロード機能を実装済みであり、問題なく画像をアップロードできる状態前提で書いていますのでご了承ください。
実装したプレビューは画像一枚のみ表示です。
環境
Rails 7.2.2.2
Ruby 3.3.6
stimulus-rails 1.3.4
Docker環境
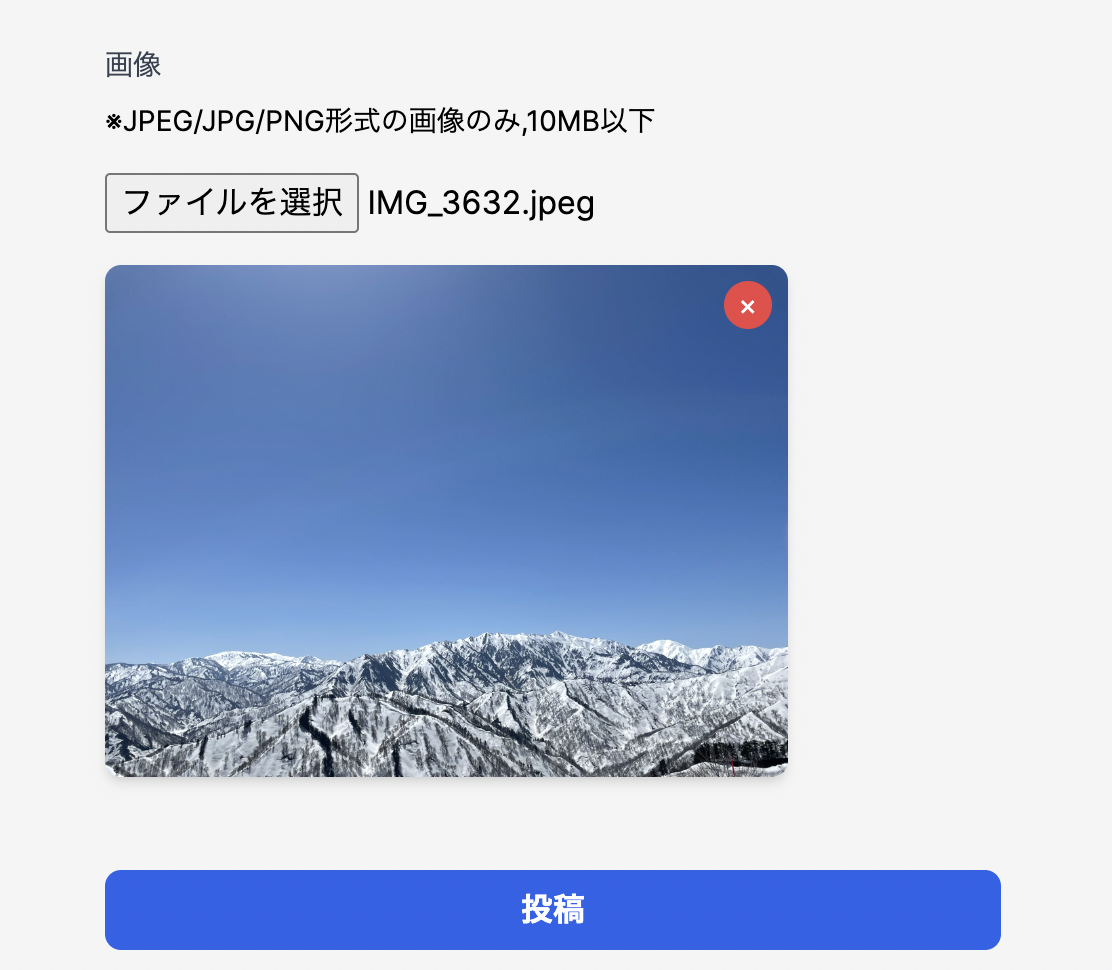
完成品
hotwire/stimulusの事前確認
ディレクトリはこのようになっています。
app/javascript/
├─ application.js
└─ controllers/
├─ index.js ← Stimulusのエントリーファイル
└─ preview_controller.js ← プレビューコントローラ
app/javascript/application.js
import "@hotwired/turbo-rails"
import "./controllers"
import "../assets/stylesheets/application.tailwind.css"
このファイルはすでにデフォルトでこのように記載されていると思います。
controllersディレクトリを読み込む設定import "./controllers"があるか確認してください。
preview_controller.jsファイル生成、プレビュー機能実装
rails generate stimulus previews
app/javascript/controllers/previews_controller.jsが生成されます。
app/javascript/controllers/index.jsには
import { application } from "./application"
// 下二行が追加
import PreviewsController from "./previews_controller"
application.register("previews", PreviewsController)
同じディレクトリにあるpreviews_contorollerを読み込む設定が追記されると思います。
app/javascript/controllers/previews_controller.js
import { Controller } from "@hotwired/stimulus"

export default class extends Controller {
  // ターゲットの定義
  static targets = ["input", "preview", "image"]
  // デバッグ用のログ出力
  connect() {
    console.log("Preview controller connected")
  }

  preview(event) {
    //選択された最初のファイルを変数fileに格納
    const file = event.target.files[0]
    const maxSizeInBytes = 10 * 1024 * 1024 // 10MB
    const validTypes = ["image/jpeg", "image/jpg", "image/png"]

    // MIMEタイプのチェック
    if (!validTypes.includes(file.type)) {
     // 不正なファイル形式の場合のアラート表示
      alert("JPEG、JPG、PNG形式のファイルを選択してください。")
      this.removeImage()
      return
    }
    // ファイルサイズのチェック
    if (file.size < maxSizeInBytes ) {
      //readerをfilereaderオブジェクトとして定義
      const reader = new FileReader()
      // ファイルをデータURLとして読み込む
      reader.readAsDataURL(file)
      // readerにファイル読み込み完了時の処理を定義
      reader.onload = (e) => {
        // 読み込んだデータをプレビュー画像のsrcに設定,e.targetでイベントを発生させたFilereaderオブジェクトを取得
        this.imageTarget.src = e.target.result
        // プレビューエリアのhiddenクラスを削除して表示
        this.previewTarget.classList.remove("hidden")
      }
    } else {
      // ファイルが大きすぎる場合のアラート表示
      alert("ファイルサイズは10MB以下にしてください。")
      this.removeImage()
    }
  }

  // 画像削除処理
  removeImage() {
    this.inputTarget.value = null
    this.imageTarget.src = null
    this.previewTarget.classList.add("hidden")
  }

  // デバッグ用
  disconnect() {
    this.revokeCurrentObjectURL()
    console.log("Preview controller disconnected")
  }
}
view
app/views/posts/_image_preview.html.erb
<!-- Stimulusコントローラーを適用 -->
<div class="mb-6" data-controller="previews">
  <%= form.label :image, "画像", class: "block text-sm font-medium text-gray-700 mb-2" %>
  <p class="text-sm text-black mb-4">※JPEG/JPG/PNG形式の画像のみ,10MB以下</p>

<!-- 既存の画像があれば表示(編集時のみ) -->
  <% if post.persisted? && post.image.attached? %>
    <div class="current-image mb-4">
      <p class="text-sm text-gray-600 mb-2">現在の画像:</p>
      <div class="relative inline-block">
        <%= image_tag post.image,
          alt: "現在の画像",
          class: "max-w-full h-auto rounded-lg shadow-md max-h-64" %>
      </div>
    </div>
    <p class="text-sm text-gray-600 mb-2">新しい画像を選択する場合:</p>
  <% end %>

<!-- ファイル入力フィールド -->
  <%= form.file_field :image,
    accept: "image/jpeg, image/jpg, image/png",
      data: {
              previews_target: "input",
              action: "change->previews#preview"
            } %>

<!-- プレビュー表示エリア -->
  <div data-previews-target="preview" class="mt-4 hidden">
    <div class="relative inline-block">
      <img data-previews-target="image"
           src=""
           alt="プレビュー画像"
         class="max-w-full h-auto rounded-lg shadow-md max-h-64">
        <button type="button"
          data-action="click->previews#removeImage"
          class="absolute top-2 right-2 bg-red-500 text-white rounded-full w-6 h-6 flex items-center justify-center text-sm hover:bg-red-600">
          ×
        </button>
    </div>
  </div>
</div>
解説
はじめに、このview全体をdata-controller="previews"で囲うことでStimulusにこの要素に previews コントローラーを適用することを宣言します。
jsファイルのstatic targets = ["input", "preview", "image"]でviewのターゲット(data-previews-targetの部分)を定義します。
- ユーザーがファイルを選択
ファイル選択フィールドの内容が変わる(ユーザーがファイルを選択)とpreviews#previewが発火します。
previewメソッドではMIMEタイプ、ファイルのサイズをチェックしています。問題なければ、FilePreaderを使って選択されたファイルをBase64のデータURLに変換します。
(ちなみにMIMEとは、テキスト以外の様々な種類のデータ(例えば、画像や音声ファイル)を取り扱うための標準規格のことです。base64とは、64進数を意味する言葉で、すべてのデータをアルファベット(a~z, A~z)と数字(0~9)、一部の記号(+,/)の64文字で表すエンコード方式のことであり、MIMEの規格ではこのエンコード方式を用いるよう定められています。)
reader.onloadでreaderの読み込み完了後に、画像のデータURLの入ったe.target.resultを、imageターゲットにあるタグのsrc属性に代入しています。
最後にプレビュー表示エリアの非表示状態を解除してプレビューを画面上に表示します。
- プレビューの×を押して画像を削除
プレビューで表示された画像の右上にある×を押すとpreviews#removeImageが発火します。
inputターゲットのvalue、imageターゲットのsrc属性をnullにし、プレビュー表示エリアを非表示にします。
参考URL