<APIでWebDavを触ってみる>で WebDav についての理解は深められたので、次は当然 OData に進めましょう。
ODataとは正式名称は”Open Data Protocol”で「RESTfulなWebAPI(Webサービス)プロトコル」のことで、Microsoft主導で策定されたようです。
Personium でのDBエンジンは Elasticsearch を採用しており、インターフェスは OData という構図になっています。
インターフェースがRESTfulなWebAPIである点と、通常RDBとして採用されるOracleやMySQLなどとも若干差異がある部分もあり、その辺についても把握できることを目指したいと思います。
1.環境の確認
セルやボックスは、<APIでWebDavを触ってみる>で利用したものをそのまま使うこととし、以下のような環境で試してみましょう。
| 項目 | 値 | 備考 |
|---|---|---|
| ユニット | https://personium.takky.org | |
| セル | usercell | |
| ボックス | userbox | |
| アカウント | user | |
| ロール | userrole | |
| コレクション(ACL) | ODataContents (read,write) | RDBでのデータベース |
| エンティティタイプ | profile | RDBでのテーブル |
2.管理者権限でのODataのCollection(データベース)の作成
まずは恒例の… unitadmin のトークンを取得しましょう。
$ curl "https://personium.takky.org/unitadmin/__token" \
-X POST -i \
-d "grant_type=password&username={{unitAdminUser}}&password={{unitAdminPassword}}&p_target=https://personium.takky.org/" \
-H "Content-Type: application/x-www-form-urlencoded"

HTTP/1.1 200
Date: Wed, 20 Mar 2019 05:28:50 GMT
Content-Type: application/json
Content-Length: 4378
Connection: keep-alive
Location: https://personium.takky.org/__token
X-Personium-Version: 1.7.4
Server: Personium

{
 "access_token":"{{unitAdminToken}}",
 "refresh_token_expires_in":86400,
 "refresh_token":"{{refreshToken}}",
 "p_target":"https:\/\/personium.takky.org\/",
 "token_type":"Bearer",
 "expires_in":3600
}
次は、コレクション(データベース)の作成です。
uriはWebDavと同様に、curl "https://personium.takky.org/{{cell}}/{{box}}/{{collection}}" のようにしましょう。
bodyには以下のようなXMLを記載する必要があるのですが、コレクションを作成する場合はこのままで良いようなので、そのまま利用します。
(リソースタイプは"odata"の"collection"ですよ。ということが表現されているようです。WebDavの時は"odata"の所に"WebDav"とは指定しなかったですが… ここに"WebDav"と"odata"の違いがありそうですね)
<D:mkcol xmlns:D=\"DAV:\" xmlns:p=\"urn:x-personium:xmlns\"><D:set><D:prop><D:resourcetype><D:collection/><p:odata/></D:resourcetype></D:prop></D:set></D:mkcol>
$ curl "https://personium.takky.org/usercell/userbox/ODataContents" -X MKCOL -i \
-d "<?xml version=\"1.0\" encoding=\"utf-8\"?><D:mkcol xmlns:D=\"DAV:\" xmlns:p=\"urn:x-personium:xmlns\"><D:set><D:prop><D:resourcetype><D:collection/><p:odata/></D:resourcetype></D:prop></D:set></D:mkcol>" \
-H "Accept:application/json" -H "Authorization:Bearer {{unitAdminToken}}"

HTTP/1.1 201
Date: Wed, 20 Mar 2019 05:32:47 GMT
Content-Length: 0
Connection: keep-alive
ETag: "1-1553059967130"
X-Personium-Version: 1.7.4
Server: Personium
レスポンスコードが200番台なので、成功したようなのですが… ほんまかね??
確認してみましょう!
確認の方法も、WebDavと全く同じですね。
$ curl "https://personium.takky.org/usercell/userbox/ODataContents" \
-X PROPFIND -i \
-H 'Depth:1' \
-d '<?xml version="1.0" encoding="utf-8"?><D:propfind xmlns:D="DAV:"><D:allprop/></D:propfind>' \
-H "Accept:application/json" -H "Authorization:Bearer {{unitAdminToken}}"

HTTP/1.1 207
Date: Wed, 20 Mar 2019 05:40:59 GMT
Content-Type: application/xml
Content-Length: 709
Connection: keep-alive
ETag: "1-1553059967130"
X-Personium-Version: 1.7.4
Server: Personium

<multistatus xmlns="DAV:">
    <response>
        <href>https://personium.takky.org/usercell/userbox/ODataContents</href>
        <propstat>
            <prop>
                <creationdate>2019-03-20T05:32:47.130+0000</creationdate>
                <getlastmodified>Wed, 20 Mar 2019 05:32:47 GMT</getlastmodified>
                <resourcetype>
                    <collection/>
                    <p:odata xmlns:p="urn:x-personium:xmlns"/>
                </resourcetype>
                <acl xml:base="https://personium.takky.org/usercell/__role/userbox/" xmlns:p="urn:x-personium:xmlns"/>
            </prop>
            <status>HTTP/1.1 200 OK</status>
        </propstat>
    </response>
</multistatus>
大丈夫そうです。
念のため、ユニットマネージャでも確認。
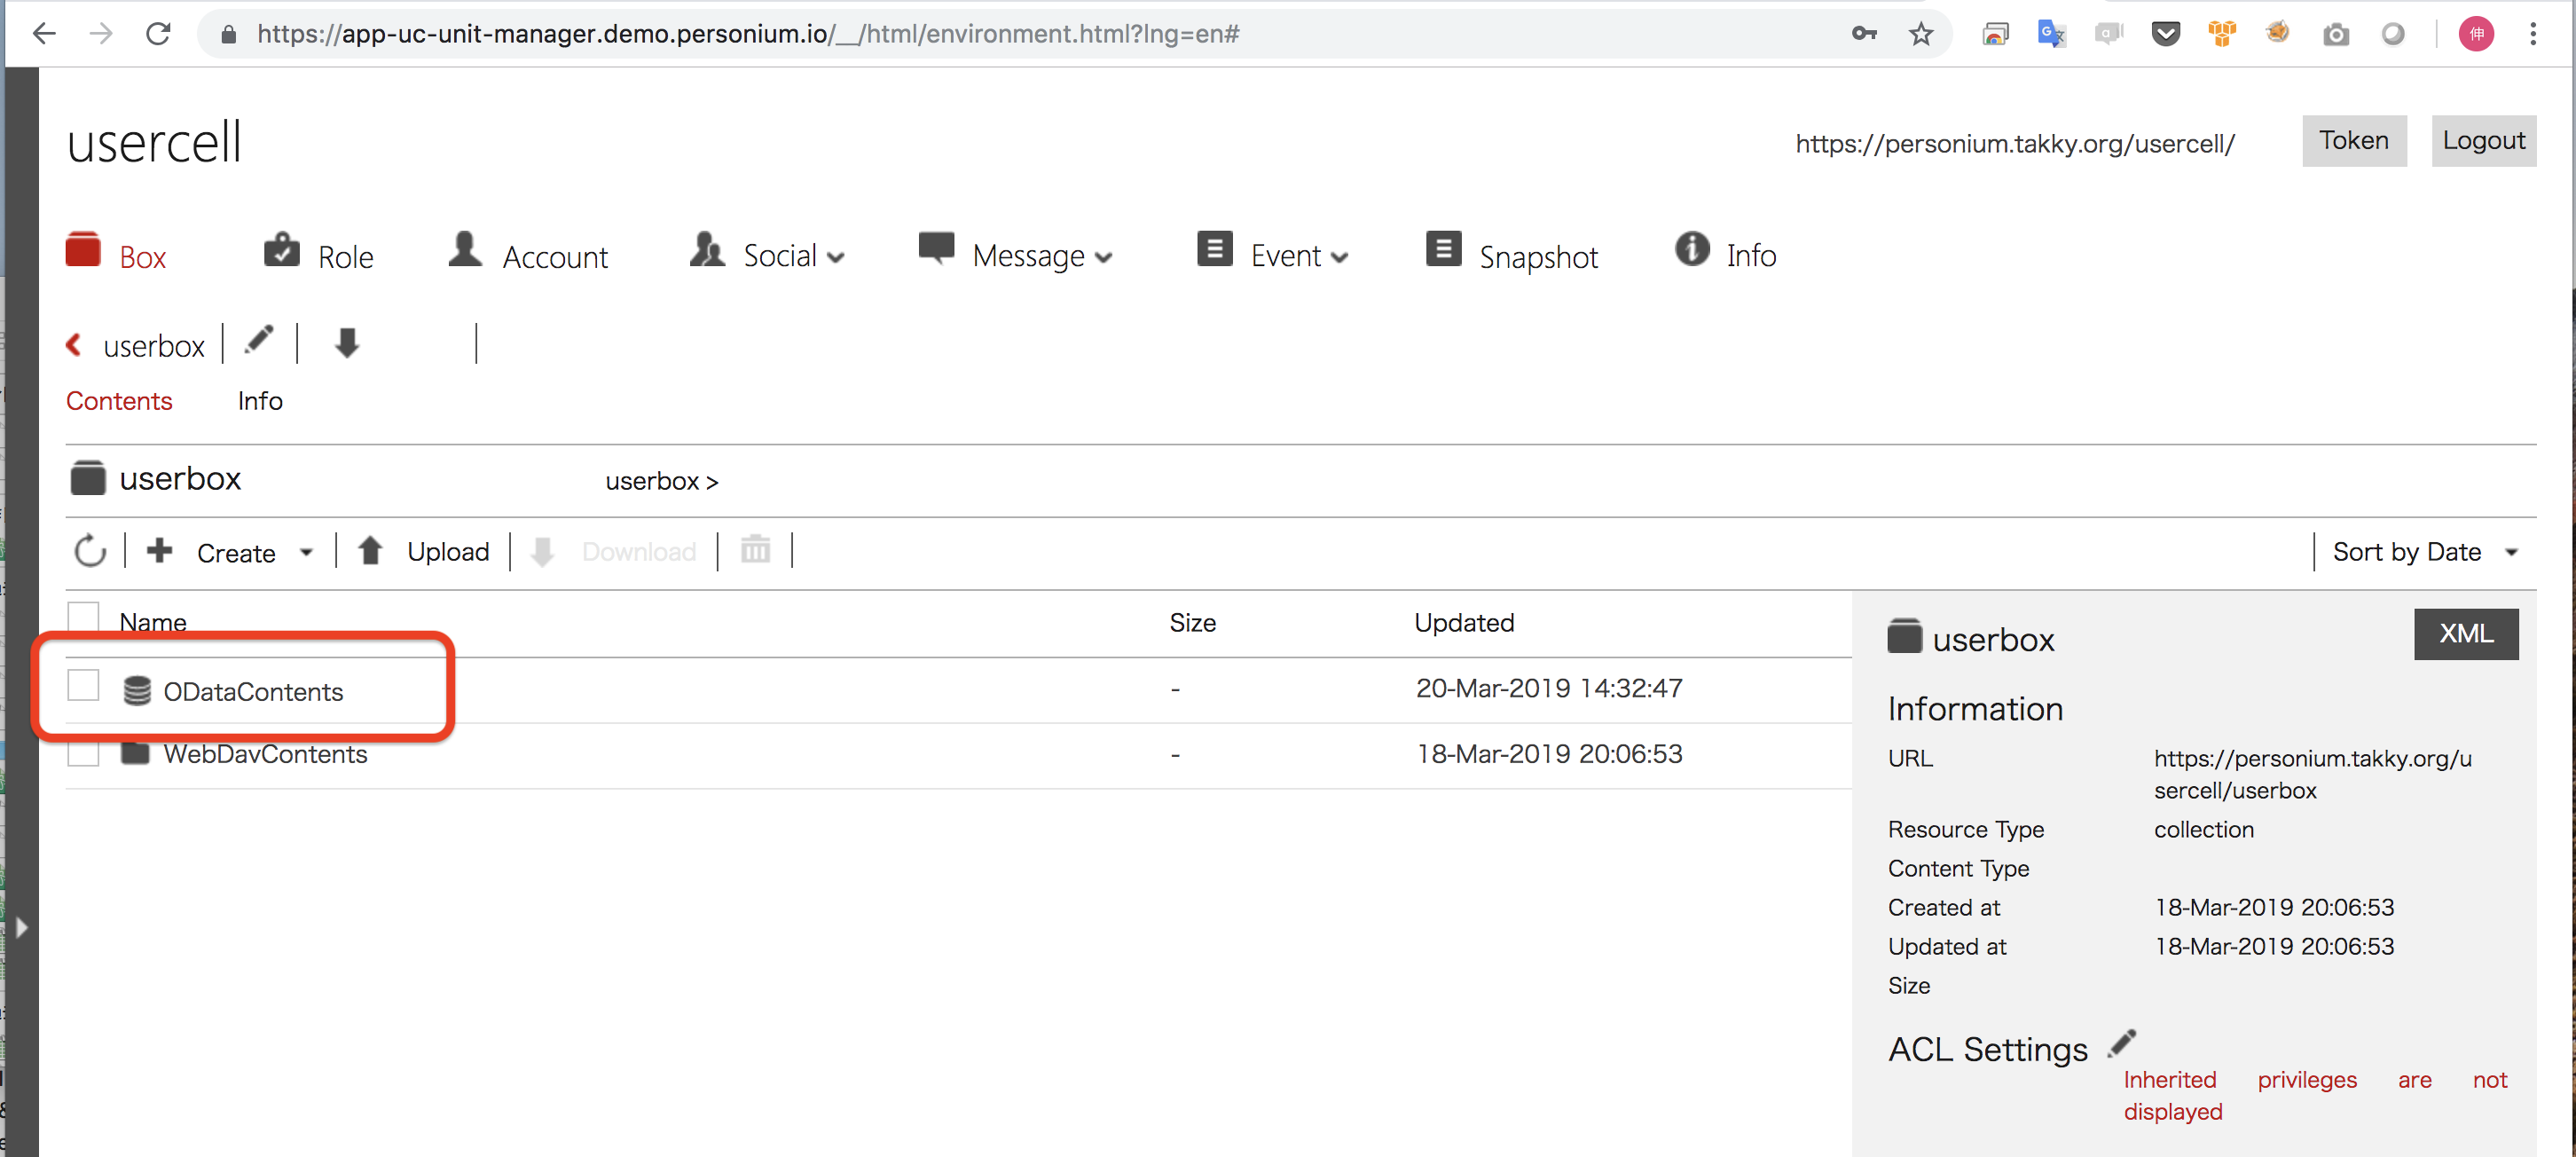
ちゃんとできてますね!! OKです。
3.管理者権限でのODataのEntityType(テーブル)の作成
次はテーブルの作成になりますね。
ODataではテーブルではなく EntityType と呼ばれているようです。
しかもこのテーブル作成時には、RDBでいうカラム(Entity)などは設定しなくても良いようです。
まずは、この EntityType を作成しましょう。
$ curl "https://pds.takky.org/OData/ODataBox/testOData/\$metadata/EntityType" \
-X POST -i \
-d '{ "Name":"profile"}' \
-H "Accept:application/json" -H "Authorization:Bearer {{unitAdminToken}}"

HTTP/1.1 201
Date: Wed, 20 Mar 2019 05:59:25 GMT
Content-Type: application/json
Content-Length: 302
Connection: keep-alive
Location: https://personium.takky.org/usercell/userbox/ODataContents/$metadata/EntityType('profile')
DataServiceVersion: 2.0
ETag: W/"1-1553061565244"
X-Personium-Version: 1.7.4
Server: Personium

{
  "d":{
    "results":{
      "__metadata":{
        "uri":"https:\/\/personium.takky.org\/usercell\/userbox\/ODataContents\/$metadata\/EntityType('profile')",
        "etag":"W\/\"1-1553061565244\"",
        "type":"ODataSvcSchema.EntityType"
      },
      "Name":"profile","__published":"\/Date(1553061565244)\/",
      "__updated":"\/Date(1553061565244)\/"
    }
  }
}
これもレスポンスコードが200番台で返ってきました!
こちらも念のため、ユニットマネージャで確認しておきましょう…
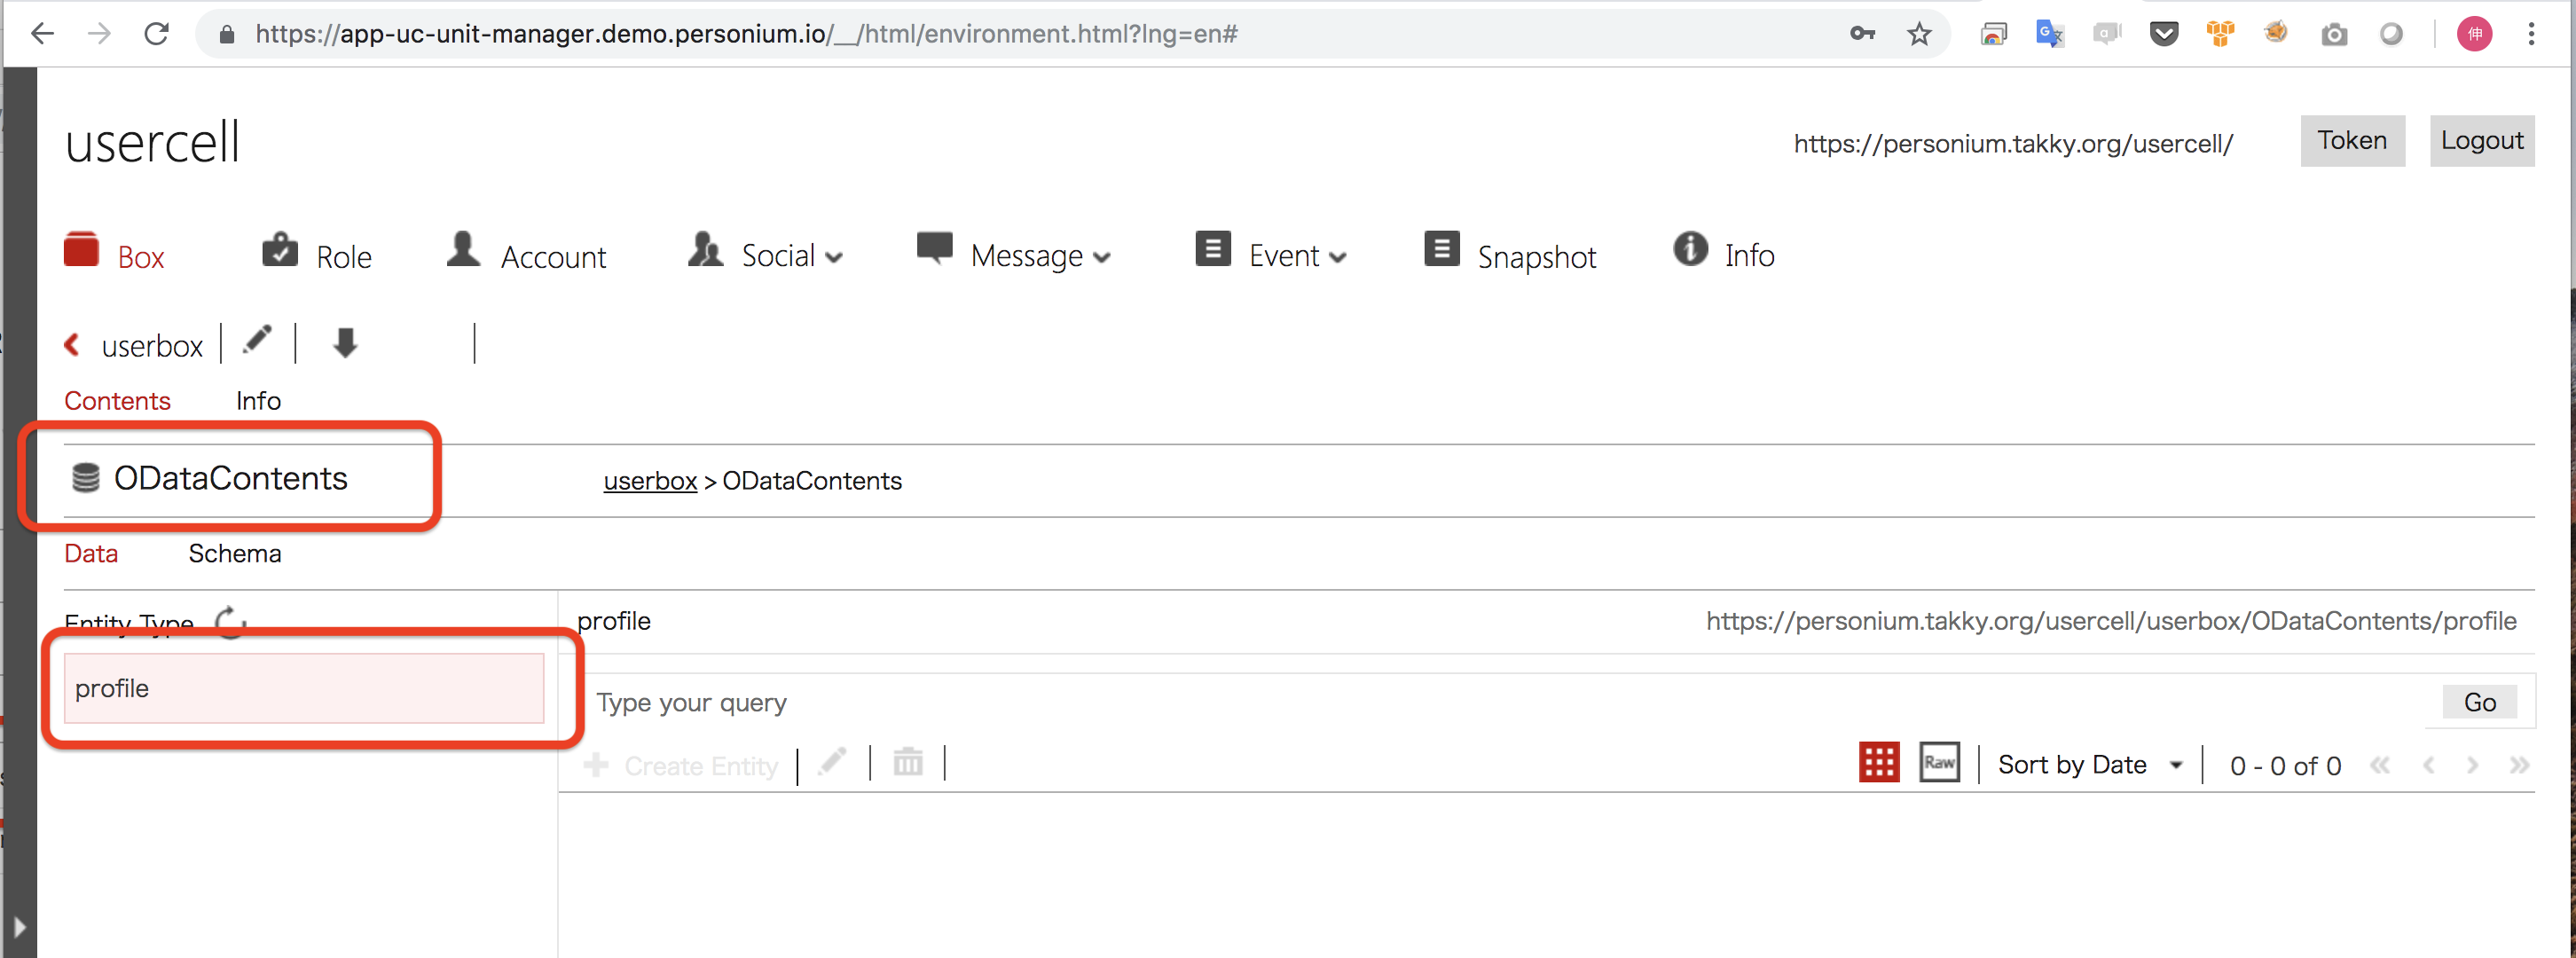
"ODataContents"コレクションの配下に、"profile"が存在しています。
OKですね!!
コマンドでは確認すれば良いのでしょう?
以下のように"GET"で確認できるようで、WebDavの取得方法("PROPFIND")ではないみたいですね。
$ curl "https://personium.takky.org/usercell/userbox/ODataContents/\$metadata" \
-X GET -i \
-H "Accept:application/json" -H "Authorization:Bearer {{unitAdminToken}}"

HTTP/1.1 200
Date: Wed, 20 Mar 2019 06:11:00 GMT
Content-Type: application/xml;charset=utf-8
Content-Length: 1084
Connection: keep-alive
DataServiceVersion: 1.0
X-Personium-Version: 1.7.4
Server: Personium

<?xml version="1.0" encoding="utf-8"?>
  <edmx:Edmx Version="1.0" xmlns:edmx="http://schemas.microsoft.com/ado/2007/06/edmx" xmlns:d="http://schemas.microsoft.com/ado/2007/08/dataservices" xmlns:m="http://schemas.microsoft.com/ado/2007/08/dataservices/metadata" xmlns:p="urn:x-personium:xmlns">
    <edmx:DataServices m:DataServiceVersion="1.0">
      <Schema xmlns="http://schemas.microsoft.com/ado/2006/04/edm" Namespace="UserData">
        <EntityType Name="profile" OpenType="true">
          <Key>
            <PropertyRef Name="__id"></PropertyRef>
          </Key>
          <Property Name="__id" Type="Edm.String" Nullable="false" DefaultValue="UUID()" p:Format="regEx('^.{1,400}$')"></Property>
          <Property Name="__published" Type="Edm.DateTime" Nullable="false" DefaultValue="SYSUTCDATETIME()" Precision="3"></Property>
          <Property Name="__updated" Type="Edm.DateTime" Nullable="false" DefaultValue="SYSUTCDATETIME()" Precision="3"></Property>
        </EntityType>
        <EntityContainer Name="UserData" m:IsDefaultEntityContainer="true">
          <EntitySet Name="profile" EntityType="UserData.profile"></EntitySet>
        </EntityContainer>
      </Schema>
    </edmx:DataServices>
  </edmx:Edmx>
急にXMLでのレスポンスになりました…(びっくり!)
EntityTypeは「Name="profile"」です。正しいですね。
Key が「Name="__id"」で、
Property として「Name="__id"」「Name="__published"」「Name="__updated"」があるのでしょうか??
こちらもユニットマネージャで確認してみましょう。
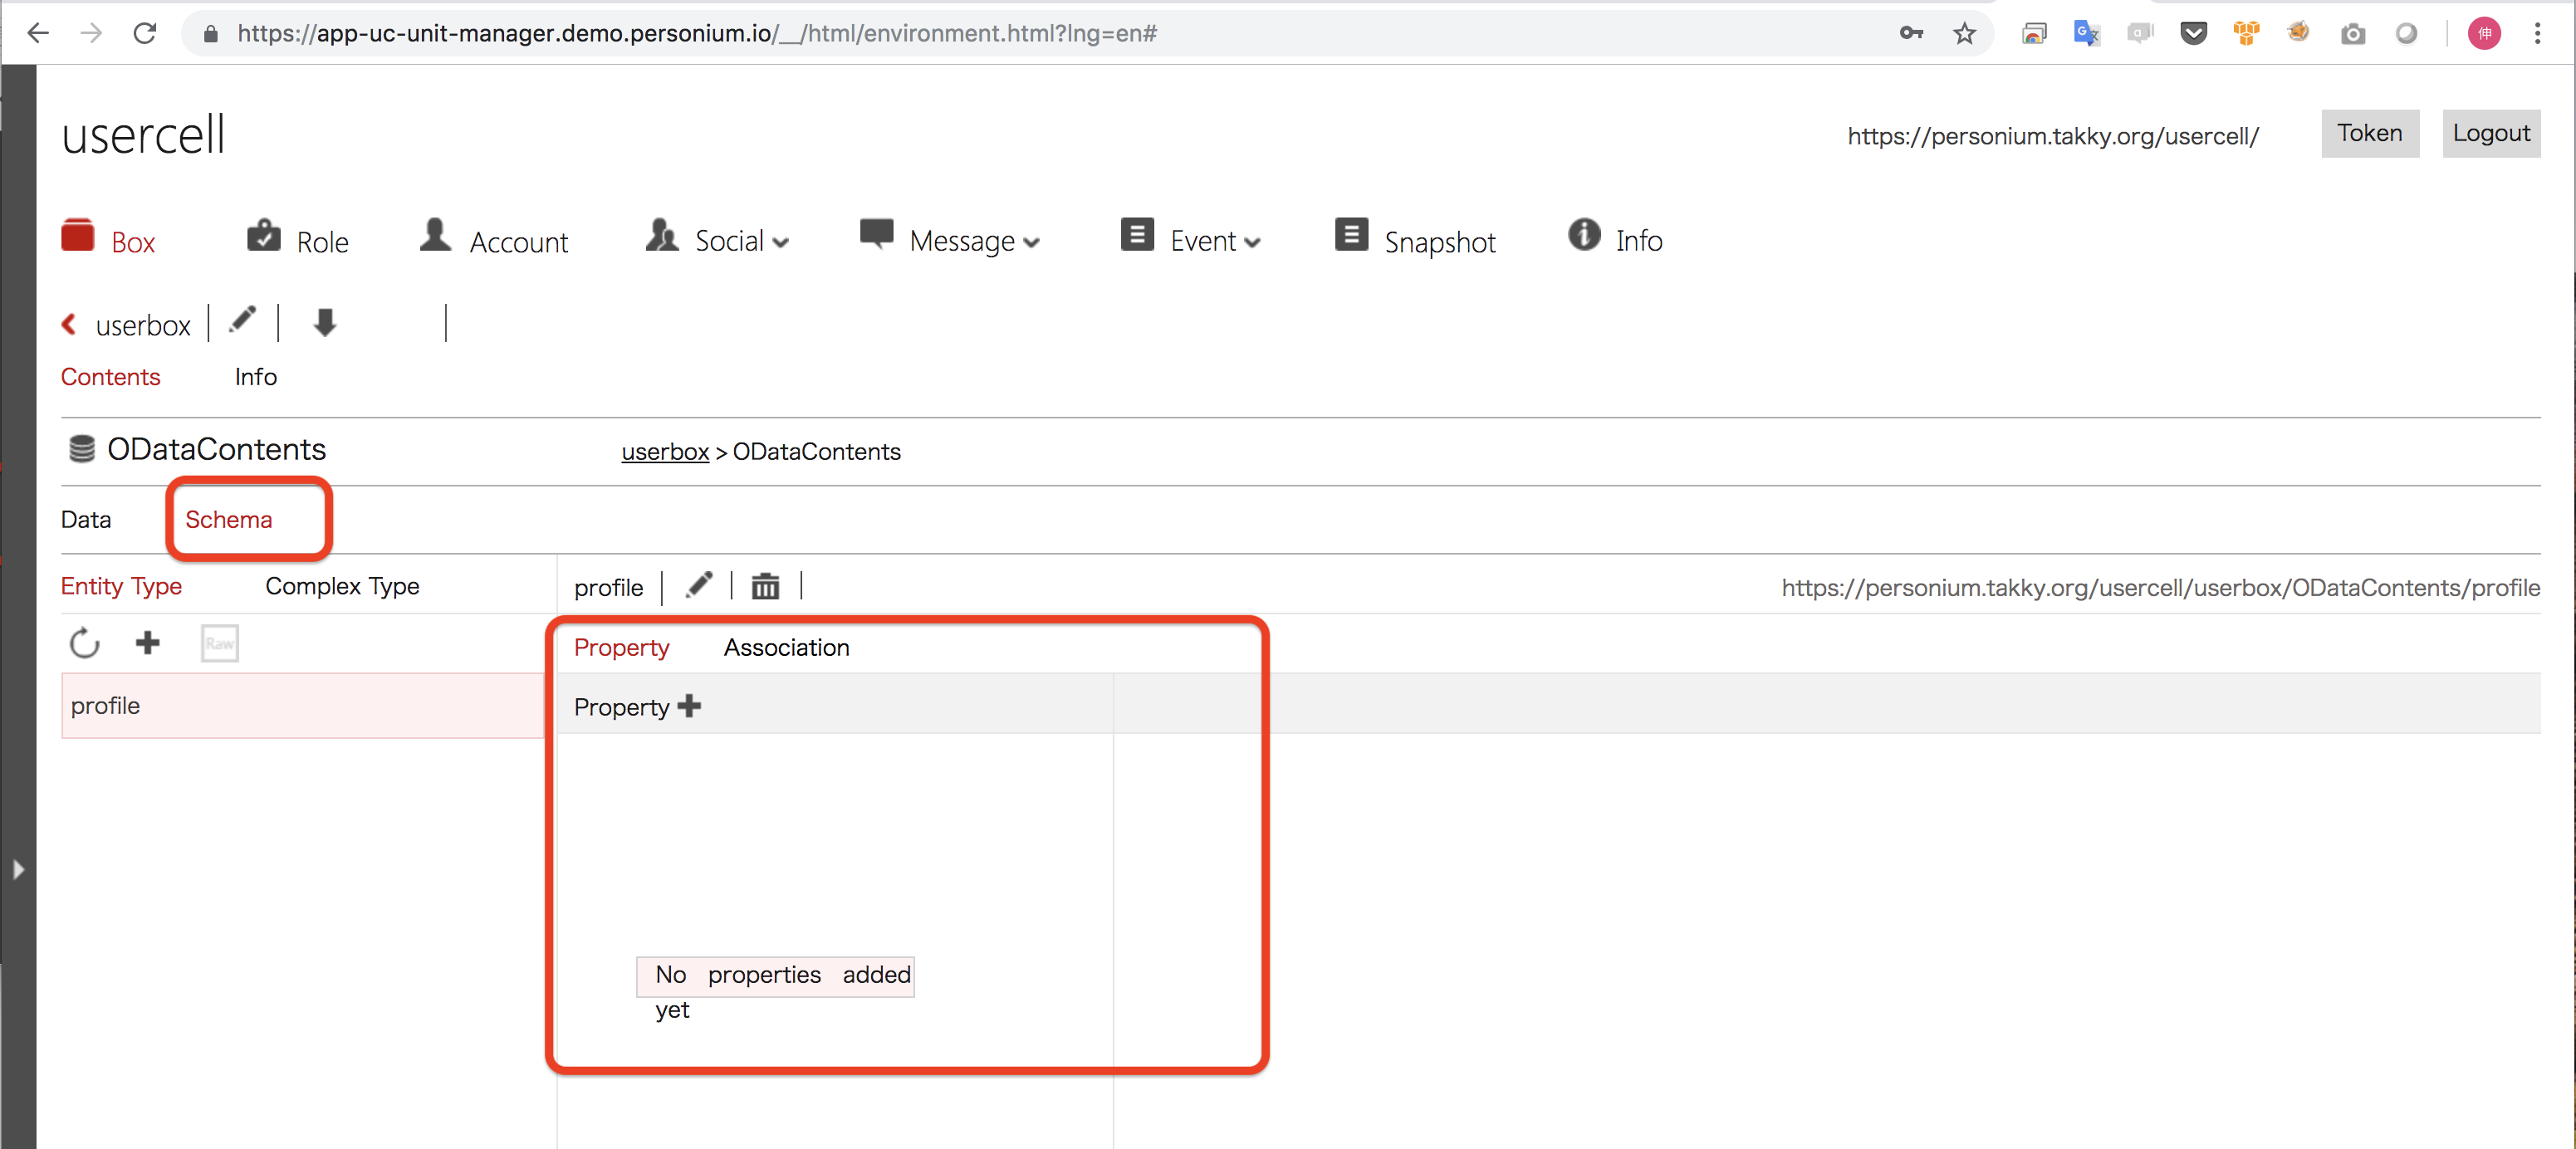
おゃ… [Schema]を開いてみると、Property には何もなく…「No properties added yet」とな?!
もしかすると上記の3つの値は、デフォルトで作成され、かつ、デフォルトで値が入力されるカラムなのかもね??
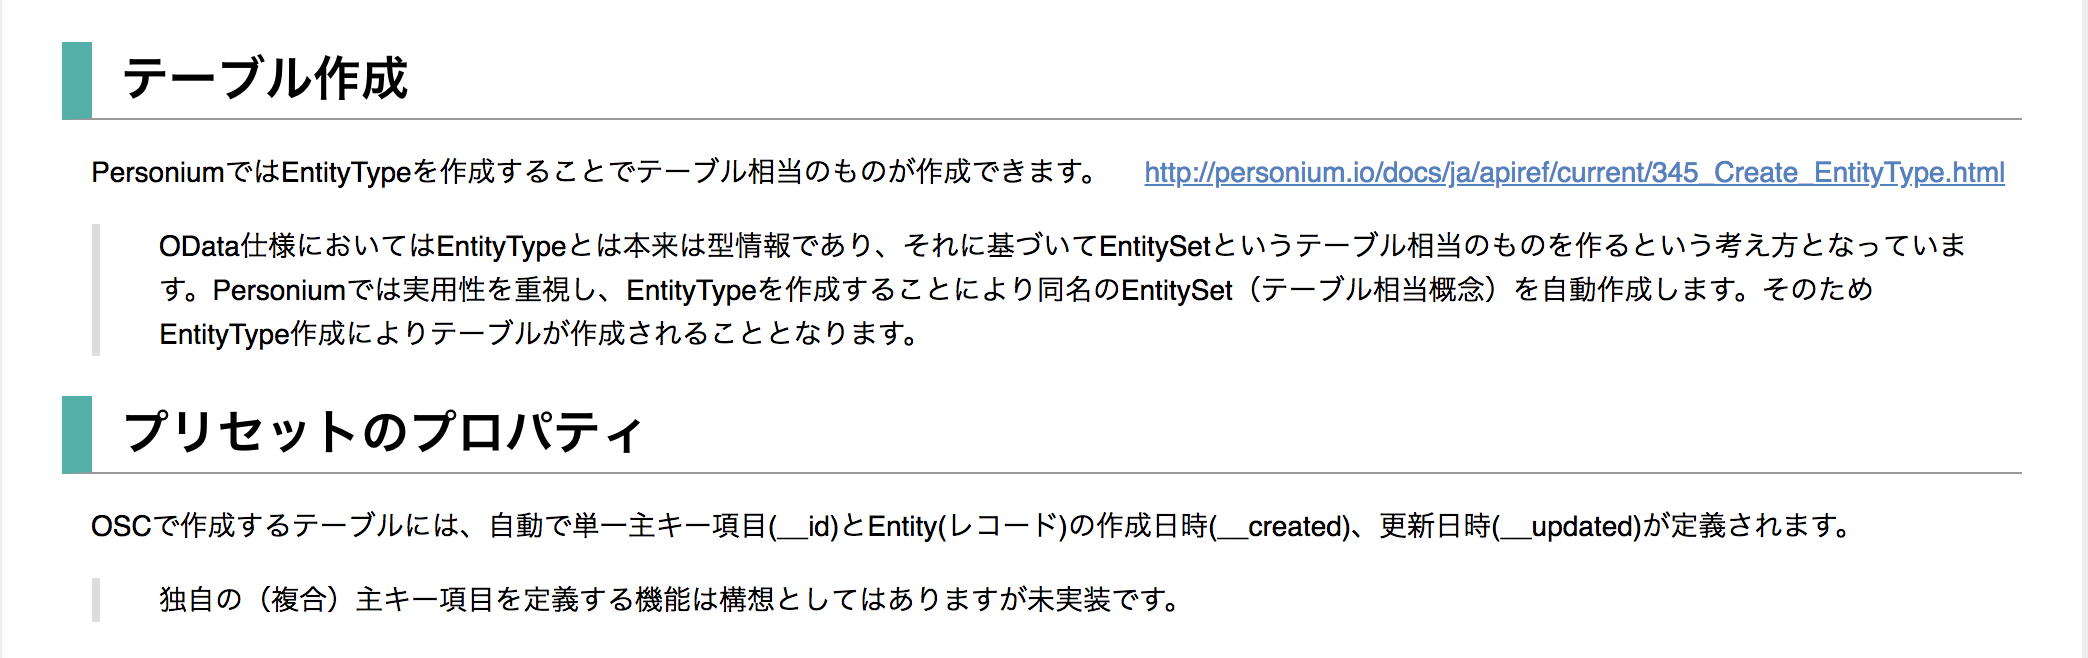
『OData Service Collection (OSC)の使い方』 というドキュメントに記載がありました。
やはり、3つの項目(列)は自動で作成されるようです。大丈夫!!
4.管理者権限でのデータのストア
では満を持して… データを挿入してみましょう。
$ curl "https://personium.takky.org/usercell/userbox/ODataContents/profile" \
-X POST -i \
-d '{"name": "Takky"}' \
-H "Accept:application/json" -H "Authorization:Bearer {{unitAdminToken}}"

HTTP/1.1 201
Date: Wed, 20 Mar 2019 06:45:46 GMT
Content-Type: application/json
Content-Length: 344
Connection: keep-alive
Location: https://personium.takky.org/usercell/userbox/ODataContents/profile('d2f6a5c5c718401ab86c98a555e331f1')
DataServiceVersion: 2.0
ETag: W/"1-1553064346586"
X-Personium-Version: 1.7.4
Server: Personium

{
  "d":{
    "results":{
      "__metadata":{
        "uri":"https:\/\/personium.takky.org\/usercell\/userbox\/ODataContents\/profile('d2f6a5c5c718401ab86c98a555e331f1')",
        "etag":"W\/\"1-1553064346586\"",
        "type":"UserData.profile"
      },
      "__id":"d2f6a5c5c718401ab86c98a555e331f1",
      "__published":"\/Date(1553064346586)\/",
      "__updated":"\/Date(1553064346586)\/",
      "name":"Takky"
    }
  }
}
おぉ! イケましたわぁ。
name列が作られ、"Takky"が設定されています。
そして想定通り、"__id" "__published" "__updated"にも、値が入力されています。
ユニットマネージャでの確認でも、スキーマとして"name"が確認でき、実際のデータにも"name"列に"Takky"として1レコード挿入されています。完璧です!!
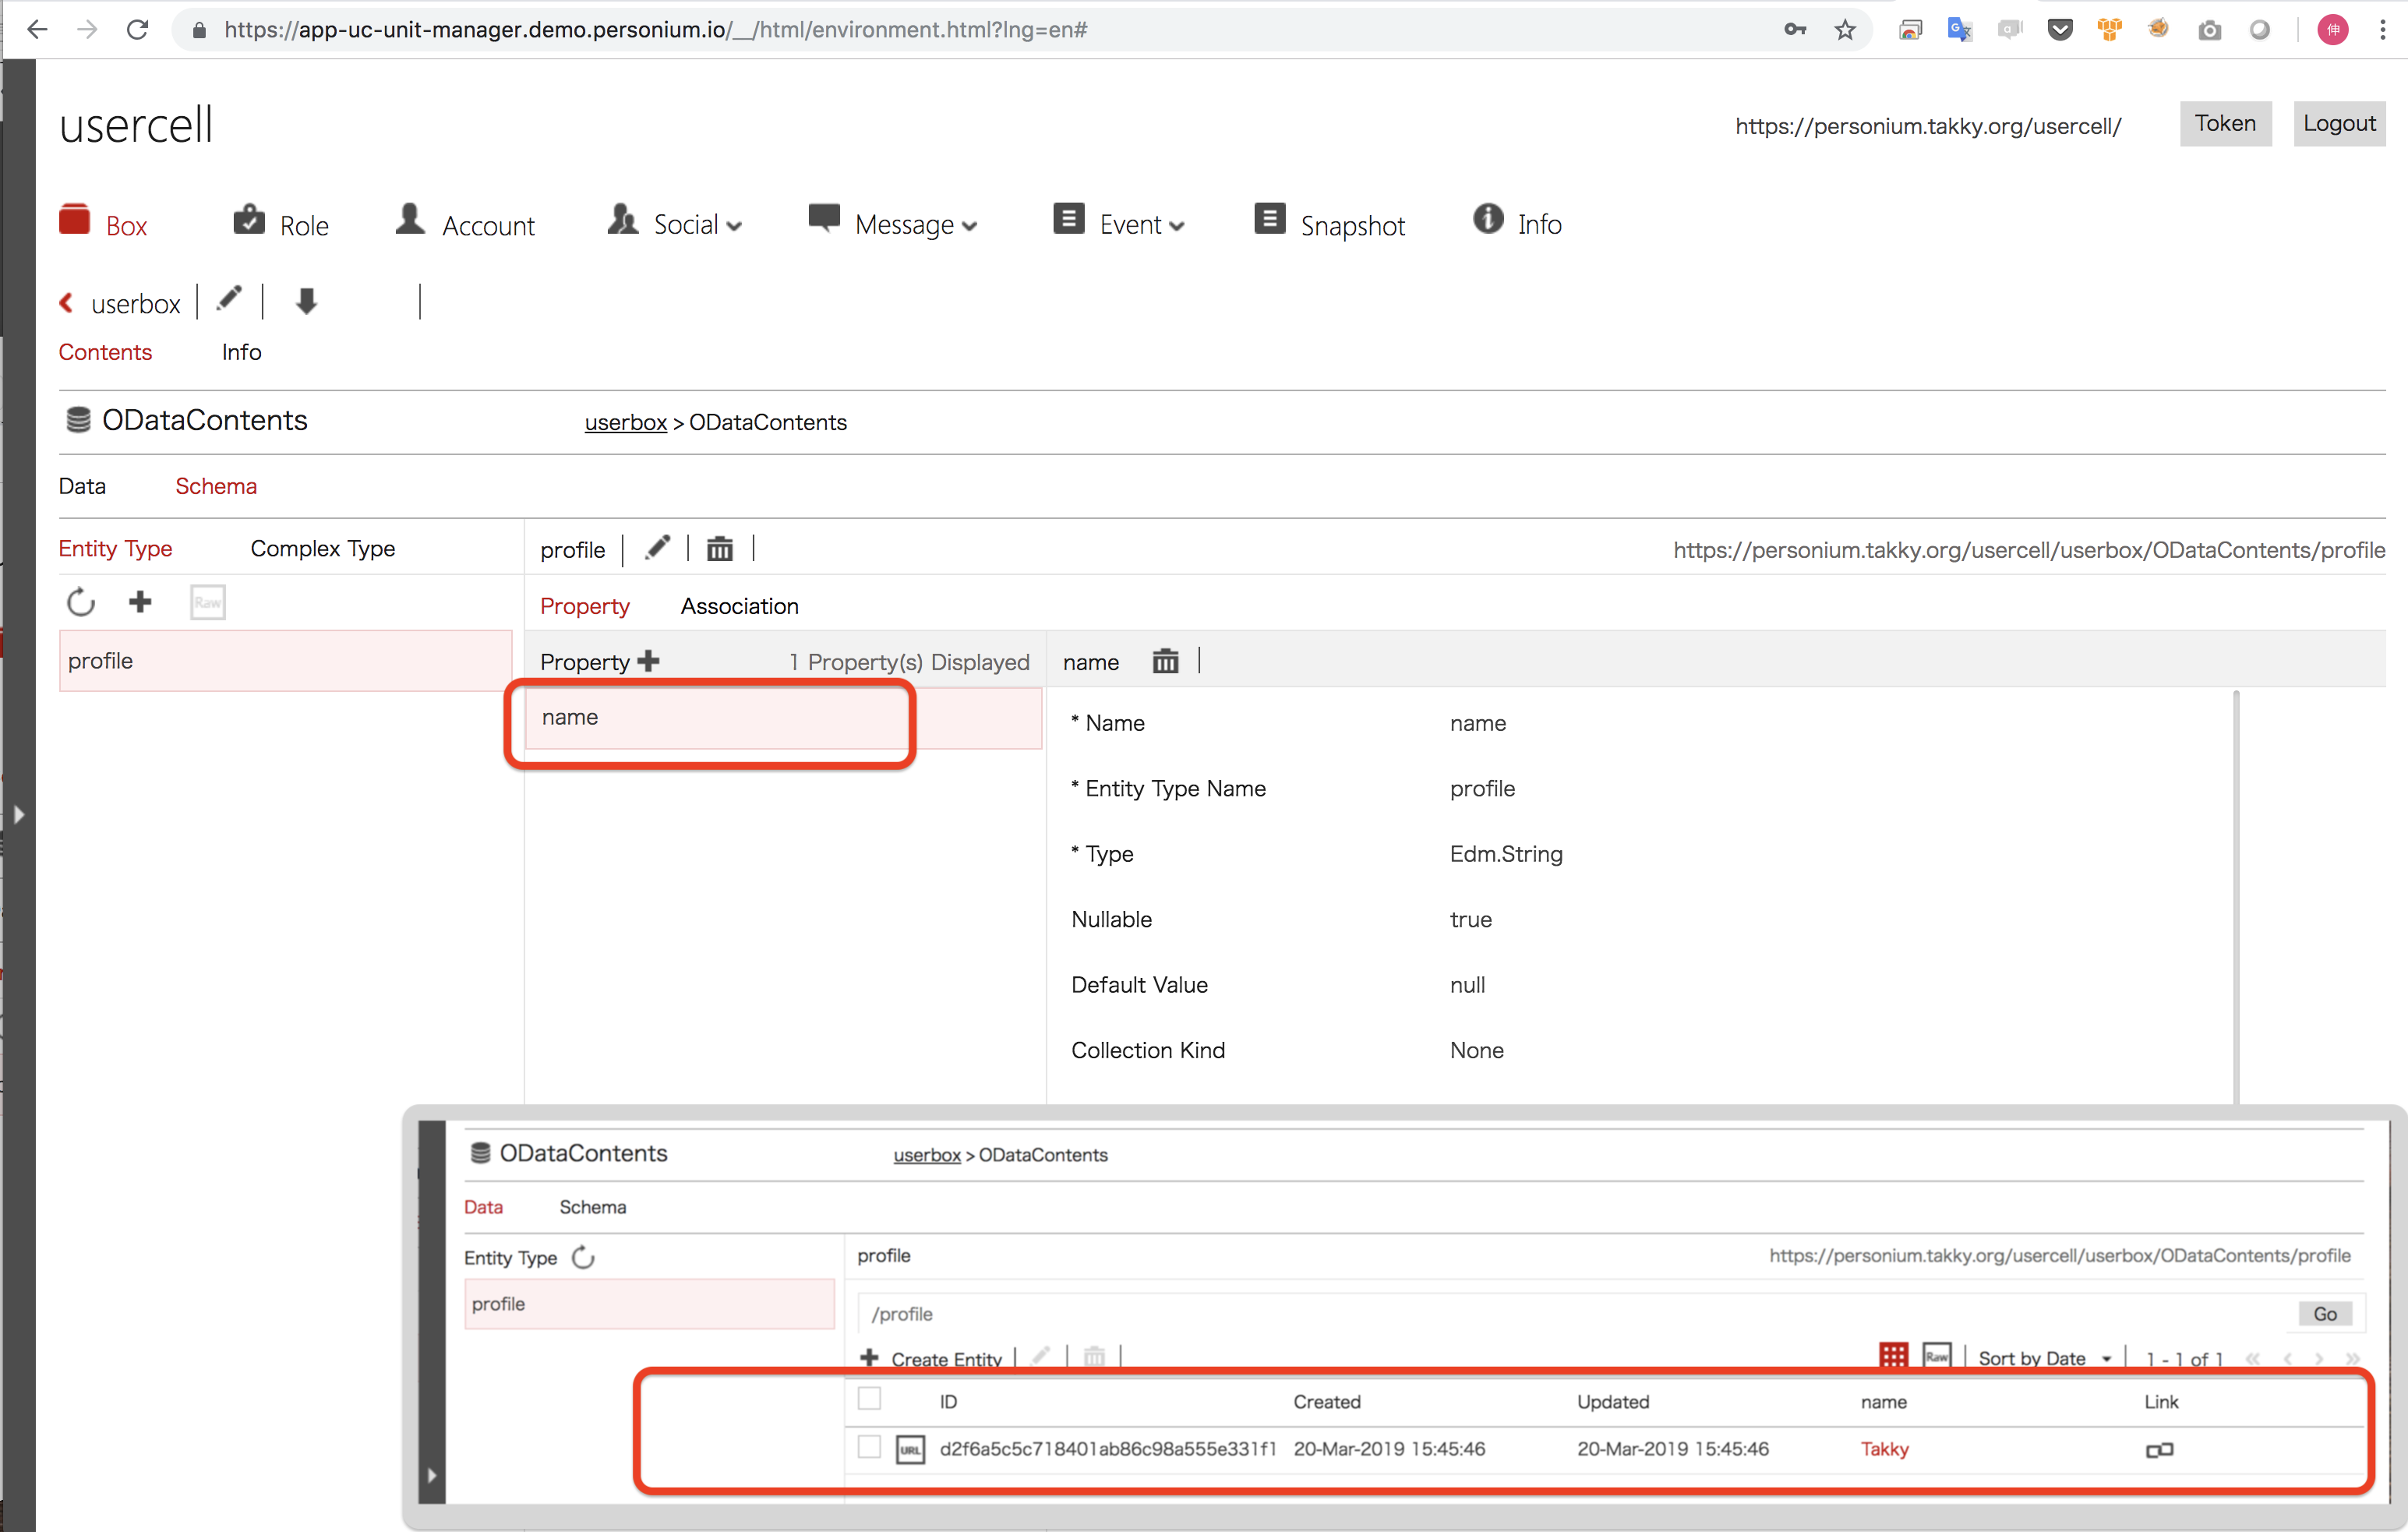
5.ユーザー権限でのスキーマの参照
では次に… ユーザー権限でODataのオブジェクトにアクセスしてみましょう。
当然、エラーになるんだと思います。
まずは、トークンの取得。
$ curl "https://personium.takky.org/usercell/__token" \
-X POST -i \
-d "grant_type=password&username={{userName}}&password={{userPassword}}" \
-H "Content-Type: application/x-www-form-urlencoded"

HTTP/1.1 200
Date: Sun, 24 Mar 2019 01:49:13 GMT
Content-Type: application/json
Content-Length: 331
Connection: keep-alive
X-Personium-Version: 1.7.4
Server: Personium

{
  "access_token":"{{user_token}}",
  "refresh_token_expires_in":86400,
  "refresh_token":{{fefresh_token}}",
  "token_type":"Bearer",
  "expires_in":3600
}
では、ユーザー権限でアクセスしましょう。
$ curl "https://personium.takky.org/usercell/userbox/ODataContents/\$metadata" \
-X GET -i \
-H "Accept:application/json" -H "Authorization:Bearer {{user_token}}"

HTTP/1.1 403
Date: Sun, 24 Mar 2019 02:02:05 GMT
Content-Type: application/json
Content-Length: 90
Connection: keep-alive
X-Personium-Version: 1.7.4
Server: Personium

{
  "code":"PR403-AU-0002",
  "message":{
    "lang":"en",
    "value":"Necessary privilege is lacking."
  }
}
当然、「権限が足りない」エラーですね。
では次に、<APIでWebDavを触ってみる>で作成済みの、ユーザー(user)にひも付いているロール(userrole)にACL(read, write)を付与しましょう。
url 'https://personium.takky.org/usercell/userbox/ODataContents'  \
-X ACL -i \
-d '<D:acl xmlns:D="DAV:" xmlns:p="urn:x-personium:xmlns" xml:base="https://personium.takky.org/usercell/__role/userbox/"><D:ace><D:principal><D:href>userrole</D:href></D:principal><D:grant><D:privilege><p:read/></D:privilege><D:privilege><p:write/></D:privilege></D:grant></D:ace></D:acl>' \
-H "Accept:application/json" -H "Authorization:Bearer {{unitAdminToken}}"

HTTP/1.1 200
Date: Sun, 24 Mar 2019 02:14:04 GMT
Content-Length: 0
Connection: keep-alive
ETag: "2-1553059967130"
X-Personium-Version: 1.7.4
Server: Personium
ACLを付与したので、もう一度…
$ curl "https://personium.takky.org/usercell/userbox/ODataContents/\$metadata" \
-X GET -i \
-H "Accept:application/json" -H "Authorization:Bearer {{user_token}}"

HTTP/1.1 200
Date: Sun, 24 Mar 2019 02:15:59 GMT
Content-Type: application/xml;charset=utf-8
Content-Length: 1172
Connection: keep-alive
DataServiceVersion: 1.0
X-Personium-Version: 1.7.4
Server: Personium

<?xml version="1.0" encoding="utf-8"?>
  <edmx:Edmx Version="1.0" xmlns:edmx="http://schemas.microsoft.com/ado/2007/06/edmx" xmlns:d="http://schemas.microsoft.com/ado/2007/08/dataservices" xmlns:m="http://schemas.microsoft.com/ado/2007/08/dataservices/metadata" xmlns:p="urn:x-personium:xmlns">
    <edmx:DataServices m:DataServiceVersion="1.0">
      <Schema xmlns="http://schemas.microsoft.com/ado/2006/04/edm" Namespace="UserData">
        <EntityType Name="profile" OpenType="true">
          <Key>
            <PropertyRef Name="__id"></PropertyRef>
          </Key>
          <Property Name="__id" Type="Edm.String" Nullable="false" DefaultValue="UUID()" p:Format="regEx('^.{1,400}$')"></Property>
          <Property Name="__published" Type="Edm.DateTime" Nullable="false" DefaultValue="SYSUTCDATETIME()" Precision="3"></Property>
          <Property Name="__updated" Type="Edm.DateTime" Nullable="false" DefaultValue="SYSUTCDATETIME()" Precision="3"></Property>
          <Property Name="name" Type="Edm.String" Nullable="true" p:IsDeclared="false</Property>
        </EntityType>
        <EntityContainer Name="UserData" m:IsDefaultEntityContainer="true">
          <EntitySet Name="profile" EntityType="UserData.profile"></EntitySet>
        </EntityContainer>
      </Schema>
    </edmx:DataServices>
  </edmx:Edmx>
イケてますね!
6.ユーザー権限でのデータのストア
ここでは、name列に"USER"のレコードを挿入しましょう。
これに成功すると、unitadmmin で挿入した"Takky"との2レコードになるはずです。
curl "https://personium.takky.org/usercell/userbox/ODataContents/profile" \
-X POST -i \
-d '{"name": "USER"}' \
-H "Accept:application/json" -H "Authorization:Bearer {{user_token}}"

HTTP/1.1 201
Date: Sun, 24 Mar 2019 02:23:25 GMT
Content-Type: application/json
Content-Length: 343
Connection: keep-alive
Location: https://personium.takky.org/usercell/userbox/ODataContents/profile('471d31832e894809b5d18943dae3d20c')
DataServiceVersion: 2.0
ETag: W/"1-1553394205719"
X-Personium-Version: 1.7.4
Server: Personium

{
  "d":{
    "results":{
      "__metadata":{
        "uri":"https:\/\/personium.takky.org\/usercell\/userbox\/ODataContents\/profile('471d31832e894809b5d18943dae3d20c')",
        "etag":"W\/\"1-1553394205719\"",
         "type":"UserData.profile"
      },
      "__id":"471d31832e894809b5d18943dae3d20c",
      "__published":"\/Date(1553394205719)\/",
      "__updated":"\/Date(1553394205719)\/",
      "name":"USER"
    }
  }
}
7.ユーザー権限でのデータの参照
では、実際に"Takky"と"USER"レコードがストアされているデータを参照(SELECT)してみましょう。
$ curl "https://personium.takky.org/usercell/userbox/ODataContents/profile" \
-X GET -i \
-H "Accept:application/json" -H "Authorization:Bearer {{user_token}}"

HTTP/1.1 200
Date: Sun, 24 Mar 2019 02:43:13 GMT
Content-Type: application/json;charset=utf-8
Content-Length: 672
Connection: keep-alive
DataServiceVersion: 2.0
X-Personium-Version: 1.7.4
Server: Personium

{
  "d":{
    "results":[
      {
        "__metadata":{
          "uri":"https:\/\/personium.takky.org\/usercell\/userbox\/ODataContents\/profile('d2f6a5c5c718401ab86c98a555e331f1')",
          "etag":"W\/\"1-1553064346586\"",
          "type":"UserData.profile"
        },
        "__id":"d2f6a5c5c718401ab86c98a555e331f1",
        "__published":"\/Date(1553064346586)\/",
        "__updated":"\/Date(1553064346586)\/",
        "name":"Takky"
      },{
        "__metadata":{
          "uri":"https:\/\/personium.takky.org\/usercell\/userbox\/ODataContents\/profile('471d31832e894809b5d18943dae3d20c')",
          "etag":"W\/\"1-1553394205719\"",
          "type":"UserData.profile"
        },
        "__id":"471d31832e894809b5d18943dae3d20c",
        "__published":"\/Date(1553394205719)\/",
        "__updated":"\/Date(1553394205719)\/",
        "name":"USER"
      }
    ]
  }
}
profile テーブルに、これまでにストアした「Takky」「USER」が存在していることが確認できます。OKですね。
ついでにユニットマネジャーでも確認。
同様に、「Takky」「USER」が存在しています。
OK!!

ODataコレクション(テーブル)の作成と、レコードの登録・参照が完了です!
最後に…
ODataとはインターフェスであり、実際のデータベースとしての機能は Elasticsearch が提供しています。Personium のデータベース機能を効果的に利用するためには、OData と Elasticsearchを把握することにより理解が深まるかと思います。
まぁでも全部を把握する必要もないと思いますので、Personium API リファレンス内の以下のAPIを把握することになるでしょう。
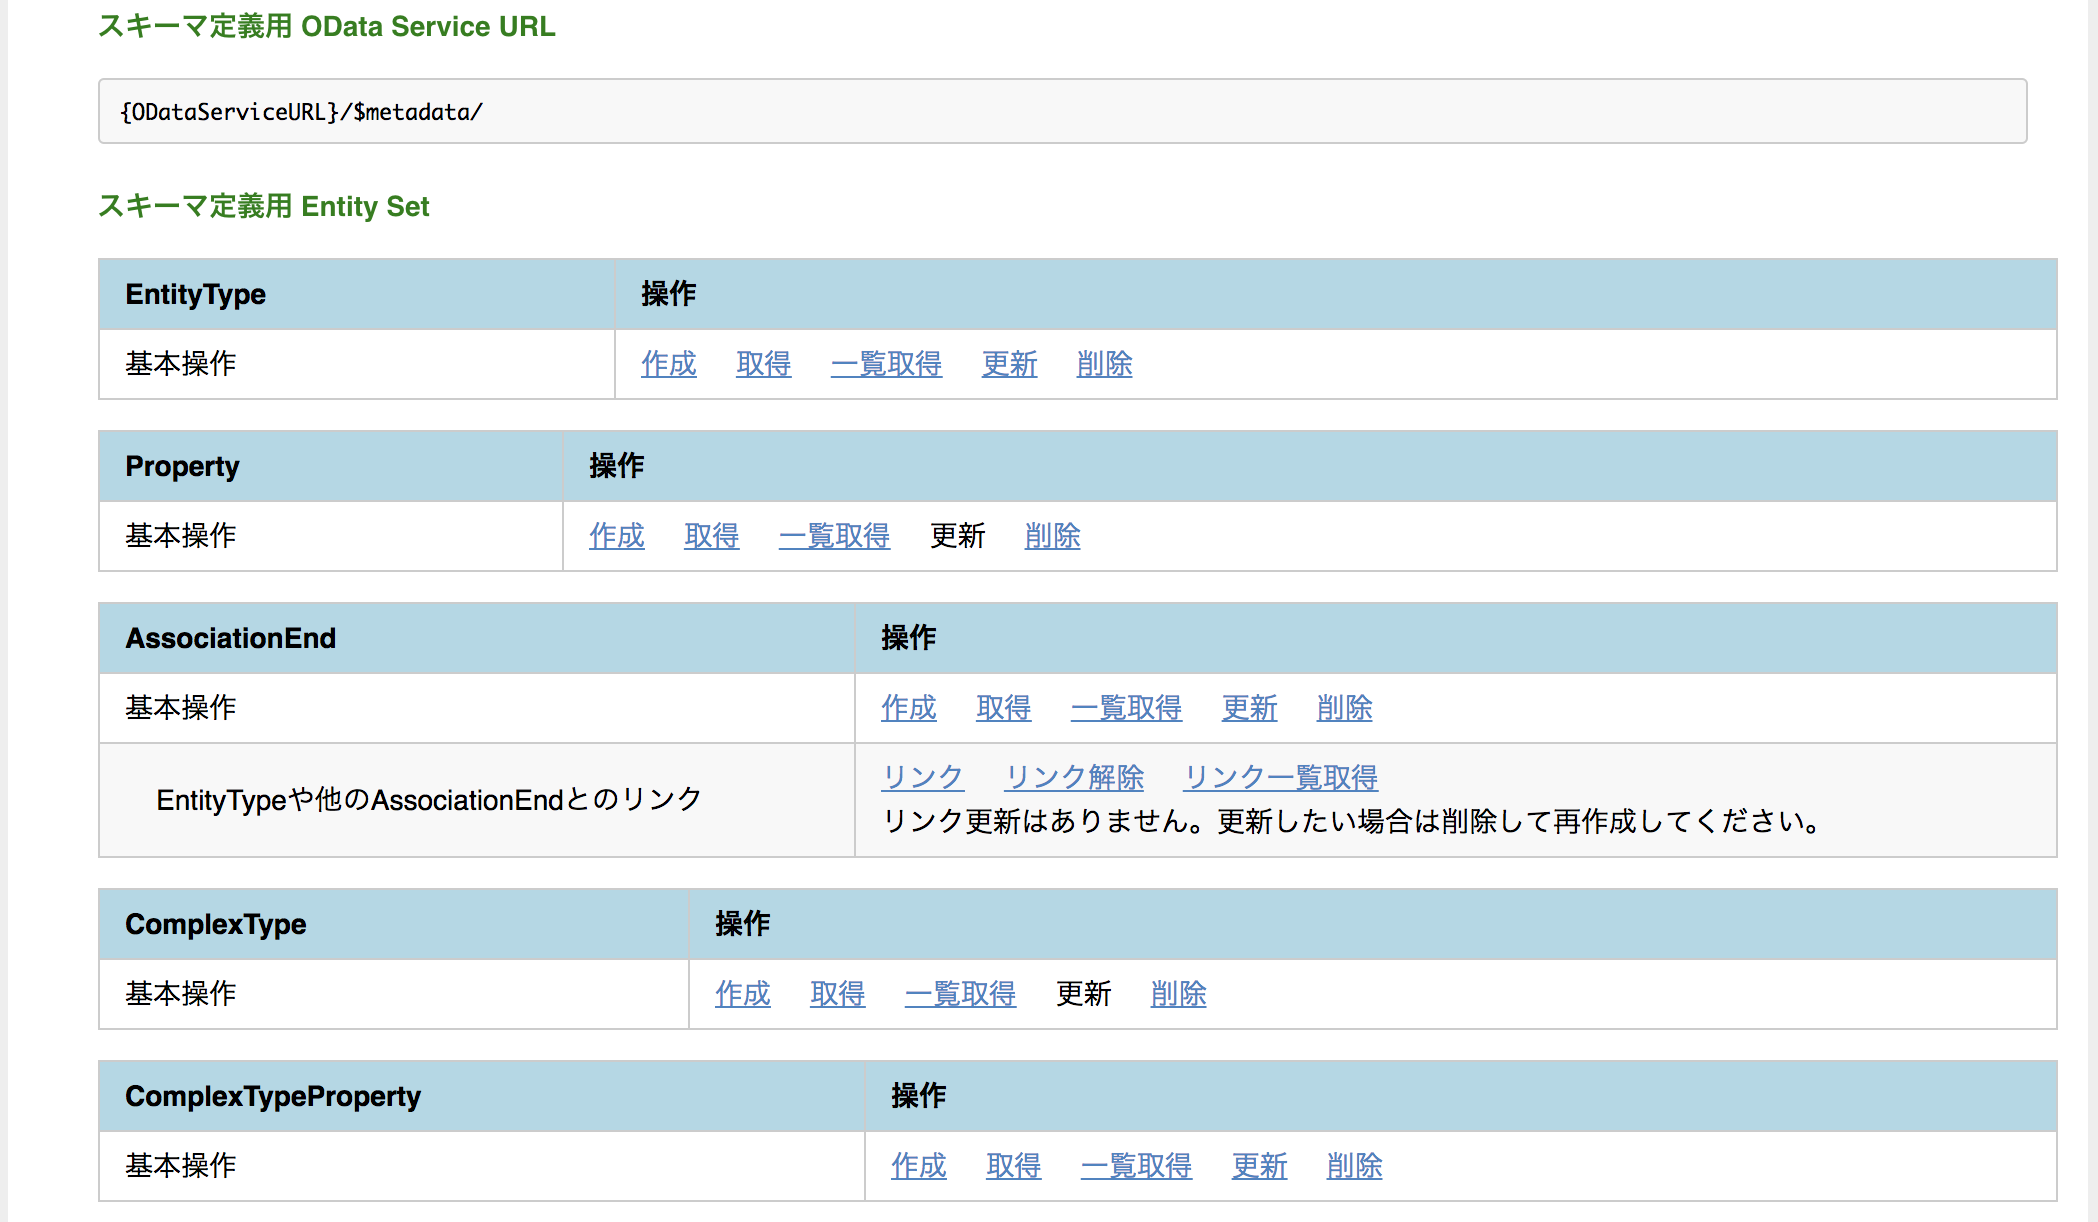
CollectionやEntityType、EntitySet などをざっくり把握できれば、ほぼRDBと似た操作でデータを扱うことができるので、大いに活用したい機能ですね。
メニュー
-
10<セルとボックスについて理解する>
-
11<ホームアプリを触ってみる>
-
12<ユニットマネージャって便利じゃん>
-
13<テンプレートアプリってなんぞや>
-
14<自分のアプリケーション>