はじめに
先日(2019/01/17)ついに、Google Cloud Functions で Go がベータサポートされました!
Get Go-ing with Cloud Functions: Go 1.11 is now a supported language
今回は OpenWeatherMap の API を使って簡単な Slack Bot のスラッシュコマンドを作っていきます。
ソースコードはこちらです。
https://github.com/takasp/go-slackbot-cloud-functions-sample
Slack Bot のサンプルはこちらです。

環境
- macOS High Sierra Version 10.13.6
- Homebrew 2.0.0
- ngrok 2.2.8
- Go 1.11.5
- nlopes/slack v0.5.0
Slack アプリを作成する
まずは、Slack アプリを作成していきましょう。
-
Your Apps から、
Create New Appを開きます。 - 以下の項目を入力して、
Create Appで作成します。
サンプルでは、weather-botというアプリ名で進めます。
- App Name : Slack Bot のアプリ名
- Development Slack Workspace : Slack Bot を動かすワークスペース
-
作成が完了すると、Slack アプリの
Basic Informationが表示されます。
Basic Informationページの中段にあるApp CredentialsのVerification Tokenを後で利用するのでコピーしておいてください。
サンプルでは、Verification Tokenを利用して、Slack からのリクエストを検証します。

-
Basic Informationページの下段にあるDisplay Informationでは Slack アプリの表示を設定できます。アイコンなどを変えると愛着が湧きますし、視覚的に役割もイメージしやすくなるので適宜設定すると良いと思います。
gcloud コマンドのインストール
以下のドキュメントから gcloud コマンドをインストールしておきましょう。
Google Cloud SDK documentation
gcloud components
コンポーネントのアップデートとベータコンポーネントをインストールしておきます。
$ gcloud components update
$ gcloud components install beta
初期セットアップ
任意のディレクトリで Go Modules を使って開発していきます。
$ export GO111MODULE=on
$ go mod init
$ go get github.com/nlopes/slack
Hello World
まずは、Hello World の Slack Bot を作っていきましょう。
Slack 上で /hello を実行するとレスポンスが返ってくるスラッシュコマンドを作成します。
この Hello World は、nlopes/slack の examples を参考に作成しています。
package function

import (
	"encoding/json"
	"net/http"
	"os"

	"github.com/nlopes/slack"
)

var verificationToken string

// グローバル変数を定義して、init で取得処理を書くと次回の関数呼び出し時にも再利用される。
// https://cloud.google.com/functions/docs/bestpractices/tips#use_global_variables_to_reuse_objects_in_future_invocations
func init() {
	verificationToken = os.Getenv("VERIFICATION_TOKEN")
}

func HelloCommand(w http.ResponseWriter, r *http.Request) {
	// スラッシュコマンドのリクエストをパースする。
	s, err := slack.SlashCommandParse(r)
	if err != nil {
		w.WriteHeader(http.StatusInternalServerError)
		return
	}

	// Slack から来るリクエストに付与される ValidateToken をチェックする。
	if !s.ValidateToken(verificationToken) {
		w.WriteHeader(http.StatusUnauthorized)
		return
	}

	switch s.Command {
	case "/hello":
		// ResponseType のデフォルトは ephemeral になっており、ephemeral では、投稿者にしかメッセージが表示されない。
		// チャンネル全体に投稿する時は、in_channel を指定する。
		params := &slack.Msg{ResponseType: "in_channel", Text: "こんにちは、<@" + s.UserID + ">さん"}
		b, err := json.Marshal(params)
		if err != nil {
			w.WriteHeader(http.StatusInternalServerError)
			return
		}
		w.Header().Set("Content-Type", "application/json")
		w.Write(b)
	default:
		w.WriteHeader(http.StatusInternalServerError)
		return
	}
}
hello コマンドを Google Cloud Functions にデプロイ
作成した Hello World をデプロイしていきます。
$VERIFICATION_TOKEN には、最初の Slack アプリ作成時にコピーした Verification Token を設定してください。
$ gcloud functions deploy hello \
--entry-point HelloCommand \
--runtime go111 \
--set-env-vars VERIFICATION_TOKEN=$VERIFICATION_TOKEN \
--trigger-http
デプロイが完了すると以下のようなエンドポイントが発行されるので、エンドポイントをコピーしておきます。
httpsTrigger:
  url: https://us-central1-[project name].cloudfunctions.net/hello
hello コマンドの Slack アプリの設定
最初に作成した Slack アプリでは、アプリを作成しただけで、コマンドに対応するリクエスト先を設定する必要があります。
再び、Slack アプリの Basic Information を開いて設定をしていきましょう。
- 有効にする機能を設定していきます。今回はスラッシュコマンドを有効にしたいので、
Slash Commandsを開きます。

-
Create New Commandを開いて、スラッシュコマンドの設定をして保存します。
- Command :
/hello - Request URL : デプロイ時に発行されたエンドポイントを指定
- Short Description : 任意
 3. スラッシュコマンド作成後、`Basic Information` に戻ると `Add features and functionality` にチェックが付いていることが分かります。
チェックが付いていたら `Install App to Workspace` から Slack アプリを追加しましょう。

4. `許可する` を押すと Slack アプリが連携されます。
3. スラッシュコマンド作成後、`Basic Information` に戻ると `Add features and functionality` にチェックが付いていることが分かります。
チェックが付いていたら `Install App to Workspace` から Slack アプリを追加しましょう。

4. `許可する` を押すと Slack アプリが連携されます。

Slack Bot で hello コマンドの確認
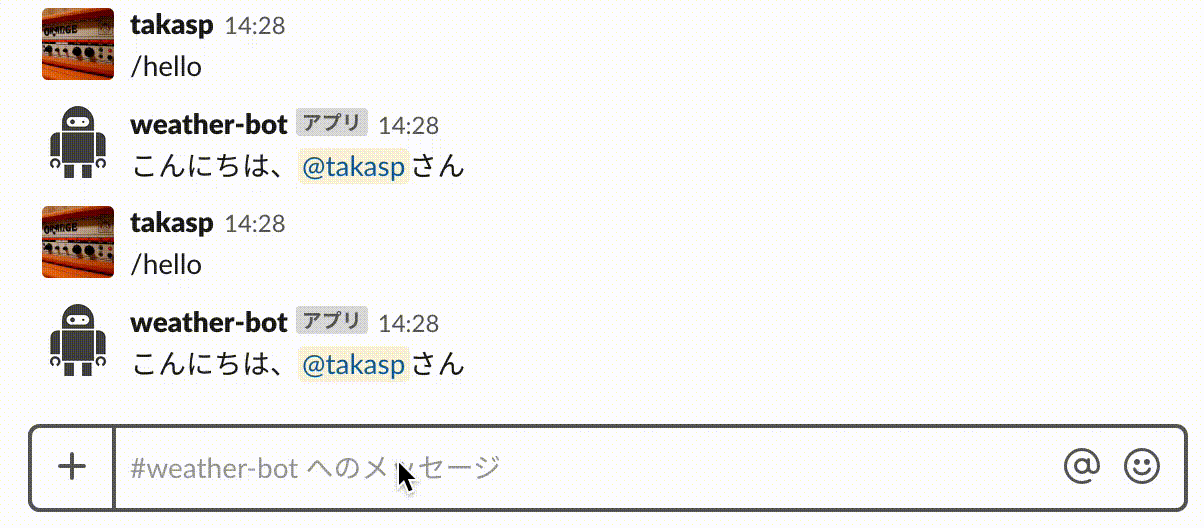
以下のように、追加したワークスペースの任意チャンネルで /hello コマンドを実行すると、「こんにちは、〇〇さん」という返答が返って来れば完了です。
お天気 Slack Bot を作成
それでは、現在の天気を教えてくれる Slack Bot を作っていきましょう。
Slack 上で /weather 地域 を実行するとレスポンスが返ってくるスラッシュコマンドを作成します。
今回のサンプルでは、単純化するために「東京・大阪・名古屋」のみに反応するスラッシュコマンドを作成します。
ローカル開発
先ほどの Hello World では、コード作成後すぐに Google Cloud Functions にデプロイしましたが、実際の開発では、ローカルで動作確認しながら開発したいものです。
そこで main 関数を作成して、ngrok というローカルホストをパブリックな URL としてトンネルしてくれるツールを用いて、ローカルで開発できるようにしていきます。
main 関数
ローカル開発時のエントリーポイントになる main 関数を作成します。
ここでは、cmd ディレクトリを作成して、main 関数を作成しています。
package main

import (
	"net/http"

	"github.com/takasp/go-slackbot-cloud-functions-sample"
)

func main() {
	http.HandleFunc("/hello", function.HelloCommand)
	http.ListenAndServe(":8080", nil)
}
ngrok のユーザー作成
ngrok のサイトからユーザー登録をします。GitHub や Google アカウントとの連携に対応しているのでお好みの方法でアカウントを作成してください。
ngrok のインストール
ngrok をインストールします。Mac 環境では、Homebrew でインストールしていきます。他にも npm やバイナリファイルからでもインストール可能です。
$ brew cask install ngrok
ngrok の設定
ngrok の設定をします。ngrok 登録後に表示されている Connect your accountから認証トークンを取得して、表示されているコマンドを実行します。
$ ngrok authtoken <YOUR_AUTH_TOKEN>
ngrok の実行
main 関数で 8080 ポートでサーバーを立てたので、ngrok で 8080 ポートでトンネルするように起動します。
$ ngrok http 8080
実行すると以下のような表示がされます。
https の Forwarding URL をコピーしておいてください。
ngrok by @inconshreveable                                  (Ctrl+C to quit)

Session Status                online
Account                       XXXXXXXXX@XXXXX.XXXX (Plan: Free)
Version                       2.2.8
Region                        United States (us)
Web Interface                 http://127.0.0.1:4040
Forwarding                    http://XXXXXXX.ngrok.io -> localhost:8080
Forwarding                    https://XXXXXXX.ngrok.io -> localhost:8080

Connections                   ttl     opn     rt1     rt5     p50     p90
                              0       0       0.00    0.00    0.00    0.00
main 関数の実行
$VERIFICATION_TOKEN には、gcloud functions deploy コマンドでも指定した Slack アプリの Verification Token を指定してください。
$ VERIFICATION_TOKEN=$VERIFICATION_TOKEN go run cmd/main.go
これで、Slack アプリのリクエスト先に ngrokの URL を指定すればローカルにリクエストが飛んできます。
引き続き、お天気 Slack Bot を作成していきましょう。
OpenWeatherMap の API を利用する
今回のサンプルは、お天気 Slack Bot ということで、いくつかサービスがある中の OpenWeatherMap の API を利用して、Slack Bot を作成していきます。
以下のサイトを参考にアカウントの作成と API キーの取得まで行いましょう。
API キーを取得できたら、コピーしておきます。
Slack の ボット で 今日の天気を通知する - JSON 取得編
weather コマンドのコードを定義する
APPID を環境変数から取得する
OpenWeatherMap の API キーを環境変数から取得できるように、VERIFICATION_TOKEN 同様、APP_ID を追加します。
var verificationToken string
+ var appId string

func init() {
	verificationToken = os.Getenv("VERIFICATION_TOKEN")
+ 	appId = os.Getenv("APP_ID")
}
OpenWeatherMap のレスポンスを型定義する
今回のサンプルで表示するにあたって必要な部分に絞って型定義しています。
以下から使用している API のレスポンス詳細が確認できます。
Weather parameters in API response
type weatherData struct {
	Id      int         `json:"id"`
	Name    string      `json:"name"`
	Weather []Weather   `json:"weather"`
	Main    Main        `json:"main"`
	Wind    Wind        `json:"wind"`
	Dt      json.Number `json:"dt"`
}

type Weather struct {
	Id          int    `json:"id"`
	Main        string `json:"main"`
	Description string `json:"description"`
	Icon        string `json:"icon"`
}

type Main struct {
	Temp float64 `json:"temp"`
}

type Wind struct {
	Speed float64 `json:"speed"`
}
WeatherCommand を定義する
/weather コマンドの実体を定義していきます。
「東京・大阪・名古屋」に限定して天気を取得するので、都市 ID を取得して一意に指定しています。
各都市 ID は以下のとおりです。
- 東京 : 1850147
- 大阪 : 1853908
- 名古屋 : 1856057
都市 ID は以下から取得できます。
http://bulk.openweathermap.org/sample/
func WeatherCommand(w http.ResponseWriter, r *http.Request) {
	s, err := slack.SlashCommandParse(r)
	if err != nil {
		w.WriteHeader(http.StatusInternalServerError)
		return
	}

	if !s.ValidateToken(verificationToken) {
		w.WriteHeader(http.StatusUnauthorized)
		return
	}

	switch s.Command {
	case "/weather":
		text := strings.Fields(s.Text)
		// 引数が指定されていなければ、引数不足を通知する。
		if len(text) == 0 {
			// ResponseType を指定していないので、デフォルトの ephemeral になり、投稿者にしか表示されない。
			params := &slack.Msg{Text: "引数に都市名を入力してください。"}
			b, err := json.Marshal(params)
			if err != nil {
				w.WriteHeader(http.StatusInternalServerError)
				return
			}
			w.Header().Set("Content-Type", "application/json")
			w.Write(b)
			return
		}

		var data weatherData
		var city string

		// text[0] に /weather コマンドの第一引数が含まれる。
		switch text[0] {
		case "tokyo":
			city = "東京"
			data, err = query("1850147")
		case "osaka":
			city = "大阪"
			data, err = query("1853908")
		case "nagoya":
			city = "名古屋"
			data, err = query("1856057")
		default:
			// 該当しなければ、対応していないことを通知する。
			params := &slack.Msg{Text: text[0] + "には対応していません。"}
			b, err := json.Marshal(params)
			if err != nil {
				w.WriteHeader(http.StatusInternalServerError)
				return
			}
			w.Header().Set("Content-Type", "application/json")
			w.Write(b)
			return
		}
		if err != nil {
			http.Error(w, err.Error(), http.StatusInternalServerError)
			return
		}

		params := weatherSlackMessageBuilder(city, data)
		b, err := json.Marshal(params)
		if err != nil {
			w.WriteHeader(http.StatusInternalServerError)
			return
		}
		w.Header().Set("Content-Type", "application/json")
		w.Write(b)
	default:
		w.WriteHeader(http.StatusInternalServerError)
		return
	}
}

// weather コマンドから Slack にレスポンスするメッセージを作成
func weatherSlackMessageBuilder(city string, data weatherData) *slack.Msg {
	// 天気の詳細・気温・風速を事前に定義
	text := fmt.Sprintf("%s(%s)", data.Weather[0].Main, data.Weather[0].Description)
	temperature := fmt.Sprintf("%.0f ℃", math.Floor(data.Main.Temp+.5))
	windSpeed := fmt.Sprintf("%.1f m/s", math.Floor(data.Wind.Speed+.5))

	attachment := slack.Attachment{
		Fallback:  "Current Weather",
		Title:     "現在の" + city + "のお天気",
		// タイトルをクリックすると OpenWeatherMap のページを開くように設定している。
		TitleLink: "https://openweathermap.org/city/" + strconv.Itoa(data.Id),
		Text:      text,
		// 横並びで「気温」と「風速」を表示している。
		Fields: []slack.AttachmentField{
			{
				Title: "気温",
				Value: temperature,
				Short: true,
			},
			{
				Title: "風速",
				Value: windSpeed,
				Short: true,
			},
		},
		// メッセージの横にお天気マークを表示している。
		ThumbURL:   "https://openweathermap.org/img/w/" + data.Weather[0].Icon + ".png",
		// フッターに OpenWeatherMap から取得していることと、OpenWeatherMap が天気を取得している時刻をそのまま表示している。
		Footer:     "OpenWeatherMap",
		FooterIcon: "https://openweathermap.org/themes/openweathermap/assets/vendor/owm/img/icons/logo_60x60.png",
		Ts:         data.Dt,
	}

	var attachments []slack.Attachment

	params := &slack.Msg{ResponseType: "in_channel", Attachments: append(attachments, attachment)}
	return params
}

// OpenWeatherMap の weather API を実行
func query(cityId string) (weatherData, error) {
	// クエリストリングには、以下を定義してリクエストしている。
	// units のデフォルトはケルビンなので、metric を指定して、摂氏に変更している。
	// APPID には、OpenWeatherMap アカウント作成時に取得した API キーを指定する。
	// id には、都市 ID を指定すると一意に特定できる。
	resp, err := http.Get("http://api.openweathermap.org/data/2.5/weather?units=metric&APPID=" + appId + "&id=" + cityId)
	if err != nil {
		return weatherData{}, err
	}

	defer resp.Body.Close()

	var d weatherData

	if err := json.NewDecoder(resp.Body).Decode(&d); err != nil {
		return weatherData{}, err
	}

	return d, nil
}
main 関数
ローカルでも確認できるように /weather のパスを追加します。
func main() {
	http.HandleFunc("/hello", function.HelloCommand)
+ 	http.HandleFunc("/weather", function.WeatherCommand)
	http.ListenAndServe(":8080", nil)
}
weather コマンドの Slack アプリの設定
hello コマンド同様、weather コマンドもリクエスト先を設定していきます。
再び、Slack アプリの Slash Commands を開いて設定をしていきましょう。
-
Create New Commandを開いて、スラッシュコマンドの設定をして保存します。
- Command :
/weather - Request URL : ngrok の URL と
/weatherを指定 - Short Description : 任意
- Usage Hint : 任意(引数のヒントを説明すると親切です。)

main 関数の実行
ソースコードが変更され、環境変数も追加されたので、再度 main 関数を実行します。
$APP_ID には、OpenWeatherMap の API キーを指定してください。
$ VERIFICATION_TOKEN=$VERIFICATION_TOKEN APP_ID=$APP_ID go run cmd/main.go
Slack Bot で weather コマンドの確認
以下のように、追加したワークスペースの任意チャンネルで /weather コマンドの引数にtokyo・osaka・nagoyaをそれぞれ指定して実行すると、「東京・大阪・名古屋」のお天気が取得できれば完了です。
これで、ローカルへのリクエストで Slack Bot が動作することが分かりました。
weather コマンドを Google Cloud Functions にデプロイ
作成したお天気 Slack Bot をデプロイしていきます。
$VERIFICATION_TOKEN と $APP_ID は、ローカル開発で使用したものと同じものを設定してください。
$ gcloud functions deploy weather \
--entry-point WeatherCommand \
--runtime go111 \
--set-env-vars VERIFICATION_TOKEN=$VERIFICATION_TOKEN,APP_ID=$APP_ID \
--trigger-http
デプロイが完了すると以下のようなエンドポイントが発行されるので、エンドポイントをコピーしておきます。
httpsTrigger:
  url: https://us-central1-[project name].cloudfunctions.net/weather
weather コマンドの Slack アプリの設定を変更
リクエスト先が変更になったため、weather コマンドのリクエスト先を変更していきます。
再び、Slack アプリの Slash Commands を開いて設定をしていきましょう。
-
weatherコマンドの編集から、スラッシュコマンドの設定を変更して保存します。
- Request URL : デプロイ時に発行されたエンドポイントを指定

再度 Slack Bot で weather コマンドの確認
改めて、追加したワークスペースの任意チャンネルで /weather コマンドの引数にtokyo・osaka・nagoyaをそれぞれ指定して実行すると、「東京・大阪・名古屋」のお天気が取得できれば完了です。
お掃除
デプロイしたものを削除するには、以下のコマンドを実行します。
$ gcloud functions delete hello
$ gcloud functions delete weather
さいごに
Go が使えるようになった Google Cloud Functions で Slack Bot を作ってみました。
関数のインターフェースが net/http なので main 関数を定義すればローカル開発が容易なのも嬉しいポイントです。
欲を言えば、Realize や fresh といったツールを使ったホットリロードでの開発までしたかったのですが、Realize は、2019年に出る新バージョンでないと Go Modules に対応していない模様なのと、fresh は、main 関数と go.mod や go.sum が同じルートディレクトリにないと上手く動かない雰囲気の挙動があったので断念しました。
もっと上手な開発の知見をお持ちの方はご指摘いただければと思います。
参考
Cloud FunctionsにGoがサポートされたので使ってみた
Google Cloud Functions documentation
nlopes/slack
ngrokが便利すぎる
Slack の ボット で 今日の天気を通知する - JSON 取得編
Go With Peter Bourgon : How I Start.
Realize が Go 1.11 の Modules で使えない