この記事は #NervesJP Advent Calendar 2020 の6日目,の代打です.歳末助け合い運動〜![]()
5日目は,@MzRyuKaさんの「nerves_system_*から読み解くNervesの動向」でした.
やっぱみんなNerves RepositoriesをWatchしてるんですね〜![]()
さて fukuoka.ex Elixir/Phoenix Advent Calendar 2020 の4日目に,こんな記事をお送りしました.Nervesの開発環境をお手軽に整えられまっせ!!というやつです.
使い方の解説は嬉しいんだけど,どうやってるのか知りたい!!という声がいっぱい寄せられませんでした.なので本記事では,Dockerfileの記述やVS Code dev-containerの設定方法などを解説します.加えて,某ハンズオン向けに仕込んだカスタマイズ方法も紹介したいと思います.
なお本記事では,それぞれのリポジトリのRelease v0.2を対象として扱います.
- Dockerfile: https://github.com/NervesJP/docker-nerves/tree/v0.2
- VS Code: https://github.com/NervesJP/nerves-devcontainer/tree/v0.2
いろいろ使い勝手の向上のために鋭意進化中です!
もちろんcontribution大歓迎です.どしどしIssue/PRをお寄せください.
ちなみに中のヒトは docker-compose がまるでわかっていません^^;
Dockerfile
ナマモノはこちらから.
https://github.com/NervesJP/docker-nerves/blob/v0.2/Dockerfile
いろいろコダワルとキリがないのがDocker道ですが,誰にとっても嬉しいなるべく最小限かつ共通の記述のみに留めています.DockerとかNervesに詳しい方は,自分でどんどんオレオレカスタマイズして使っていただければです.
各行それぞれを追いながら説明していきます.
Elixir/Erlangのインストール
# docker-elixir 1.11.2
# https://hub.docker.com/_/elixir
FROM elixir:1.11.2
コメントにあるとおり,OfficialのDocker Imageを持ってきているだけです.
Elixir 1.11.2-otp-23のイメージを指定しています.ちなみにOSはDebian 10です.
NervesはElixir/Erlangのバージョンをちゃんと気にする必要があるので,ここはきちんとタグを指定することにしています.
なお余談ですが,Elixir 1.11.0のbugがNerves Projectで見つかって,Joseも交えてワイワイfixされてたりします.なのでNervesは1.11.0と1.11.1では動作しません.
Nerves用のパッケージのインストール
ENV DEBCONF_NOWARNINGS yes

# Install libraries for Nerves development
RUN apt-get update && \
    apt-get install -y build-essential automake autoconf git squashfs-tools ssh-askpass pkg-config curl && \
    rm -rf /var/lib/apt/lists/*

# [Optional] Uncomment this section to install libraries for customizing Nerves System
# RUN apt-get update && \
#    apt-get install -y libssl-dev libncurses5-dev bc m4 unzip cmake python && \
#    rm -rf /var/lib/apt/lists/*
Nerves公式Hexdocsの Installation / For Debian based systemsに従ったapt installをしています.
[Optional]のところは,Buildrootを使ったNerves Systemのカスタマイズをしたい場合には必要です.要は上級者向けです.Docker環境で使いたい方は少ないんじゃないかなぁと思われますが,でもまぁいちおうコメントで書いておきました.
fwupのインストール
# Install fwup (https://github.com/fhunleth/fwup)
ENV FWUP_VERSION="1.8.2"
RUN wget https://github.com/fhunleth/fwup/releases/download/v${FWUP_VERSION}/fwup_${FWUP_VERSION}_amd64.deb && \
    apt-get install -y ./fwup_${FWUP_VERSION}_amd64.deb && \
    rm ./fwup_${FWUP_VERSION}_amd64.deb && \
    rm -rf /var/lib/apt/lists/*
fwup とは,Nervesのファームウェアを構築したり,microSDカードへの書込みを行うためのユーティリティです.
https://github.com/fhunleth/fwup
ここでは,Debian/Ubuntu AMD64向けのapt packageをダウンロードしてインストールしています.
Hexパッケージのインストール
# Install hex and rebar
RUN mix local.hex --force
RUN mix local.rebar --force
# Install Mix environment for Nerves
RUN mix archive.install hex nerves_bootstrap 1.10.0 --force
ビルドツールの hex, rebar/rebar3 と,NervesのMix環境である nerves_bootstrap をインストールしています.
mix コマンドでのインストールはデフォルトだとインタラクティブに Yes する必要があり,docker buildには具合が悪いです.そのため --force オプションを付けています.
nerves_bootstrap については,ここもバージョンを揃えておいたほうが良いかなということで,明示的に指定しています.
CMDの指定
CMD ["/bin/bash"]
最後に,コンテナ実行時のコマンドを指定しています.
実はElixir Official Imageでは iex が記述されています.Nerves開発にとっては気持ちが悪いので,bashに上書きしておくことにしました.
Tips: Docker Hubとの連携
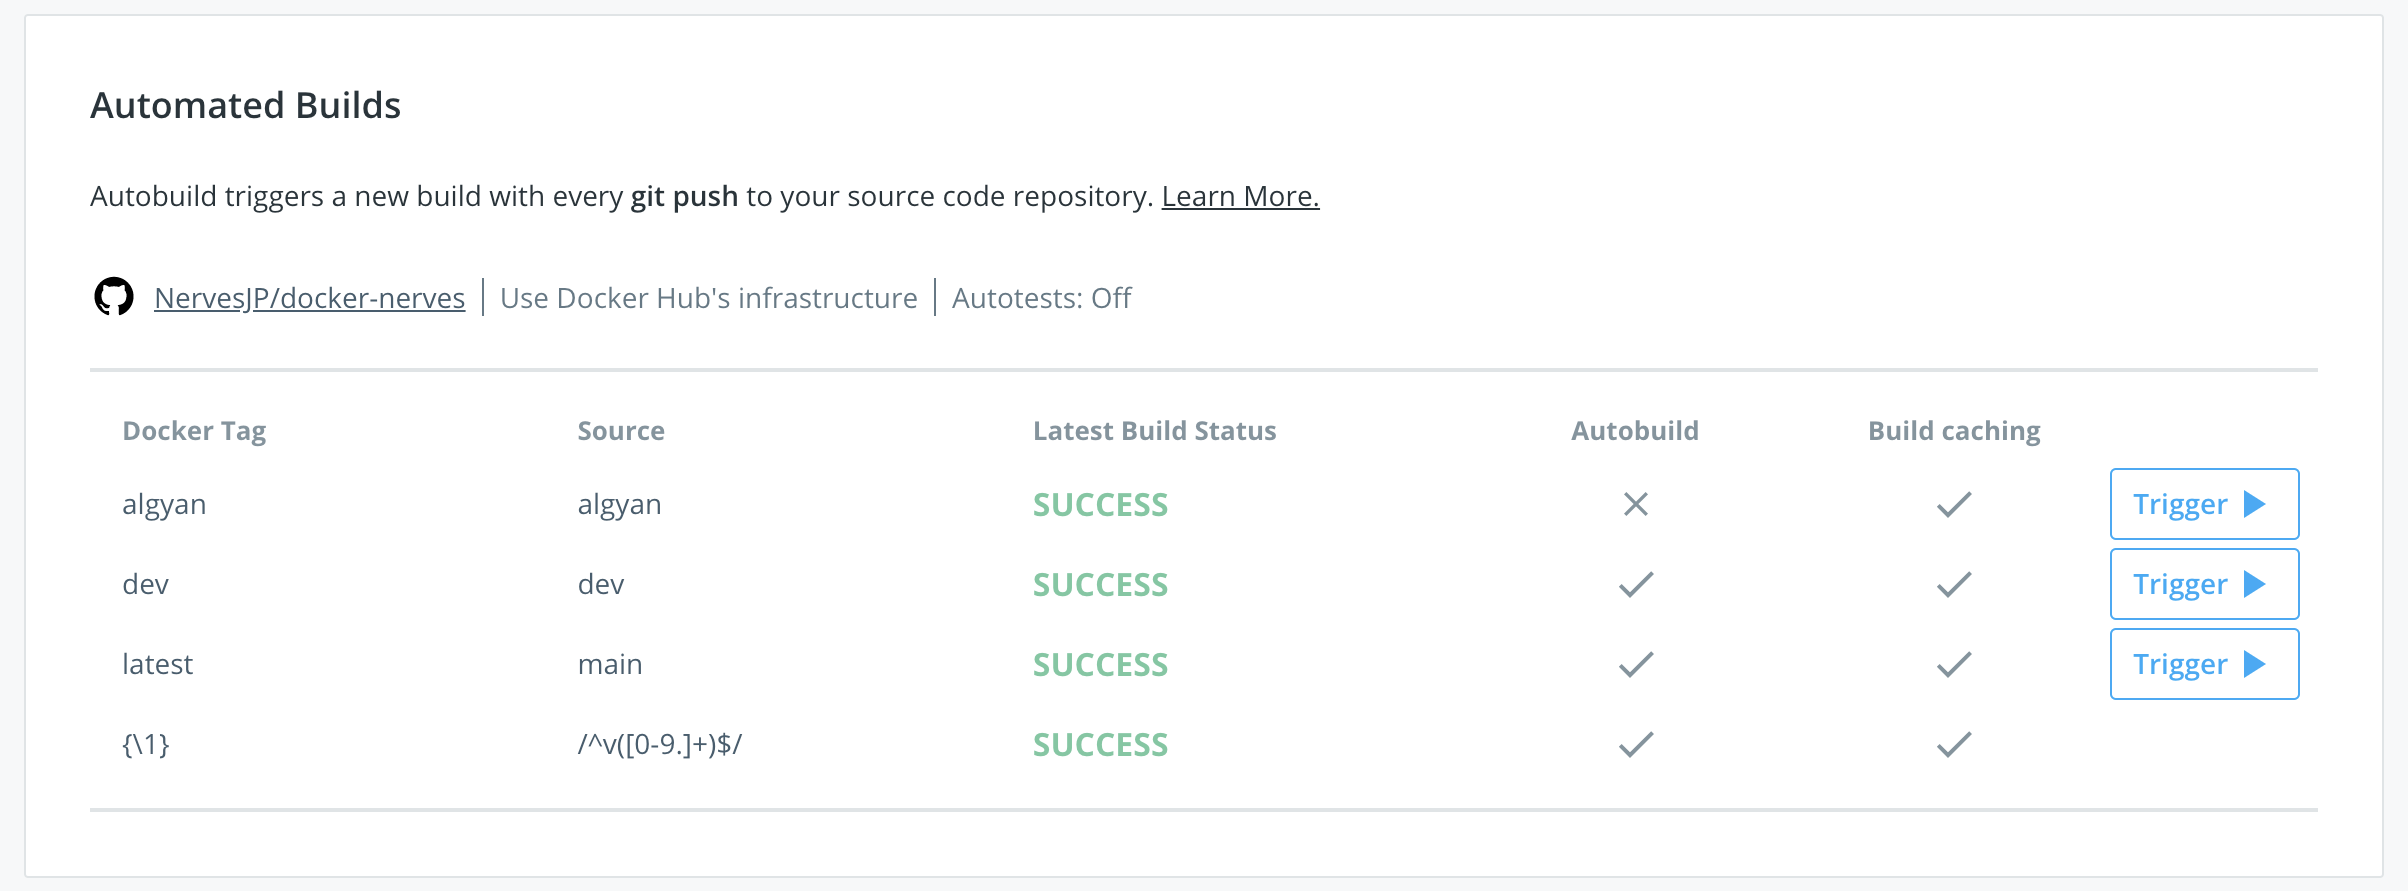
GitHubとDocker Hubを連携したら良い感じにCI/CDできるらしいっす.
こんな感じにAutomated Builds Ruleを仕込んでます.確かに便利〜
(algyan は某ハンズオン用です)
VS Code設定
次はVS Code dev-containerの設定です.コレ自体の解説は,他の記事を読んだほうが早いです.
- (MS公式) Visual Studio Code Remote Development
- VSCode Remote Containerが良い - Qiita
- DockerとRemote Containersでの開発環境が最高過ぎる - Sweet Escape
設定方法は簡単で, ./devcontainer/devcontainer.json というファイルでポチポチとプロパティを書いていくだけです.Properties referenceはこんな感じ.
https://code.visualstudio.com/docs/remote/devcontainerjson-reference
ということでナマモノはこちらから.
https://github.com/NervesJP/nerves-devcontainer/blob/v0.2/.devcontainer/devcontainer.json
コチラも各行それぞれを追いながら説明していきます.
コンテナ名とイメージの指定
{
	"name": "Nerves",
	// Pull Docker image from DockerHub  https://hub.docker.com/r/nervesjp/nerves
	"image": "nervesjp/nerves:0.2",
	// NOTE: original Dockerfile is maintained at https://github.com/NervesJP/docker-nerves/blob/main/Dockerfile
	// You can also build Docker image locally by locating above file to here and uncomment next line
	//"dockerFile": "Dockerfile",
コンテナ名を"Nerves"にしています.これがVS Code左下ステータスバーの緑色のところに表示されます.
イメージは,Docker Hubにpushしてあるビルド済みのイメージを指定しています.コメントにもある通り,Dockerfileをローカルに置いて直接ビルドすることもできます.
マウントの指定
	"mounts": [
		"source=${localWorkspaceFolder}/.hex,target=/root/.hex,type=bind,consistency=cached",
		"source=${localWorkspaceFolder}/.nerves,target=/root/.nerves,type=bind,consistency=cached",
		"source=${localWorkspaceFolder}/.ssh,target=/root/.ssh,type=bind,consistency=cached"
	],
ホストとDockerコンテナの間でマウントするディレクトリを指定しています.
ここ割りとコダワリどころで,Nerves開発に使う上記3つのディレクトリをマウントするようにしました.これらはカレントディレクトリ(GitHubのディレクトリ)にもともと作ってあります.${HOME}でも良いかなと悩んだのですが,Nervesはじめてな方はこれらのディレクトリが無いかなということで,この形式に落ち着いています.
なお dev-container を開いたホストのディレクトリは,コンテナ内の /workspaces/nerves-devcontainer に自動的にマウントされます.
シェルの設定
	"settings": {
		"terminal.integrated.shell.linux": "bash"
	},
まぁ定番ということでbashを指定しています.
ここは各人でコダワリあるかもしれませんが,宗教戦争は控えましょう^^;
VS Code拡張機能のインストール
	"extensions": [
		"jakebecker.elixir-ls"
	],
コンテナ内のVS Codeにて使用する拡張機能を指定しています.
とりあえずベタにElixirLSだけにしてあります.オススメのプラグイン教えてください〜
Nerves向け環境変数の設定
	// This section sets environment variables for Nerves development
	"remoteEnv": {
		"MIX_TARGET": "rpi3",
		"WIFI_SSID": "xxxxxxxx",
		"WIFI_PSK": "yyyyyyyy"
	}
[使い方篇 / 環境変数の設定] でも紹介していますが,VS Code拡張機能の便利なところで,コンテナ内のシェル環境変数を設定することができます.
よく忘れがちな ${MIX_TARGET} を入れておきました.
あとはVintageNet WiFiの設定をするための環境変数です.これらの環境変数の使い方は @kentaro さんのナイスな記事をご参照いただくのが良いかと.
ご利用の際には,これらをお好みに合わせていただければです.
ユーザの設定
	// Uncomment to connect as a non-root user. More info: https://aka.ms/vscode-remote/containers/non-root.
	//"remoteUser": "vscode"
}
コンテナ内のユーザを設定できますが,まぁrootでも良いかなということでコメントにしてあります.
ハンズオンに向けた調整
[使い方篇] では,devcontainerこんな嬉しさがあるぜっ!ってのを紹介しました.
- ハンズオンの開催を計画する時にすごく頭を悩ませるのが,参加者の環境を揃えることです.DockerfileとかVS Codeの各種設定ファイルを調整すれば,これもお手軽に解消できます!!
- |> [PR]参考例[広告]
- |> この例の導入方法[ステマ]
もともとdev-container環境を整備したのは,このハンズオンに向けた準備のためでした.
じゃあどうやってカスタマイズしているの?を紹介します.
Dockerfile
Dockerfile側は,v0.1から algyan branchを生やして整備しました.
GitHubのWebページではこんな感じです.
https://github.com/NervesJP/docker-nerves/compare/v0.1...algyan
ターミナルではこんな感じです.これもブロックごとに説明しましょう.
$ git diff v0.1..algyan Dockerfile
diff --git a/Dockerfile b/Dockerfile
index 95ce84e..5cbadf5 100644
--- a/Dockerfile
+++ b/Dockerfile
@@ -29,4 +29,28 @@ RUN mix local.rebar --force
 # Install Mix environment for Nerves
 RUN mix archive.install hex nerves_bootstrap --force

+# Download archives of Nerves artifacts on Docker build process
+RUN mkdir -p ~/.nerves/dl
+# Alghough the latest version of nerves_system_rpi4 is now v1.13.1, we found
+# the issue about WiFi connection to 5GHz AP on this version.
+# So we decided to download both versions to avoid confusion on ALGYAN hands-on.
+RUN wget -q -P ~/.nerves/dl/ https://github.com/nerves-project/nerves_system_rpi4/releases/download/v1.13.0/nerves_system_rpi4-portable-1.13.0-366303C.tar.gz
+RUN wget -q -P ~/.nerves/dl/ https://github.com/nerves-project/toolchains/releases/download/v1.3.2/nerves_toolchain_arm_unknown_linux_gnueabihf-linux_x86_64-1.3.2-E31F29C.tar.xz
+RUN wget -q -P ~/.nerves/dl/ https://github.com/nerves-project/nerves_system_rpi4/releases/download/v1.13.1/nerves_system_rpi4-portable-1.13.1-C916C86.tar.gz
+RUN wget -q -P ~/.nerves/dl/ https://github.com/nerves-project/toolchains/releases/download/v1.3.2/nerves_toolchain_aarch64_unknown_linux_gnu-linux_x86_64-1.3.2-7C57FE3.tar.xz
+
今回の準備で特に気にしたことは,ハンズオンの最中の通信量を少しでも削減することでした.
ALGYANイベントはMS Teamsでオンライン開催ですので,負荷は小さいほうがよいです.また,ラズパイ4を参加者にプレゼント!ということで,ターゲットはrpi4だけ気にすればよいです.
ということで,mix deps.getの際にダウンロードしてくるnerves_systemパッケージをコンテナ内に入れ込むことにしました.
v1.13.0とv1.13.1の両方があるのは,まぁいろいろな事情があります^^;
+# COPY SSH keys (id_rsa / id_rsa.pub) to `/root/.ssh/` on Docker dev-container
+# Of course we understand that sharing SSH keys on GitHubit is dangerous, but
+# we employ this way to make the hands-on process more efficient.
+RUN mkdir -p /root/.ssh
+COPY .ssh/id_rsa /root/.ssh/
+RUN chmod 600 /root/.ssh/id_rsa
+COPY .ssh/id_rsa.pub /root/.ssh/
+COPY .ssh/config /root/.ssh/
+RUN chmod 600 /root/.ssh/config
+
今回のハンズオンでは,Nervesファームウェアをもう書き込み済み!のmicroSDカードをプレゼントしています.これは,dev-containerからはmix burnできない,,,という制約から来ています.
その代わり,SSH鍵をコンテナに入れ込むことができるので,そのあたりの設定をスキップすることができます.ただし,SSH鍵をみんなで同じの使い回すという,ちと危険が危ないやつですが^^;
ちなみに .ssh/config はこんな設定を書いてあります.
Host nerves.local
    ServerAliveInterval 10
    StrictHostKeyChecking no
最後に,シェルの設定をちょっと入れ込んでいます.
+# Append some environmental variables for hands-on
+RUN echo "export PS1=\"\n\[\033[0;32m\]\u@\h \[\033[0;33m\]\w\n\\[\033[0m\]# \[\033[0m\]\"" >> ~/.bashrc
+RUN echo "export MIX_TARGET=rpi4" >> ~/.bashrc
+
 CMD ["/bin/bash"]
これもrpi4だけ気にすればよいので,${MIX_TARGET}を設定してあります.
また,${PS1}は私の好みです^^;
なおVS Code拡張機能のremoteEnvオプションを知ったのは,このあとのお話しでしたw
VS Code設定
こちらはハンズオンの混乱を避けるために,v0.1からファイルをコピってリポジトリをまるごと分けました.
https://github.com/NervesJP/nerves-algyan-devcontainer
またもや git diff を追って見ていきます.
$ git diff c17534 .devcontainer/devcontainer.json
diff --git a/.devcontainer/devcontainer.json b/.devcontainer/devcontainer.json
index 5ef137c..924e3f7 100644
--- a/.devcontainer/devcontainer.json
+++ b/.devcontainer/devcontainer.json
@@ -1,10 +1,17 @@
 {
-       "name": "Nerves",
-       "dockerFile": "Dockerfile",
-       "extensions": [
-               "jakebecker.elixir-ls"
-       ],
+       "name": "NervesJP-ALGYAN",
+       "image": "nervesjp/nerves:algyan",
+
+       //"mounts": [
+       //      "source=${localWorkspaceFolder}/.ssh,target=/root/.ssh,type=bind,consistency=cached"
+       //],
+
        "settings": {
                "terminal.integrated.shell.linux": "bash"
-       }
+       },
こっちはシンプルですね.
コンテナの名前を "NervesJP-ALGYAN" に変更しているのと,pullしてくるDocker imageのタグを :algyan にしているだけです.タグの変更だけでDocker Hub連携をよしなにできるの,マジ便利です.
あと .ssh/ 等のバインドはやめています.
おわりに
こんな感じで,おれのかんがえた最強のNerves dev-container環境を整えてみてください!!
#NervesJP Advent Calendar 2020 の7日目は @myasu さんによる「Elixir/NervesでPLC(多機能リレー)を作ってみた」です.PLCまるでわからん![]()

