android:fitSystemWindows とか、 setOnApplyWindowInsetsListener とか StatusBar とか NavigationBar とか DrawerLayoutとか、 SYSTEM_UI_FLAG_.. とか難しいですよね??
それを紐解いていきたいです。
それを理解していくにはAndroidでonApplyWindowInsets()がどのように呼ばれているのかを理解していく必要があります。
最初にまとめ
- ViewツリーでonApplyWindowInsets()が深さ優先で呼ばれる。
- 他のレイアウトでWindowInsetがconsumeされると意図した場所でonApplyWindowInsets()が呼ばれないので注意
- setSystemUiVisibilityでSYSTEM_UI_FLAG_LAYOUT_HIDE_NAVIGATIONなどを設定するとアプリのレイアウトがstatusbarなどに食い込むようになる
- setOnApplyWindowInsetsListenerでinsets.systemWindowInsetTopなどで、その食い込んでいる高さがわかるので、レイアウトにpaddingを設定してあげれば良い。
- レイアウトに元から設定されているpaddingを考慮してあげるように、chrisbanes/insetterなどを使おう
- RecyclerViewでpaddingも描画するには
clipToPadding="false"を使おう
onApplyWindowInsets()の呼ばれ方
まずレイアウトの初期段階でViewRootImplの中でdispatchApplyInsets()が呼ばれ、そこからdispatchApplyWindowInsets()が呼ばれます。
木の上のレイアウトから深さ優先探索で呼ばれていきます。
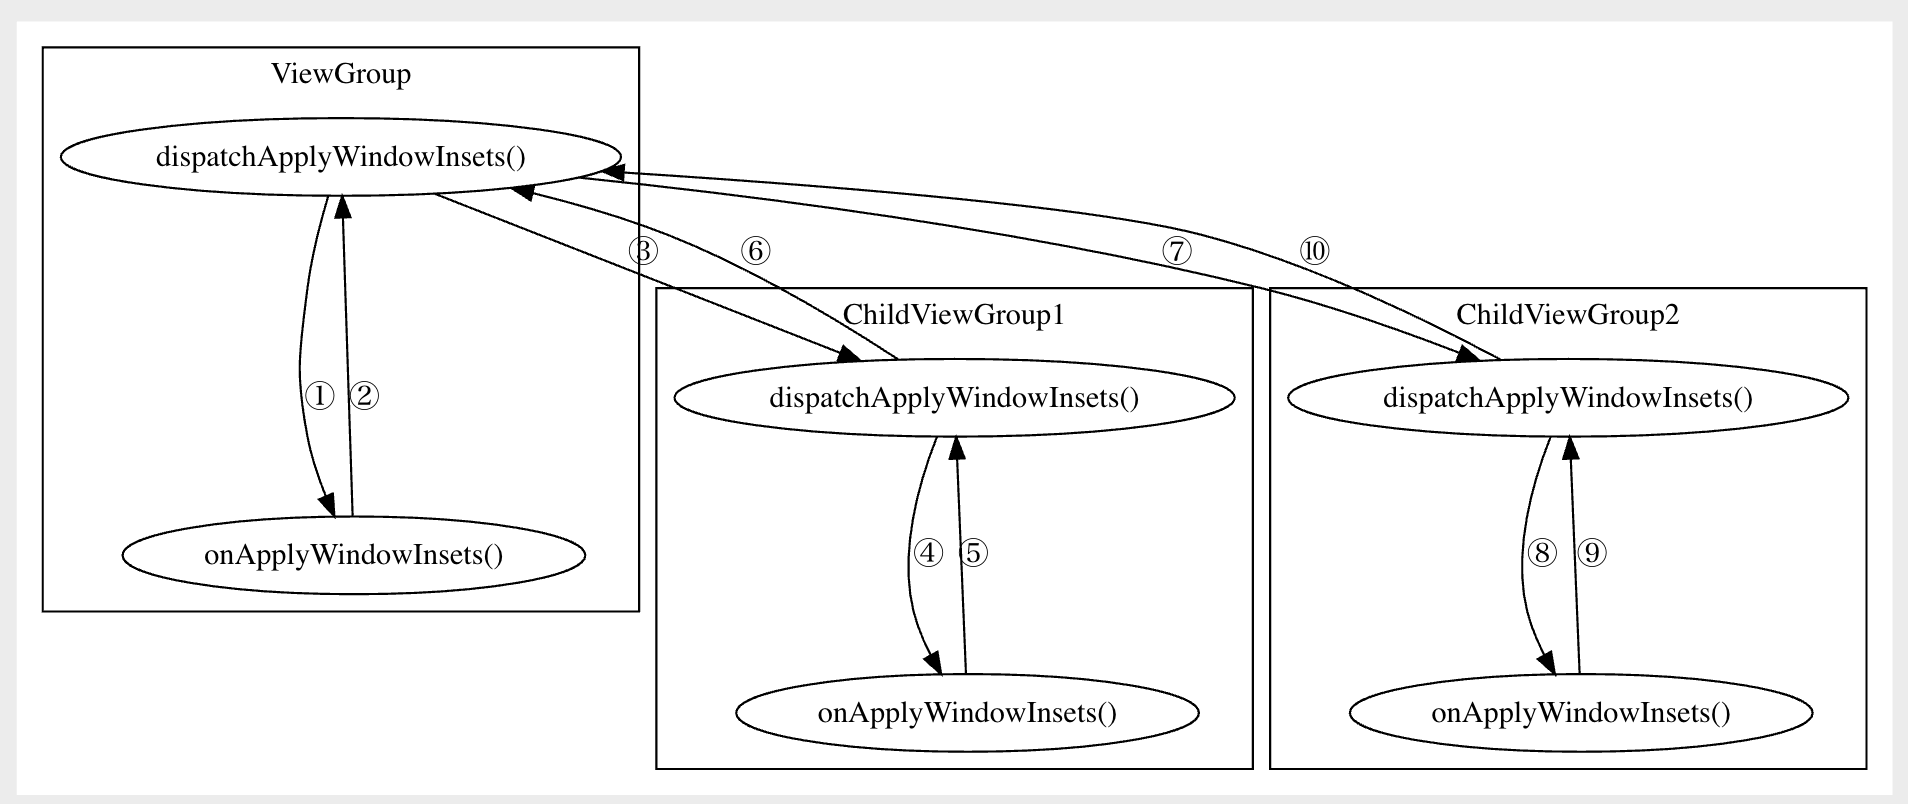
図
```dot digraph G { size=7 subgraph cluster_0 { cluster_0_dispatch[label="dispatchApplyWindowInsets()"] cluster_0_apply[label="onApplyWindowInsets()"] label = "ViewGroup"; } subgraph cluster_1 { cluster_1_dispatch[label="dispatchApplyWindowInsets()"] cluster_1_apply[label="onApplyWindowInsets()"] label = "ChildViewGroup1"; } subgraph cluster_2 { cluster_2_dispatch[label="dispatchApplyWindowInsets()"] cluster_2_apply[label="onApplyWindowInsets()"] label = "ChildViewGroup2"; } cluster_0_dispatch -> cluster_0_apply [label="①"] cluster_0_apply -> cluster_0_dispatch [label="②"] cluster_0_dispatch -> cluster_1_dispatch [label="③"] cluster_1_dispatch -> cluster_1_apply [label="④"] cluster_1_apply -> cluster_1_dispatch [label="⑤"] cluster_1_dispatch -> cluster_0_dispatch [label="⑥"] cluster_0_dispatch -> cluster_2_dispatch [label="⑦"] cluster_2_dispatch -> cluster_2_apply [label="⑧"] cluster_2_apply -> cluster_2_dispatch [label="⑨"] cluster_2_dispatch -> cluster_0_dispatch [label="⑩"] } ```将来的には常に上記の動きになりそうですが、現在は以下のような動きが入っています。
(https://github.com/aosp-mirror/platform_frameworks_base/blob/android10-release/core/java/android/view/View.java の sBrokenInsetsDispatchを参照 )
WindowInsetsをconsumeしたインスタンスを返した場合は他のメソッドは呼ばなくなっています。
WindowInsetsをconsumeとはどういうことなのかはもう少し後で出てきます。
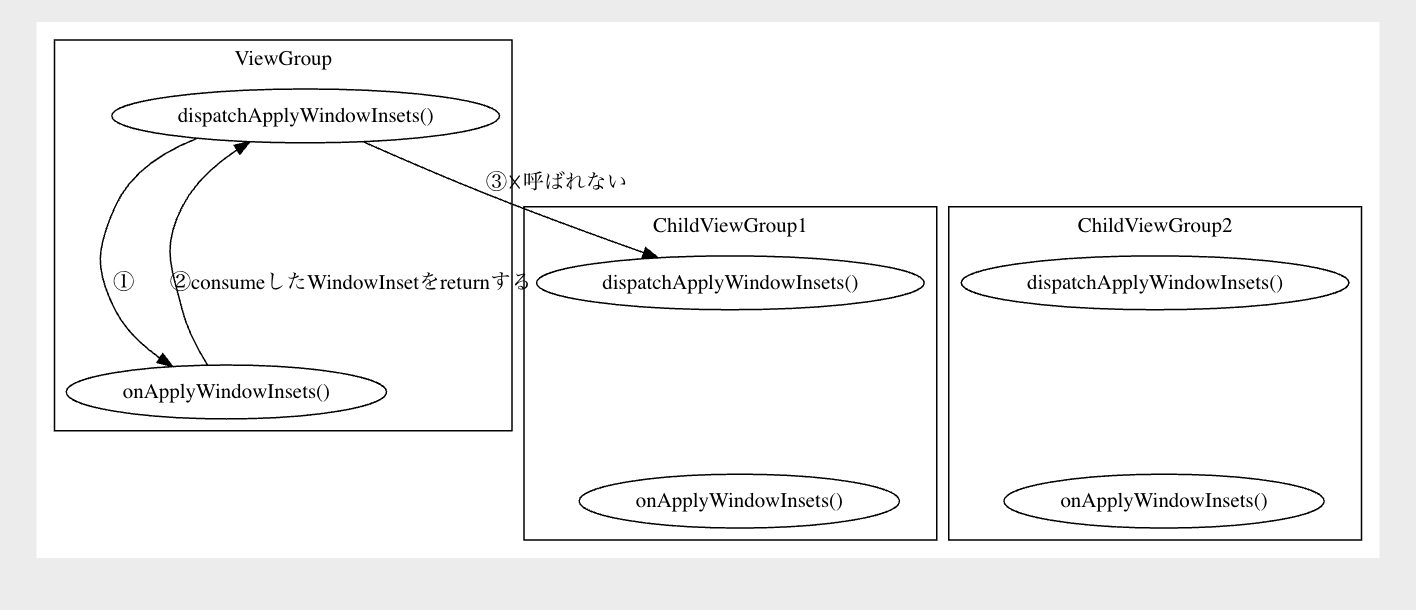
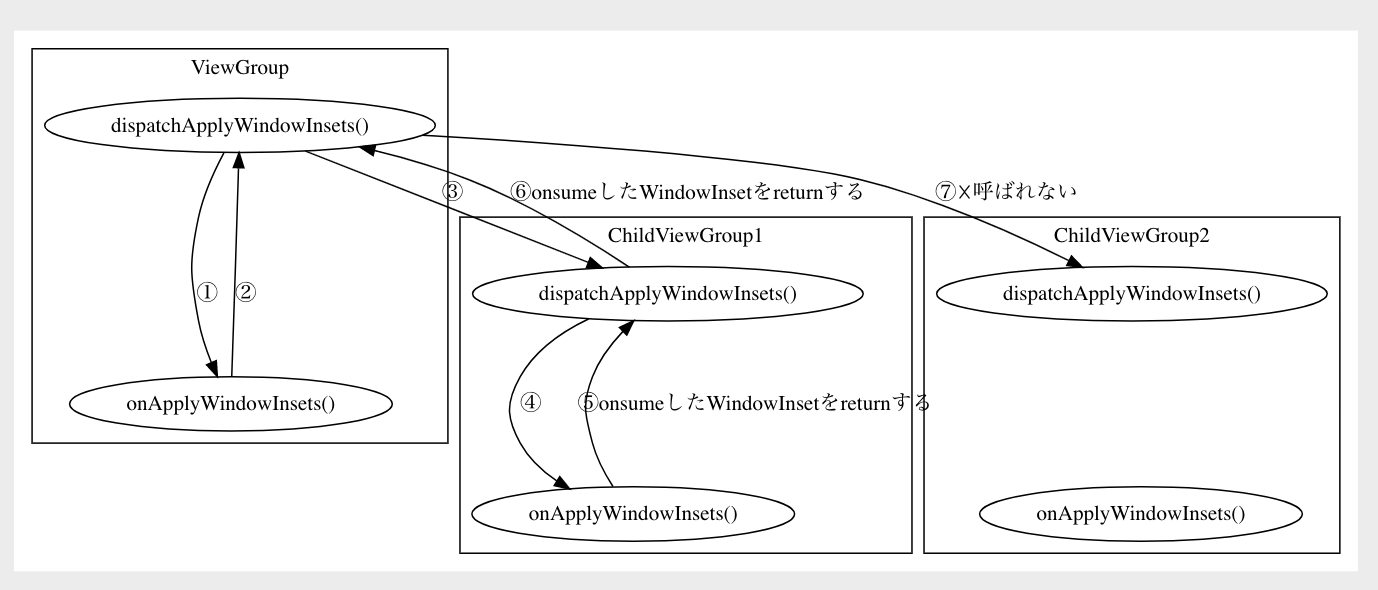
図
```dot digraph G { size=7 subgraph cluster_0 { cluster_0_dispatch[label="dispatchApplyWindowInsets()"] cluster_0_apply[label="onApplyWindowInsets()"] label = "ViewGroup"; } subgraph cluster_1 { cluster_1_dispatch[label="dispatchApplyWindowInsets()"] cluster_1_apply[label="onApplyWindowInsets()"] label = "ChildViewGroup1"; } subgraph cluster_2 { cluster_2_dispatch[label="dispatchApplyWindowInsets()"] cluster_2_apply[label="onApplyWindowInsets()"] label = "ChildViewGroup2"; } cluster_0_dispatch -> cluster_0_apply [label="①"] cluster_0_apply -> cluster_0_dispatch [label="②"] cluster_0_dispatch -> cluster_1_dispatch [label="③"] cluster_1_dispatch -> cluster_1_apply [label="④"] cluster_1_apply -> cluster_1_dispatch [label="⑤onsumeしたWindowInsetをreturnする"] cluster_1_dispatch -> cluster_0_dispatch [label="⑥onsumeしたWindowInsetをreturnする"] cluster_0_dispatch -> cluster_2_dispatch [label="⑦☓呼ばれない"] cluster_2_dispatch -> cluster_2_apply [label="⑧",style = invis] cluster_2_apply -> cluster_2_dispatch [label="⑨",style = invis] cluster_2_dispatch -> cluster_0_dispatch [label="⑩",style = invis] } ```DrawerLayoutから見るonApplyWindowInsets()の実装方法
DrawerLayoutでは見て分かる通り、StatusBarに食い込んでレイアウトを表示しています
まずはView.javaの中のdispatchApplyWindowInsets()の実際のコードを確認してみましょう。
mOnApplyWindowInsetsListenerがあればそれを使うし、なければ、View.onApplyWindowInsets()を使うようになっています。
    public WindowInsets dispatchApplyWindowInsets(WindowInsets insets) {
        try {
            mPrivateFlags3 |= PFLAG3_APPLYING_INSETS;
            if (mListenerInfo != null && mListenerInfo.mOnApplyWindowInsetsListener != null) {
                return mListenerInfo.mOnApplyWindowInsetsListener.onApplyWindowInsets(this, insets);
            } else {
                return onApplyWindowInsets(insets);
            }
        } finally {
            mPrivateFlags3 &= ~PFLAG3_APPLYING_INSETS;
        }
    }
つまり、setOnApplyWindowInsetsListener()でリスナーを追加することで、onApplyWindowInsets()を実装したのと同じことができます。
DrawerLayoutのコンストラクタ内でこのリスナーを使って、処理を行っているので、見ていきましょう。以下の2つのことを行っています
① setOnApplyWindowInsetsListenerを使っており、setChildInsets内で自分でpaddingを設定して、consumeしたinsetを返す
② setSystemUiVisibilityでの設定
SYSTEM_UI_FLAG_LAYOUT_FULLSCREENによって、アプリコンテンツのレイアウトが上部に食い込みます。そしてstatusBarの大きさなどが入ったinsetがonApplyWindowInsets()で渡ってきて、自分でpaddingを設定できる。という感じになります。
        if (ViewCompat.getFitsSystemWindows(this)) {
            if (Build.VERSION.SDK_INT >= 21) {
                // ①
                setOnApplyWindowInsetsListener(new View.OnApplyWindowInsetsListener() {
                    @Override
                    public WindowInsets onApplyWindowInsets(View view, WindowInsets insets) {
                        final DrawerLayout drawerLayout = (DrawerLayout) view;
                        drawerLayout.setChildInsets(insets, insets.getSystemWindowInsetTop() > 0);
                        return insets.consumeSystemWindowInsets();
                    }
                });
                // ②
                setSystemUiVisibility(View.SYSTEM_UI_FLAG_LAYOUT_STABLE
                        | View.SYSTEM_UI_FLAG_LAYOUT_FULLSCREEN);
                final TypedArray a = context.obtainStyledAttributes(THEME_ATTRS);
                try {
                    mStatusBarBackground = a.getDrawable(0);
...
        }
ちなみにSYSTEM_UI_FLAG_LAYOUT_FULLSCREENではなくSYSTEM_UI_FLAG_LAYOUT_HIDE_NAVIGATIONを使うことでレイアウトの領域をStatusBarとNavigationBarの領域も含むようにする事ができます。
つまりアプリだと以下のようにするといい感じにできます。
将来的にconsumeが使われないようになりそうなのと、chris banes氏も使っていないようなのでconsumeは使っていません。
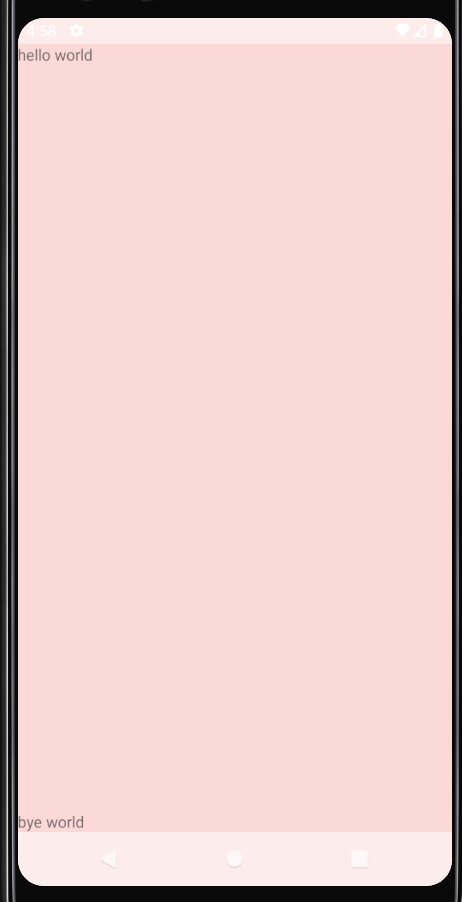
    <style name="AppTheme" parent="Theme.AppCompat.Light.NoActionBar">
        <!-- Customize your theme here. -->
        <item name="colorPrimary">@color/colorPrimary</item>
        <item name="colorPrimaryDark">@color/colorPrimaryDark</item>
        <item name="colorAccent">@color/colorAccent</item>
        <item name="android:statusBarColor">#80FFFFFF</item> // **半分白く**
        <item name="android:navigationBarColor">#80FFFFFF</item>  // **半分白く**
    </style>
<FrameLayout xmlns:android="http://schemas.android.com/apk/res/android"
    xmlns:tools="http://schemas.android.com/tools"
    android:id="@+id/root"
    android:layout_width="match_parent"
    android:layout_height="match_parent"
    android:background="#22ff0000" // **デバッグ用に赤くする**
    tools:context=".MainActivity">
    <TextView
        android:layout_width="match_parent"
        android:layout_height="wrap_content"
        android:text="hello world" />
    <TextView
        android:layout_width="match_parent"
        android:layout_height="wrap_content"
        android:layout_gravity="bottom"
        android:text="bye world" />
</FrameLayout>
    override fun onCreate(savedInstanceState: Bundle?) {
        super.onCreate(savedInstanceState)
        setContentView(R.layout.activity_main)
        val root = findViewById<View>(R.id.root)
        root.setOnApplyWindowInsetsListener { v, insets ->
            root.updatePadding(
                top = insets.systemWindowInsetTop,
                bottom = insets.systemWindowInsetBottom
            )
            return@setOnApplyWindowInsetsListener insets
        }
        root.systemUiVisibility =
            View.SYSTEM_UI_FLAG_LAYOUT_STABLE or
 // **レイアウトの領域をStatusBarとNavigationBarの領域も含むようにする**
                    View.SYSTEM_UI_FLAG_LAYOUT_HIDE_NAVIGATION
    }
chrisbanes/insetterはなにをするか?
今回の記事のきっかけになった記事が以下です。
以下のブログで、chrisbanes/insetterについての紹介があります。
https://chris.banes.dev/2019/04/12/insets-listeners-to-layouts/
現在の方法だと、paddingがViewに設定されていた場合にupdatePaddingの呼び出しによって上書きされておかしくなってしまうので、最初にViewに設定されているpaddingを保存しておいて、それとsystemWindowInsetBottomなどを合わせてpaddingを設定してくれるというものです。
<FrameLayout xmlns:android="http://schemas.android.com/apk/res/android"
    xmlns:tools="http://schemas.android.com/tools"
    android:id="@+id/root"
    android:paddingTop="16dp"  // **このpaddingが上書きされてしまうのを解決する**
    android:layout_width="match_parent"
    android:layout_height="match_parent"
    android:background="#22ff0000"
    tools:context=".MainActivity">
RecyclerViewをいい感じに表示するには?
clipToPadding="false"によってpadding内も描画させることによって、スクロールもでき、またコンテンツを表示しておくことができます。
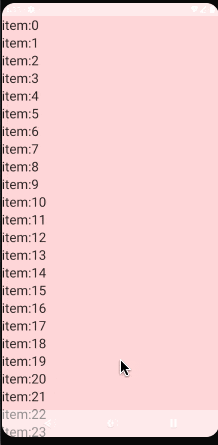
    <androidx.recyclerview.widget.RecyclerView
        android:id="@+id/recycler"
        android:background="#22ff0000"
        android:clipToPadding="false"  // ← padding内も描画される
        android:orientation="vertical"
        app:layoutManager="androidx.recyclerview.widget.LinearLayoutManager"
        android:layout_width="match_parent"
        android:layout_height="match_parent" />
    override fun onCreate(savedInstanceState: Bundle?) {
        super.onCreate(savedInstanceState)
        setContentView(R.layout.activity_main)
        val recyclerView = findViewById<RecyclerView>(R.id.recycler)
        recyclerView.setOnApplyWindowInsetsListener { v, insets ->
            recyclerView.updatePadding(
                top = insets.systemWindowInsetTop,
                bottom = insets.systemWindowInsetBottom
            )
            return@setOnApplyWindowInsetsListener insets
        }
        recyclerView.systemUiVisibility =
            View.SYSTEM_UI_FLAG_LAYOUT_STABLE or
                    View.SYSTEM_UI_FLAG_LAYOUT_HIDE_NAVIGATION