Dagger Hiltを使った場合に、まだどのように実装していくのが良いのかよくわかっっていない部分があるので、公式の実装に近そうな、android/architecture-samplesのdev-hiltブランチを読んでいきます。
Dagger Hiltのサンプルとして実用的に見えるものがここに上がっているようなので、参考に見ていきます。
https://github.com/android/architecture-samples/tree/dev-hilt
以下時点のコードになります。
https://github.com/android/architecture-samples/tree/f2fd9ce969a431b20218f3ace38bbb95fd4d1151
Dagger Hiltは以下のようなコンポーネントが最初から用意されています。それぞれのコンポーネントにどのようにインスタンスがひもづいているのか見ていきましょう。
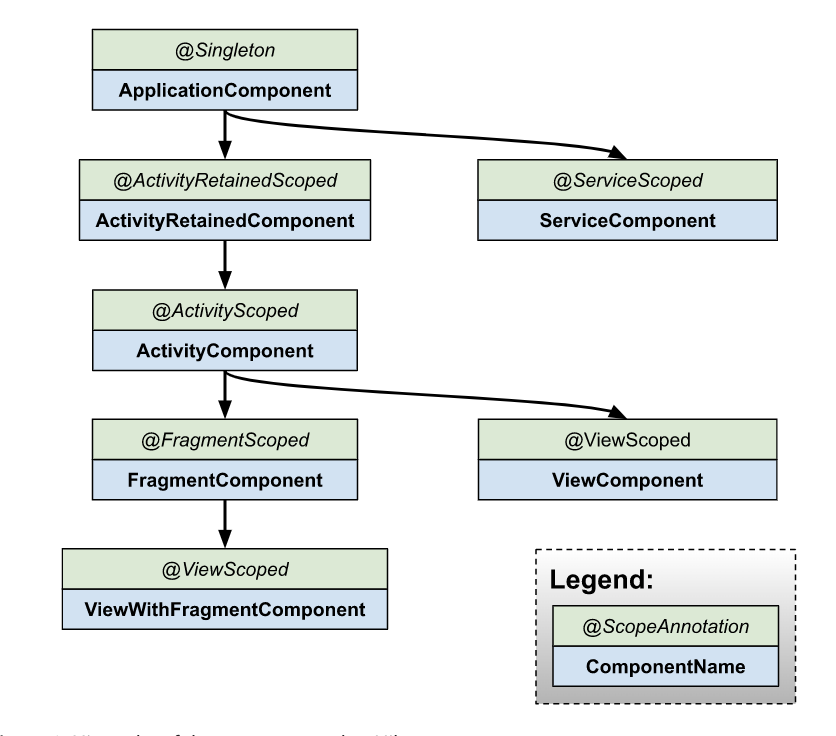
https://developer.android.com/training/dependency-injection/hilt-android より
ApplicationComponent
@HiltAndroidAppのアノテーションを付与することで、AppComponentにApplicationクラスが紐付けされます。
@HiltAndroidApp
class TodoApplication : Application() {

    override fun onCreate() {
        super.onCreate()
        if (BuildConfig.DEBUG) Timber.plant(DebugTree())
    }
}
またApplicationComponentにAppModuleとTasksRepositoryModuleが紐付けされています。
ApplicationComponent
- AppModule
- TasksRepositoryModule
@Module
@InstallIn(ApplicationComponent::class)
object AppModule {
...
}

/**
 * The binding for TasksRepository is on its own module so that we can replace it easily in tests.
 */
@Module
@InstallIn(ApplicationComponent::class)
object TasksRepositoryModule {
...
}
AppModuleではTasksLocalDataSourceなどのインスタンスを配布していますが、TasksDataSourceというインターフェースの型で配布しており、RemoteTasksDataSourceなのかLocalTasksDataSourceなのかの識別できるようにするため、Qualifierのアノテーションを付けています。
@Module
@InstallIn(ApplicationComponent::class)
object AppModule {

    @Qualifier
    @Retention(RUNTIME)
    annotation class RemoteTasksDataSource

    @Qualifier
    @Retention(RUNTIME)
    annotation class LocalTasksDataSource
...

    @Singleton
    @LocalTasksDataSource
    @Provides
    fun provideTasksLocalDataSource(
        database: ToDoDatabase,
        ioDispatcher: CoroutineDispatcher
    ): TasksDataSource {
        return TasksLocalDataSource(
            database.taskDao(), ioDispatcher
        )
    }
...
}
そして、RemoteTasksDataSourceなどのアノテーションを使ったTasksDataSourceを使って、provideTasksRepositoryにてRepositoryを作成します。
/**
 * The binding for TasksRepository is on its own module so that we can replace it easily in tests.
 */
@Module
@InstallIn(ApplicationComponent::class)
object TasksRepositoryModule {

    @Singleton
    @Provides
    fun provideTasksRepository(
        @AppModule.RemoteTasksDataSource remoteTasksDataSource: TasksDataSource,
        @AppModule.LocalTasksDataSource localTasksDataSource: TasksDataSource,
        ioDispatcher: CoroutineDispatcher
    ): TasksRepository {
        return DefaultTasksRepository(
            remoteTasksDataSource, localTasksDataSource, ioDispatcher
        )
    }
}
ApplicationComponentで配布されているものをテストでどう切り替えるか?
以下のようなテストのソースセットでFakeを提供するモジュールを定義して、@UninstallModulesでFakeではないものを消して、入れ替えてしまうことで対応しています。
@Module
@InstallIn(ApplicationComponent::class)
abstract class TestTasksRepositoryModule {
    @Singleton
    @Binds
    abstract fun bindRepository(repo: FakeRepository): TasksRepository
}
@RunWith(AndroidJUnit4::class)
@MediumTest
@ExperimentalCoroutinesApi
// ** ↓UninstallModulesでデフォルトのモジュールを消して、TestTasksRepositoryModuleを読み込ませる  **
@UninstallModules(TasksRepositoryModule::class)
@HiltAndroidTest
class TasksFragmentTest {
ActivityComponent
@AndroidEntryPointのアノテーションを付与することで、ActivityComponentと紐付けされます。
@AndroidEntryPoint
class TasksActivity : AppCompatActivity() {
このActiivtyでのFragmentの作り方はNavigationによるものです。
        val navController: NavController = findNavController(R.id.nav_host_fragment)
        appBarConfiguration =
            AppBarConfiguration.Builder(R.id.tasks_fragment_dest, R.id.statistics_fragment_dest)
                .setDrawerLayout(drawerLayout)
                .build()
        setupActionBarWithNavController(navController, appBarConfiguration)
        findViewById<NavigationView>(R.id.nav_view)
            .setupWithNavController(navController)
        <fragment
            android:id="@+id/nav_host_fragment"
            android:name="androidx.navigation.fragment.NavHostFragment"
            android:layout_width="match_parent"
            android:layout_height="match_parent"

            app:defaultNavHost="true"
            app:navGraph="@navigation/nav_graph" />
<navigation xmlns:android="http://schemas.android.com/apk/res/android"
    xmlns:app="http://schemas.android.com/apk/res-auto"
    android:id="@+id/nav_graph"
    app:startDestination="@id/tasks_fragment_dest">
   <!-- **↑ 開始Fragmentを指定 ↑** -->

    <fragment
        android:id="@+id/task_detail_fragment_dest"
        android:name="com.example.android.architecture.blueprints.todoapp.taskdetail.TaskDetailFragment"
        android:label="Task Details">
...
        <argument
            android:name="taskId"
            app:argType="string" />
...
    </fragment>
   <!-- **↓ 開始Fragmentを指定 ↓** -->
    <fragment
        android:id="@+id/tasks_fragment_dest"
        android:name="com.example.android.architecture.blueprints.todoapp.tasks.TasksFragment"
        android:label="@string/app_name">
...
        <action
            android:id="@+id/action_tasksFragment_to_taskDetailFragment"
            app:destination="@id/task_detail_fragment_dest" />
...
    </fragment>
FragmentComponent
@AndroidEntryPointを使うことでFragmentComponentと紐付けされます。
TasksFragmentは以下のようにタスクリストを表示するものです。引数はnavigationから取得するようです。

@AndroidEntryPoint
class TasksFragment : Fragment() {
    private val viewModel by viewModels<TasksViewModel>()
    private val args: TasksFragmentArgs by navArgs()
ViewModelは @ViewModelInjectによってうまくInjectされるようです。 ( ここの仕組みは以前見てみました。 https://qiita.com/takahirom/items/36f658b01d1d121b3760 )
class TasksViewModel @ViewModelInject constructor(
    private val tasksRepository: TasksRepository,
    @Assisted private val savedStateHandle: SavedStateHandle
) : ViewModel() {
...
Fragmentのテストはどのように行うか?
まずは最初に実際にテストを見ていく前に、使われるモジュールなのですが、テストのソースセットには以下のようなモジュールが存在しており、これはFakeRepositoryを読み込むもので、テストでこのモジュールが使われるようになります。
@Module
@InstallIn(ApplicationComponent::class)
abstract class TestTasksRepositoryModule {
    @Singleton
    @Binds
    abstract fun bindRepository(repo: FakeRepository): TasksRepository
}
① @UninstallModules(TasksRepositoryModule::class)によって通常のリポジトリが読み込まれるのを阻止します。
② HiltAndroidRule#injectにより、テストにFakeRepositoryがInjectされます。
@RunWith(AndroidJUnit4::class)
@MediumTest
@ExperimentalCoroutinesApi
// ** ①通常のリポジトリが読み込まれるのを阻止する **
@UninstallModules(TasksRepositoryModule::class)
@HiltAndroidTest
class TasksFragmentTest {

    @get:Rule
    var hiltRule = HiltAndroidRule(this)
    // ② HiltAndroidRuleにより、FakeRepositoryがInjectされる。
    @Inject
    lateinit var repository: TasksRepository

    @Before
    fun init() {
        // Populate @Inject fields in test class
        hiltRule.inject()
    }
あとはFakeRepositoryにデータを保存し、Activityを起動して、表示されることでUIのテストをしています。
    @Test
    fun displayTask_whenRepositoryHasData() {
        // GIVEN - One task already in the repository
        repository.saveTaskBlocking(Task("TITLE1", "DESCRIPTION1"))

        // WHEN - On startup
        launchActivity()

        // THEN - Verify task is displayed on screen
        onView(withText("TITLE1")).check(matches(isDisplayed()))
    }

    private fun launchActivity(): ActivityScenario<TasksActivity>? {
        val activityScenario = launch(TasksActivity::class.java)
        activityScenario.onActivity { activity ->
            // Disable animations in RecyclerView
            (activity.findViewById(R.id.tasks_list) as RecyclerView).itemAnimator = null
        }
        return activityScenario
    }
直接Fragmentを起動するテストもあるのですが、 launchFragmentInHiltContainer() という関数を定義して使っています。
    @Test
    fun clickAddTaskButton_navigateToAddEditFragment() {
        // GIVEN - On the home screen
        val navController = mock(NavController::class.java)

        launchFragmentInHiltContainer<TasksFragment>(Bundle(), R.style.AppTheme) {
            Navigation.setViewNavController(this.view!!, navController)
        }

        // WHEN - Click on the "+" button
        onView(withId(R.id.add_task_fab)).perform(click())

        // THEN - Verify that we navigate to the add screen
        verify(navController).navigate(
            TasksFragmentDirections.actionTasksFragmentToAddEditTaskFragment(
                null, getApplicationContext<Context>().getString(R.string.add_task)
            )
        )
    }
なぜlaunchFragmentInHiltContainer()が必要かと言うと androidx.fragment:fragment-testing は EmptyFragmentActivity というActivityを使うのですが、このActivityは @AndroidEntryPointがついていないので利用できないためです。 HiltTestActivityというActiivtyを定義して、それを利用して起動するコードになります。
/**
 * launchFragmentInContainer from the androidx.fragment:fragment-testing library
 * is NOT possible to use right now as it uses a hardcoded Activity under the hood
 * (i.e. [EmptyFragmentActivity]) which is not annotated with @AndroidEntryPoint.
 *
 * As a workaround, use this function that is equivalent. It requires you to add
 * [HiltTestActivity] in the debug folder and include it in the debug AndroidManifest.xml file
 * as can be found in this project.
 */
inline fun <reified T : Fragment> launchFragmentInHiltContainer(
    fragmentArgs: Bundle? = null,
    @StyleRes themeResId: Int = R.style.FragmentScenarioEmptyFragmentActivityTheme,
    crossinline action: Fragment.() -> Unit = {}
) {
    val startActivityIntent = Intent.makeMainActivity(
        ComponentName(
            ApplicationProvider.getApplicationContext(),
            HiltTestActivity::class.java
        )
    ).putExtra(EmptyFragmentActivity.THEME_EXTRAS_BUNDLE_KEY, themeResId)

    ActivityScenario.launch<HiltTestActivity>(startActivityIntent).onActivity { activity ->
        val fragment: Fragment = activity.supportFragmentManager.fragmentFactory.instantiate(
            Preconditions.checkNotNull(T::class.java.classLoader),
            T::class.java.name
        )
        fragment.arguments = fragmentArgs
        activity.supportFragmentManager
            .beginTransaction()
            .add(android.R.id.content, fragment, "")
            .commitNow()

        fragment.action()
    }
}
architecture-samplesのFragmentのテストのスコープは?
どうやらarchitecture-samplesではViewModelをmock化やDummyを差し込むようなことはせず、Repositoryを差し替えることで、Fragmentなどのテストを行っているようです。つまり範囲としてはFragment + ViewModelの範囲をTasksFragmentTestが見る形になっています。なのですが、TasksViewModelTestもあるので、TasksFragmentTestはUnitTestではなく、少し広い範囲を見るIntegrationTestに近い感じなのかなと思いました。
このFragmentだけ切り出してテストする場合にどのようにするのかなどは少し興味があったのですが、このサンプルでは見ることができなさそうでした。
まとめ
ほんとにあんまり紹介することがないぐらい、基本的には@AndroidEntryPointを定義することで、簡単に利用できていきそうです。
またテストでは少し課題があるものの、ワークアラウンドもあるようなので、チェックしてみると良さそうです。