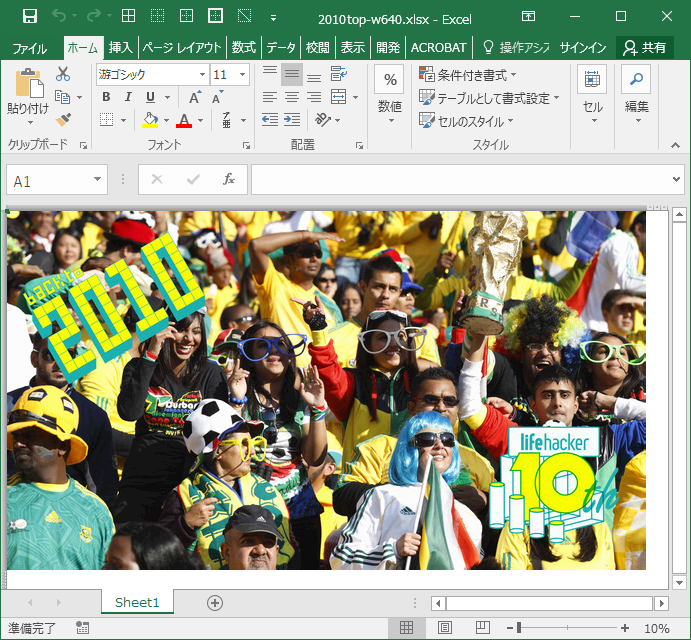
はじめに
初投稿です。エンジニアではないです。(防衛線)
社内のちょっとしたことを便利にできないかなと勉強している身です。
ロクなソフトが入れられないため開発環境はPowerShellかVBAがほとんどです。
記述方法、もっといいやり方等ありましたら心が折れない程度に教えて頂ければ幸いです。
参考資料様
画像のExcelize
親元です。私は二番煎じです。
PowerShell でファイル選択ダイアログを利用する
PowerShellで簡単な画像処理する
PowerShell で Excel をどうのこうのすることに興味を持ってくれると嬉しい
今回の実装の大部分を占める参考資料。お世話になります。
Excel の仕様および制限
書式設定の最大数が64,000らしく、フルカラーで実装したら色飛びした。
32,768(32^3)色まで減色して色飛びしないようにしている。
PowerShell 使い方メモ
それ PowerShell でできるよ
バッチファイルからの卒業に際してお世話になりました。
環境
- Windows10
- Excel 2016
- Powershell
PS C:\Users\(USER)> $PSVersionTable

Name                           Value
----                           -----
PSVersion                      5.1.15063.1155
PSEdition                      Desktop
PSCompatibleVersions           {1.0, 2.0, 3.0, 4.0...}
BuildVersion                   10.0.15063.1155
CLRVersion                     4.0.30319.42000
WSManStackVersion              3.0
PSRemotingProtocolVersion      2.3
SerializationVersion           1.1.0.1
ソースコード
# Powershellで画像のExcelizeに挑戦

# 画像を扱えるようにする
Add-Type -AssemblyName System.Drawing
# ダイアログを使えるようにする
[void][System.Reflection.Assembly]::LoadWithPartialName("System.windows.forms")

$dialog = New-Object System.Windows.Forms.OpenFileDialog
$dialog.Filter = "画像ファイル(*.png;*.jpg;*.gif)|*.PNG;*.JPG;*.JPEG;*.GIF"
$dialog.InitialDirectory = "C:\Users\1501275\Desktop\kojin"
$dialog.Title = "ファイルを選択"
if($dialog.ShowDialog() -eq [System.Windows.Forms.DialogResult]::OK){
    $filepath = $dialog.FileName
    $folder = Split-Path -parent $filepath
    $filename = [System.IO.Path]::GetFileNameWithoutExtension($filepath)
} else {
    Read-Host "キャンセルされました。ENTERキーを押してください。"
    return
}

# 画像読み込み
$src_image = [System.Drawing.Image]::FromFile($dialog.FileName) #画像を読み込む
$image_width = $src_image.Width
$image_height = $src_image.Height

# Excel側の作業
$excel = New-Object -ComObject Excel.Application
$excel.Visible = $true
$excel.DisplayAlerts = $true
$book = $excel.Workbooks.Add()
$sheet = $book.Sheets(1)
$sheet.Range($sheet.Cells(1,1),$sheet.Cells($image_height,$image_width)).Borders.Linestyle = -4142 #セルの罫線をすべて消す
$sheet.Range($sheet.Cells(1,1),$sheet.Cells($image_height,$image_width)).EntireColumn.ColumnWidth = 1 # セルの幅を1に
$sheet.Range($sheet.Cells(1,1),$sheet.Cells($image_height,$image_width)).EntireRow.RowHeight = 11 #セルの高さを11に

# 減色処理関数(長いのでたたむこと)
# 256^3色を32^3色にすることで約3万色に減色、色漏れを防ぐ。
# ビット計算式に変更
function subtractcolor($inputcolor){
   $outputcolor = ($inputcolor -band 248) -bor 4
   return $outputcolor
}

# for文 画像から色を抽出してセルの背景色に
    1..($image_height-1)|%{
        $y = $_
        1..($image_width-1)|%{
            $x = $_
            $r = $src_image.GetPixel($x,$y).R
            $g = $src_image.GetPixel($x,$y).G
            $b = $src_image.GetPixel($x,$y).B
            $r = subtractcolor($r)
            $g = subtractcolor($g)
            $b = subtractcolor($b)
            $color = $r+$g*256+$b*256*256
            Write-Host "(x,y)=($x,$y), RGB=($r,$g,$b), Color=$color" 確認出力用
            $cell = $sheet.Cells($y,$x)
            $cell.interior.color = $color
        }
    }
$book.SaveAs($folder + "\" + $filename + ".xlsx")

# 末端処理
$src_image.Dispose()
$excel.Quit()
[System.Runtime.InteropServices.Marshal]::ReleaseComObject($excel)
[System.Runtime.InteropServices.Marshal]::ReleaseComObject($sheet)
やってみてどうだった

ライン上にビーッと描かれていく様は眺めてて退屈しない。
たのしかったです!(夏休みの小学生並みの感想)
課題
末端処理のところをまだ説明できない。
減色関数のところもうちょっときれいにしたい。
減色処理についてはビット演算でシンプルに書けるかと思います。
($inputcolor -band 248) -bor 4
のようにすれば簡単になります。
修正しました。1行になった!すごい!
[減色 英語][検索] → [Subtractive color]、勉強してから実装しましょう。
修正しました。