Databricks生成AIクックブックのコンテンツです。
Data + AI Summit 2024の目玉の一つがMosaic AIのアップデートだったと思います。
あまりに量が多くて「これはキャッチアップできるのか??」となっていたのが正直なところです。そういった中、マニュアルを見ていると気になる記述が。
クックブックとな。
そして、このようなサイトができていました。素敵。
ざっと見ていたらこちらを発見。(多分)10分でわかるデモノートブックだ。
ということで動かしてみます。
注意
このウォークスルーで使う機能の一部は、現時点では日本リージョンでは利用できません。
Mosaic AI Agent Framework & Agent Evaluationのデモ
TLDR; このノートブックでは:
-
Agent Frameworkを用いて構築したRAGアプリケーションをAgent Evaluationレビューアプリケーションにデプロイします。
- このレビューアプリケーションはあなたのアプリのフィードバックを提供するためにビジネスステークホルダーによって使用されます。
-
Agent EvaluationとMLflowを用いてアプリケーションの品質を評価します。
- これらAIアシストの評価は、アプリケーションの品質を改善するために開発者によって活用されます。
使用する製品:
- 高品質なRAGアプリケーションをクイックかつ安全に構築するためのMosaic AI Agent Framework SDK。
- アウトプットが高品質かどうかを判定するためのMosaic AI Agent EvaluationのAIアシスト評価ツール。人間のステークホルダーからフィードバックを取得するための直感的なUIを提供。
- Mosaic AI Model Servingが、プロダクションレディかつスケーラブルなREST APIとしてアプリケーションロジックをホスト。
- MLflowが、評価結果とアプリケーションコードや設定を含むアプリケーションのライフサイクルを管理。
- Generative AI Cookbook Mosaic AIの研究チームとのパートナーシップを通じて開発された高品質生成AIアプリを構築するための決定版のハウツーガイド、コードも提供。
DBR 14.3+が稼働するシングルユーザークラスターが必要です
Agent Evaluationレビューアプリケーション

MlflowにおけるAgent Evaluationのアウトプット
Generative AI Cookbook

%pip uninstall -y mlflow mlflow-skinny
%pip install -U -qqqq databricks-agents mlflow mlflow-skinny databricks-vectorsearch databricks-sdk langchain==0.2.1 langchain_core==0.2.5 langchain_community==0.2.4
dbutils.library.restartPython()
セットアップ: Databricks Cookbook repoから必要なデータとコードをロード
以下のセルでは、Git Folderを用いてhttps://github.com/databricks/genai-cookbookのGenerative AI cookbookのレポジトリから、このノートブックと同じフォルダーのgenai-cookbookフォルダーにクローンします。
あるいは、Gitレポジトリhttps://github.com/databricks/genai-cookbookをフォルダーgenai-cookbookに手動でクローンします。
import os
from databricks.sdk.core import DatabricksError
from databricks.sdk import WorkspaceClient

CURRENT_FOLDER = os.getcwd()
QUICK_START_REPO_URL = "https://github.com/databricks/genai-cookbook.git"
QUICK_START_REPO_SAVE_FOLDER = "genai-cookbook"

if os.path.isdir(QUICK_START_REPO_SAVE_FOLDER):
    raise Exception(
        f"{QUICK_START_REPO_SAVE_FOLDER} folder already exists, please change the variable QUICK_START_REPO_SAVE_FOLDER to be a non-existant path."
    )

# レポジトリのクローン
w = WorkspaceClient()
try:
    w.repos.create(
        url=QUICK_START_REPO_URL, provider="github", path=f"{CURRENT_FOLDER}/{QUICK_START_REPO_SAVE_FOLDER}"
    )
    print(f"Cloned sample code repo to: {QUICK_START_REPO_SAVE_FOLDER}")
except DatabricksError as e:
    if e.error_code == "RESOURCE_ALREADY_EXISTS":
        print("Repo already exists. Skipping creation")
    else:
        raise Exception(
            f"Failed to clone the quick start code.  You can manually import this by creating a Git folder from the contents of {QUICK_START_REPO_URL} in the {QUICK_START_REPO_SAVE_FOLDER} folder in your workspace and then re-running this Notebook."
        )
カレントディレクトリにコードがクローンされます。
Cloned sample code repo to: genai-cookbook

アプリケーションの設定
あなたのユーザー名に基づいて以下のパラメーターのデフォルト値を選択しますが、既存のリソースを使いたい場合には確認、変更して下さい。存在しないリソースは次のステップで作成されます。
-
UC_CATALOG&UC_SCHEMA: パース、チャンク化された文書やVector Searchのインデックスが格納されるUnity Catalogのカタログとスキーマ。 -
UC_MODEL_NAME: チェーンのモデルを記録、格納するUnity Catalog上の場所 -
VECTOR_SEARCH_ENDPOINT: 結果として得られるベクトルインデックスをホストするVector Search Endpoint
# 全ての必要なリソースを作成するために現行のユーザー名を使用
w = WorkspaceClient()
user_name = w.current_user.me().user_name.split("@")[0].replace(".", "")

# アウトプットのテーブルやインデックスが格納されるUCのカタログとスキーマ
# このカタログやスキーマが存在していない場合、カタログとスキーマの作成権限が必要となります
UC_CATALOG = f'{user_name}_catalog'
UC_SCHEMA = f'agent_demo'

# POCチェーンが記録されるUCのモデル名
UC_MODEL_NAME = f"{UC_CATALOG}.{UC_SCHEMA}.doc_bot"

# インデックスがロードされるVector Searchエンドポイント
# 存在しない場合には作成されます
#VECTOR_SEARCH_ENDPOINT = f'{user_name}_vector_search'
VECTOR_SEARCH_ENDPOINT = 'one-env-shared-endpoint-7'
UCのカタログやVector Searchエンドポイントが存在するかを確認。存在しない場合には作成
このセルのコードはリソースが存在するかどうかを確認し、存在しない場合には作成を試みます。
from databricks.sdk import WorkspaceClient
from databricks.sdk.service.vectorsearch import EndpointStatusState, EndpointType
from databricks.sdk.service.serving import EndpointCoreConfigInput, EndpointStateReady
from databricks.sdk.errors import ResourceDoesNotExist, NotFound, PermissionDenied
import os
w = WorkspaceClient()

# UCカタログが存在しない場合には作成、それ以外の場合には例外をスロー
try:
    _ = w.catalogs.get(UC_CATALOG)
    print(f"PASS: UC catalog `{UC_CATALOG}` exists")
except NotFound as e:
    print(f"`{UC_CATALOG}` does not exist, trying to create...")
    try:
        _ = w.catalogs.create(name=UC_CATALOG)
    except PermissionDenied as e:
        print(f"FAIL: `{UC_CATALOG}` does not exist, and no permissions to create.  Please provide an existing UC Catalog.")
        raise ValueError(f"Unity Catalog `{UC_CATALOG}` does not exist.")

# UCスキーマが存在しない場合には作成、それ以外の場合には例外をスロー
try:
    _ = w.schemas.get(full_name=f"{UC_CATALOG}.{UC_SCHEMA}")
    print(f"PASS: UC schema `{UC_CATALOG}.{UC_SCHEMA}` exists")
except NotFound as e:
    print(f"`{UC_CATALOG}.{UC_SCHEMA}` does not exist, trying to create...")
    try:
        _ = w.schemas.create(name=UC_SCHEMA, catalog_name=UC_CATALOG)
        print(f"PASS: UC schema `{UC_CATALOG}.{UC_SCHEMA}` created")
    except PermissionDenied as e:
        print(f"FAIL: `{UC_CATALOG}.{UC_SCHEMA}` does not exist, and no permissions to create.  Please provide an existing UC Schema.")
        raise ValueError("Unity Catalog Schema `{UC_CATALOG}.{UC_SCHEMA}` does not exist.")

# Vector Searchエンドポイントが存在しない場合には作成
vector_search_endpoints = w.vector_search_endpoints.list_endpoints()
if sum([VECTOR_SEARCH_ENDPOINT == ve.name for ve in vector_search_endpoints]) == 0:
    print(f"Please wait, creating Vector Search endpoint `{VECTOR_SEARCH_ENDPOINT}`.  This can take up to 20 minutes...")
    w.vector_search_endpoints.create_endpoint_and_wait(VECTOR_SEARCH_ENDPOINT, endpoint_type=EndpointType.STANDARD)

# Vector Searchエンドポイントがオンラインで利用できることを確認
w.vector_search_endpoints.wait_get_endpoint_vector_search_endpoint_online(VECTOR_SEARCH_ENDPOINT)

print(f"PASS: Vector Search endpoint `{VECTOR_SEARCH_ENDPOINT}` exists")
PASS: UC catalog `takaakiyayoi_catalog` exists
PASS: UC schema `takaakiyayoi_catalog.agent_demo` exists
PASS: Vector Search endpoint `one-env-shared-endpoint-7` exists
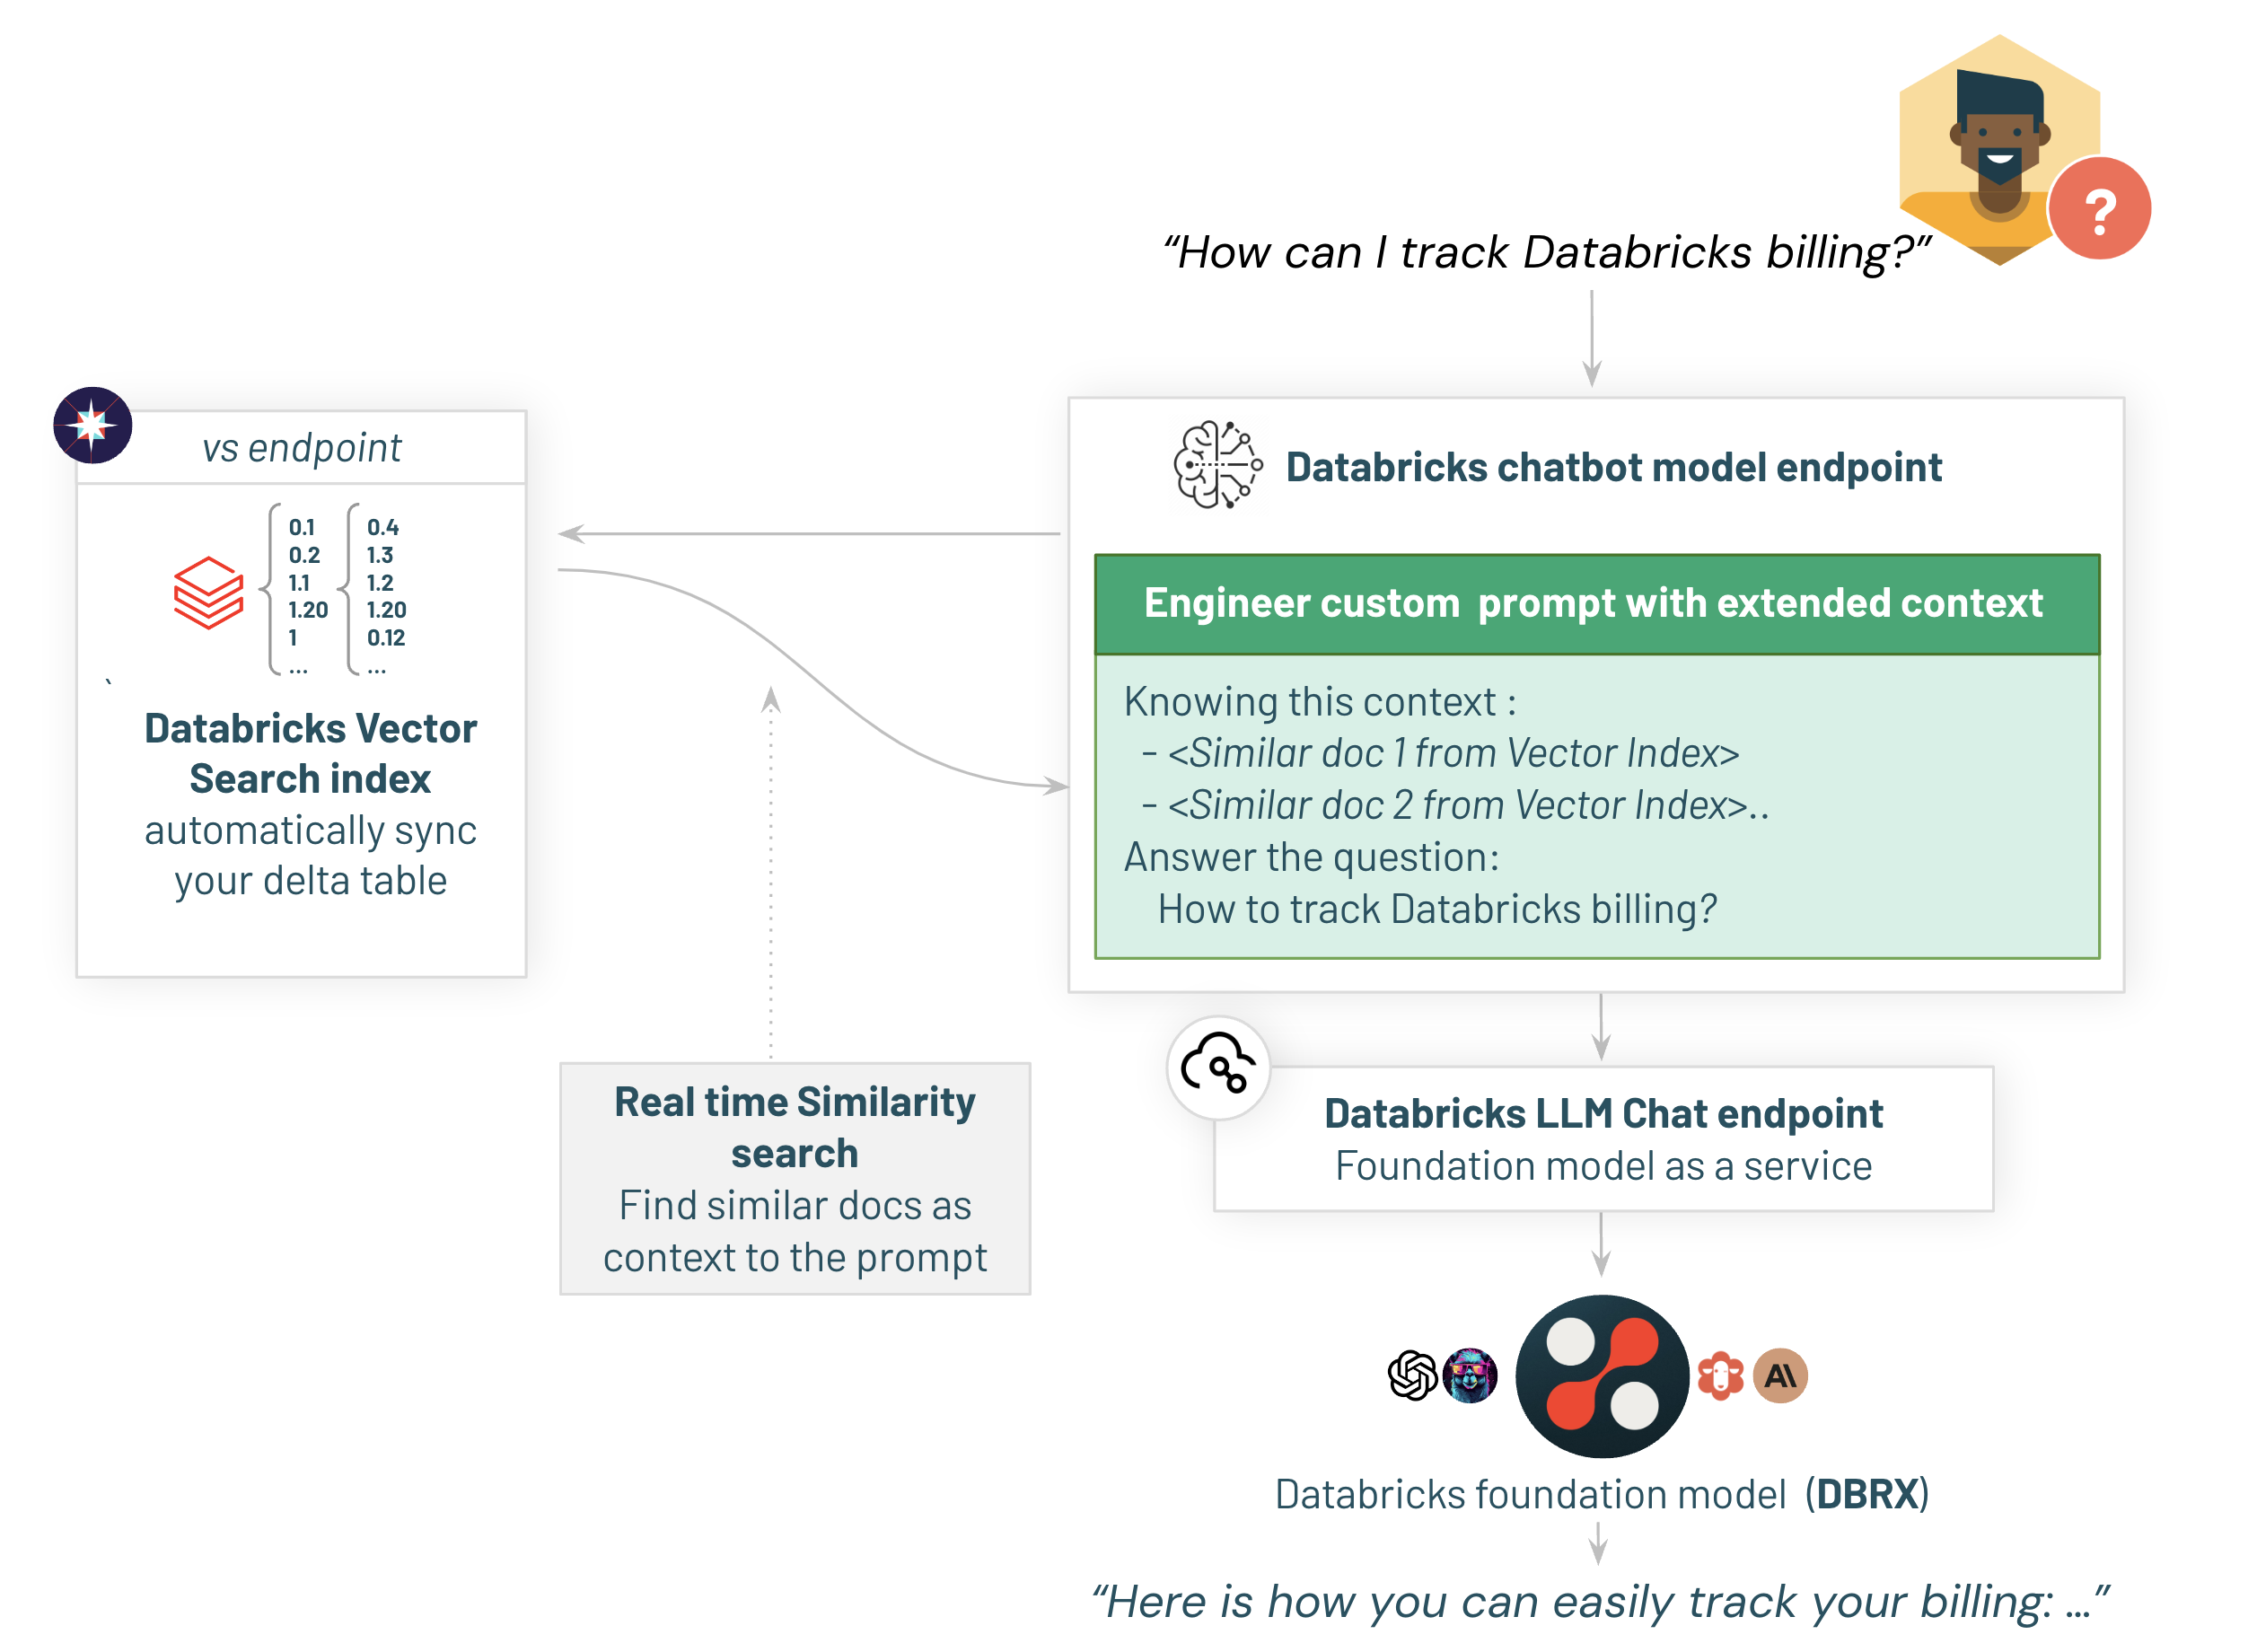
アプリケーションの構築およびデプロイ
以下は、デプロイするアーキテクチャのハイレベルの概要です:

1/ Vector Search Indexの作成
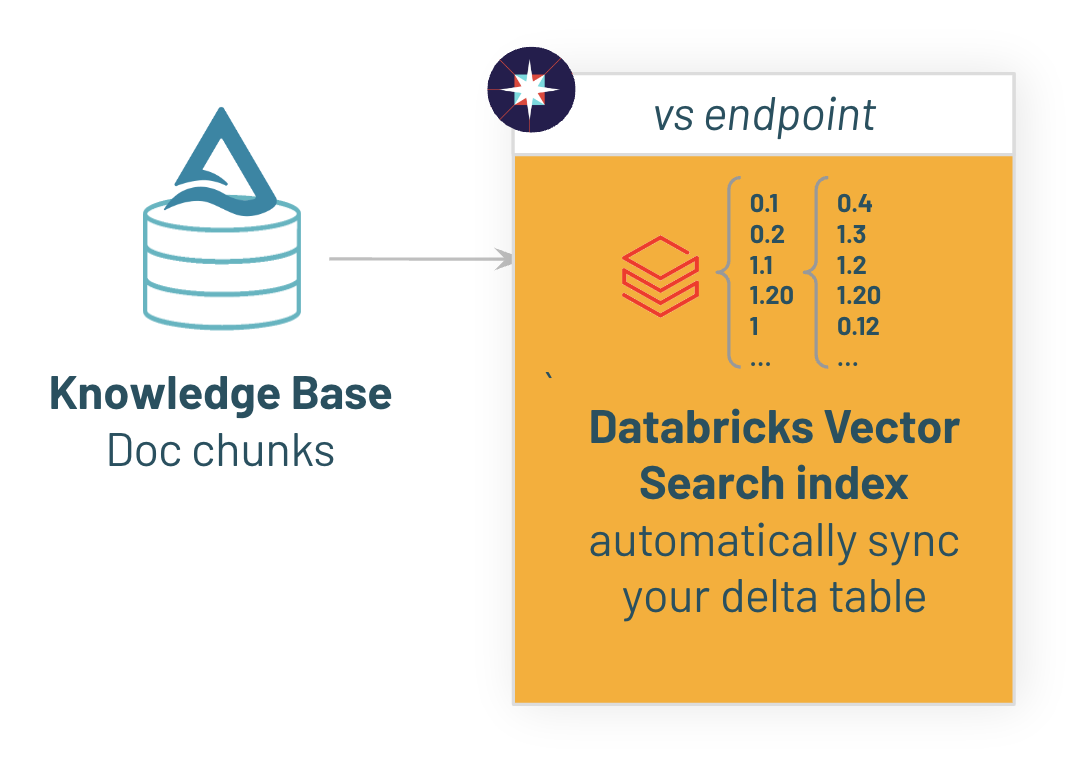
はじめに、サンプルデータをDeltaテーブルにコピーし、Vector Searchインデックスに同期します。ここでは、Databricks Foundational Model APIでホストされるgte-large-en-v1.5エンベディングモデルを使います。
# チャンク化された文書とインデックスを格納するUCのロケーション
CHUNKS_DELTA_TABLE = f"{UC_CATALOG}.{UC_SCHEMA}.databricks_docs_chunked"
CHUNKS_VECTOR_INDEX = f"{UC_CATALOG}.{UC_SCHEMA}.databricks_docs_chunked_index"
from pyspark.sql import SparkSession
from databricks.vector_search.client import VectorSearchClient

# Deltaテーブル/ベクトルインデックスへのリンクを表示するために使うワークスペースのURL
workspace_url = SparkSession.getActiveSession().conf.get(
    "spark.databricks.workspaceUrl", None
)

# Vector Searchクライアント
vsc = VectorSearchClient(disable_notice=True)

# Deltaテーブルにチャンク化したデータをロードし、Vector Searchとテーブルが同期するようにチェンジデータキャプチャを有効化
chunked_docs_df = spark.read.parquet(
    f"file:{CURRENT_FOLDER}/{QUICK_START_REPO_SAVE_FOLDER}/quick_start_demo/chunked_databricks_docs.snappy.parquet"
)
chunked_docs_df.write.format("delta").mode("overwrite").saveAsTable(CHUNKS_DELTA_TABLE)
spark.sql(
    f"ALTER TABLE {CHUNKS_DELTA_TABLE} SET TBLPROPERTIES (delta.enableChangeDataFeed = true)"
)

print(
    f"View Delta Table at: https://{workspace_url}/explore/data/{UC_CATALOG}/{UC_SCHEMA}/{CHUNKS_DELTA_TABLE.split('.')[-1]}"
)

# エンベディングの作成、ベクトルインデックスにチャンクを同期
print(
    f"Embedding docs & creating Vector Search Index, this will take ~5 - 10 minutes.\nView Index Status at: https://{workspace_url}/explore/data/{UC_CATALOG}/{UC_SCHEMA}/{CHUNKS_VECTOR_INDEX.split('.')[-1]}"
)

index = vsc.create_delta_sync_index_and_wait(
    endpoint_name=VECTOR_SEARCH_ENDPOINT,
    index_name=CHUNKS_VECTOR_INDEX,
    primary_key="chunk_id",
    source_table_name=CHUNKS_DELTA_TABLE,
    pipeline_type="TRIGGERED",
    embedding_source_column="chunked_text",
    embedding_model_endpoint_name="databricks-gte-large-en",
)
しばらくするとベクトルインデックスがレディになります。

ここまでは、これまでにRAG構成組むのと同じです。
2/ レビューアプリケーションへのデプロイ
ここからがNew、レビューアプリケーションとな。
ベクトルインデックスの準備ができたので、RAGチェーンを準備し、モデルサービングで提供されるスケーラブルでプロダクションレベルのREST APIで稼働するレビューアプリケーションにデプロイします。
2.1/ チェーンのパラメーターの設定
MLflow Model Configurationsを用いることで、Databricksではチェーンのパラメータ化が容易となります。あとで、システムプロンプトや収集設定のようなこれらのパラメータを調整することでアプリケーションの品質をチューニングします。ほとんどのアプリケーションでは、さらに多くパラメータが含まれますが、このデモでは設定を最小限にとどめます。
chain_config = {
    "llm_model_serving_endpoint_name": "databricks-dbrx-instruct",  # 使用する基盤モデル
    "vector_search_endpoint_name": VECTOR_SEARCH_ENDPOINT,  # vector searchエンドポイント
    "vector_search_index": f"{CHUNKS_VECTOR_INDEX}",
    "llm_prompt_template": """You are an assistant that answers questions. Use the following pieces of retrieved context to answer the question. Some pieces of context may be irrelevant, in which case you should not use them to form the answer.\n\nContext: {context}""", # LLMプロンプトテンプレート
}

# ここでは、Agent Frameworkで必要となるスキーマで入力例を定義します
input_example = {"messages": [ {"role": "user", "content": "What is Retrieval-augmented Generation?"}]}
2.1/ アプリケーションの記録およびトレースの参照
はじめにMLflowモデルとしてチェーンを登録し、チェーンの中で何が起きているのかを理解するためにMLflowトレースを調査します。
MLflowトレース

import mlflow

# MLflowにモデルを記録
with mlflow.start_run(run_name="databricks-docs-bot"):
    logged_chain_info = mlflow.langchain.log_model(
        lc_model=os.path.join(
            os.getcwd(),
            f"{QUICK_START_REPO_SAVE_FOLDER}/quick_start_demo/sample_rag_chain",
        ),  # クイックスタートのレポジトリのチェーンのコードファイル
        model_config=chain_config,  # 上で設定したチェーンの設定
        artifact_path="chain",  # MLflowで必要な設定
        input_example=input_example,  # チェーンの入力スキーマの保存。出力のスキーマを記録、キャプチャする前に、MLflowはチェーンを実行します。
    )

# MLflow Traceを確認するためにローカルでチェーンをテスト
chain = mlflow.langchain.load_model(logged_chain_info.model_uri)
chain.invoke(input_example)
これがMLflow Trace、LangSmithみたいな感じですかね。

2.1/ アプリケーションのデプロイ
それでは、以下を実行しましょう:
- Unity Catalogにアプリケーションを登録
- Quality LabのレビューアプリケーションにデプロイするためにAgent Frameworkを使用
レビューアプリケーションに加え、スケーラブルかつプロダクションレディのモデルサービングエンドポイントもデプロイされます。
from databricks import agents
import time
from databricks.sdk.service.serving import EndpointStateReady, EndpointStateConfigUpdate

# チェーンを記録するためにUnity Catalogを使用
mlflow.set_registry_uri('databricks-uc')

# UCにチェーンを登録
uc_registered_model_info = mlflow.register_model(model_uri=logged_chain_info.model_uri, name=UC_MODEL_NAME)

# レビューアプリを有効化するためにデプロイしAPIエンドポイントを作成
deployment_info = agents.deploy(model_name=UC_MODEL_NAME, model_version=uc_registered_model_info.version)

# レビューアプリの準備ができるまで待つ
print("\nWaiting for endpoint to deploy.  This can take 10 - 20 minutes.", end="")
while w.serving_endpoints.get(deployment_info.endpoint_name).state.ready == EndpointStateReady.NOT_READY or w.serving_endpoints.get(deployment_info.endpoint_name).state.config_update == EndpointStateConfigUpdate.IN_PROGRESS:
    print(".", end="")
    time.sleep(30)
Created version '1' of model 'takaakiyayoi_catalog.agent_demo.feedback'.

    Deployment of takaakiyayoi_catalog.agent_demo.doc_bot version 1 initiated.  This can take up to 15 minutes and the Review App & Query Endpoint will not work until this deployment finishes.

    View status: https://xxxxx.net/ml/endpoints/agents_takaakiyayoi_catalog-agent_demo-doc_bot
    Review App: https://xxxx.net/ml/review/takaakiyayoi_catalog.agent_demo.doc_bot/1?o=984752964297111


Waiting for endpoint to deploy.  This can take 10 - 20 minutes.........................
Agent Evaluationレビューアプリケーション
デプロイが完了するとモデルサービングエンドポイントにはRAGとフィードバック収集用のエンティティがデプロイされていることがわかります。

デプロイが完了したら上のReview Appにアクセスします。なるほど、RAGアプリの評価ができるってことか。

質問に対してサムズアップ、サムズダウンできます。

さらに詳細フィードバックも。

そして、これらのデータがペイロードテーブルに格納されると。

3/ あなたのアプリケーションを評価するためのAgent Evaluation
3.1/ 評価データセットを構築するためにステークホルダーにbotとチャットさせる
通常、我々は内部のドメイン専門家を有しているので、彼らにボットをテスト、レビューさせます。ドメイン専門家はDatabricksワークスペースへのアクセス権を持っている必要はありません - SCIMを有効化している場合には、お使いのSSOの任意のユーザーに権限を割り当てることができます。
これは、あなたの評価ようデータセットを構築、改善するための重要なステップです: ユーザーにbotに質問するようにお願いし、適切な回答でなかった場合には出力された回答をbotに提示します。
あなたのアプリケーションは、全てのステークホルダーの質問と、それぞれのMLflow Traceを含むbotのレスポンスを自動であなたのレイクハウスのDeltaテーブルに格納します。さらに、Databricksではエンドユーザーからのフィードバックの追跡が簡単になります: チャットbotが適切な回答をせず、ユーザーがサムズダウンした際、彼らのフィードバックはDeltaテーブルに格納されます。
あなたの評価ようデータセットは、品質を改善するための開発ワークフローの基礎となります: 品質問題の根本原因を特定し、修正のインパクトを客観的に計測します。
3.2/ お使いのチェーンの評価の実行
それでは、我々のモデルのパフォーマンスを評価するために、Agent EvaluationのAIエバリュエーターを活用しましょう。Agent Evaluationはmlflow.evaluate(...)に統合されており、必要なことはmodel_type="databricks-agent"を指定するだけです。
このデモでは、模擬的な10個の質問評価データセットを使います。お使いの評価データセットのサイズに応じたベストプラクティスをご覧ください。
import pandas as pd

sample_eval_set = [
    {
        "request_id": "5482",
        "request": "What happens if I try to access an index that is out of bounds in an array using the [ ] operator in Databricks SQL when spark.sql.ansi.enabled is set to false?",
        "expected_response": "If you try to access an index that is out of bounds in an array using the [ ] operator in Databricks SQL when spark.sql.ansi.enabled is set to false, Databricks will return NULL instead of raising an error.",
    },
    {
        "request_id": "2112",
        "request": "Why is a long-running stage in my Spark job only showing one task, and how can I resolve this issue?",
        "expected_response": "A long-running stage with one task in a Spark job could be due to several reasons such as:\n\n1. Expensive User Defined Functions (UDFs) on small data\n2. Window function without a PARTITION BY statement\n3. Reading from an unsplittable file type like gzip\n4. Setting the multiLine option when reading a JSON or CSV file\n5. Schema inference of a large file\n6. Use of repartition(1) or coalesce(1)\n\nTo resolve this issue, you can:\n\n1. Optimize your UDFs or replace them with built-in functions if possible.\n2. Ensure that you have a proper PARTITION BY statement in your window functions.\n3. Avoid using unsplittable file types like gzip. Instead, use splittable file types like snappy or lz4.\n4. Avoid setting the multiLine option when reading JSON or CSV files.\n5. Perform schema inference on a small sample of your data and then apply it to the entire dataset.\n6. Avoid using repartition(1) or coalesce(1) unless necessary.\n\nBy implementing these changes, you should be able to resolve the issue of a long-running stage with only one task in your Spark job.",
    },
    {
        "request_id": "5054",
        "request": "How can I represent 4-byte single-precision floating point numbers in Databricks SQL and what are their limits?",
        "expected_response": "4-byte single-precision floating point numbers can be represented in Databricks SQL using the `FLOAT` or `REAL` syntax. The range of numbers that can be represented is from -3.402E+38 to +3.402E+38, including negative infinity, positive infinity, and NaN (not a number). Here are some examples of how to represent these numbers:\n\n* `+1F` represents 1.0\n* `5E10F` represents 5E10\n* `5.3E10F` represents 5.3E10\n* `-.1F` represents -0.1\n* `2.F` represents 2.0\n* `-5555555555555555.1F` represents -5.5555558E15\n* `CAST(6.1 AS FLOAT)` represents 6.1\n\nNote that `FLOAT` is a base-2 numeric type, so the representation of base-10 literals may not be exact. If you need to accurately represent fractional or large base-10 numbers, consider using the `DECIMAL` type instead.",
    },
    {
        "request_id": "2003",
        "request": "How can I identify the reason for failing executors in my Databricks workspace, and what steps can I take to resolve memory issues?",
        "expected_response": "1. Identify failing executors: In your Databricks workspace, navigate to the compute's Event log to check for any explanations regarding executor failures. Look for messages indicating spot instance losses or cluster resizing due to autoscaling. If using spot instances, refer to 'Losing spot instances' documentation. For autoscaling, refer to 'Learn more about cluster resizing' documentation.\n\n2. Check executor logs: If no information is found in the event log, go to the Spark UI and click the Executors tab. Here, you can access logs from failed executors to investigate further.\n\n3. Identify memory issues: If the above steps do not provide a clear reason for failing executors, it is likely a memory issue. To dig into memory issues, refer to the 'Spark memory issues' documentation.\n\n4. Resolve memory issues: To resolve memory issues, consider the following steps:\n\n   a. Increase executor memory: Allocate more memory to executors by adjusting the 'spark.executor.memory' property in your Spark configuration.\n\n   b. Increase driver memory: Allocate more memory to the driver by adjusting the 'spark.driver.memory' property in your Spark configuration.\n\n   c. Use off-heap memory: Enable off-heap memory by setting the 'spark.memory.offHeap.enabled' property to 'true' and allocating off-heap memory using the 'spark.memory.offHeap.size' property.\n\n   d. Optimize data processing: Review your data processing workflows and optimize them for memory efficiency. This may include reducing data shuffling, using broadcast variables, or caching data strategically.\n\n   e. Monitor memory usage: Monitor memory usage in your Databricks workspace to identify potential memory leaks or inefficient memory utilization. Use tools like the Spark UI, Ganglia, or Grafana to monitor memory usage.",
    },
]

eval_df = pd.DataFrame(sample_eval_set)
display(eval_df)

with mlflow.start_run(run_id=logged_chain_info.run_id):
    # 評価
    eval_results = mlflow.evaluate(
        data=eval_df,  # あなたの評価セット
        model=logged_chain_info.model_uri,  # 上で記録したモデル
        model_type="databricks-agent",  # Mosaic AI Agent Evaluationを起動
    )

上述の通り、Mosaic AI Agent EvaluationはMLflow Evaluationにインテグレーションされているので、エクスペリメントの評価タブで結果を目で確認することができます。

さらにMLflow Traceの結果はトレースタブで確認できます。

まとめ
- Mosaic AI Agent Frameworkを活用してクイックにエージェントアプリを構築。
- エージェント向けMLflowトレースでエージェントアプリをデバッグ。
- Mosaic AI Agent Evaluationでエージェントアプリを評価。
これ以外にもサンプルコードがあるので勉強します!
- 目次
- 前のセクション: 5. 評価ドリブンの開発ワークフロー
- 次のセクション: 前提条件: 要件の収集