この記事はVue.js #2 Advent Calendar 2018の14日目の記事です。
最近仕事でVueを触り始めて、VueとVuexを用いてプロダクトを開発しています。その際に自分がちょっと工夫したことを書こうと思います。
動作確認環境
- macOS Mojave 10.14
- Node.js v10.14.2 (2018/12/14時点での最新のLTS版です)
- Yarn 1.10.1
- @vue/cli 3.1.1
プロジェクトの作成
$ mkdir sample-project
$ cd sample-project
$ yarn init
$ yarn global add @vue/cli
$ vue create .
@vue/cliのプロジェクト作成時は↓の感じですが、まあこれは今回vuexとvue-router以外あまり関係ないことなので自由で大丈夫です。
Vue CLI v3.1.1

? Please pick a preset: Manually select features
? Check the features needed for your project: Babel, Router, Vuex, CSS Pre-processors, Linter
? Use history mode for router? (Requires proper server setup for index fallback in production) Yes
? Pick a CSS pre-processor (PostCSS, Autoprefixer and CSS Modules are supported by default): Sass/SCSS
? Pick a linter / formatter config: Prettier
? Pick additional lint features: Lint on save
? Where do you prefer placing config for Babel, PostCSS, ESLint, etc.? In dedicated config files
? Save this as a preset for future projects? N
ユーザーの入力が多く、かつそれをstateに保存するタイプのアプリケーションを作成する
例えばアンケートの機能を作るとします。
もちろん場合によりますが、2桁以上の質問などの比較的多い質問があると仮定します。
このような機能を作る場合、POSTリクエストの数を極力減らしたいので、ユーザーの回答を一つずつPOSTしてサーバーサイドに渡すといったことはしないと思います。
どういう設計にするかというと、ユーザーの回答を配列としてstateに保持し、すべての回答が終わった段階でリクエストに乗せるといった設計にするかと思います。
実際のコード
アンケートの「質問(questions)」と「回答(answers)」でstoreをmodulesに分けます。
Router
import Vue from "vue";
import Router from "vue-router";

import Questionnaire from "./views/Questionnaire.vue"
import Result from "./views/Result.vue"

Vue.use(Router);

export default new Router({
  mode: "history",
  base: process.env.BASE_URL,
  routes: [
    {
      path: "/",
      name: "Questionnaire",
      component: Questionnaire
    },
    {
      path: "/result",
      name: "Result",
      component: Result
    }
  ]
});
Store
import Vue from "vue";
import Vuex from "vuex";

import questions from "./modules/question"
import answers from "./modules/answers"

Vue.use(Vuex);

export default new Vuex.Store({
  modules: {
    questions,
    answers
  }
});
import { answerTypes } from "../../mutation-types"

const answers = {
  namespaced: true,
  state: {
    answers: []
  },
  mutations: {
    [answerTypes.PUSH_ANSWER](state, payload) {
      state.answers.push({
        number: payload.number,
        answer: payload.answer
      })
    }
  },
  actions: {
    pushAnswer({ commit }, payload) {
      commit("PUSH_ANSWER", payload)
    }
  }
}

export default answers
import fetchQuestionAPI from "../../api/fetchQuestion"
import { questionsTypes } from "../../mutation-types"

const questions = {
  namespaced: true,
  state: {
    questions: []
  },
  mutations: {
    [questionsTypes.SUCCESS_REQUEST_QUESTIONS](state, payload) {
      state.questions = payload.questions
    },
    [questionsTypes.FAILURE_REQUEST_QUESTIONS](state, payload) {
      console.error(payload)
    }
  },
  actions: {
    async fetchQuestions({ dispatch }) {
      try {
        const questions = await fetchQuestionAPI()
        dispatch("doneFetchQuestions", questions)
      } catch (e) {
        dispatch("failureFetchQuestions", e)
      }
    },
    doneFetchQuestions({ commit }, questions) {
      commit("SUCCESS_REQUEST_QUESTIONS", questions)
    },
    failureFetchQuestions({ commit }, e) {
      commit("FAILURE_REQUEST_QUESTIONS", e)
    }
  }
}

export default questions
Views(Pages)
<template>
  <div>
    <div>
      1: とてもそう思う
      2: そう思う
      3: そうは思わない
      4: まったくそう思わない
    </div>
    <QuestionList :questions="this.questions" />
    <div>
      <router-link to="/result">回答一覧へ</router-link>
    </div>
  </div>
</template>

<script>
import { mapState, mapActions } from "vuex"

import QuestionList from "@/components/QuestionList.vue"

export default {
  name: "Questionnaire",
  components: {
    QuestionList
  },
  computed: {
    ...mapState("question", [
      "questions"
    ])
  },
  methods: {
    ...mapActions("questions", [
      "fetchQuestions"
    ])
  },
  created() {
    this.fetchQuestions()
  }
}
</script>
Components
<template>
  <div>
    <div v-for="(question, index) in this.questions" :key="index" >
      <QuestionBody :question="question" />
    </div>
  </div>
</template>

<script>
import { mapState } from "vuex"

import QuestionBody from "./QuestionBody.vue"

export default {
  name: "QuestionList",
  components: {
    QuestionBody
  },
  props: {
    questions: Array
  }
}
</script>
<template>
  <div>
    <div>
      質問番号: {{ this.question.number }}
    </div>
    <div>
      質問内容: {{ this.question.title }}
    </div>
    <div>
      <AnswerButtons :number="this.question.number" />
    </div>
  </div>
</template>

<script>
import AnswerButtons from "./AnswerButtons.vue"

export default {
  name: "QuestionBody",
  components: {
    AnswerButtons
  },
  props: {
    question: Object
  }
}
</script>
<template>
  <div>
    <input type="radio" @click="pushAnswer({ number: number, answer: 1 })">
      1
    <input type="radio" @click="pushAnswer({ number: number, answer: 2 })">
      2
    <input type="radio" @click="pushAnswer({ number: number, answer: 3 })">
      3
    <input type="radio" @click="pushAnswer({ number: number, answer: 4 })">
      4
  </div>
</template>

<script>
import { mapActions } from "vuex"

export default {
  name: "AnswerButtons",
  props: {
    number: Number
  },
  methods: {
    ...mapActions("answers", [
      "pushAnswer"
    ])
  }
}
</script>
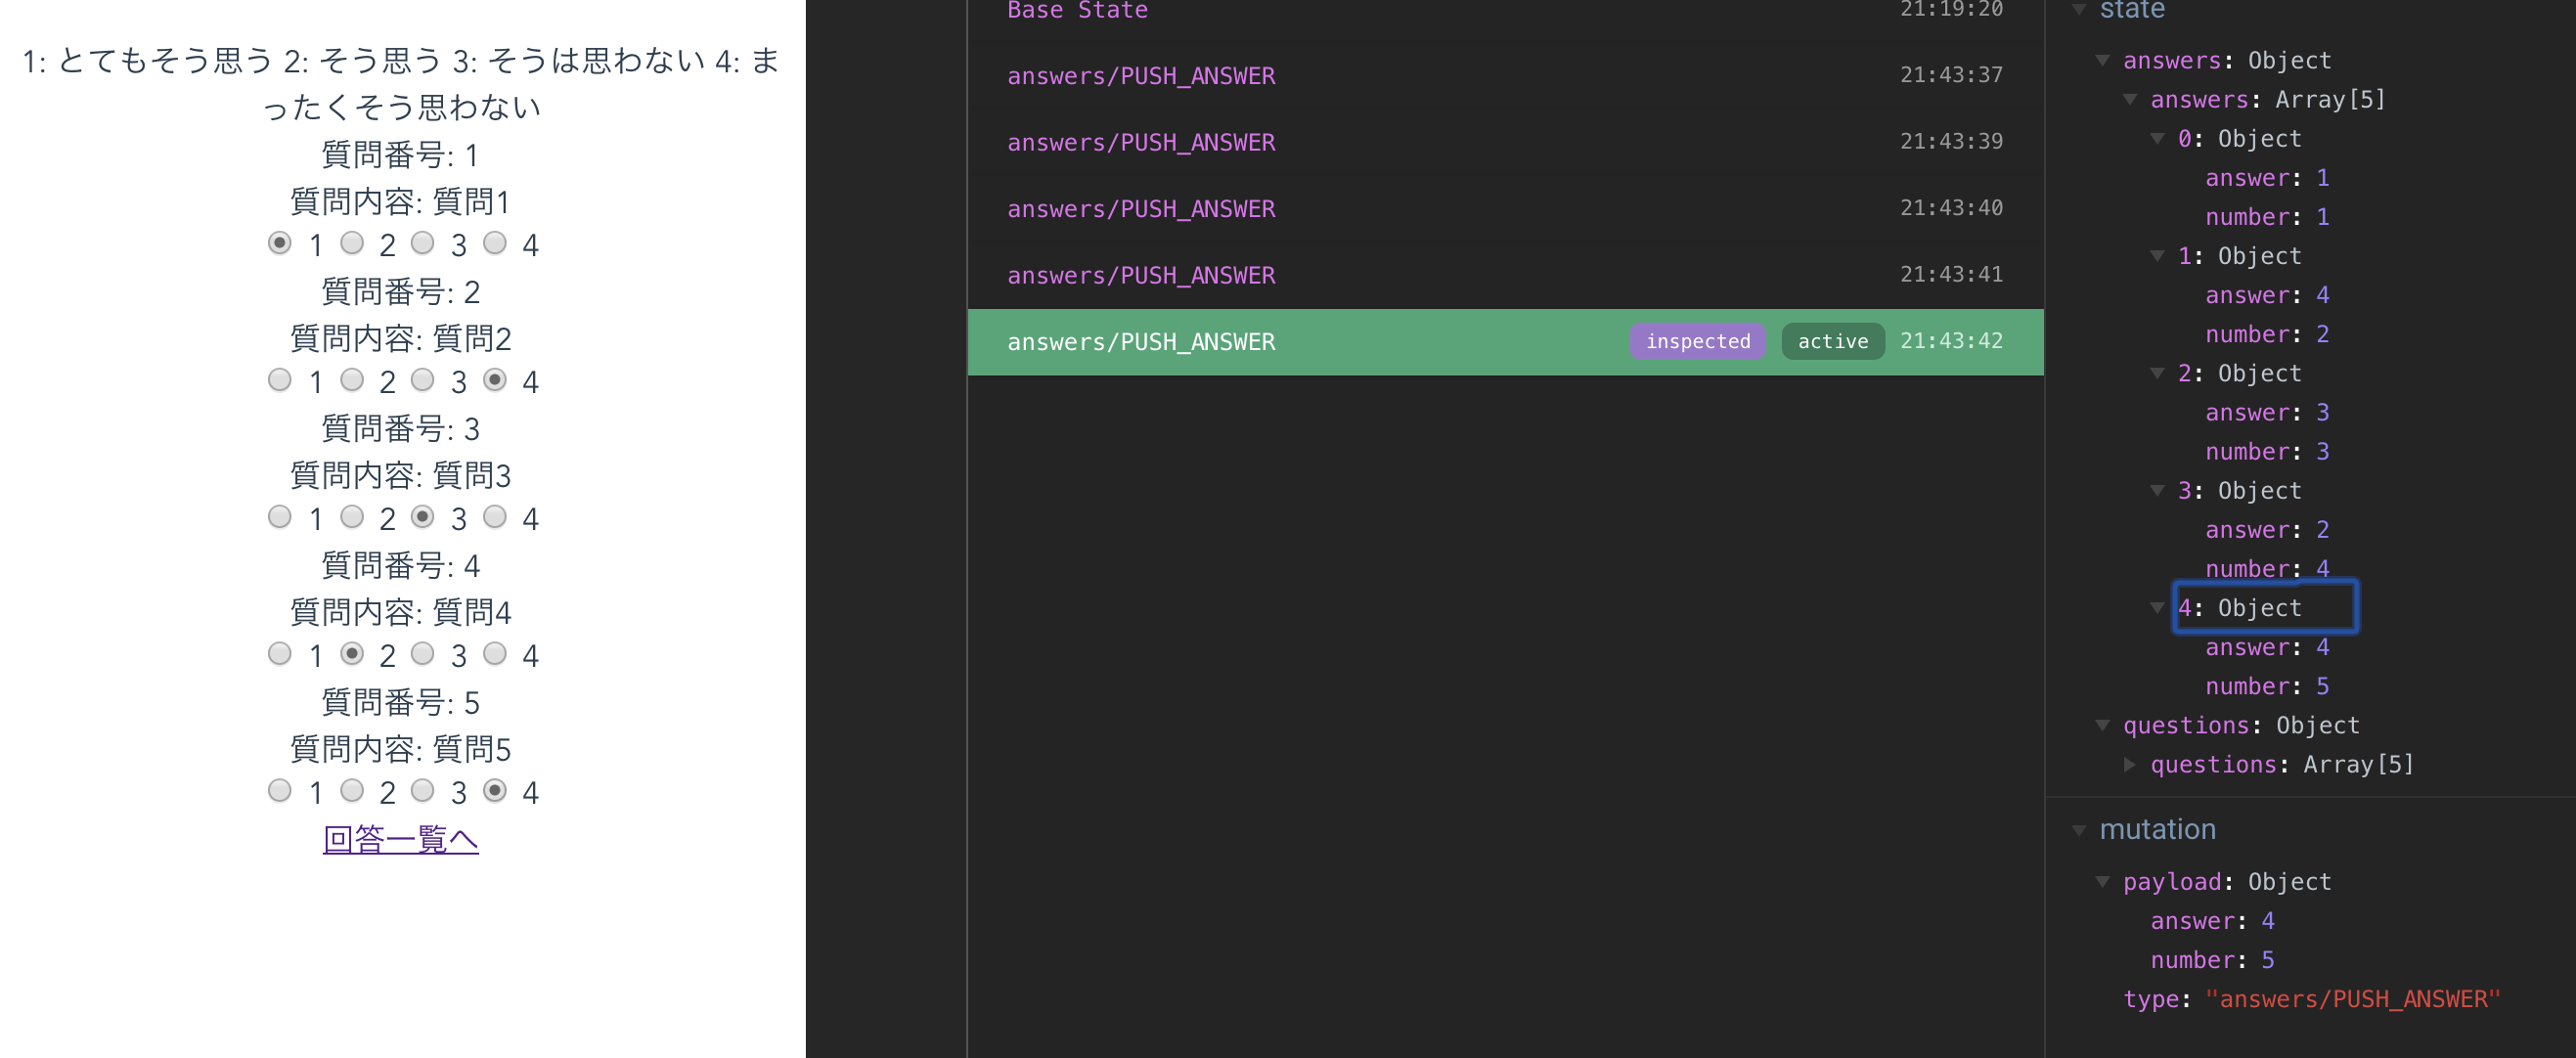
実際の画面はこんな感じ(スタイル一切当ててなくて申し訳ないです)

押したラジオボタンの値と質問番号が配列にpushされていきます。
今回はユーザーが回答を変更した場合については考慮していません(ラジオボタンを押すたびにただanswersという配列にObjectをpushしているだけなので)
回答結果画面を実装する
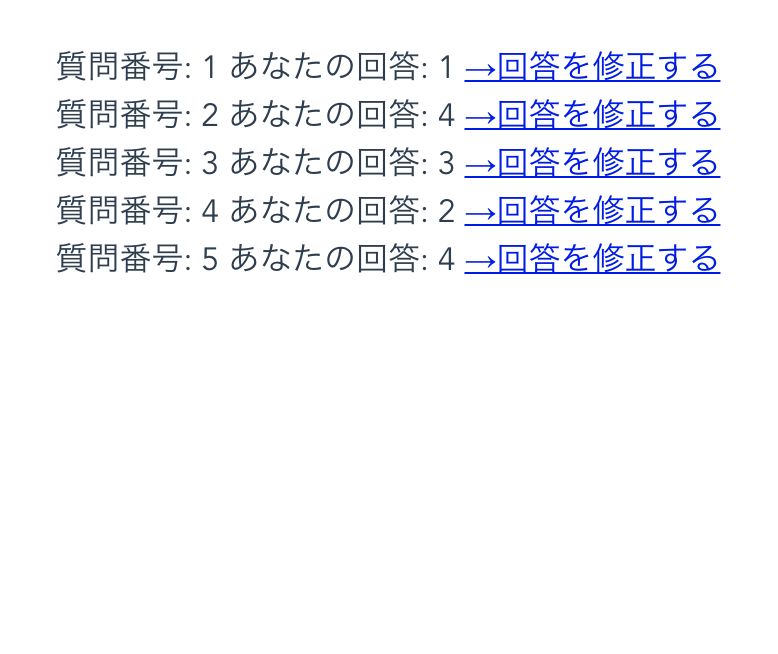
ユーザーが回答を終えたら、回答結果画面に遷移できるようにします。
<template>
  <div>
    <ResultList :answers="this.answers" />
  </div>
</template>

<script>
import { mapState } from "vuex"

import ResultList from "../components/ResultList.vue"

export default {
  name: "Result",
  components: {
    ResultList
  },
  computed: {
    ...mapState("answers", [
      "answers"
    ])
  }
}
</script>
<template>
  <div>
    <div v-for="(answer, index) in answers" :key="index">
      質問番号: {{ answer.number }}
      あなたの回答: {{ answer.answer }}
      <a href="#">→回答を修正する</a>
    </div>
  </div>
</template>

<script>
export default {
  name: "ResultList",
  props: {
    answers: Array
  }
}
</script>
回答結果を確認したいときに不便な点
このような設計の場合、面倒なのが「すべてのアンケートが回答された状態」にすることです。
@vue/cli-serviceで起動したアプリケーションはデフォルトでホットリローディングしてくれるため、コードの変更が即座に反映されるので開発中はそこまで困らないかもしれません。
ですが、「ユーザーがすべての回答をしきったあとの回答確認画面」のようなものを他の人に見てもらったりする際に、いちいちすべての問題を一つずつ回答しないと確認画面に辿り着けない、つまり「すべてのアンケートが回答された状態」にするのにとても手間がかかります。
回答を一気に埋めるActions/Mutationsを定義する
回答結果画面をすぐに出したいのにいちいちアンケートに全部答えないといけなくて面倒だと思ったときに、stateのanswersに対して大量の回答結果をpushするActions/Mutationsを作成してしまえば楽なのではないか?と思い、実際に作成してみました。
上記の「すべてのアンケートが回答された状態」にするのは、vuexを使っている場合はstateに対してアンケートの数ぶんの回答を持つ配列で更新してあげればいいだけなので、実現自体は簡単です。
import { answersTypes } from "../../mutation-types"

const answers = {
  namespaced: true,
  state: {
    answers: []
  },
  mutations: {
    [answersTypes.PUSH_ANSWER](state, payload) {
      state.answers.push({
        number: payload.number,
        answer: payload.answer
      })
-   }
+   },
+   [answersTypes.PUSH_ALL_ANSWERS](state, payload) {
+     state.answers.push(...payload)
+   }
  },
  actions: {
    pushAnswer({ commit }, payload) {
      commit("PUSH_ANSWER", payload)
-   }
+   },
+   pushAllAnswers({ commit }) {
+     const payload = [
+       { number: 1, answer: 5 },
+       { number: 2, answer: 4 },
+       { number: 3, answer: 3 },
+       { number: 4, answer: 2 },
+       { number: 5, answer: 1 }
+     ]
+    commit("PUSH_ALL_ANSWERS", payload)
+   }
  }
}

export default answers
こんな感じでベタ書きしてそれをpayloadとして渡してしまえば、あとはこのpushAllAnswersというActionを発火するだけで一気にstateのanswersに値が入ります。
Actionをどこで発火するか?
ではこのActionを発火するのはどこにするか?と考えたときに、アンケート画面上で発火させるのもな……と思ったので、「pushAllAnswersというActionを発火させてから回答一覧に遷移する」というイベントを持つコンポーネントを作ります。
import Vue from "vue";
import Router from "vue-router";

import Questionnaire from "./views/Questionnaire.vue"
import Result from "./views/Result.vue"

Vue.use(Router);

export default new Router({
  mode: "history",
  base: process.env.BASE_URL,
  routes: [
    {
      path: "/",
      name: "Questionnaire",
      component: Questionnaire
    },
    {
      path: "/result",
      name: "Result",
      component: Result
-   }
+   },
+   {
+     path: "/confirmation",
+     name: "Confirmation",
+     component: Confirmation
+   }
  ]
});
<template>
  <div>
    <div>
      <button @click="pushAllAnswersAndMoveResults()">
        回答したことにして回答一覧画面に遷移する
      </button>
    </div>
  </div>
</template>

<script>
import { mapActions } from "vuex"

export default {
  name: "Confirmation",
  methods: {
    ...mapActions("answers", [
      "pushAllAnswers"
    ]),
    pushAllAnswersAndMoveResults() {
      this.pushAllAnswers()
      this.$router.push("result")
    }
  }
}
</script>

<style lang="postcss" scoped>
button {
  border: solid;
}
</style>
この画面のボタンを押すと、ベタ書きした回答結果が一気にstateに詰め込まれて一瞬で回答結果画面に遷移します。

production環境に出したくないコード
これで一瞬で回答結果画面に遷移できる、と思ったのですが、こんな確認のためだけのActionsやMutationsをプロダクションのコードに混ぜるというのは大変よろしくありません。
このアプリケーション上での確認になるのでどうしてもこのアプリケーションの中のどこかにこういったコードを仕込まなくてはいけませんが、この確認機能だけのために複数のファイルにまたがってActionsやMutationsを足して……とやっていると、いざproduction環境に出すのでこの確認機能のコードを消す、となった際に複数のファイルを精査しなくてはならず、ミスが生まれやすくなります。
なので、こういった確認機能のコードを一箇所にまとめたいと思います。
mapXxxを使わずにActionsやMutationsを定義する
まずどこにまとめるかというと、確認機能を発火させるために必要なsrc/views/Confirmation.vueです。
ここのmethodsにまとめてしまいます。
また、ActionsやMutationsをstore(のmodules)に定義していますが、これはmapActionsやmapMutationsを使わない場合はthis.$store.[Action]やthis.$store.[Mutation]のような書き方ができます。
this.$storeに直接Mutationsを追加する
ここが今回の「確認機能を一箇所にまとめる」上でのポイントです。
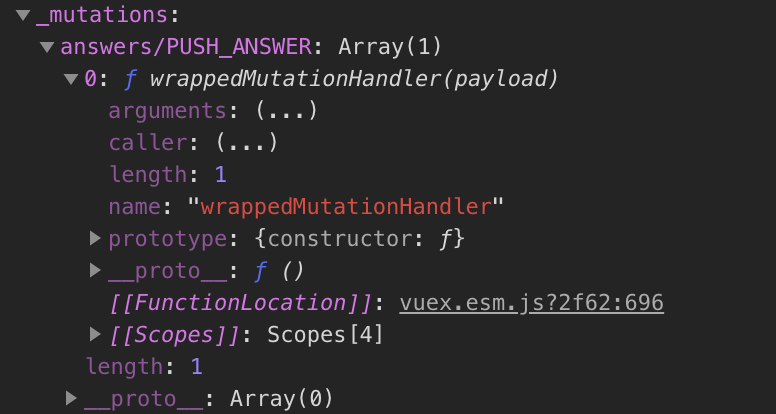
まず、ブラウザのconsoleでthis.$storeを見てみます。

vuexのソースコードを読むと分かりますが、_mutationsというプロパティが定義されています。ここには名前の通り、storeで定義したMutationsが定義されています。

つまり、this.$store._mutationsにアクセスすれば、直接プロパティを追加することができます。
src/views/Confirmation.vueでthis.$store._mutationsにアクセスしてMutationsを追加し、src/store/modules/answers.jsで定義したMutationsを削除します。
また、今回の確認機能には非同期の処理は含まれていないので、Actionsに関しては単に削除してdispatchせずにいきなりcommitするようにします。
import { answersTypes } from "../../mutation-types"

const answers = {
  namespaced: true,
  state: {
    answers: []
  },
  mutations: {
    [answersTypes.PUSH_ANSWER](state, payload) {
      state.answers.push({
        number: payload.number,
        answer: payload.answer
      })
+   }
-   },
-   [answersTypes.PUSH_ALL_ANSWERS](state, payload) {
-     state.answers.push(...payload)
-   }
  },
  actions: {
    pushAnswer({ commit }, payload) {
      commit("PUSH_ANSWER", payload)
+   }
-   },
-   pushAllAnswers({ commit }) {
-     const payload = [
-       { number: 1, answer: 5 },
-       { number: 2, answer: 4 },
-       { number: 3, answer: 3 },
-       { number: 4, answer: 2 },
-       { number: 5, answer: 1 }
-     ]
-    commit("PUSH_ALL_ANSWERS", payload)
-   }
  }
}

export default answers
<template>
  <div>
    <div>
      <button @click="pushAllAnswersAndMoveResults()">
        回答したことにして回答一覧画面に遷移する
      </button>
    </div>
  </div>
</template>

<script>
- import { mapActions } from "vuex"

export default {
  name: "Confirmation",
  methods: {
-   ...mapActions("answers", [
-     "pushAllAnswers"
-   ]),
    pushAllAnswersAndMoveResults() {
-     this.pushAllAnswers()
+     this.setMutationForConfirm()
+     const payload = [
+       { number: 1, answer: 5 },
+       { number: 2, answer: 4 },
+       { number: 3, answer: 3 },
+       { number: 4, answer: 2 },
+       { number: 5, answer: 1 }
+     ]
+     this.$store.commit("pushAllAnswers", payload)
      this.$router.push("result")
-   }
+   },
+   setMutationsForConfirm() {
+     Object.assign(this.$store._mutations,
+       {
+         pushAllAnswers: [payload => {
+           this.$store.state.answers.answers.push(...payload)
+         }]
+       }
+     )
+   }
  }
}
</script>

<style lang="postcss" scoped>
button {
  border: solid;
}
</style>
ちなみに、this.$store._mutationsに追加するオブジェクトの値が配列なのは、this.$store._mutationsの実際のMutationsがどのように登録されているのかを確認すればわかります。

こんな感じで、modules内にあったActionsとMutationsを確認機能のView内で完結するようにできました。
課題
_で始まるプロパティ
そもそも、_(アンダースコア)で始まるプロパティ名はprivateのプロパティとして扱いたいという意図があるそうです。(参考)
JavaScriptは実際にprivateなプロパティを定義することはできず、習慣的にアンダースコアで始まるプロパティ名/メソッド名を定義しているとのことでした。
なので、この記事ではライブラリの作者の意図を無視していることになります。そこについては賛否両論あると思います。
routerからは分離できていない
確認機能を自分のローカルだけで使いたければ、.gitignoreにsrc/views/Confirmation.vueを入れてしまえばよいのですが、vue-routerからは分離することができず、結局src/router.jsには確認機能用のルーティングが残ってしまいます。
この状態でproduction環境に置き/confirmationにアクセスすると、ルーティングはされているがコンポーネントが存在しないのでいわゆる500エラーになってしまいます。
現状、production環境に置く前にルーティングを手動で削除する以外の方法がありません。ここも課題です。
まとめ
やり方としてはあまりクリーンではないですが、ユーザーの入力を大量にstateに保持するアプリケーションの「ユーザーの入力を一覧として確認する画面」をお手軽に表示する方法をご紹介しました。
拙く長い文となってしまいましたが、読んでいただきありがとうございました。
ご指摘がありましたらぜひよろしくお願いいたします。
