はじめに
Spring Security の文献を読んでも、なかなか頭に入らず、イメージを掴むのに苦労しました。
フレームワークなので、本来は「簡単に実装できるように作られているはず」ですが、最初は、取っ掛かりすらよく分からないことが多いです。
ここでは、初心者でも、順を追って Spring Security の動作の仕組みがわかるように、基本的な構成をまとめていきます。
具体的には、次のような簡素なアプリケーションを作って、ログイン認証失敗時やユーザー登録失敗時のメッセージも表示させつつ、一通りの要点を押さえていきます。
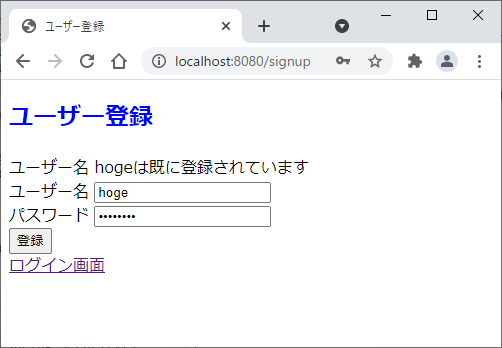
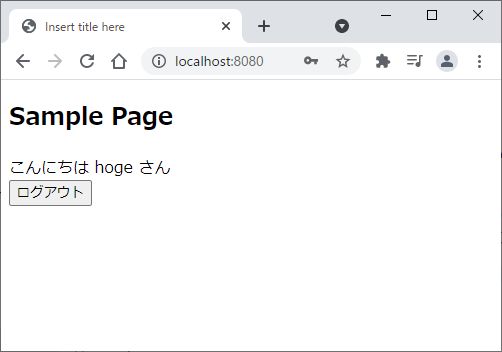
やってみると、結構簡単に扱えるようになっています。
Spring Boot を使用してプロジェクトを作成し、データベースは MySQL を使います。
実行した環境は次のとおりです。
| 項目 | 内容 |
|---|---|
| IDE | Spring Tool Suite4 |
| OS | Windows 10 |
| データベース | MySQL |
| DB接続のAPI | JDBC API |
| ビルドツール | Maven |
データベースアクセスは、直感的に分かりやすい JdbcTemplate を使用します。
以下、プロジェクトの作成から順を追って書いていきます。
気を付けて書いたつもりですが、誤り等ありましたらご指摘などいただけると幸いです。
<主な参考サイトなど>
・Spring Security リファレンス
・TERASOLUNA Server Framework for Java (5.x) Development Guideline
・Spring Security 使い方メモ 認証・認可
・Spring Security と Spring Bootで最小機能のデモアプリケーションを作成する
・Java Spring Security (Udemy)
目次
1. プロジェクトの作成とDBの設定
2. デフォルトのログイン機能の確認
3. ユーザー名とパスワードを指定してログインする
4. ログイン画面とログアウト処理をカスタマイズする
5. データベースに登録したユーザー名とパスワードでログインする
6. ユーザー登録をしてログインする(基本部分)
7. ユーザー登録をしてログインする(追加事項)
1. プロジェクトの作成とDBの設定
1-1. データベース(MySQL)の準備
事前の準備として、MySQL にデータベースを作成して、併せてアクセス用のユーザーを作成しておきます。
ここで設定した内容は後で application.properties というファイルに記述して、作成するアプリケーションと紐付けることになります。
まず、コマンドプロンプトから MySQL を開いて、最初に「spring_security_test」というデータベースを作成します(データベース名は何でも構いません)。
mysql> create database spring_security_test;
Query OK, 1 row affected (0.25 sec)
次に、アクセス用のユーザーを作成します。
以下は、ユーザー名「hoge」、パスワード「password123」とする場合の例です。
mysql> create user 'hoge'@'localhost' identified by 'password123';
Query OK, 0 rows affected (1.41 sec)
作成したユーザーに、作成したデータベース(spring_security_test)に対する全ての権限を与えておきます。
mysql> grant all on spring_security_test.* to 'hoge'@'localhost';
Query OK, 0 rows affected (0.32 sec)
MySQL のインストールや操作方法などの詳しいことは、こちらのサイトを参照してください。
1-2. プロジェクトの作成
**Spring Tool Sweet(STS)**を使用してプロジェクトを作成していきます。
メニューから「File」→「New」→「Spring Starter Project」の順で選択して、次の画面を表示します。
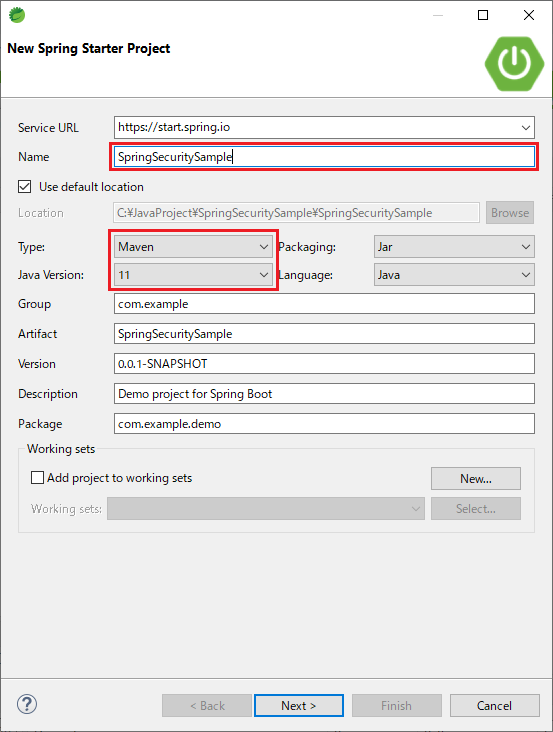
ここでは、次のように設定していますが、ここの設定はアバウトで大丈夫です。
| 項目 | 設定内容 | 補足 |
|---|---|---|
| プロジェクト名(Name) | SpringSecuritySample | プロジェクト名は何でも構いません |
| ビルドツール(Type) | Maven | Gradle でも構いません |
| パッケージング(Packaging) | Jar | War でも構いません |
| Java バージョン(Java Version) | 11 | 他のバージョンの動作は未確認です |
Next ボタンを押すと、ライブラリの選択画面が表示されます。
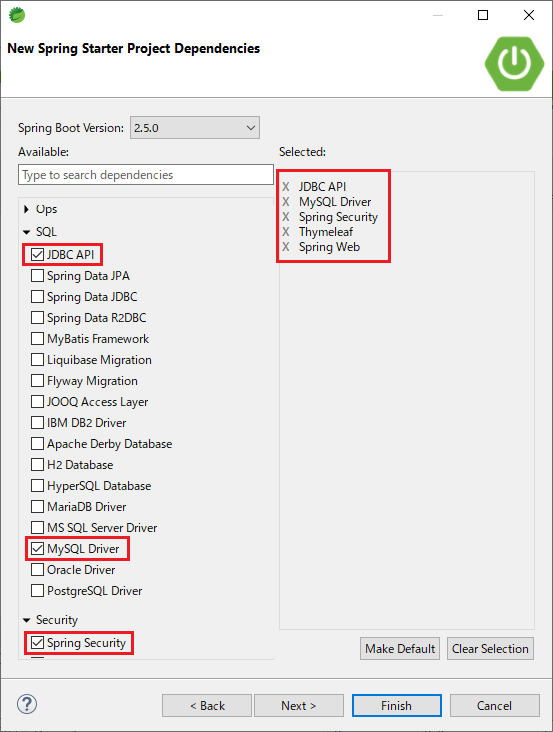
【参考】ライブラリの選択画面の続き
| 区分 | ライブラリ | 備考 |
|---|---|---|
| SQL | JDBC API | Javaからデータベースを操作するインターフェイス |
| SQL | MySQL Driver | MySQLへの接続ドライバ |
| Security | Spring Security | セキュリティ対策を実装するフレームワーク |
| Template Engines | Thymeleaf | ビューを作成するためのテンプレートエンジン |
| Web | Spring Web | WEBアプリを構築するためのスターター |
以上を選択したら Finish を押します。
ビルドツールに、Maven を使用した場合、次のような pom.xml ファイルが自動生成されています。
pom.xml のソースコードはここをクリック
<?xml version="1.0" encoding="UTF-8"?>
<project xmlns="http://maven.apache.org/POM/4.0.0" xmlns:xsi="http://www.w3.org/2001/XMLSchema-instance"
	xsi:schemaLocation="http://maven.apache.org/POM/4.0.0 https://maven.apache.org/xsd/maven-4.0.0.xsd">
	<modelVersion>4.0.0</modelVersion>
	<parent>
		<groupId>org.springframework.boot</groupId>
		<artifactId>spring-boot-starter-parent</artifactId>
		<version>2.5.0</version>
		<relativePath/> <!-- lookup parent from repository -->
	</parent>
	<groupId>com.example</groupId>
	<artifactId>SpringSecuritySample</artifactId>
	<version>0.0.1-SNAPSHOT</version>
	<name>SpringSecuritySample</name>
	<description>Demo project for Spring Boot</description>
	<properties>
		<java.version>11</java.version>
	</properties>
	<dependencies>
		<dependency>
			<groupId>org.springframework.boot</groupId>
			<artifactId>spring-boot-starter-jdbc</artifactId>
		</dependency>
		<dependency>
			<groupId>org.springframework.boot</groupId>
			<artifactId>spring-boot-starter-security</artifactId>
		</dependency>
		<dependency>
			<groupId>org.springframework.boot</groupId>
			<artifactId>spring-boot-starter-thymeleaf</artifactId>
		</dependency>
		<dependency>
			<groupId>org.springframework.boot</groupId>
			<artifactId>spring-boot-starter-web</artifactId>
		</dependency>
		<dependency>
			<groupId>org.thymeleaf.extras</groupId>
			<artifactId>thymeleaf-extras-springsecurity5</artifactId>
		</dependency>

		<dependency>
			<groupId>mysql</groupId>
			<artifactId>mysql-connector-java</artifactId>
			<scope>runtime</scope>
		</dependency>
		<dependency>
			<groupId>org.springframework.boot</groupId>
			<artifactId>spring-boot-starter-test</artifactId>
			<scope>test</scope>
		</dependency>
		<dependency>
			<groupId>org.springframework.security</groupId>
			<artifactId>spring-security-test</artifactId>
			<scope>test</scope>
		</dependency>
	</dependencies>

	<build>
		<plugins>
			<plugin>
				<groupId>org.springframework.boot</groupId>
				<artifactId>spring-boot-maven-plugin</artifactId>
			</plugin>
		</plugins>
	</build>

</project>
プロジェクトの設定の基本的なことは、こちらの記事に書いてありますので、必要に応じて参照してください。
1-3. データベース接続に関する設定
今回は、MySQL を使用するため、application.properties にその設定を記述しておく必要があります(下図のファイルです)。
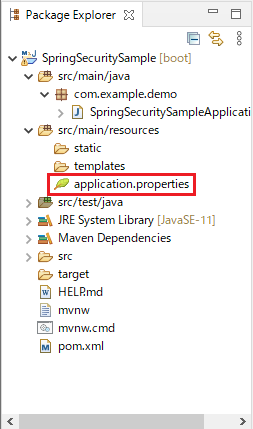
application.properties ファイルには、次のように設定しておきます(詳細はこちらの記事を参照)。
spring.datasource.url=jdbc:mysql://localhost:3306/spring_security_test
spring.datasource.username=hoge
spring.datasource.password=password123
spring.datasource.driver-class-name=com.mysql.cj.jdbc.Driver
spring.sql.init.enabled=false
spring.sql.init.encoding=utf-8
| 項目 | 記載内容 |
|---|---|
| spring.datasource.url | MySQLへのコネクション(spring_security_test は DB名) |
| spring.datasource.username | MySQLで作成したユーザー名 |
| spring.datasource.password | MySQLで設定したパスワード |
| spring.datasource.driver-class-name | JDBCドライバを指定 |
| spring.sql.init.enabled | DBの初期化の要否を設定(true=実行する、false=実行しない) |
| spring.sql.init.encoding | 文字コードを指定 |
spring.sql.init.enabled が非推奨とのアラートが出た場合
spring.datasource.url=jdbc:mysql://localhost:3306/spring_security_test
spring.datasource.username=hoge
spring.datasource.password=password123
spring.datasource.driver-class-name=com.mysql.cj.jdbc.Driver
spring.sql.init.mode=never
spring.sql.init.encoding=utf-8
| 項目 | 記載内容 |
|---|---|
| spring.sql.init.mode | DBの初期化の要否を設定(always=実行する、embedded=埋め込みDBのときに実行、never=実行しない) |
2. デフォルトのログイン機能の確認
Spring Security のライブラリを入れるだけで、基本のログイン機能は自動で用意されますので、まずそれを確認します。
2-1. 必要なファイルの作成
ここでは、下図のように「テスト表示用のトップページ(index.html)」と「コントローラー(TestController.java)」のみを作成します。
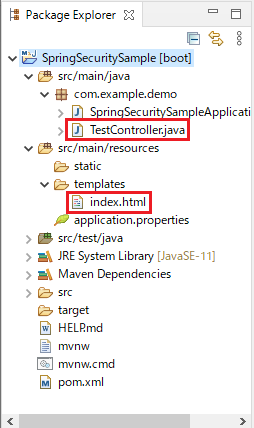
トップページは、文字を表示させるだけにしておきます。
<!DOCTYPE html>
<html>
<head>
<meta charset="UTF-8">
<title>Insert title here</title>
</head>
<body>
    <h2>Sample Page</h2>
</body>
</html>
コントローラーは、http://localhost:8080/ にアクセスしたときに、トップページ(index.html)を表示させる記述をしておきます。
package com.example.demo;

import org.springframework.stereotype.Controller;
import org.springframework.web.bind.annotation.GetMapping;
import org.springframework.web.bind.annotation.RequestMapping;

@Controller
@RequestMapping("/")
public class TestController {
	@GetMapping
	public String index () {
		return "index";
	}
}
以上で、準備は完了です。
2-2. ログイン機能の確認
アプリケーションを起動させます。

コンソール画面に次のように表示されます。
赤枠部分にパスワードが表示されますので、これをコピーしておきます。
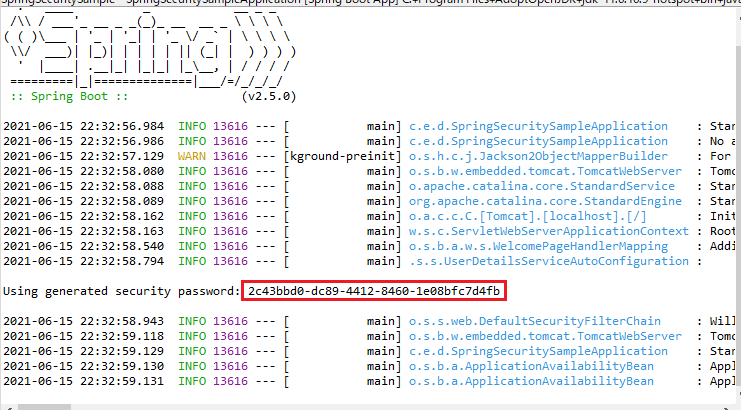
http://localhost:8080/ にアクセスすると、次のようなログイン画面が表示されると思います。
Username の欄には「user」と入れて、Password の欄には先ほどコンソール上に表示されていたパスワードをコピペで貼り付けます(上記の場合は「2c43bbd0-dc89-4412-8460-1e08bfc7d4fb」でしたが、毎回異なるパスワードが指定されます)。
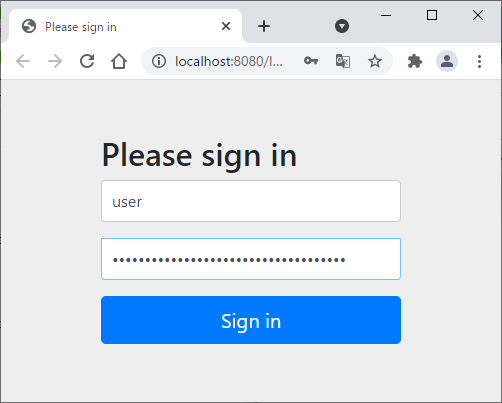
Sign in をクリックして、次のようにトップページが表示されたら成功です。
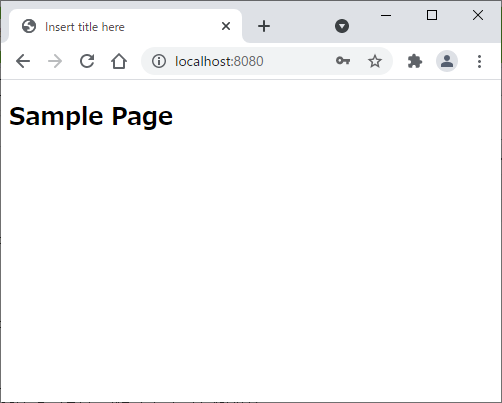
やってみれば、イージーです。
ただし、この場合は、ユーザー名もパスワードも用意されたものしか使用できません。
3. ユーザー名とパスワードを指定してログインする
次に、ユーザー名とパスワードを指定してログインをする方法です。
これを実装するために、Spring Security の設定(Been 定義)を行うコンフィギュレーションクラスを作成します。
以下のように SecurityConfig.java という名前でファイルを作成します(名前は自由です)。
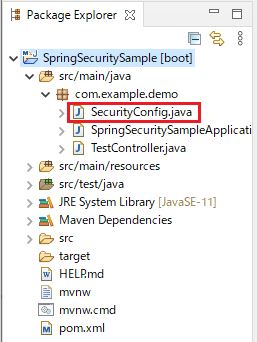
3-1. ソースコード
作成したファイル(SecurityConfig.java)に次のようにコードを書くことで、ログインするユーザー名とパスワードを指定することができます。
クラス名は任意ですが SecurityConfig という名前にしています。
Spring Security の設定を行うために、WebSecurityConfigurerAdapter というクラスを継承する必要があります。
このクラスには「Spring Securityの設定情報が定義されており、対象のメソッドをオーバーライドすることで設定を変更することができる」ものです(こちらの記事の説明より)。
package com.example.demo;

import org.springframework.context.annotation.Bean;
import org.springframework.security.config.annotation.authentication.builders.AuthenticationManagerBuilder;
import org.springframework.security.config.annotation.web.configuration.EnableWebSecurity;
import org.springframework.security.config.annotation.web.configuration.WebSecurityConfigurerAdapter;
import org.springframework.security.crypto.bcrypt.BCryptPasswordEncoder;
import org.springframework.security.crypto.password.PasswordEncoder;

@EnableWebSecurity
public class SecurityConfig extends WebSecurityConfigurerAdapter {

    @Bean
    public PasswordEncoder passwordEncoder() {
        return new BCryptPasswordEncoder();
    }

    @Override
    protected void configure(AuthenticationManagerBuilder auth) throws Exception {
        auth.inMemoryAuthentication()
            .withUser("yama3")
            .password(passwordEncoder().encode("123456"))
            .roles("USER");
    }
}
このサンプルコードは、ユーザー名が「yama3」、パスワードは「123456」の場合です。
パスワードは「ハッシュ化された文字列」をセットする必要がありますので、BCryptPasswordEncoder の encode メソッドでハッシュ化しています。
当然ですが、次のように、ハッシュ化されたパスワードを直接記載しても、問題なく動作します。
    auth.inMemoryAuthentication()
        .withUser("yama3")
        .password("$2a$10$E55vg96856cWy4oyAUpQ6OH2mxO6eTt43A5lPwa3MszPbDpAOPiLG")
        .roles("USER");
以下、コードの詳細を確認していきます。
3-1-1. @EnableWebSecurity
まず、最初に出てくるアノテーション @EnableWebSecurity ですが、これを指定することで Spring Security の機能が有効化されます。
厳密に言うと、このアノテーションにより「Spring Security が提供しているコンフィギュレーションクラスがインポートされ、Spring Security を利用するために必要となるコンポーネントの Been 定義が自動で行われる」とのことです(Spring 徹底入門414ページ)。
なお、様々なサイトを見てみると、このアノテーションの指定方法には、次の3パターンがありました。
| 項番 | アノテーション | 参考サイト |
|---|---|---|
| 1 | @Configuration と @EnableWebSecurity の両方を指定 | リンク |
| 2 | @EnableWebSecurity のみを指定 | リンク |
| 3 | @Configuration のみを指定 | リンク |
公式では、上記の項番1と項番2の書き方が混在していましたので、何らかの使い分けがあるのかもしれません。
このあたりの違いを明確に教えてくれるサイトは見当たりませんでしたが、ここで作成するサンプルでは、どの場合でも動作します。
<参考記事>
・Spring Security を有効にする
・【Spring Security はじめました 】#1 導入
・What is the use of @EnableWebSecurity in Spring?
3-1-2. パスワードエンコーダーの設定
クライアント側から入力された平文のパスワードと、データベースのハッシュ化されたパスワードを照合するために、パスワードエンコーダーを設定する必要があります。
次のように、@Been アノテーションを付けて Been 定義を行い、DI コンテナに登録します。
    @Bean
    public PasswordEncoder passwordEncoder() {
        return new BCryptPasswordEncoder();
    }
初学者には用語がしんどいところで「Been 定義でコンポーネント化して、DIコンテナにインジェクションする」とか言われても、何を言っているんだろう? という感じですが、慣れるしかなさそうです。
Been については「Beanとは一体何者なのか?」という記事を読むと、少し分かった気になれますのでお薦めです。
<参考記事>
・[SpringBoot] Beanとは一体何者なのか?
・Spring Securityで使われているBCryptPasswordEncoderの仕組み
・インターフェース PasswordEncoder
・クラス BCryptPasswordEncoder
3-1-3. ユーザー情報をコードに記載
次に、ログイン認証に使用するユーザー情報を設定する部分です。
ここでは、認証管理を行う AuthenticationManagerBuilder クラスを引数にとった configure メソッドを使用します。
    @Override
    protected void configure(AuthenticationManagerBuilder auth) throws Exception {
        auth.inMemoryAuthentication()
            .withUser("yama3")
            .password(passwordEncoder().encode("123456"))
            .roles("USER");
    }
DB はまだ使わないので、inMemoryAuthentication というメソッドを使用して、メモリ内にユーザー情報を格納して認証を行うようにしています。
ユーザー名、パスワード等は、次の形で指定します。
auth.inMemoryAuthentication().withUser(ユーザー名).password(パスワード).roles(権限情報);
| 記載内容 | 説明 |
|---|---|
| inMemoryAuthentication() | メモリ内認証を追加する |
| withUser(ユーザー名) | ユーザー名を指定 |
| password(パスワード) | パスワードを指定(ハッシュ化されたもの) |
| roles(権限情報) | ユーザーが保持する権限情報を指定 |
パスワードは平文ではなく、ハッシュ化した文字列を記載する必要があります。
あらかじめハッシュ化した文字列を指定したい場合は、どこか適宜の場所に次のコードを書けば、コンソール画面から取得できます。
System.out.println(new BCryptPasswordEncoder().encode("123456"));
3-2. 指定したユーザー名とパスワードでログイン
それでは、指定したユーザー名(yama3)とパスワード(123456)でログインできるかを確認してみます。
http://localhost:8080/ にアクセスしてユーザー名とパスワードを入力します。
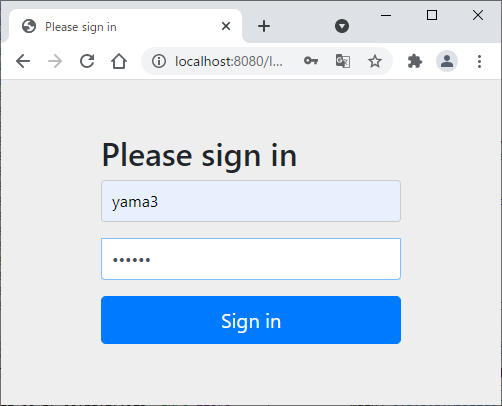
次のように表示されればログイン成功です。
4. ログイン画面とログアウト処理をカスタマイズする
ここまでは、デフォルトのログイン画面を使用していましたが、ここで、独自のログイン画面を作成しておきます。
併せて、ログアウト処理も独自のものに変更します。
4-1. デフォルト画面の確認
まず、デフォルトのログイン、ログアウトの機能を確認しておきます。
画面と HTML からその設定を見ていきます。
4-1-1. ログイン画面
4-1-1-1. ログイン画面のPOSTメソッドについて
ログイン画面 http://localhost:8080/login の HTML を確認すると、次のようになっています。
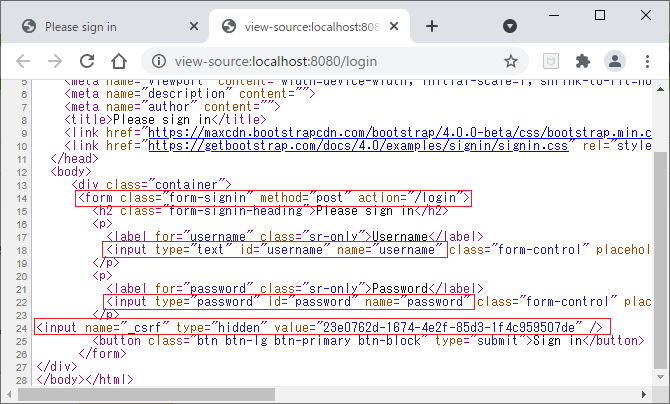
これから作成するログイン画面で実装が必要になるのは、次のタグと属性です。
| タグ | 必要な属性 | HTTP通信の内容 |
|---|---|---|
| form | method="post" action="/login" | HTTPメソッド:Post リクエストURL:/login |
| input | type="text" name="username" | 入力データの要素名:username |
| input | type="password" name="password" | 入力データの要素名:password |
| input | name="_csrf" type="hidden" value="(略)" | データの要素名:_csrf (CSRFトークンを送信) |
最後に出てくる CSRF とは、サイバー攻撃の一種で、Spring Security ではデフォルトで CSRF 対策が有効になっています。
_csrf で正しいトークンが送信されないとHTTPリクエストが受け付けられない仕組みになっていますので、この部分の対応も必要になります。
4-1-1-2. ログイン失敗時のアラートの表示について
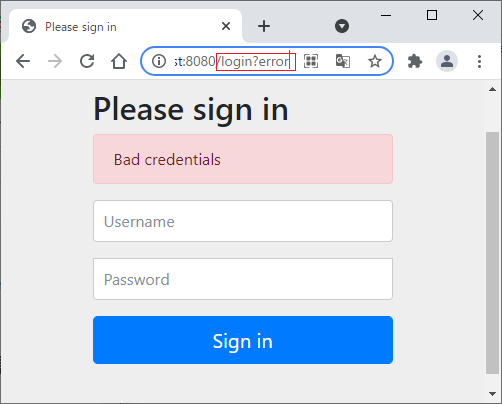
ログインに失敗すると http://localhost:8080/login?error に遷移し、再度ログイン画面が表示されるとともにアラートが表示されます。
このアラートの表示も実装するようにします。
4-1-2. ログアウト画面
4-1-2-1. ログアウト画面のPOSTメソッドについて
ルートパスに「/logout」を付けてアクセスすると次のようなログアウト画面が表示されます(GETメソッドで http://localhost:8080/logout にリクエスト)。

HTML を確認すると、次のようになっています。
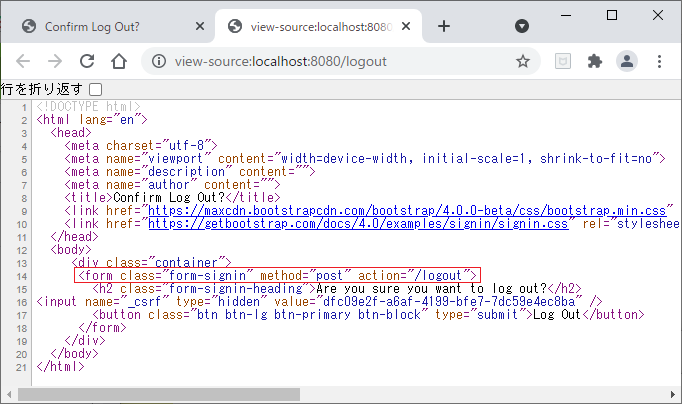
これから作成するログアウト処理で実装が必要になるのは、次のタグと属性です。
| タグ | 必要な属性 | HTTP通信の内容 |
|---|---|---|
| form | method="post" action="/login" | HTTPメソッド:Post リクエストURL:/logout |
| input | name="_csrf" type="hidden" value="(略)" | データの要素名:_csrf (CSRFトークンを送信) |
つまり、URL /logout に **GET メソッド**でリクエストを送信するとログアウト画面が表示され、URL /logout に **POST メソッド**でリクエストを送信するとログアウト処理が実行されることになります。
今回は簡易化のため、ログアウト画面は作らず、POST メソッドによるログアウト処理のみ実装します。
4-1-2-2. ログアウト時のメッセージの表示について
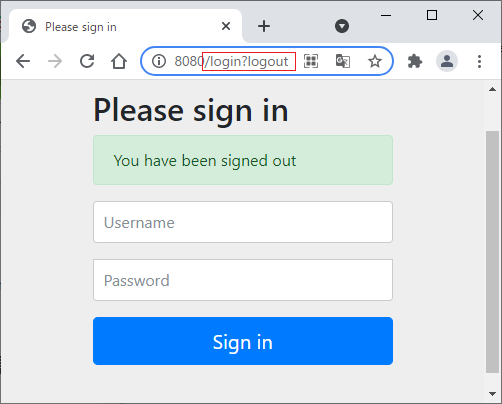
ログアウトすると http://localhost:8080/login?logout に遷移し、ログイン画面が表示されるとともにログアウトをした旨のメッセージが表示されます。
このメッセージの表示も実装するようにします。
4-2. ログイン画面の作成
ログイン画面を実装するために、login.html ファイルを作成します。
併せて、SecurityConfig.java 及び TestController.java の2つのファイルのコードを修正します。
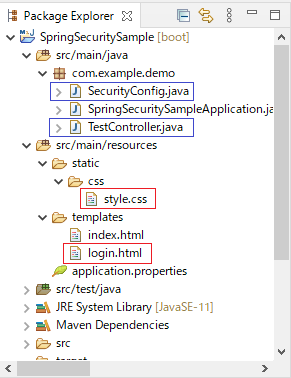
なお、CSS や Java Script などの静的リソースへも Spring Security が適用されるため、この適用を排除する必要があります。
これを確認するサンプルとして /src/main/resources/static に css フォルダを作成した上で style.css ファイルを1つ作成しておきます。
4-2-1. CSSファイルのサンプル
CSS ファイルは確認用なので、以下のように1つだけコードを書いておきます。
.heading {
	color: blue;
}
4-2-2. ログイン画面のHTML
login.html ファイルには、次のように記載します。
<!DOCTYPE html>
<html xmlns:th="http://www.thymeleaf.org">
<head>
    <meta charset="UTF-8">
    <link th:href="@{/css/style.css}" rel="stylesheet"/>
    <title>ログイン</title>
</head>
<body>
    <h2 class="heading">ログイン</h2>
    <form method="post" th:action="@{/login}">
        <div th:if="${param.error}">
            ログインに失敗しました
            <div th:if="${session[SPRING_SECURITY_LAST_EXCEPTION] != null}">
                <span th:text="${session[SPRING_SECURITY_LAST_EXCEPTION].message}"></span>
            </div>
        </div>
        <div th:if="${param.logout}">
            ログアウトしました
        </div>
        <label for="username">ユーザー名</label>
        <input type="text" id="username" name="username"><br>
        <label for="password">パスワード</label>
        <input type="password" id="password" name="password"><br>
        <button type="submit">ログイン</button>
    </form>
</body>
</html>
上記のコードでは、CSRFトークンの記載していませんが、フォームタグのところに th:action="@{/login}"の記載をすることで、自動的に CSRFトークンが設定されるようになっています。
後で、実際に動作させてみますが、その際に、ブラウザから HTML を確認してみると、赤枠のところに自動的に CSRF トークンが設定されていることが分かります。

該当箇所を抜き出すと、次のようになっています。
<input type="hidden" name="_csrf" value="28fa2860-3180-40d3-b750-fb09a1c588b7"/>
以上のとおり、コードを書く側は CSRF を意識しなくとも Spring Security が自動的に CSRF 対策をしてくれます。
4-2-2-1. CSRFトークンの部分を自分で書く場合(参考)
あえて自分で、HTML に記載する場合は、次のようにすることで同じ結果を得ることができます。
<!-- 略 -->
<form method="post" action="/login">
    <!-- 略 -->
    <label for="username">ユーザー名</label>
    <input type="text" id="username" name="username"><br>
    <label for="password">パスワード</label>
    <input type="password" id="password" name="password"><br>
    <button type="submit">ログイン</button>
    <input type="hidden" th:name="${_csrf.parameterName}" th:value="${_csrf.token}" />
</form>
<!-- 略 -->
変更点は、form タグの th:action="@{/login}" のところを action="/login" としているところと、form タグ内に、次の1行を追加しているところです。
<input type="hidden" th:name="${_csrf.parameterName}" th:value="${_csrf.token}" />
いまのところは、上記のように書く必要はありませんが、把握しておくことで何かの時に役に立つだろうと思います。
4-2-2-2. CSS の適用
CSS ファイルを適用する記載は、次のとおりです。
これにより、見出しとなる「ログイン」の文字が青で表示されることになります。
<head>
    <!-- 略 -->
    <link th:href="@{/css/style.css}" rel="stylesheet"/>
    <!-- 略 -->
</head>
<body>
    <h2 class="heading">ログイン</h2>
    <!-- 略 -->
</body>
4-2-2-3. エラーメッセージ及びログアウト情報の取得
エラーメッセージ及びログアウト情報は、次のように条件分岐を行い表示します。
<div th:if="${param.error}">
    ログインに失敗しました
    <div th:if="${session[SPRING_SECURITY_LAST_EXCEPTION] != null}">
        <span th:text="${session[SPRING_SECURITY_LAST_EXCEPTION].message}"></span>
    </div>
</div>
<div th:if="${param.logout}">
    ログアウトしました
</div>
① 条件分岐
「ログインエラー」又は「ログアウト情報」があるかどうかを判別するための条件分岐は、次のようにしています(公式と同じ書き方です)。
| 項目 | 条件 |
|---|---|
| ログインエラーがある場合 | th:if="${param.error}" |
| ログアウト情報がある場合 | th:if="${param.logout}" |
これらの要件を満たしたときに、ブラウザにエラーメッセージを表示したり、ログアウトしたことを表示したりすればよいことになります。
補足ですが、th:if="${param.error != null}" というような条件文で紹介しているサイトも多く、この書き方でも同様に挙動します。
また、formLogin メソッドで表示される Javadoc でも "${param.error != null}" という書き方になっています(JSTL で記述されていますが)。
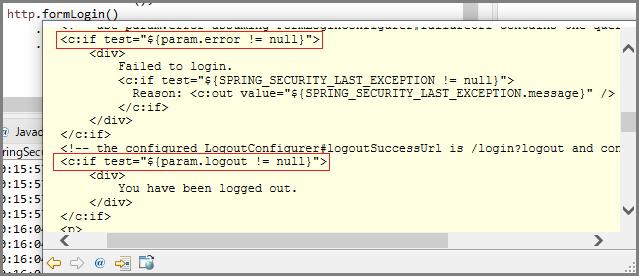
まあ、どちらでも動くということを把握しておけば、迷うことも少ないだろうと思います。
<参考サイト>
・Spring Security フォームログインのサンプルコード
② エラーメッセージの取得
認証エラー時に発生した例外オブジェクトは、SPRING_SECURITY_LAST_EXCEPTION という属性名で保持されますので、ここからエラーメッセージを取得します。
| 記述 | 説明 |
|---|---|
| th:if="${session[SPRING_SECURITY_LAST_EXCEPTION] != null}" | 例外が発生している場合 |
| th:text="${session[SPRING_SECURITY_LAST_EXCEPTION].message}" | エラーメッセージを取得 |
<参考サイト>
・認証(Spring Securityが提供している認証機能についての説明)
4-2-3. コントローラーの修正
TestController.java ファイルは次のように修正します。
package com.example.demo;

import org.springframework.stereotype.Controller;
import org.springframework.web.bind.annotation.GetMapping;
import org.springframework.web.bind.annotation.RequestMapping;

@Controller
@RequestMapping("/")
public class TestController {
    @GetMapping
    public String index () {
        return "index";
    }

    @GetMapping("/login")
    public String login () {
        return "login";
    }
}
コントローラーには、ログイン画面を表示するための login メソッドを追加します。
/login にアクセスすれば、login.html を表示するという単純なものです。
4-2-4. コンフィギュレーションクラスの修正
SecurityConfig.java ファイルは次のように修正します。
package com.example.demo;

import org.springframework.context.annotation.Bean;
import org.springframework.security.config.annotation.authentication.builders.AuthenticationManagerBuilder;
import org.springframework.security.config.annotation.web.builders.HttpSecurity;
import org.springframework.security.config.annotation.web.builders.WebSecurity;
import org.springframework.security.config.annotation.web.configuration.EnableWebSecurity;
import org.springframework.security.config.annotation.web.configuration.WebSecurityConfigurerAdapter;
import org.springframework.security.crypto.bcrypt.BCryptPasswordEncoder;
import org.springframework.security.crypto.password.PasswordEncoder;

@EnableWebSecurity
public class SecurityConfig extends WebSecurityConfigurerAdapter {

    @Bean
    public PasswordEncoder passwordEncoder() {
        return new BCryptPasswordEncoder();
    }

    @Override
    public void configure(WebSecurity web) throws Exception {
        web.ignoring().antMatchers("/css/**");
    }

    @Override
    protected void configure(AuthenticationManagerBuilder auth) throws Exception {
        auth.inMemoryAuthentication()
            .withUser("yama3")
            .password(passwordEncoder().encode("123456"))
            .roles("USER");
    }

    @Override
    protected void configure(HttpSecurity http) throws Exception {
        http.authorizeRequests()
            .anyRequest()
            .authenticated();
        http.formLogin()
            .loginPage("/login")
            .defaultSuccessUrl("/")
            .permitAll();
    }
}
4-2-4-1. WebSecurity クラス(追加部分1)
WebSecurity クラスを使用して、主にアプリケーション全体に関するセキュリティの設定を行います。
    @Override
    public void configure(WebSecurity web) throws Exception {
        web.ignoring().antMatchers("/css/**");
    }
ここでは、CSS フォルダにあるファイルに対して、Spring Security の処理を適用しないようにしています。
| メソッド | 説明 |
|---|---|
| ignoring() | Spring Security が無視する RequestMatcher インスタンスを追加できる |
| antMatchers(String... antPatterns) | ant パターンに一致するリソース(List)を適用対象にする |
<参考サイト>
・Spring BootでWebセキュリティを設定しよう
4-2-4-2. HttpSecurity クラス(追加部分2)
HttpSecurity クラスを使用して、主にURLごとのセキュリティの設定を行います(参考サイト)。
    @Override
    protected void configure(HttpSecurity http) throws Exception {
        http.authorizeRequests()
            .anyRequest()
            .authenticated();
        http.formLogin()
            .loginPage("/login")
            .defaultSuccessUrl("/")
            .permitAll();
    }
以下、個別にコードを見ていきます。
4-2-4-3. アクセス制限の設定
次の部分で「全てのリクエストの承認は、ログインしていることが条件」と規定しています。
    http.authorizeRequests()
        .anyRequest()
        .authenticated();
authorizeRequests メソッドでアクセス制限の設定を呼び出し、anyRequest で全てのリクエストを対象として、authenticated メソッドで認証済み(ログイン済み)のユーザーにのみリクエストを承認するという形になっています。
ここでは、簡単な設定のみにしましたが、以下のように様々なメソッドを使用してアクセス制限の設定を行うことができます。
| メソッド | 説明 |
|---|---|
| permitAll() | 常にアクセスを許可 |
| denyAll() | 常にアクセスを拒否 |
| hasRole(String role) | 特定の権限を持っているかどうかを判別 |
| hasAnyRole(String... role) | 指定された権限のいずれかを持っているかどうかを判別 |
| authorizeRequests() | リクエスト URL のパターンからアクセスを制御 |
| anyRequest() | 全てのリクエストを示す |
| authenticated() | 認証(ログイン)済みであることを示す |
| anonymous() | 匿名ユーザーの表示方法を構成 |
| antMatchers(String... antPatterns) | ant パターンに一致するリソース(List)を適用対象にする |
| mvcMatchers(String... mvcPatterns) | Spring MVC パターンに一致するリソース(List)を適用対象にする |
| regexMatchers(String... regexPatterns) | 正規表現パターンに一致するリソース(List)を適用対象にする |
| csrf() | CSRF 保護を有効にする(csrf().disable() で無効となる) |
| disable() | 無効にする |
その他に、下表のようなメソッドもありますが、現在はあまり使用されていないようです(上の表の antMatchers, mvcMatchers, regexMatchers を使用することで足りるからです)。
| メソッド | 説明 |
|---|---|
| antMatcher(String antPattern) | ant パターンに一致する場合にのみ呼出し |
| mvcMatcher(String mvcPattern) | Spring MVC パターンと一致する場合にのみ呼出し |
| regexMatcher(String pattern) | 正規表現パターンに一致する場合にのみ呼出し |
色々なメソッドが用意されていますが、今回のサンプルコードでは、あまり詳細な設定をしていません。
以下、よくあるパターンの例を挙げておきます。
権限に応じたアクセス制限を行う場合
    http.authorizeRequests()
        .antMatchers("/admin/**").hasRole("ADMIN")
        .anyRequest().hasRole("USER");
このような場合は、まず、ant パターン "/admin/**" にマッチする URL には、"ADMIN" というロール(権限)がなければアクセスできないということを指定しています。
そして、その他のリクエストについては、"USER" というロール(権限)が必要ということになります。
なお、複数の定義を行う場合は上から順に適用されるため、記述する順番に注意が必要です。
CSRF対策を無効にする場合
    http.csrf().disable()
        .authorizeRequests().anyRequest().authenticated();
上記のように csrf().disable() を追加すれば、CSRF対策を無効にすることができます。
なお、一部のを無効にする方法は「一部のパスだけSpring SecurityのCSRF対策を無効化する」という記事を参照してください。
<参考サイト>
・Spring Security の antMatcher() を使用する場合
・antMatcherとmvcMatcherの違い
・デフォルトのログイン画面をオリジナルログイン画面に変更する
・SPRING SECURITYダイジェスト認証
4-2-4-4. フォーム認証の設定
次の部分では、formLogin メソッドでフォーム認証を使用することを指定しています。
loginPage メソッドでログイン画面のURLを /login と指定し、defaultSuccessUrl メソッドで認証後にリダイレクトされるページを指定し、permitAll メソッドで全てのユーザーにアクセスの許可を与えています。
    http.formLogin()
        .loginPage("/login")
        .defaultSuccessUrl("/")
        .permitAll();
なお、Spring Security では、フォーム認証のほか、Basic 認証、Digest 認証、Remember Me 認証用のサーブレットフィルタクラスも提供されています(Spring 徹底入門423ページ)。
フォーム認証に関連するメソッドには次のようなものがあります。
| メソッド | 説明 |
|---|---|
| formLogin() | フォーム認証をサポートすることを指定 |
| loginPage(String loginPage) | ログインが必要な場合にユーザーを送信する URL を指定する |
| defaultSuccessUrl(String defaultSuccessUrl) | 認証後にユーザーがリダイレクトされる場所を指定 |
| successForwardUrl(String forwardUrl) | フォワード認証成功ハンドラー |
| passwordParameter(String passwordParameter) | 認証を実行するときにパスワードを探す HTTP パラメータ |
| usernameParameter(String usernameParameter) | 認証を実行するときにユーザー名を探す HTTP パラメータ |
| httpBasic() | Basic認証を構成する |
| rememberMe() | Remember Me 認証の構成を許可する |
<参考資料>
・クラス FormLoginConfigurer
4-2-5. ログインフォームの確認
それでは、ログイン画面の確認のため、アプリケーションを立ち上げてみます。
http://localhost:8080/login にアクセスすると、独自のログインフォームが表示されます。
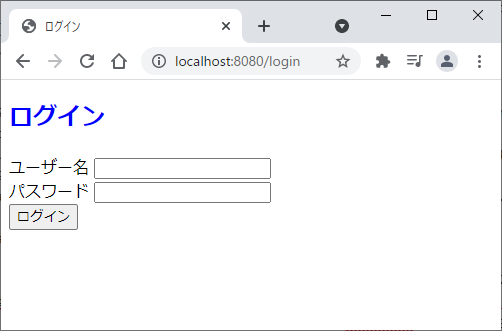
正しいパスワードを入力すれば、SecurityConfig.java の defaultSuccessUrl メソッドで指定したリダイレクト先("/")の画面が表示されます(画面は省略)。
また、誤ったパスワードを入力すると次のように、エラーメッセージも表示されます。
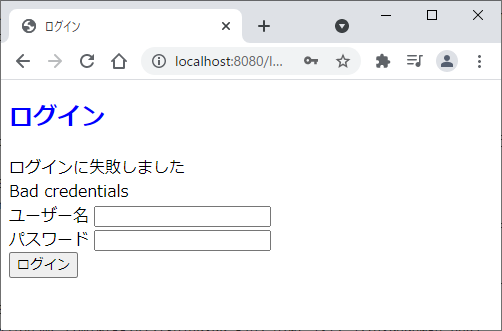
特に、何も設定していないのでメッセージは英語で表示されます。
4-2-6. エラーメッセージの日本語化
メッセージを日本語化しておきます。
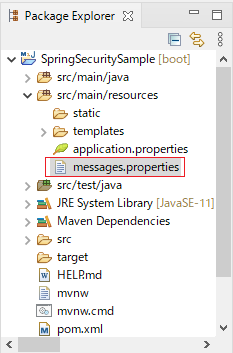
英語メッセージを日本語に置き換えるための空ファイル messages.properties を、ここでは、下図のところ(/src/main/resources の直下)に作成しておきます。実際は、どのディレクトリに作成しても大丈夫なようです。
このファイルにメッセージを記載することで、メッセージのカスタマイズ(日本語化)をすることができます。
日本語のメッセージは自分で作文しても良いのですが、Jar ファイルの中に日本語メッセージが用意されているので、それを使うことにします。
Package Explorer の Maven Dependencies にある Jar ファイルを見ていきます。
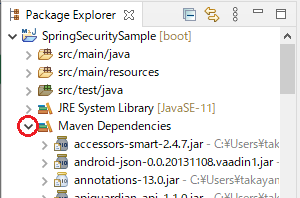
Maven Dependencies の中から spring-security-core-5.5.0.jar を探し出して、
org.springframework.security フォルダを開きます(下図)。
このフォルダの中に、様々な言語の messages.properties が用意されています(探すのが結構面倒でした)。
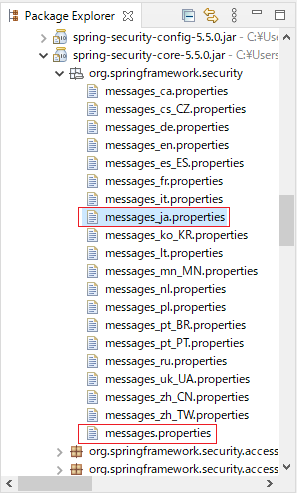
これらのファイルのうち、次の2つのファイルが重要です(日本人にとっては)。
| ファイル名 | 説明 |
|---|---|
| messages.properties | Spring Security が用意しているメッセージ(デフォルト) |
| messages_ja.properties | Spring Security が用意しているメッセージ(日本語) |
messages.properties にはデフォルトのメッセージが格納されています。
今回関係するところを抜き出すと次のようになっています。
# 省略
AbstractUserDetailsAuthenticationProvider.badCredentials=Bad credentials
AbstractUserDetailsAuthenticationProvider.credentialsExpired=User credentials have expired
AbstractUserDetailsAuthenticationProvider.disabled=User is disabled
AbstractUserDetailsAuthenticationProvider.expired=User account has expired
AbstractUserDetailsAuthenticationProvider.locked=User account is locked
AbstractUserDetailsAuthenticationProvider.onlySupports=Only UsernamePasswordAuthenticationToken is supported
# 省略
一方、messages_ja.properties には日本語のメッセージが格納されています。
こちらは次のようになっています。
一見では分かりませんが、日本語が unicode の文字コードで表されています。
# 省略
AbstractUserDetailsAuthenticationProvider.badCredentials=\u30e6\u30fc\u30b6\u540d\u304b\u30d1\u30b9\u30ef\u30fc\u30c9\u304c\u6b63\u3057\u304f\u3042\u308a\u307e\u305b\u3093
AbstractUserDetailsAuthenticationProvider.credentialsExpired=\u30e6\u30fc\u30b6\u8a8d\u8a3c\u60c5\u5831\u306e\u6709\u52b9\u671f\u9650\u304c\u5207\u308c\u3066\u3044\u307e\u3059
AbstractUserDetailsAuthenticationProvider.disabled=\u7121\u52b9\u306a\u30e6\u30fc\u30b6\u3067\u3059
AbstractUserDetailsAuthenticationProvider.expired=\u30e6\u30fc\u30b6\u30a2\u30ab\u30a6\u30f3\u30c8\u306e\u6709\u52b9\u671f\u9650\u304c\u5207\u308c\u3066\u3044\u307e\u3059
AbstractUserDetailsAuthenticationProvider.locked=\u30e6\u30fc\u30b6\u30a2\u30ab\u30a6\u30f3\u30c8\u304c\u30ed\u30c3\u30af\u3055\u308c\u3066\u3044\u307e\u3059
AbstractUserDetailsAuthenticationProvider.onlySupports=UsernamePasswordAuthenticationToken\u306e\u307f\u30b5\u30dd\u30fc\u30c8\u3055\u308c\u3066\u3044\u307e\u3059
# 省略
文字コードの上にカーソルを合わせると、次のような表示がされてメッセージの内容を確認することができます。
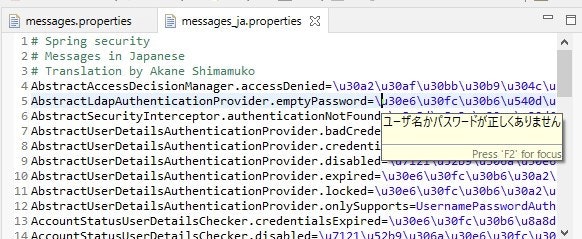
この messages_ja.properties のテキストを全てコピーして、最初に作成した /src/main/resources 直下の空ファイル messages.properties に貼り付けます。
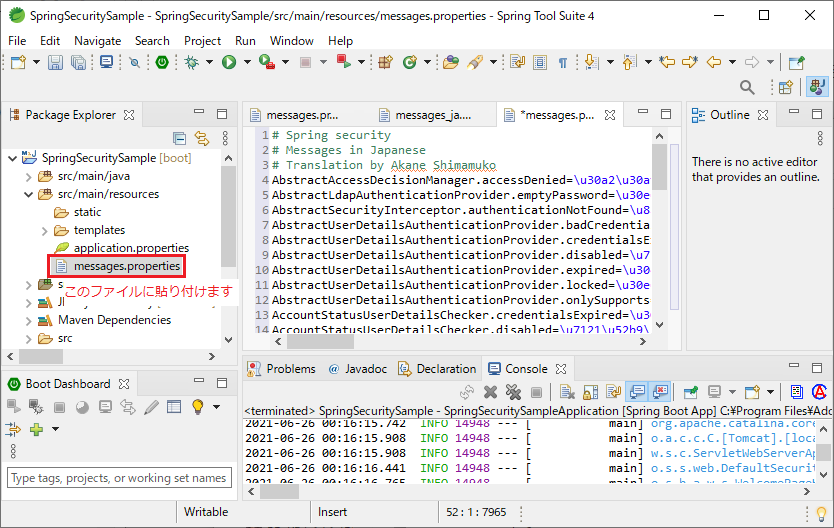
以上で、メッセージの日本語化は完了です。
誤ったログイン情報を入力すると、次のように日本語でメッセージが表示されます。
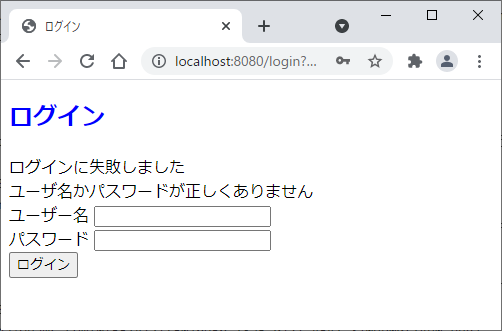
なお、ここでは、上書き用の messages.properties を作成して日本語化を行いましたが、spring-security-core-5.5.0.jar にある messages_ja.properties を直接呼び出す方法もあるのだろうと思います(今は分かりません)。
<参考サイト>
・Spring Boot/ログインエラーのメッセージをカスタマイズする
・message.propertiesの文字コードの変更に関する記事
4-2-7. (参考)文字コード表記を日本語文字に変換する
本題から少し外れます。
messages.properties の内容が文字コード(unicode)のままでは違和感がある方もいると思います。
これを、日本語文字に変える方法を記しておきます。
4-2-7-1. ファイルで使用する文字コードを変更する
まず、事前の設定として、/src/main/resources 直下の messages.properties ファイルを右クリックして Properties を開きます。
下図のところで、ファイルの文字コードを UTF-8 に変更して、Apply and Close をクリックします。
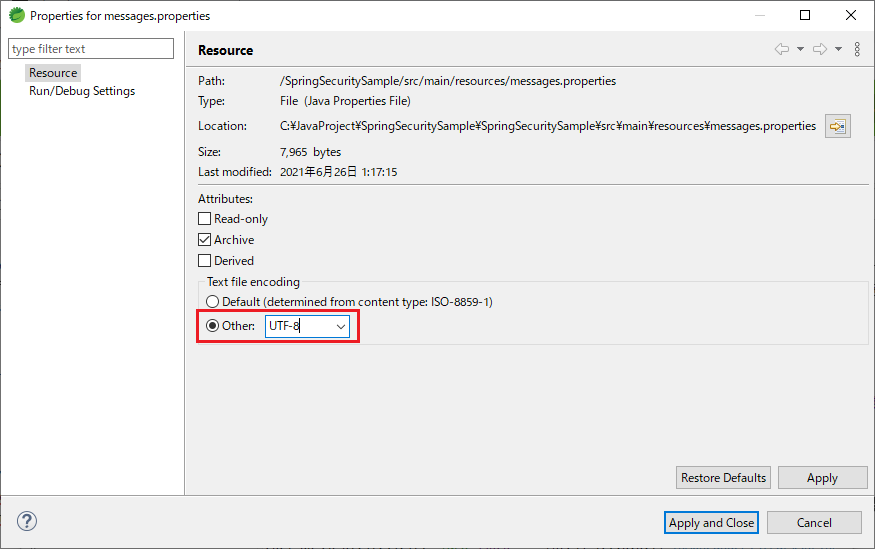
次のダイアログも「Yes」を選択します(この辺は自己責任でお願いします)。

これを実行したところで、日本語文字には変換されませんが、messages.properties ファイルに日本語文字を記載することができるようになります。
4-2-7-2. 文字コードを日本語文字に変換するサンプルコード
文字コードの羅列のみであれば、この記事のコードを拝借すれば日本語文字に変換できそうですが、以下のように ASCII 文字(qop とか 'auth' など)と文字コードが混在しています。
# qopの'auth'に必要なダイジェスト値がありません。受け取ったヘッダ情報:{0}
DigestAuthenticationFilter.missingAuth=qop\u306e'auth'\u306b\u5fc5\u8981\u306a\u30c0\u30a4\u30b8\u30a7\u30b9\u30c8\u5024\u304c\u3042\u308a\u307e\u305b\u3093\u3002\u53d7\u3051\u53d6\u3063\u305f\u30d8\u30c3\u30c0\u60c5\u5831:{0}
これを一発で変換できるサンプルコードが見当たらなかったので、仕方なく自分で作ることにします。
テストコード用のディレクトリに、クラスファイルを一つ作ります(テストをするわけではないです)。
名前は何でもよいのですが、ここでは ConvertTest としました。
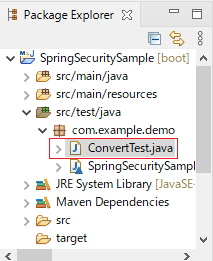
コードは次のように書きました。
filePath には、お手元の環境に合わせた messages.properties のフルパスを指定してください。
package com.example.demo;

import java.io.BufferedReader;
import java.io.IOException;
import java.nio.file.Files;
import java.nio.file.Path;
import java.nio.file.Paths;
import java.util.regex.Matcher;
import java.util.regex.Pattern;

import org.junit.jupiter.api.Test;

public class ConvertTest {
    @Test
    public void convUnicode() throws IOException {
        String filePath = "C:\\JavaProject\\SpringSecuritySample\\SpringSecuritySample\\src\\main\\resources\\messages.properties";  // 作成した messages.properties のフルパスを指定
        Path file = Paths.get(filePath);
        String convStr = "";  // 変換後の文字列を格納
        try (BufferedReader br = Files.newBufferedReader(file)) {
            String str;
            while ((str = br.readLine()) != null) convStr += convUnicode(str) + "\r\n";  // 変換して格納
         }
        System.out.println(convStr);  // 結果をコンソール画面に出力
    }

    // 文字コード部分のみを文字に変換するメソッド
    public String convUnicode(String text) {
        Pattern pattern = Pattern.compile("\\\\u[a-f0-9]{4}");  // unocodeの文字コード("\\u30a2")を正規表現で取得
        Matcher matcher = pattern.matcher(text);
        String convStr = "";
        int endPos = 0;
        while (matcher.find()) {
            if (endPos < matcher.start()) convStr += text.substring(endPos, matcher.start());  // 文字コード以外のASCII文字を追加
            String unicode = text.substring(matcher.start() + 2, matcher.end());  // unicodeの数値部分("30a2")を切り出し
            convStr += (char)Integer.parseInt(unicode, 16);  // 文字コードを文字に変換して追加
            endPos = matcher.end();
        }
        if (text.length() > endPos) convStr += text.substring(endPos, text.length());  // 最後に残った文字コード以外の文字列を格納
        return convStr;
    }
}
コード上で右クリックして Run As から JUnit Test を実行します。

コンソール上に変換された文字列が表示されますので、これをコピーします。
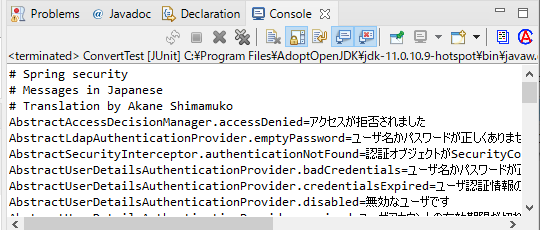
コピーしたテキストを messages.properties ファイルに貼り付ければ、次のように日本語で表示されます。
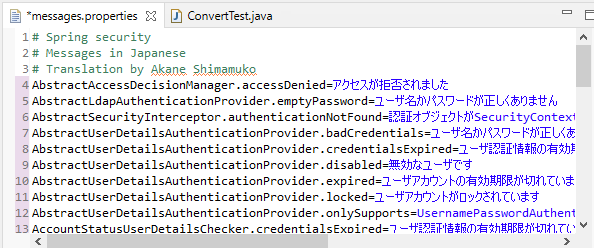
まあ、見やすいと言えば見やすいですね。
<参考サイト>
・JavaのUnicode文字列の変換用メソッド("あ" <-> "\u3042")
・Java での正規表現の使い方メモ
4-3. ログアウト処理の実装
ログアウト処理を実装するために、index.html および SecurityConfig.java の2つのファイルのコードを修正します。
4-3-1. ログアウト処理のHTML
index.html ファイルを次のように修正します。
<!DOCTYPE html>
<html xmlns:th="http://www.thymeleaf.org">
<head>
<meta charset="UTF-8">
<title>Insert title here</title>
</head>
<body>
    <h2>Sample Page</h2>
    <form th:action="@{/logout}" method="post">
        <input type="submit" value="ログアウト" />
    </form>
</body>
</html>
追加したのは、Thymeleaf の名前空間定義の1行と、form タグの部分の3行です。
4-3-2. コンフィギュレーションクラスの修正
SecurityConfig.java ファイルを修正します。
修正するのは、HttpSecurity クラスの設定部分です。
    // 略
    @Override
    protected void configure(HttpSecurity http) throws Exception {
        http.authorizeRequests()
            .anyRequest()
            .authenticated();
        http.formLogin()
            .loginPage("/login")
            .defaultSuccessUrl("/")
            .permitAll();
        http.logout()
            .permitAll();
    }
    // 略
ソースコードの全体は、次のようになっています。
修正後の SecurityConfig の全ソースコードはここをクリック
package com.example.demo;

import org.springframework.context.annotation.Bean;
import org.springframework.security.config.annotation.authentication.builders.AuthenticationManagerBuilder;
import org.springframework.security.config.annotation.web.builders.HttpSecurity;
import org.springframework.security.config.annotation.web.builders.WebSecurity;
import org.springframework.security.config.annotation.web.configuration.EnableWebSecurity;
import org.springframework.security.config.annotation.web.configuration.WebSecurityConfigurerAdapter;
import org.springframework.security.crypto.bcrypt.BCryptPasswordEncoder;
import org.springframework.security.crypto.password.PasswordEncoder;

@EnableWebSecurity
public class SecurityConfig extends WebSecurityConfigurerAdapter {

    @Bean
    public PasswordEncoder passwordEncoder() {
        return new BCryptPasswordEncoder();
    }

    @Override
    public void configure(WebSecurity web) throws Exception {
        web.ignoring().antMatchers("/css/**");
    }

    @Override
    protected void configure(AuthenticationManagerBuilder auth) throws Exception {
        auth.inMemoryAuthentication()
            .withUser("yama3")
            .password(passwordEncoder().encode("123456"))
            .roles("USER");
    }

    @Override
    protected void configure(HttpSecurity http) throws Exception {
        http.authorizeRequests()
            .anyRequest()
            .authenticated();
        http.formLogin()
            .loginPage("/login")
            .defaultSuccessUrl("/")
            .permitAll();
        http.logout()
            .permitAll();
    }
}
4-3-2-1. 追加部分
追加したのは、次の2行です。
logout() メソッドでログアウト機能を有効にして、permitAll() で全てのユーザーに対してログアウト機能に関するアクセス権を付与しています。
    http.logout()
        .permitAll();
ログアウトに関するメソッドには、次のようなものがあります。
| メソッド | 説明 |
|---|---|
| logout() | ログアウト機能を有効にする |
| logoutSuccessHandler(LogoutSuccessHandler logoutSuccessHandler) | 使用する LogoutSuccessHandler を設定する |
| logoutSuccessUrl(String logoutSuccessUrl) | ログアウト後にリダイレクトする URL を指定 |
| logoutUrl(String logoutUrl) | ログアウトをトリガーする URL(デフォルトは "/logout") |
| permitAll() | true を引数として使用する permitAll(boolean) のショートカット |
<参考サイト>
・クラス LogoutConfigurer
4-3-2-2. メソッドチェーン
なお、ほとんどのサイトでは、次のようにメソッドを繋げてコードを記載しています。
    @Override
    protected void configure(HttpSecurity http) throws Exception {
        http.authorizeRequests().anyRequest().authenticated().and()
            .formLogin().loginPage("/login").defaultSuccessUrl("/").permitAll().and()
            .logout().permitAll();
    }
このようにメソッドをどんどん繋げていく方法をメソッドチェーンといいます。
初心者には馴染みづらい書き方だと思いますが、以後は、この方法に従ってコードを書いていきます。
4-3-3. ログアウト機能の確認
ログアウト機能の確認をしておきます。
ログインしてトップページにアクセスすると、ログアウトボタンが表示されています。
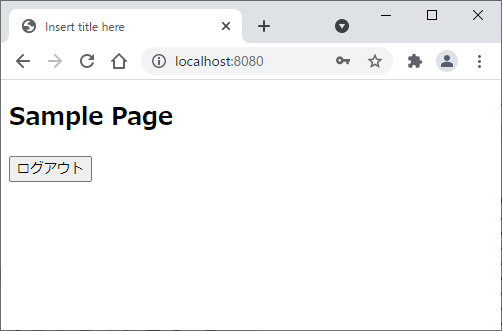
ログアウトボタンを押下すると、ログインページにリダイレクトします。
次のように、「ログアウトしました」というメッセージも表示されます。
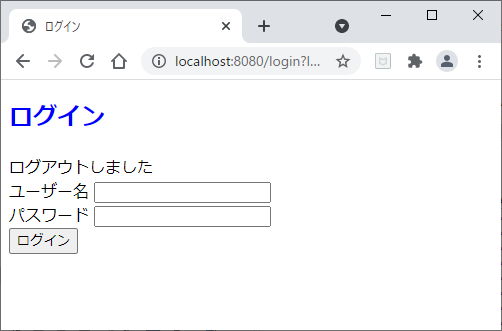
Spring Security の用意するデフォルトの画面よりも質素ですが、これで同等の機能を実装することができました。
5. データベースに登録したユーザー名とパスワードでログインする
ここからは、データベース(MySQL)を使用します。
あらかじめデータベースにユーザー情報を登録した上で、そのユーザー名とパスワードでログインが行えるようにしていきます。
作業を行う前に「ログイン認証の枠組み」を把握しておいた方が楽なので、簡単な図を書いておきます。
Spring 徹底入門などを参考にしていますが、簡略化しているため正確性は保証できません。つまり、何となく、こんな感じというところです。
ログイン認証の概略図
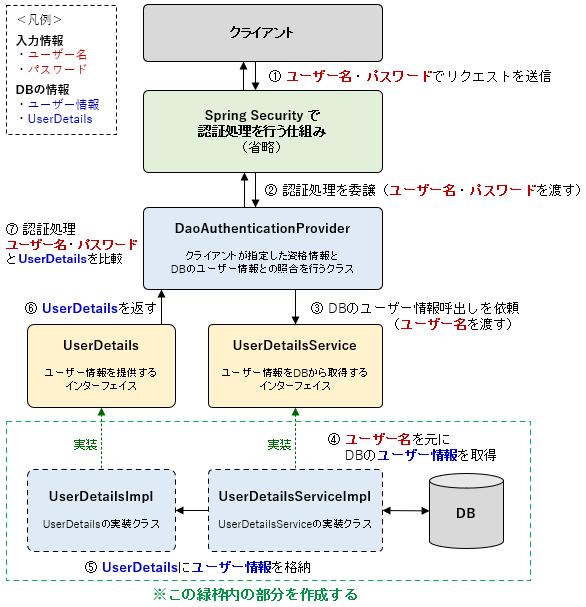
上記の図の流れでログイン認証が行われますが、今回コードに書くのは図の緑の枠内のところのみです。
初見ではイメージがしにくいですが、以下の 3 点を把握していれば、ひとまず大丈夫だと思います。
① ユーザー情報を DB から取得
UserDetailsService インターフェイスは、DaoAuthenticationProvider というクラスから依頼を受けて、データベースからユーザー情報を取得する役割を担います。
この処理は、実装クラス UserDetailsServiceImpl を作成してコードを書いていきます。
② UserDetails の生成
UserDetails は、ユーザー情報を保持し提供するためのインターフェイスです。
実装クラス UserDetailsImpl を作成してコードを書いていきます。
これが DaoAuthenticationProvider クラスに渡されることになります。
③ ユーザー情報の照合
ここでは中身は扱いませんが DaoAuthenticationProvider を介して認証処理が行われます。
このクラスがユーザーの入力したユーザー名とパスワードを、DBのユーザー情報(UserDetails)と照合して認証の可否の判定を行ってくれることになります。
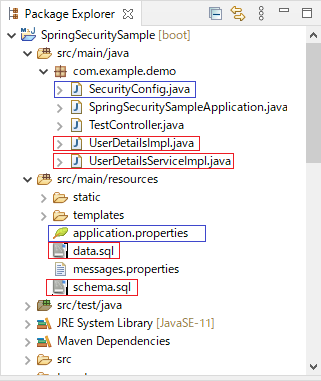
5-1. 作成するファイルなど
今回は、赤枠部分の4つのファイルを作成します。
なお、UserDetailsImpl と UserDetailsServiceImpl は、STS の機能を使えばある程度簡単にコードが書けるので、すぐに作らなくとも大丈夫です。
青枠の2つのは、既存のコードに一部修正を行います。
5-2. データベースに関する設定
5-2-1. ハッシュ化したパスワードを取得する
データベースには、あらかじめハッシュ化したパスワードを登録するので、SecurityConfig.java に次のように記載するなどして、ハッシュ化したパスワードを取得しておいてください。
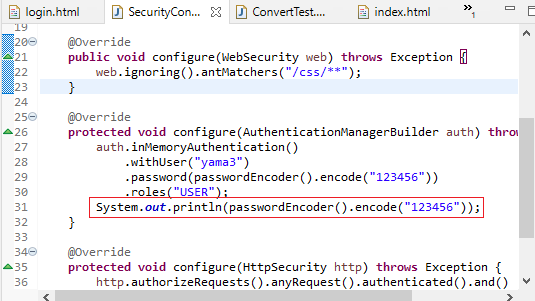
アプリケーションを立ち上げると、コンソール画面にハッシュ化されたパスワードが出力されます。

5-2-2. application.properties ファイルの修正
データベースに初期情報を読み込ませるため application.properties を次のように修正します。
spring.datasource.url=jdbc:mysql://localhost:3306/spring_security_test
spring.datasource.username=hoge
spring.datasource.password=password123
spring.datasource.driver-class-name=com.mysql.cj.jdbc.Driver
spring.sql.init.enabled=true
spring.sql.init.schema-locations=classpath:schema.sql
spring.sql.init.data-locations=classpath:schema.sql
spring.sql.init.encoding=utf-8
5行目の spring.sql.init.enabled の値を false から true に変更しています。
これで、アプリケーションの起動時に schema.sql 及び schema.sql 初期情報が読み込まれることになります。
6行目、7行目を新たに追加しています。
ここで、アプリケーションの起動時に読み込みを行う schema.sql ファイル及び schema.sql ファイルの場所を指定しています。
(参考)Spring Boot Version 2.5.1 以降の場合
Spring Boot Version 2.5.1 では以下のように記述します(5行目が違うだけです)。
spring.datasource.url=jdbc:mysql://localhost:3306/spring_security_test
spring.datasource.username=hoge
spring.datasource.password=password123
spring.datasource.driver-class-name=com.mysql.cj.jdbc.Driver
spring.sql.init.mode=always
spring.sql.init.schema-locations=classpath:schema.sql
spring.sql.init.data-locations=classpath:data.sql
spring.sql.init.encoding=utf-8
5-2-3. SQL ファイルの作成
SQLファイルには、次のように、プロジェクト起動時に実行されるSQL文を記載します。
5-2-3-1. schema.sql ファイルの作成
ここには、ユーザー情報を格納する user テーブルを作成する SQL 文を記載します。
DROP TABLE IF EXISTS user;

CREATE TABLE user
(
   id INT NOT NULL AUTO_INCREMENT PRIMARY KEY,
   name VARCHAR(100) NOT NULL UNIQUE,
   password VARCHAR(100) NOT NULL,
   authority VARCHAR(100)
);
5-2-3-2. data.sql ファイルの作成
ここには、初期データを挿入する SQL 文を書いておきます。
パスワードは、ハッシュ化したものを記載します。
INSERT INTO user(name, password, authority)
VALUES('yama3', '$2a$10$KBVjUqJO8wdYklH9dV4RFOOMzd0rJhjEJtwJDeEep3GTAefMbCynO', 'ROLE_USER');
5-3. UserDetailsImpl の作成
5-3-1. UserDetails インターフェイスの確認
まず先に、インターフェイスの確認をしておきます。
UserDetails インターフェイスには次のようなメソッドが用意されています。
各メソッドの意味は、コメントに書いてあるとおりです。
public interface UserDetails extends Serializable {
	Collection<? extends GrantedAuthority> getAuthorities();  // 権限リストを返す
	String getPassword();  // パスワードを返す
	String getUsername();  // ユーザー名を返す
	boolean isAccountNonExpired();  // アカウントの有効期限の判定
	boolean isAccountNonLocked();  // アカウントのロック状態の判定
	boolean isCredentialsNonExpired();  // 資格情報の有効期限の判定
	boolean isEnabled();  // 有効なユーザーであるかの判定
}
なお、Collection<? extends GrantedAuthority> で指定されているデータ型 <? extends GrantedAuthority> は GrantedAuthority 型のすべてのサブクラスを表していることになります。
詳しくは、下記のサイトを参考にしてください。
<参考サイト>
・ extends ...>や super ...>って何?代入編
5-3-2. UserDetailsImpl クラスのコードの記述
以下、UserDetails インターフェイスの実装クラスとして、UserDetailsImpl クラスを作成していきます。
このクラスのコードは、STS の機能を使うと簡単に記述できるので、その手順を書いておきます。
5-3-2-1. クラスファイルの作成
まず、「Package Explorer」から「com.example.demo」フォルダを右クリックして、「New」→「Class」を選択します。
次の画面で、クラス名(Name)を「UserDetailsImpl」として(名前は別名でも構いません)、インターフェイス(Interfaces)の右側にある「Add...」をクリックします。
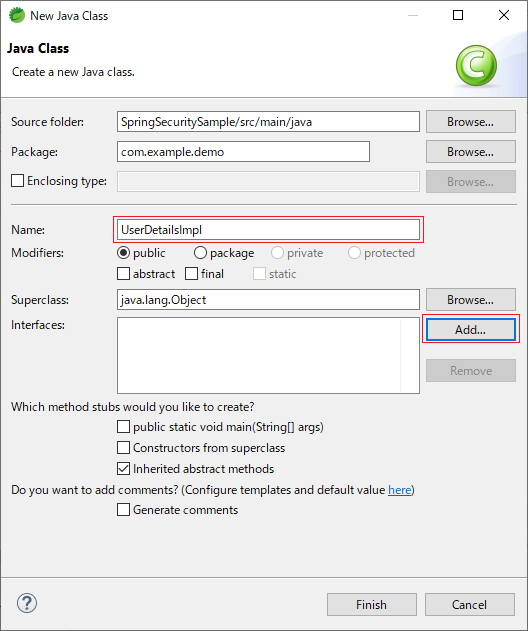
下図のダイアログが現れます。
上部のテキストボックスに、「UserDetails」と入力するとインターフェイスの候補が出てきますので UserDetails を選択して「OK」ボタンをクリックします。
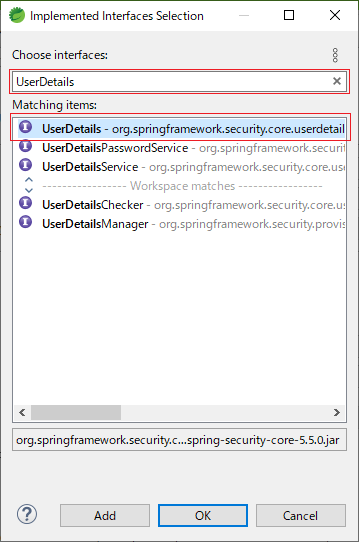
次の画面で「Finish」をクリックすると、必要なメソッドが一通り記載されているクラスファイルが作成されます。
5-3-2-2. フィールド変数の記載
生成されたコードを見ると、クラス名「UserDetailsImpl」のところに、serialVersionUID を宣言すべきとの警告がでています。
宣言して、特に問題が出るわけではないようなので、ここでは、そのとおりに作っておきます。
クラス名のところにカーソルを合わせて「Add default serial version ID」を選択します。
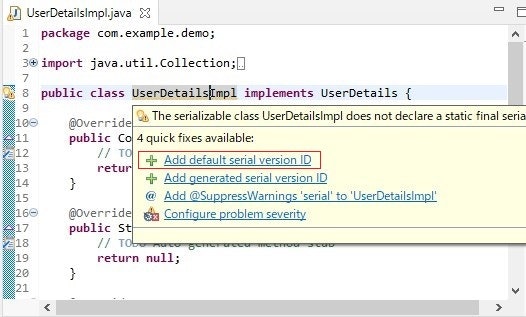
すると、下図の青枠のところに serialVersionUID が生成されます。
さらに、この下側に3つの変数を追加します(赤枠部分)。
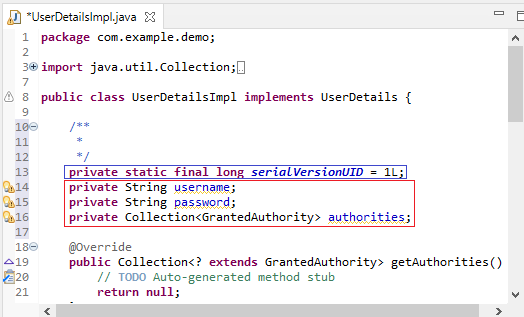
コピペしたい方のために、テキストも貼っておきます。
    private String username;
    private String password;
    private Collection<GrantedAuthority> authorities;
<参考サイト>
・serialVersionUIDって何なの?書くのめんどい。
・難解なSerializableという仕様について俺が知っていること、というか俺の理解
5-3-2-3. コンストラクタの生成
次に、先ほど追加した3つの変数の下あたりを右クリックして「Source」→「Generate Constructor using Fields...」を選択します。

次の画面で、3つのフィールド変数にチェックを入れて「Generate」をクリックします。
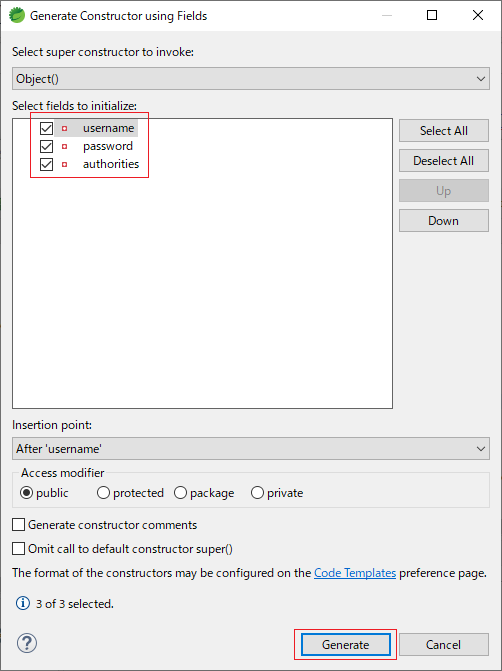
これで、コンストラクタも生成されます。
以上で、9割方コードの記述が完了します。
5-3-2-4. UserDetailsImpl クラスのソースコード
各メソッドの戻り値を以下のように修正して、UserDetailsImpl クラスを完成させます。
package com.example.demo;

import java.util.Collection;

import org.springframework.security.core.GrantedAuthority;
import org.springframework.security.core.userdetails.UserDetails;

public class UserDetailsImpl implements UserDetails {
    private static final long serialVersionUID = 1L;
    private String username;
    private String password;
    private Collection<GrantedAuthority> authorities;

    public UserDetailsImpl(String username, String password, Collection<GrantedAuthority> authorities) {
        this.username = username;
        this.password = password;
        this.authorities = authorities;
    }

    @Override
    public Collection<? extends GrantedAuthority> getAuthorities() {
        return authorities;
    }
    @Override
    public String getPassword() {
        return password;
    }
    @Override
    public String getUsername() {
        return username;
    }
    @Override
    public boolean isAccountNonExpired() {
        return true;
    }
    @Override
    public boolean isAccountNonLocked() {
         return true;
    }
    @Override
    public boolean isCredentialsNonExpired() {
        return true;
    }
    @Override
    public boolean isEnabled() {
        return true;
    }
}
メソッドの戻り値は、次のようにしておきます。
最後の4つは、特に判定せず、全て true を返すようにしておきます。
| メソッド | 戻り値の設定 | 内容 |
|---|---|---|
| Collection extends GrantedAuthority> getAuthorities() | コンストラクタで設定した値 | 権限リストを返す |
| String getPassword() | コンストラクタで設定した値 | パスワードを返す |
| String getUsername() | コンストラクタで設定した値 | ユーザー名を返す |
| boolean isAccountNonExpired() | 常に true とする | アカウントの有効期限の判定 |
| boolean isAccountNonLocked() | 常に true とする | アカウントのロック状態の判定 |
| boolean isCredentialsNonExpired() | 常に true とする | 資格情報の有効期限の判定 |
| boolean isEnabled() | 常に true とする | 有効なユーザーであるかの判定 |
5-4. UserDetailsServiceImpl の作成
5-4-1. UserDetailsService インターフェイスの確認
UserDetailsService インターフェイスには次のようになっています。
public interface UserDetailsService {
	UserDetails loadUserByUsername(String username) throws UsernameNotFoundException;  // ユーザー名からユーザー情報を取得
}
見てのとおり、loadUserByUsername メソッドが一つだけ用意されています。
このメソッドは、ユーザー名を元に、データベースのユーザー情報を取得するものです。
5-4-2. UserDetailsServiceImpl クラスのコードの記述
UserDetailsServiceImpl クラスのコードは次のように記述します。
先ほどの、UserDetailsImplのクラスファイルの作成と同様に、インターフェイスを指定してクラスファイルを生成すると、少し楽にコードが書けます(こちらはそんなに恩恵はありません)。
package com.example.demo;

import java.util.ArrayList;
import java.util.Collection;
import java.util.Map;

import org.springframework.beans.factory.annotation.Autowired;
import org.springframework.jdbc.core.JdbcTemplate;
import org.springframework.security.core.GrantedAuthority;
import org.springframework.security.core.authority.SimpleGrantedAuthority;
import org.springframework.security.core.userdetails.UserDetails;
import org.springframework.security.core.userdetails.UserDetailsService;
import org.springframework.security.core.userdetails.UsernameNotFoundException;
import org.springframework.stereotype.Service;

@Service
public class UserDetailsServiceImpl implements UserDetailsService {

    @Autowired
    JdbcTemplate jdbcTemplate;

    @Override
    public UserDetails loadUserByUsername(String username) throws UsernameNotFoundException {
        try {
            String sql = "SELECT * FROM user WHERE name = ?";
            Map<String, Object> map = jdbcTemplate.queryForMap(sql, username);
            String password = (String)map.get("password");
            Collection<GrantedAuthority> authorities = new ArrayList<>();
            authorities.add(new SimpleGrantedAuthority((String)map.get("authority")));
            return new UserDetailsImpl(username, password, authorities);
        } catch (Exception e) {
            throw new UsernameNotFoundException("user not found.", e);
        }
    }
}
① データベース操作
ここでは、JdbcTemplate を使用し、SQL文でレコードを抽出して、取得したユーザー情報を UserDetails(UserDetailsImpl)に詰め込んでいます。
② 権限情報の追加
権限情報は、GrantedAuthority にセットします。
SimpleGrantedAuthority クラスは、GrantedAuthority インターフェイスの実装クラスであり、引数に権限情報の文字列を指定することで、GrantedAuthority のインスタンスを生成しています。
そしてそのインスタンスを、authorities に追加しています。
③ Collection と ArrayList について
言うまでもないですが、Collection<GrantedAuthority> は、GrantedAuthority を要素に持つコレクションです。
Collection はインターフェイスなので、インスタンスを生成するときは、ArrayList クラスなどを使用することになります。
Java 初心者には、このあたりがちょっと分かりにくいと思います。
④ 例外処理(UsernameNotFoundException)
例外が発生した場合は、UsernameNotFoundException がスローされます。
しかし、Spring Security のデフォルトの動作では、UsernameNotFoundException は BadCredentialsException という例外に変換してからエラー処理が行われるようになっています(参考記事「認証例外情報の隠蔽」)。
そのため、クライアント側では「Bad credentials(ユーザー名かパスワードが正しくありません)」という通知を受け取ることになります。
<参考サイト>
・コレクションクラス
・9.2.2.4.2. UserDetailsServiceの作成
5-5. DaoAuthenticationProvider を確認する
ここでは深くは触れませんが、認証処理の基本的なところは、DaoAuthenticationProvider クラスで行われています。
このクラスは、手を加えることなくそのまま使いますが、データの流れのイメージを掴むため、UserDetails や UserDetailsService が関係するところを抜粋しておきます。
public class DaoAuthenticationProvider extends AbstractUserDetailsAuthenticationProvider {
	// 略
	private UserDetailsService userDetailsService;  // UserDetailsServiceが使用されている
	// 略
	@Override
	protected final UserDetails retrieveUser(String username, UsernamePasswordAuthenticationToken authentication)  // UserDetailsでユーザー情報を受け取る
			throws AuthenticationException {
		prepareTimingAttackProtection();
		try {
			UserDetails loadedUser = this.getUserDetailsService().loadUserByUsername(username);  // UserDetailsServiceImplで実装したloadUserByUsernameメソッドが使われている
			if (loadedUser == null) {
				throw new InternalAuthenticationServiceException(
						"UserDetailsService returned null, which is an interface contract violation");
			}
			return loadedUser;
		}
		catch (UsernameNotFoundException ex) {
		// 略
		}
	}
}
retrieveUser メソッドにおいて、UserDetailsServiceImpl で実装した、loadUserByUsername が使われており、取得したユーザー情報は、UserDetails で受け取っていることが分かります。
要点を簡単にまとめると次のとおりです(感想レベルですが)。
| 項目 | 種類 | 感想 |
|---|---|---|
| UserDetailsService | フィールド | UserDetailsService が使用されていることがわかる |
| retrieveUser | メソッドの実装 | UserDetails の形式で DB のユーザー情報を取得している |
| loadUserByUsername | メソッドの呼び出し | UserDetailsServiceImpl で実装した loadUserByUsername メソッドが使われている |
なお、DaoAuthenticationProvider には、PasswordEncoder を使用して、入力されたユーザー名とパスワードと、DB から取得したユーザー情報の照合などを行うメソッドなどもあります。
興味のある方は、ご自身で確認してみてください。
5-6. コンフィギュレーションクラスの修正
SecurityConfig クラスを修正します。
修正するのは、AuthenticationManagerBuilder クラスの設定部分です。
このように書くことで、認証に使用するユーザー情報を userDetailsService を介してデータベースから受け取ることになります。
    // 略
    @Override
    protected void configure(AuthenticationManagerBuilder auth) throws Exception {
        auth.userDetailsService(userDetailsService);
    }
    // 略
修正後の全体のコードは、次のとおりです。
修正後の SecurityConfig クラスの全ソースコードはここをクリック
package com.example.demo;

import org.springframework.beans.factory.annotation.Autowired;
import org.springframework.context.annotation.Bean;
import org.springframework.security.config.annotation.authentication.builders.AuthenticationManagerBuilder;
import org.springframework.security.config.annotation.web.builders.HttpSecurity;
import org.springframework.security.config.annotation.web.builders.WebSecurity;
import org.springframework.security.config.annotation.web.configuration.EnableWebSecurity;
import org.springframework.security.config.annotation.web.configuration.WebSecurityConfigurerAdapter;
import org.springframework.security.core.userdetails.UserDetailsService;
import org.springframework.security.crypto.bcrypt.BCryptPasswordEncoder;
import org.springframework.security.crypto.password.PasswordEncoder;

@EnableWebSecurity
public class SecurityConfig extends WebSecurityConfigurerAdapter {

    @Autowired
    private UserDetailsService userDetailsService;

    @Bean
    public PasswordEncoder passwordEncoder() {
        return new BCryptPasswordEncoder();
    }

    @Override
    public void configure(WebSecurity web) throws Exception {
        web.ignoring().antMatchers("/css/**");
    }

    @Override
    protected void configure(AuthenticationManagerBuilder auth) throws Exception {
        auth.userDetailsService(userDetailsService);
    }

    @Override
    protected void configure(HttpSecurity http) throws Exception {
        http.authorizeRequests().anyRequest().authenticated().and()
            .formLogin().loginPage("/login").defaultSuccessUrl("/").permitAll().and()
            .logout().permitAll();
    }
}
5-7. 動作の確認
以上で、データベースに登録したユーザー情報で、ログイン認証ができるようになります。
ここでは、確認作業の記載は省略しますが、アプリケーションを立ち上げて、ログインできるか確認してみてください。
ログイン時の挙動、ログアウト時の挙動など、全てメモリ内認証の場合と同様になっていると思います。
6. ユーザー登録をしてログインする(基本部分)
最初に、最低限の骨組みのみ実装します。
その後で、バリデーションやエラー処理なども付け加えていきます。
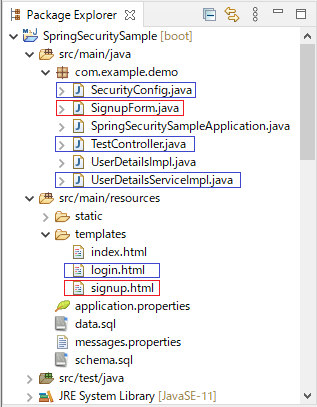
6-1. 作成するファイル
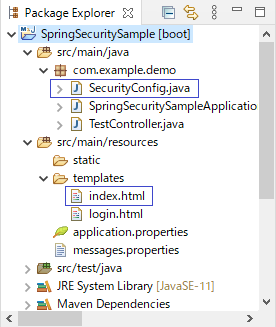
作成するファイルは、赤枠部分の2つです。
青枠のファイルは、既存のコードに一部修正を行います(なお、最後に index.html も修正します)。
6-1-1. フォームクラスの作成
入力値を保持するためのフォームクラス(SignupForm)を作成します。
このフォームクラスにユーザーの入力値を保持してデータのやり取りを行います。
バリデーションは後から設定するとして、今はシンプルなままにしておきます。
package com.example.demo;

public class SignupForm {
    private String username;
    private String password;

    public String getUsername() {
        return username;
    }
    public void setUsername(String username) {
        this.username = username;
    }
    public String getPassword() {
        return password;
    }
    public void setPassword(String password) {
        this.password = password;
    }
}
6-1-2. ユーザー登録画面のHTML
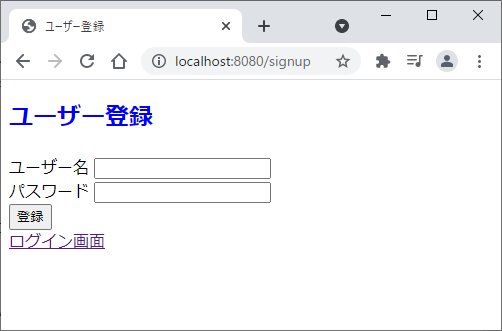
ユーザー登録画面はこんな感じです。
基本的には、ログイン画面と同様になっています。
<!DOCTYPE html>
<html xmlns:th="http://www.thymeleaf.org">
<head>
    <meta charset="UTF-8">
    <link th:href="@{/css/style.css}" rel="stylesheet"/>
    <title>ユーザー登録</title>
</head>
<body>
    <h2 class="heading">ユーザー登録</h2>
    <form method="post" th:action="@{/signup}" th:object="${signupForm}">
        <div th:if="${signupError}">
            <div th:text="${signupError}"></div>
        </div>
        <label for="username">ユーザー名</label>
        <input type="text" id="username" name="username" th:value="${signupForm.username}"><br>
        <label for="password">パスワード</label>
        <input type="password" id="password" name="password" th:value="${signupForm.password}"><br>
        <button type="submit">登録</button>
    </form>
    <a href="/login">ログイン画面</a>
</body>
</html>
6-2. ファイルの修正
6-2-1. コンフィギュレーションクラスの修正
SecurityConfig.java ファイルは HttpSecurity クラスの設定部分のみ修正します。
package com.example.demo;
// 略
@EnableWebSecurity
public class SecurityConfig extends WebSecurityConfigurerAdapter {
    // 略
    @Override
    protected void configure(HttpSecurity http) throws Exception {
        http.authorizeRequests()
            .antMatchers("/signup").permitAll()
            .anyRequest().authenticated().and()
            .formLogin().loginPage("/login").defaultSuccessUrl("/").permitAll().and()
            .logout().permitAll();
    }
}
修正後の SecurityConfig クラスの全ソースコードはここをクリック
package com.example.demo;

import org.springframework.beans.factory.annotation.Autowired;
import org.springframework.context.annotation.Bean;
import org.springframework.security.config.annotation.authentication.builders.AuthenticationManagerBuilder;
import org.springframework.security.config.annotation.web.builders.HttpSecurity;
import org.springframework.security.config.annotation.web.builders.WebSecurity;
import org.springframework.security.config.annotation.web.configuration.EnableWebSecurity;
import org.springframework.security.config.annotation.web.configuration.WebSecurityConfigurerAdapter;
import org.springframework.security.core.userdetails.UserDetailsService;
import org.springframework.security.crypto.bcrypt.BCryptPasswordEncoder;
import org.springframework.security.crypto.password.PasswordEncoder;

@EnableWebSecurity
public class SecurityConfig extends WebSecurityConfigurerAdapter {

    @Autowired
    private UserDetailsService userDetailsService;

    @Bean
    public PasswordEncoder passwordEncoder() {
        return new BCryptPasswordEncoder();
    }

    @Override
    public void configure(WebSecurity web) throws Exception {
        web.ignoring().antMatchers("/css/**");
    }

    @Override
    protected void configure(AuthenticationManagerBuilder auth) throws Exception {
        auth.userDetailsService(userDetailsService);
    }

    @Override
    protected void configure(HttpSecurity http) throws Exception {
        http.authorizeRequests()
            .antMatchers("/signup").permitAll()
            .anyRequest().authenticated().and()
            .formLogin().loginPage("/login").defaultSuccessUrl("/").permitAll().and()
            .logout().permitAll();
    }
}
.antMatchers("/signup").permitAll() を加えているだけです。
これにより、ログインしていないユーザーにも「ユーザー登録画面(/signup)」にアクセスすることが許可されます。
6-2-2. ログイン画面の一部修正
<a>タグ部分の1行を加えているだけです。
ログイン画面から、ユーザー登録画面(/signup)に移動できるようにしておきます。
<body>
    <h2 class="heading">ログイン</h2>
    <form method="post" th:action="@{/login}">
        <!-- 略 -->
    </form>
    <a href="/signup">ユーザー登録</a>
</body>
6-2-3. UserDetailsServiceImpl クラスの修正
UserDetailsServiceImpl クラスに、ユーザー情報をデータベースに登録する register メソッドを追加します。
追加部分を抜粋すると、次のようになります。
// 略
@Service
public class UserDetailsServiceImpl implements UserDetailsService {
    // 略
    @Autowired
    PasswordEncoder passwordEncoder;
    // 略
    @Transactional
    public void register(String username, String password, String authority) {
        String sql = "INSERT INTO user(name, password, authority) VALUES(?, ?, ?)";
        jdbcTemplate.update(sql, username, passwordEncoder.encode(password), authority);
    }
}
修正後の UserDetailsServiceImpl クラスのコード全体は、次のとおりです。
修正後の UserDetailsServiceImpl の全ソースコードはここをクリック
package com.example.demo;

import java.util.ArrayList;
import java.util.Collection;
import java.util.Map;

import org.springframework.beans.factory.annotation.Autowired;
import org.springframework.jdbc.core.JdbcTemplate;
import org.springframework.security.core.GrantedAuthority;
import org.springframework.security.core.authority.SimpleGrantedAuthority;
import org.springframework.security.core.userdetails.UserDetails;
import org.springframework.security.core.userdetails.UserDetailsService;
import org.springframework.security.core.userdetails.UsernameNotFoundException;
import org.springframework.security.crypto.password.PasswordEncoder;
import org.springframework.stereotype.Service;
import org.springframework.transaction.annotation.Transactional;

@Service
public class UserDetailsServiceImpl implements UserDetailsService {

    @Autowired
    JdbcTemplate jdbcTemplate;

    @Autowired
    PasswordEncoder passwordEncoder;

    @Override
    public UserDetails loadUserByUsername(String username) throws UsernameNotFoundException {
        try {
            String sql = "SELECT * FROM user WHERE name = ?";
            Map<String, Object> map = jdbcTemplate.queryForMap(sql, username);
            String password = (String)map.get("password");
            Collection<GrantedAuthority> authorities = new ArrayList<>();
            authorities.add(new SimpleGrantedAuthority((String)map.get("authority")));
            return new UserDetailsImpl(username, password, authorities);
        } catch (Exception e) {
            throw new UsernameNotFoundException("user not found.", e);
        }
    }

    @Transactional
    public void register(String username, String password, String authority) {
        String sql = "INSERT INTO user(name, password, authority) VALUES(?, ?, ?)";
        jdbcTemplate.update(sql, username, passwordEncoder.encode(password), authority);
    }
}
① PasswordEncoder
@Autowired アノテーションを使用して、SecurityConfig クラスで Bean 定義した PasswordEncode を取得します。
② データベースにユーザー情報を登録
JdbcTemplate の update メソッドで、データベースにユーザー情報を登録します。
パスワードは、PasswordEncoder(BCrypt)でハッシュ化しておきます。
6-2-4. コントローラーの修正
追加したのは、後半部分の newSignup メソッドと signup メソッドのところです。
package com.example.demo;

import org.springframework.beans.factory.annotation.Autowired;
import org.springframework.dao.DataAccessException;
import org.springframework.stereotype.Controller;
import org.springframework.ui.Model;
import org.springframework.web.bind.annotation.GetMapping;
import org.springframework.web.bind.annotation.PostMapping;
import org.springframework.web.bind.annotation.RequestMapping;

@Controller
@RequestMapping("/")
public class TestController {
    @Autowired
    private UserDetailsServiceImpl userDetailsServiceImpl;

    @GetMapping
    public String index() {
        return "index";
    }

    @GetMapping("/login")
    public String login() {
        return "login";
    }

    @GetMapping("/signup")
    public String newSignup(SignupForm signupForm) {
        return "signup";
    }

    @PostMapping("/signup")
    public String signup(SignupForm signupForm, Model model) {
        try {
            userDetailsServiceImpl.register(signupForm.getUsername(), signupForm.getPassword(), "ROLE_USER");
        } catch (DataAccessException e) {
            model.addAttribute("signupError", "ユーザー登録に失敗しました");
            return "signup";
        }
        return "redirect:/";
    }
}
① ユーザー登録ページの表示
newSignup メソッドは、「ユーザー登録」ページを表示するだけのものです。
② ユーザー情報の登録実行
signup メソッドでは、UserDetailsServiceImpl において作成した register メソッドを使用して、ユーザー情報をデータベースに格納します。
ユーザー登録に失敗した場合は、「ユーザー登録に失敗しました」というメッセージを表示するようにしておきます。
6-3. 動作確認
ユーザー登録画面は、次のように表示されます。
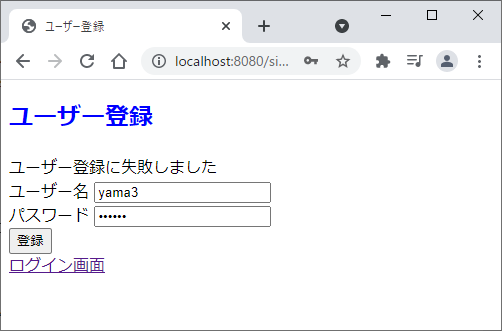
既に登録されているユーザー名で登録しようとすると、とりあえずエラーメッセージが表示されます。
とはいえ、ほとんどのエラーには対応できていない状態ですので、この辺は後で補正していきます。
登録が成功すると、一旦、ログイン画面に遷移します(画面は省略)。
面倒ですが、登録したユーザー名とパスワードを再度入力してログインすると、トップページが表示されます。
このあたりも、登録と同時に自動的にログインできるように修正していきます。
7. ユーザー登録をしてログインする(追加事項)
7-1. 入力チェック(バリデーション)の設定
7-1-1. ライブラリの追加
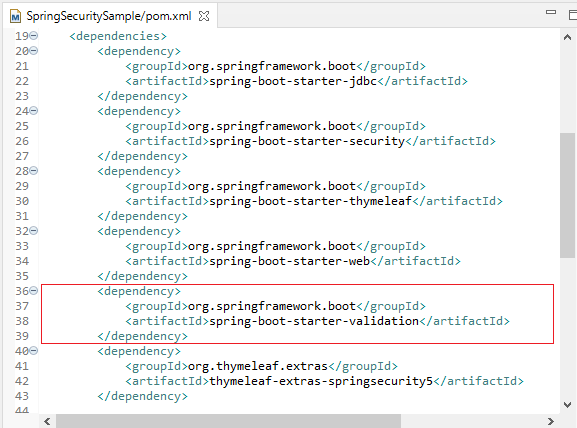
バリデーションを使用するために、Maven プロジェクトにライブラリを追加します。
<!-- 略 -->
    <dependency>
        <groupId>org.springframework.boot</groupId>
        <artifactId>spring-boot-starter-validation</artifactId>
    </dependency>
<!-- 略 -->
修正後の pom.xml の全ソースコードはここをクリック
<?xml version="1.0" encoding="UTF-8"?>
<project xmlns="http://maven.apache.org/POM/4.0.0" xmlns:xsi="http://www.w3.org/2001/XMLSchema-instance"
	xsi:schemaLocation="http://maven.apache.org/POM/4.0.0 https://maven.apache.org/xsd/maven-4.0.0.xsd">
	<modelVersion>4.0.0</modelVersion>
	<parent>
		<groupId>org.springframework.boot</groupId>
		<artifactId>spring-boot-starter-parent</artifactId>
		<version>2.5.0</version>
		<relativePath/> <!-- lookup parent from repository -->
	</parent>
	<groupId>com.example</groupId>
	<artifactId>SpringSecuritySample</artifactId>
	<version>0.0.1-SNAPSHOT</version>
	<name>SpringSecuritySample</name>
	<description>Demo project for Spring Boot</description>
	<properties>
		<java.version>11</java.version>
	</properties>
	<dependencies>
		<dependency>
			<groupId>org.springframework.boot</groupId>
			<artifactId>spring-boot-starter-jdbc</artifactId>
		</dependency>
		<dependency>
			<groupId>org.springframework.boot</groupId>
			<artifactId>spring-boot-starter-security</artifactId>
		</dependency>
		<dependency>
			<groupId>org.springframework.boot</groupId>
			<artifactId>spring-boot-starter-thymeleaf</artifactId>
		</dependency>
		<dependency>
			<groupId>org.springframework.boot</groupId>
			<artifactId>spring-boot-starter-web</artifactId>
		</dependency>
        <dependency>
            <groupId>org.springframework.boot</groupId>
            <artifactId>spring-boot-starter-validation</artifactId>
        </dependency>
		<dependency>
			<groupId>org.thymeleaf.extras</groupId>
			<artifactId>thymeleaf-extras-springsecurity5</artifactId>
		</dependency>

		<dependency>
			<groupId>mysql</groupId>
			<artifactId>mysql-connector-java</artifactId>
			<scope>runtime</scope>
		</dependency>
		<dependency>
			<groupId>org.springframework.boot</groupId>
			<artifactId>spring-boot-starter-test</artifactId>
			<scope>test</scope>
		</dependency>
		<dependency>
			<groupId>org.springframework.security</groupId>
			<artifactId>spring-security-test</artifactId>
			<scope>test</scope>
		</dependency>
	</dependencies>

	<build>
		<plugins>
			<plugin>
				<groupId>org.springframework.boot</groupId>
				<artifactId>spring-boot-maven-plugin</artifactId>
			</plugin>
		</plugins>
	</build>

</project>
7-1-2. フォームクラスの修正
フォームには、入力チェックを行うためのアノテーションを付けていきます。
package com.example.demo;

import javax.validation.constraints.NotBlank;
import javax.validation.constraints.Size;

public class SignupForm {
    @NotBlank
    @Size(min = 1, max = 50)
    private String username;

    @NotBlank
    @Size(min = 6, max = 20)
    private String password;

    public String getUsername() {
        return username;
    }
    public void setUsername(String username) {
        this.username = username;
    }
    public String getPassword() {
        return password;
    }
    public void setPassword(String password) {
        this.password = password;
    }
}
ここで関連するアノテーションは次のとおりです。
| アノテーション | 内容 |
|---|---|
| @Size | 入力文字数の最小値と最大値を指定 |
| @NotNull | Nullをエラーとする |
| @NotEmpty | Null、空白をエラーとする |
| @NotBlank | Null、空文字、空白をエラーとする |
7-1-2-1. @Size の補足
@Size アノテーションでは、独自のメッセージを表示することもできます。
@Size(min = 1, max = 50, message = "ユーザー名は1文字以上50文字以下で入力してください")
7-1-2-2. @NotBlank の補足
Null チェックには、一般的には @NotNull を使いますが、ここでは、@NotBlank を使用しています。
@NotNull 又は @NotEmpty を使用した場合、半角スペースのみでもユーザー名として登録ができてしまいますが、この半角スペースのユーザー名ではログインすることができないためです。
| アノテーション | Null | ""(空文字) | 半角空白 | 全角空白 |
|---|---|---|---|---|
| @NotNull | × | ○ | ○ | ○ |
| @NotEmpty | × | × | ○ | ○ |
| @NotBlank | × | × | × | ○ |
なお、Spring MVC では「文字列の入力フィールドに未入力の状態でフォームを送信した場合、デフォルトではフォームオブジェクトにnullではなく、空文字がバインドされる」(参考)ため、@NotNull は入力値のチェックでは働きません。
上記のフォームで @NotNull を使用した場合は「リクエストパラメータにそのフィールド自体が含まれるかをチェックする」という役割にとどまることになります。
<参考サイト>
・SpringBootの入力チェックの実現
・@NotBlank、@NotEmpty、@NotNullの挙動の違いをSpring Boot + Thymeleafで整理する
・入力チェック - 基本的な単項目チェック
7-1-3. ユーザー登録画面 HTML の修正
バリデーションエラーが生じた場合に、メッセージを表示するように修正します。
<!DOCTYPE html>
<html xmlns:th="http://www.thymeleaf.org">
<head>
    <meta charset="UTF-8">
    <link th:href="@{/css/style.css}" rel="stylesheet"/>
    <title>ユーザー登録</title>
</head>
<body>
    <h2 class="heading">ユーザー登録</h2>
    <form method="post" th:action="@{/signup}" th:object="${signupForm}">
        <div th:if="${signupError}">
            <div th:text="${signupError}"></div>
        </div>
        <label for="username">ユーザー名</label>
        <input type="text" id="username" name="username" th:value="${signupForm.username}"><br>
        <div th:if="${#fields.hasErrors('username')}" th:errors="${signupForm.username}"></div>
        <label for="password">パスワード</label>
        <input type="password" id="password" name="password" th:value="${signupForm.password}"><br>
        <div th:if="${#fields.hasErrors('password')}" th:errors="${signupForm.password}"></div>
        <button type="submit">登録</button>
    </form>
    <a href="/login">ログイン画面</a>
</body>
</html>
ユーザー名及びパスワードの入力フィールドの下に、それぞれ次の1行追加しています。
<div th:if="${#fields.hasErrors('フィールド名')}" th:errors="${signupForm.フィールド名}"></div>
| 式 | 内容 |
|---|---|
| th:if="${#fields.hasErrors('フィールド名')}" | バリデーションエラーが生じた場合(条件分岐) |
| th:errors="${signupForm.フィールド名}" | フィールドのエラーメッセージを表示 |
なお、特に条件分岐を書かなくとも、エラーが生じた場合にのみメッセージが表示されますので、省略して次のように書くこともできます(usernameフィールドの例)。
$ に代えて # を使用することでオブジェクト名も省略しています。
<div th:errors="*{username}"></div>
7-1-4. コントロ-ラーの修正
バリデーションチェックを行うために、signup メソッドのところに関連する記述を加えます(追加部分はコメントで示しています)。
    // 略
    @PostMapping("/signup")
    public String signup(@Validated SignupForm signupForm, BindingResult result, Model model) {
        // ※以下追加部分
        if (result.hasErrors()) {
            return "signup";
        }
        // ※以上追加部分

        try {
            userDetailsServiceImpl.register(signupForm.getUsername(), signupForm.getPassword(), "ROLE_USER");
        } catch (DataAccessException e) {
            model.addAttribute("signupError", "ユーザー登録に失敗しました");
            return "signup";
        }
        return "redirect:/";
    }
    // 略
修正後のソースコードの全体は、下記のとおりです。
修正後の TestController の全ソースコードはここをクリック
package com.example.demo;

import org.springframework.beans.factory.annotation.Autowired;
import org.springframework.dao.DataAccessException;
import org.springframework.stereotype.Controller;
import org.springframework.ui.Model;
import org.springframework.validation.BindingResult;
import org.springframework.validation.annotation.Validated;
import org.springframework.web.bind.annotation.GetMapping;
import org.springframework.web.bind.annotation.PostMapping;
import org.springframework.web.bind.annotation.RequestMapping;

@Controller
@RequestMapping("/")
public class TestController {
    @Autowired
    private UserDetailsServiceImpl userDetailsServiceImpl;

    @GetMapping
    public String index() {
        return "index";
    }

    @GetMapping("/login")
    public String login() {
        return "login";
    }

    @GetMapping("/signup")
    public String newSignup(SignupForm signupForm) {
        return "signup";
    }

    @PostMapping("/signup")
    public String signup(@Validated SignupForm signupForm, BindingResult result, Model model) {
        if (result.hasErrors()) {
            return "signup";
        }

        try {
            userDetailsServiceImpl.register(signupForm.getUsername(), signupForm.getPassword(), "ROLE_USER");
        } catch (DataAccessException e) {
            model.addAttribute("signupError", "ユーザー登録に失敗しました");
            return "signup";
        }
        return "redirect:/";
    }
}
signup メソッドの引数「SignupForm signupForm」にアノテーション @Validated を加えて、バリデーションチェックを有効にしています。
また、その直後に BindingResult result を引数として追加しています。ここに、エラー情報が格納されます。
そして、if (result.hasErrors()) のところで、BindingResult の hasErrors メソッドでエラーの有無をチェックして、エラーの場合には /signup のページを表示するようにしています。
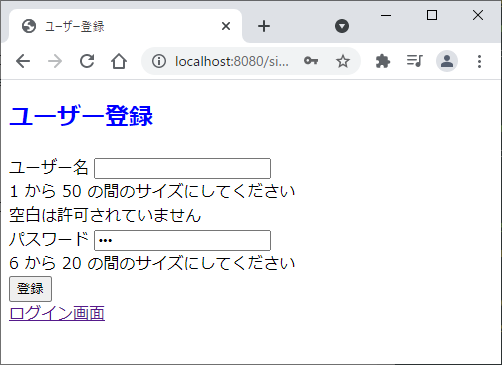
7-1-5. バリデーションチェックの確認
アプリケーションを起動させて、ユーザー登録画面から適当に入力すると、次のようにバリデーションエラーのメッセージが表示されます。
7-2. 同一ユーザー名が登録済かのチェック
バリデーションチェックまで行えば、その他に生じるエラーは同一ユーザー名で登録しようとする場合になると思われます。
そうすると、既にあるエラーメッセージを次のように書き換えるだけで十分ということになります。
    // 略
    try {
        userDetailsServiceImpl.register(signupForm.getUsername(), signupForm.getPassword(), "ROLE_USER");
    } catch (DataAccessException e) {
        model.addAttribute("signupError", "ユーザー名 " + signupForm.getUsername() + "は既に登録されています");
        return "signup";
    }
    // 略
とはいえ、ユーザー登録をする項目を増やしたりして、エラー内容を特定する必要が生じる場合もあるかもしれません。
そのため、ここでは、同一ユーザー名が登録されているかをチェックする機能も作っておきます。
7-2-1. UserDetailsServiceImpl へのメソッド追加
データベースに同一ユーザー名が既に登録されているかを確認するために、isExistUser というメソッドを追加します。
JdbcTemplate の queryForObject メソッドを使用してデータベース内の検索結果を取得します。
そして、同一ユーザー名が存在すれば true、存在しなければ false を返します。
    // 略
    public boolean isExistUser(String username) {
        String sql = "SELECT COUNT(*) FROM user WHERE name = ?";
        int count = jdbcTemplate.queryForObject(sql, Integer.class, new Object[] { username });
        if (count == 0) {
            return false;
        }
        return true;
    }
    // 略
修正後のソースコードの全体は、次のとおりです。
修正後の UserDetailsServiceImpl の全ソースコードはここをクリック
package com.example.demo;

import java.util.ArrayList;
import java.util.Collection;
import java.util.Map;

import org.springframework.beans.factory.annotation.Autowired;
import org.springframework.jdbc.core.JdbcTemplate;
import org.springframework.security.core.GrantedAuthority;
import org.springframework.security.core.authority.SimpleGrantedAuthority;
import org.springframework.security.core.userdetails.UserDetails;
import org.springframework.security.core.userdetails.UserDetailsService;
import org.springframework.security.core.userdetails.UsernameNotFoundException;
import org.springframework.security.crypto.password.PasswordEncoder;
import org.springframework.stereotype.Service;
import org.springframework.transaction.annotation.Transactional;

@Service
public class UserDetailsServiceImpl implements UserDetailsService {

    @Autowired
    JdbcTemplate jdbcTemplate;

    @Autowired
    PasswordEncoder passwordEncoder;

    @Override
    public UserDetails loadUserByUsername(String username) throws UsernameNotFoundException {
        try {
            String sql = "SELECT * FROM user WHERE name = ?";
            Map<String, Object> map = jdbcTemplate.queryForMap(sql, username);
            String password = (String)map.get("password");
            Collection<GrantedAuthority> authorities = new ArrayList<>();
            authorities.add(new SimpleGrantedAuthority((String)map.get("authority")));
            return new UserDetailsImpl(username, password, authorities);
        } catch (Exception e) {
            throw new UsernameNotFoundException("user not found.", e);
        }
    }

    @Transactional
    public void register(String username, String password, String authority) {
        String sql = "INSERT INTO user(name, password, authority) VALUES(?, ?, ?)";
        jdbcTemplate.update(sql, username, passwordEncoder.encode(password), authority);
    }

    public boolean isExistUser(String username) {
        String sql = "SELECT COUNT(*) FROM user WHERE name = ?";
        int count = jdbcTemplate.queryForObject(sql, Integer.class, new Object[] { username });
        if (count == 0) {
            return false;
        }
        return true;
    }
}
7-2-2. コントローラーの修正
先ほど作成した isExistUser を使用して、エラーメッセージを返す処理を TestController の signup メソッドに追加します(追加部分はコメントを参照)。
    // 略
    @PostMapping("/signup")
    public String signup(@Validated SignupForm signupForm, BindingResult result, Model model) {
        if (result.hasErrors()) {
            return "signup";
        }

        // ※以下、追加部分
        if (userDetailsServiceImpl.isExistUser(signupForm.getUsername())) {
            model.addAttribute("signupError", "ユーザー名 " + signupForm.getUsername() + "は既に登録されています");
            return "signup";
        }
        // ※以上、追加部分

        try {
            userDetailsServiceImpl.register(signupForm.getUsername(), signupForm.getPassword(), "ROLE_USER");
        } catch (DataAccessException e) {
            model.addAttribute("signupError", "ユーザー登録に失敗しました");
            return "signup";
        }
        return "redirect:/";
    }
    // 略
修正後の TestController の全ソースコードはここをクリック
package com.example.demo;

import org.springframework.beans.factory.annotation.Autowired;
import org.springframework.dao.DataAccessException;
import org.springframework.stereotype.Controller;
import org.springframework.ui.Model;
import org.springframework.validation.BindingResult;
import org.springframework.validation.annotation.Validated;
import org.springframework.web.bind.annotation.GetMapping;
import org.springframework.web.bind.annotation.PostMapping;
import org.springframework.web.bind.annotation.RequestMapping;

@Controller
@RequestMapping("/")
public class TestController {
    @Autowired
    private UserDetailsServiceImpl userDetailsServiceImpl;

    @GetMapping
    public String index() {
        return "index";
    }

    @GetMapping("/login")
    public String login() {
        return "login";
    }

    @GetMapping("/signup")
    public String newSignup(SignupForm signupForm) {
        return "signup";
    }

    @PostMapping("/signup")
    public String signup(@Validated SignupForm signupForm, BindingResult result, Model model) {
        if (result.hasErrors()) {
            return "signup";
        }

        if (userDetailsServiceImpl.isExistUser(signupForm.getUsername())) {
            model.addAttribute("signupError", "ユーザー名 " + signupForm.getUsername() + "は既に登録されています");
            return "signup";
        }

        try {
            userDetailsServiceImpl.register(signupForm.getUsername(), signupForm.getPassword(), "ROLE_USER");
        } catch (DataAccessException e) {
            model.addAttribute("signupError", "ユーザー登録に失敗しました");
            return "signup";
        }
        return "redirect:/";
    }
}
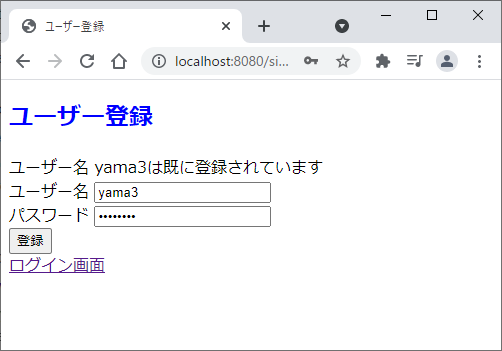
7-2-3. エラー表示の確認
同一ユーザー名で登録をしようとすると、次のようにエラーメッセージが表示されます。
7-3. ユーザー登録完了後に自動的にログインさせる
7-3-1. コントローラーの修正
TestController の signup メソッドに、自動でログイン処理を行うコードを追加します。
既にログインしている場合は、一旦ログアウトさせるようにしてます。
なお、メソッドの引数に HttpServletRequest request を追加しています。
    // 略
    @PostMapping("/signup")
    public String signup(@Validated SignupForm signupForm, BindingResult result, Model model,
            HttpServletRequest request) {
        // 略

        try {
            userDetailsServiceImpl.register(signupForm.getUsername(), signupForm.getPassword(), "ROLE_USER");
        } catch (DataAccessException e) {
            model.addAttribute("signupError", "ユーザー登録に失敗しました");
            return "signup";
        }

        // ※以下追加部分
        SecurityContext context = SecurityContextHolder.getContext();
        Authentication authentication = context.getAuthentication();

        if (authentication instanceof AnonymousAuthenticationToken == false) {
            SecurityContextHolder.clearContext();
        }

        try {
            request.login(signupForm.getUsername(), signupForm.getPassword());
        } catch (ServletException e) {
            e.printStackTrace();
        }
        // ※以上追加部分

        return "redirect:/";
    }
    // 略
修正後のソースコードの全体は、下記のとおりです。
修正後の TestController の全ソースコードはここをクリック
package com.example.demo;

import javax.servlet.ServletException;
import javax.servlet.http.HttpServletRequest;

import org.springframework.beans.factory.annotation.Autowired;
import org.springframework.dao.DataAccessException;
import org.springframework.security.authentication.AnonymousAuthenticationToken;
import org.springframework.security.core.Authentication;
import org.springframework.security.core.context.SecurityContext;
import org.springframework.security.core.context.SecurityContextHolder;
import org.springframework.stereotype.Controller;
import org.springframework.ui.Model;
import org.springframework.validation.BindingResult;
import org.springframework.validation.annotation.Validated;
import org.springframework.web.bind.annotation.GetMapping;
import org.springframework.web.bind.annotation.PostMapping;
import org.springframework.web.bind.annotation.RequestMapping;

@Controller
@RequestMapping("/")
public class TestController {
    @Autowired
    private UserDetailsServiceImpl userDetailsServiceImpl;

    @GetMapping
    public String index() {
        return "index";
    }

    @GetMapping("/login")
    public String login() {
        return "login";
    }

    @GetMapping("/signup")
    public String newSignup(SignupForm signupForm) {
        return "signup";
    }

    @PostMapping("/signup")
    public String signup(@Validated SignupForm signupForm, BindingResult result, Model model,
            HttpServletRequest request) {
        if (result.hasErrors()) {
            return "signup";
        }

        if (userDetailsServiceImpl.isExistUser(signupForm.getUsername())) {
            model.addAttribute("signupError", "ユーザー名 " + signupForm.getUsername() + "は既に登録されています");
            return "signup";
        }

        try {
            userDetailsServiceImpl.register(signupForm.getUsername(), signupForm.getPassword(), "ROLE_USER");
        } catch (DataAccessException e) {
            model.addAttribute("signupError", "ユーザー登録に失敗しました");
            return "signup";
        }

        SecurityContext context = SecurityContextHolder.getContext();
        Authentication authentication = context.getAuthentication();

        if (authentication instanceof AnonymousAuthenticationToken == false) {
            SecurityContextHolder.clearContext();
        }

        try {
            request.login(signupForm.getUsername(), signupForm.getPassword());
        } catch (ServletException e) {
            e.printStackTrace();
        }

        return "redirect:/";
    }
}
7-3-1-1. ログアウト処理(ログインしている場合)
自動的にログインさせる処理を行う前に、既にログインしているユーザーをログアウトさせる処理を追加します。
この処理は実際的ではないかもしれませんが、試みとして実装しておきます。
関連するコードは、次の部分です。
    SecurityContext context = SecurityContextHolder.getContext();
    Authentication authentication = context.getAuthentication();

    if (authentication instanceof AnonymousAuthenticationToken == false) {
        SecurityContextHolder.clearContext();
    }
以下、正確ではないかもしれませんが、ざっと概要を説明します。
① セキュリティコンテキストの取得
まず、最初に出てくる SecurityContext は、セキュリティ情報(コンテキスト)を定義するインターフェースです。
そして、実行中のアプリケーションに関するセキュリティ情報(コンテキスト)は、SecurityContextHolder の getContext メソッドを使用することで取得することができます。
② セッション中のユーザー情報の取得
この SecurityContextHolder には、現在アプリケーションとやり取りをしているユーザーに関する情報も含まれています。
このユーザーに関する情報は、Authentication インターフェイスで定義されており、SecurityContextHolder の getAuthentication メソッドを使用することにより取得することができます。
なお、この Authentication オブジェクトから、ユーザー名や権限情報(ロール)なども取得することができます(後述)。
③ 匿名ユーザー(anonymousUser)であることの判定
ここで必要なのは「ログイン済みのユーザー」であることを判定することですが、そのために「匿名ユーザー」(ログインしていないユーザー) かどうかを判定する手段を用います(参考)。
匿名ユーザー(anonymousUser)かどうかは、Authentication オブジェクトが AnonymousAuthenticationToken インスタンスであるかどうかを確認することで判定することができます。
authentication instanceof AnonymousAuthenticationToken
<参考サイト>
・Spring Securityで「anonymousUser」が認証されるのはなぜですか?
・Spring MVCコントローラーのセキュリティコンテキストからUserDetailsオブジェクトを取得する
・Javaプログラムにおけるinstanceof演算子の使い方【初心者向け】
④ ログアウト処理を実行する
以上の処理から、現在ログイン中と判定されたユーザーに対してログアウト処理を実行します。
ログアウト処理は、SecurityContextHolder に格納されているセキュリティ情報(コンテキスト)を消去することで実行します。
消去には、clearContext メソッドを使用します。
SecurityContextHolder.clearContext();
<参考サイト>
・spring ログアウト処理
7-3-1-2. ログイン処理の実行
ログイン処理を行うコードは次のところです(こちらのサイトから拝借させていただきました)。
    @PostMapping("/signup")
    public String signup(@Validated SignupForm signupForm, BindingResult result, Model model,
            HttpServletRequest request) {
        // 略
        try {
            request.login(signupForm.getUsername(), signupForm.getPassword());
        } catch (ServletException e) {
            e.printStackTrace();
        }
        // 略
    }
HttpServletRequest オブジェクトの login メソッドを使用して、新たに登録されたユーザー名とパスワードでログイン処理を行っています。
<参考サイト>
・Spring Securityでユーザ認証を実装してみる
7-3-2. 自動ログイン処理の確認
ユーザー登録画面から、新しいユーザー名、パスワードを入力して登録ボタンを押します。
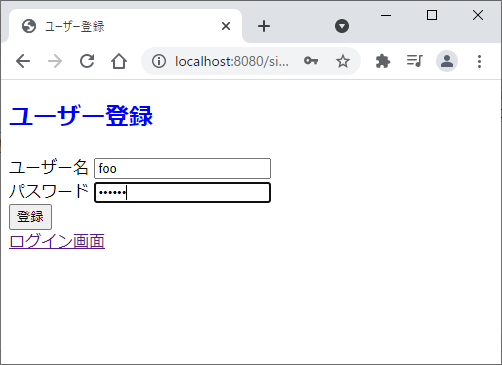
次のように、トップページが表示されれば成功です。
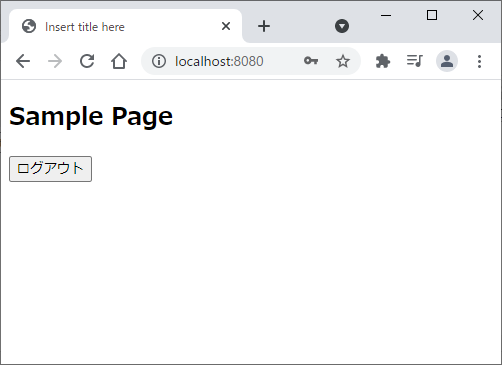
7-4. ログイン中のユーザー情報を取得して表示する
トップページにログイン中のユーザー名を表示するようにします。
7-4-1. Thymeleaf を使用してユーザー名を表示する
Thymeleaf を使用して、ユーザー名を表示するには、index.html を次のように修正します。
<!DOCTYPE html>
<html xmlns:th="http://www.thymeleaf.org">
<head>
<meta charset="UTF-8">
<title>Insert title here</title>
</head>
<body>
    <h2>Sample Page</h2>
    <div th:text="'こんにちは ' + ${#authentication.name} + ' さん'"></div>
    <form th:action="@{/logout}" method="post">
        <input type="submit" value="ログアウト" />
    </form>
</body>
</html>
追加しているのは、1行のみです。
th:text="${#authentication.name}"の振り合いで、ユーザー名を表示することができます。
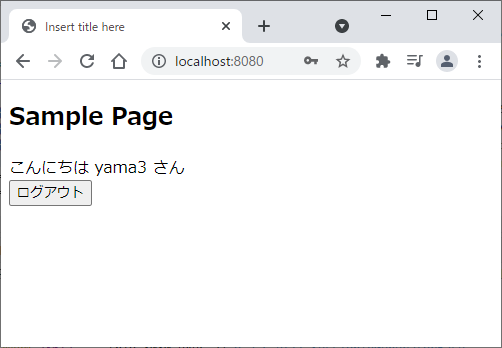
この機能を使用するには、thymeleaf-extras-springsecurity5 が必要となりますが、基本的にはプロジェクトの作成時に、Maven プロジェクト(pom.xml ファイル)に追加されていると思います。
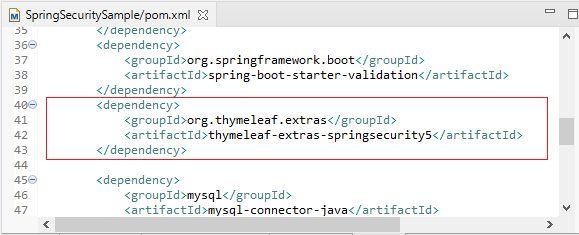
なお、現在やり取りをしている プリンシパル(認証主体:principal)を取得することで、次のようにユーザー名、パスワード、権限情報を取得することもできます。
    <div th:text="${#authentication.principal.username}"></div>  // ユーザー名を表示
    <div th:text="${#authentication.principal.password}"></div>  // パスワードを表示
    <div th:text="${#authentication.principal.authorities}"></div>  // 権限情報を表示
<参考サイト>
・Spring Security と Spring Bootで最小機能のデモアプリケーションを作成する
7-4-2. SecurityContextHolder からユーザー情報を取得する(参考)
ユーザー情報を SecurityContextHolder から取得することもできます。
試しとして、TestController のindex メソッドに、次のように記載します。
    @GetMapping
    public String index() {
        // SecurityContextHolderからAuthenticationオブジェクトを取得
        SecurityContext context = SecurityContextHolder.getContext();
        Authentication authentication = context.getAuthentication();

        // Authenticationオブジェクトからユーザー情報を取得
        System.out.println(authentication.getName());  // ユーザー名を表示
        System.out.println(authentication.getAuthorities());  // 権限情報を表示

        // Authenticationオブジェクトからユーザー情報を取得
        UserDetails principal = (UserDetails) authentication.getPrincipal();
        System.out.println(principal.getUsername());  // ユーザー名を表示
        System.out.println(principal.getPassword());  // パスワードを表示
        System.out.println(principal.getAuthorities());  // 権限情報を表示

        return "index";
    }
TestController の全ソースコードはここをクリック
package com.example.demo;

import javax.servlet.ServletException;
import javax.servlet.http.HttpServletRequest;

import org.springframework.beans.factory.annotation.Autowired;
import org.springframework.dao.DataAccessException;
import org.springframework.security.authentication.AnonymousAuthenticationToken;
import org.springframework.security.core.Authentication;
import org.springframework.security.core.context.SecurityContext;
import org.springframework.security.core.context.SecurityContextHolder;
import org.springframework.security.core.userdetails.UserDetails;
import org.springframework.stereotype.Controller;
import org.springframework.ui.Model;
import org.springframework.validation.BindingResult;
import org.springframework.validation.annotation.Validated;
import org.springframework.web.bind.annotation.GetMapping;
import org.springframework.web.bind.annotation.PostMapping;
import org.springframework.web.bind.annotation.RequestMapping;

@Controller
@RequestMapping("/")
public class TestController {
    @Autowired
    private UserDetailsServiceImpl userDetailsServiceImpl;

    @GetMapping
    public String index() {
        // SecurityContextHolderからAuthenticationオブジェクトを取得
        SecurityContext context = SecurityContextHolder.getContext();
        Authentication authentication = context.getAuthentication();

        // Authenticationオブジェクトからユーザー情報を取得
        System.out.println(authentication.getName());  // ユーザー名を表示
        System.out.println(authentication.getAuthorities());  // 権限情報を表示

        // Authenticationオブジェクトからユーザー情報を取得
        UserDetails principal = (UserDetails) authentication.getPrincipal();
        System.out.println(principal.getUsername());  // ユーザー名を表示
        System.out.println(principal.getPassword());  // パスワードを表示
        System.out.println(principal.getAuthorities());  // 権限情報を表示

        return "index";
    }

    @GetMapping("/login")
    public String login() {
        return "login";
    }

    @GetMapping("/signup")
    public String newSignup(SignupForm signupForm) {
        return "signup";
    }

    @PostMapping("/signup")
    public String signup(@Validated SignupForm signupForm, BindingResult result, Model model,
            HttpServletRequest request) {
        if (result.hasErrors()) {
            return "signup";
        }

        if (userDetailsServiceImpl.isExistUser(signupForm.getUsername())) {
            model.addAttribute("signupError", "ユーザー名 " + signupForm.getUsername() + "は既に登録されています");
            return "signup";
        }

        try {
            userDetailsServiceImpl.register(signupForm.getUsername(), signupForm.getPassword(), "ROLE_USER");
        } catch (DataAccessException e) {
            model.addAttribute("signupError", "ユーザー登録に失敗しました");
            return "signup";
        }

        SecurityContext context = SecurityContextHolder.getContext();
        Authentication authentication = context.getAuthentication();

        if (authentication instanceof AnonymousAuthenticationToken == false) {
            SecurityContextHolder.clearContext();
        }

        try {
            request.login(signupForm.getUsername(), signupForm.getPassword());
        } catch (ServletException e) {
            e.printStackTrace();
        }

        return "redirect:/";
    }
}
トップページを表示する際に、コンソール画面に次のように出力されます。
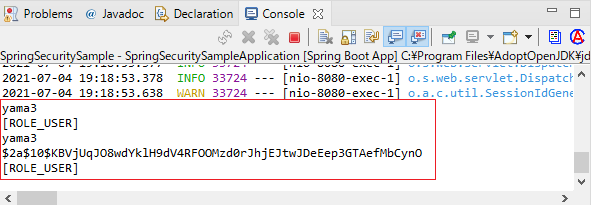
<参考サイト>
・Spring Security 使い方メモ 認証・認可
・Spring Security - MyMemoWiki
・現在のユーザーに関する情報を取得する
7-4-3. @AuthenticationPrincipal からユーザー情報を取得する(参考)
ユーザー情報は、アノテーション @AuthenticationPrincipal を使用すると、より簡単に取得することができます
こちらも、試しとして TestController のindex メソッドに、次のように記載します。
    // 略
    @GetMapping
    public String index(@AuthenticationPrincipal UserDetailsImpl userDetails) {
        System.out.println(userDetails.getUsername());  // ユーザー名を表示
        System.out.println(userDetails.getPassword());  // パスワードを表示
        System.out.println(userDetails.getAuthorities().toString());  // 権限情報を表示
        return "index";
    }
    // 略
TestController の全ソースコードはここをクリック
package com.example.demo;

import javax.servlet.ServletException;
import javax.servlet.http.HttpServletRequest;

import org.springframework.beans.factory.annotation.Autowired;
import org.springframework.dao.DataAccessException;
import org.springframework.security.authentication.AnonymousAuthenticationToken;
import org.springframework.security.core.Authentication;
import org.springframework.security.core.annotation.AuthenticationPrincipal;
import org.springframework.security.core.context.SecurityContext;
import org.springframework.security.core.context.SecurityContextHolder;
import org.springframework.security.core.userdetails.UserDetails;
import org.springframework.stereotype.Controller;
import org.springframework.ui.Model;
import org.springframework.validation.BindingResult;
import org.springframework.validation.annotation.Validated;
import org.springframework.web.bind.annotation.GetMapping;
import org.springframework.web.bind.annotation.PostMapping;
import org.springframework.web.bind.annotation.RequestMapping;

@Controller
@RequestMapping("/")
public class TestController {
    @Autowired
    private UserDetailsServiceImpl userDetailsServiceImpl;

    @GetMapping
    public String index(@AuthenticationPrincipal UserDetailsImpl userDetails) {
        System.out.println(userDetails.getUsername());  // ユーザー名を表示
        System.out.println(userDetails.getPassword());  // パスワードを表示
        System.out.println(userDetails.getAuthorities().toString());  // 権限情報を表示
        return "index";
    }

    @GetMapping("/login")
    public String login() {
        return "login";
    }

    @GetMapping("/signup")
    public String newSignup(SignupForm signupForm) {
        return "signup";
    }

    @PostMapping("/signup")
    public String signup(@Validated SignupForm signupForm, BindingResult result, Model model,
            HttpServletRequest request) {
        if (result.hasErrors()) {
            return "signup";
        }

        if (userDetailsServiceImpl.isExistUser(signupForm.getUsername())) {
            model.addAttribute("signupError", "ユーザー名 " + signupForm.getUsername() + "は既に登録されています");
            return "signup";
        }

        try {
            userDetailsServiceImpl.register(signupForm.getUsername(), signupForm.getPassword(), "ROLE_USER");
        } catch (DataAccessException e) {
            model.addAttribute("signupError", "ユーザー登録に失敗しました");
            return "signup";
        }

        SecurityContext context = SecurityContextHolder.getContext();
        Authentication authentication = context.getAuthentication();

        if (authentication instanceof AnonymousAuthenticationToken == false) {
            SecurityContextHolder.clearContext();
        }

        try {
            request.login(signupForm.getUsername(), signupForm.getPassword());
        } catch (ServletException e) {
            e.printStackTrace();
        }

        return "redirect:/";
    }
}
この場合も、コンソール画面に次のように表示されます。

<参考サイト>
・【Spring Security はじめました】#2 ユーザー認証
さいごに
コンパクトで、端的にわかりやすいものを書くつもりでしたが、結局長くなってしまいました。
何らかの参考となれば幸いです。
