【とってもおすすめ!Androidアプリ!】 簡単家計簿 ⇒
【とってもおすすめ!Androidアプリ!】 音感診断 ⇒
Parseからプッシュ通知でAndroidアプリにjsonデータを送る方法
Parseからプッシュ通知でAndroidアプリにjsonデータを送るメモ。
ParseのサイトからPush Notificationの画面を開くと何やらJSONという文字発見。
なるほど、JSON形式でデータが送信できるらしい。
【AndroidでParse.comからプッシュ通知をする方法(eclipse作業編】で設定した内容に追記する形で実装してみる。
作業を簡単にまとめると以下の通り。
①AndroidManifest.xmlを変更する
②FromParseReceiver.javaを作成する
③Parseからプッシュ通知(json)を送る
■jsonデータの送信・アプリでの受信方法
①AndroidManifest.xmlを変更する
AndroidManifest.xmlに新たなレシーバーを追記する。
<receiver android:name="com.example.test.FromParseReceiver" android:exported="false">
            <intent-filter>
                <action android:name="com.example.test.UPDATE_STATUS"/>
            </intent-filter>
        </receiver>
ちなみに青枠部分は自分のプロジェクトに合わせて変更すること。

追記後の全体像はこんな感じ。
<?xml version="1.0" encoding="utf-8"?>
<manifest xmlns:android="http://schemas.android.com/apk/res/android"
    package="com.example.test"
    android:versionCode="1"
    android:versionName="1.0" >

    <uses-sdk
        android:minSdkVersion="8"
        android:targetSdkVersion="19" />

    <uses-permission android:name="android.permission.INTERNET" />
	<uses-permission android:name="android.permission.ACCESS_NETWORK_STATE" />
	<uses-permission android:name="android.permission.WAKE_LOCK" />
	<uses-permission android:name="android.permission.VIBRATE" />
	<uses-permission android:name="android.permission.RECEIVE_BOOT_COMPLETED" />
	<uses-permission android:name="android.permission.GET_ACCOUNTS" />
	<uses-permission android:name="com.google.android.c2dm.permission.RECEIVE" />
	<permission android:protectionLevel="signature"
	    android:name="com.example.test.permission.C2D_MESSAGE" />
	<uses-permission android:name="com.example.test.permission.C2D_MESSAGE" />

    <application
        android:allowBackup="true"
        android:icon="@drawable/ic_launcher"
        android:label="@string/app_name"
        android:theme="@style/AppTheme" >
        <activity
            android:name="com.example.test.MainActivity"
            android:label="@string/app_name" >
            <intent-filter>
                <action android:name="android.intent.action.MAIN" />

                <category android:name="android.intent.category.LAUNCHER" />
            </intent-filter>
        </activity>

        <!-- プッシュ通知に必要なレシーバー -->
        <service android:name="com.parse.PushService" />
		<receiver android:name="com.parse.ParseBroadcastReceiver">
		  <intent-filter>
		    <action android:name="android.intent.action.BOOT_COMPLETED" />
		    <action android:name="android.intent.action.USER_PRESENT" />
		  </intent-filter>
		</receiver>
		<receiver android:name="com.parse.GcmBroadcastReceiver"
		    android:permission="com.google.android.c2dm.permission.SEND">
		  <intent-filter>
		    <action android:name="com.google.android.c2dm.intent.RECEIVE" />
		    <action android:name="com.google.android.c2dm.intent.REGISTRATION" />
		    <category android:name="com.example.test" />
		  </intent-filter>
		</receiver>

		<!-- プッシュ通知に必要なレシーバー(JSON) -->
        <receiver android:name="com.example.test.FromParseReceiver" android:exported="false">
            <intent-filter>
                <action android:name="com.example.test.UPDATE_STATUS"/>
            </intent-filter>
        </receiver>
    </application>

</manifest>
②FromParseReceiver.javaを作成する
タグのandroid:nameで指定した通りの場所にFromParseReceiverクラスを作成する。
package com.example.test;

import android.content.BroadcastReceiver;
import android.content.Context;
import android.content.Intent;
import android.graphics.Color;
import android.os.Bundle;
import android.view.Gravity;
import android.view.View;
import android.widget.LinearLayout;
import android.widget.TextView;
import android.widget.Toast;
import android.util.Log;
import org.json.JSONException;
import org.json.JSONObject;

public class FromParseReceiver extends BroadcastReceiver {

    //JSON型で送られてきたプッシュ通知を受け取り処理する
    public void onReceive(Context context, Intent intent) {
        Log.i("Parse", "onReceive");
        try {
            //jsonから値を取り出し
            Bundle extra        = intent.getExtras();
            String data         = extra.getString("com.parse.Data");
            JSONObject json     = new JSONObject(data);
            Log.i("Parse", data);

            //取り出したデータを変数へ
            String msg          = json.getString("msg");
            String showtoast    = json.getString("showtoast");

            /** ここより下はお好みの処理を書く。今回はトーストでメッセージを表示して見るため以下の様な記載としている**/
            if("on".equals(showtoast))
            {
                // メッセージビュー
                TextView tv = new TextView(context);
                tv.setTextSize(20.0f);
                tv.setTextColor(Color.WHITE);
                tv.setText( msg );

                // リニアレイアウト上に、作成したビューを並べる
                LinearLayout ll = new LinearLayout(context);
                ll.setOrientation( LinearLayout.HORIZONTAL );
                ll.setGravity( Gravity.CENTER );
                ll.addView(tv);

                // トーストを作成し、今作ったビューをセットする
                Toast toast = new Toast(context);
                toast.setView(ll);
                toast.setGravity( Gravity.CENTER, 0, 0 );
                toast.setDuration(Toast.LENGTH_LONG);

                View v = toast.getView();
                v.setBackgroundColor(Color.rgb(30, 30, 30));

                toast.show();
            }
        } catch (JSONException e) {
            e.printStackTrace();
        }
    }
}
上記でjsonから送られてきたデータを取り出す処理は
//jsonから値を取り出し
            Bundle extra        = intent.getExtras();
            String data         = extra.getString("com.parse.Data");
            JSONObject json     = new JSONObject(data);
            Log.i("Parse", data);

            //取り出したデータを変数へ
            String msg          = json.getString("msg");
            String showtoast    = json.getString("showtoast");
までの部分となる。以降の処理は、お好みで行いたい処理を記述する。
(今回は例としてtoastを表示してみる)
③Parseからプッシュ通知(json)を送る
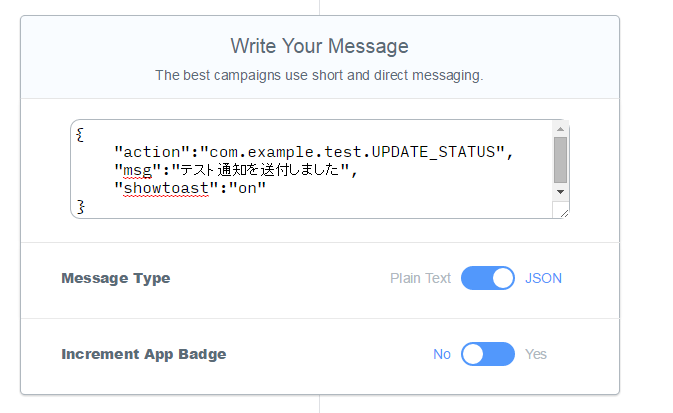
これでひと通りの準備が完了したためアプリを起動してparseから通知を送る。
送る内容は以下の通り。
{
    "action":"com.example.test.UPDATE_STATUS",
    "msg":"テスト通知を送付しました",
    "showtoast":"on"
}
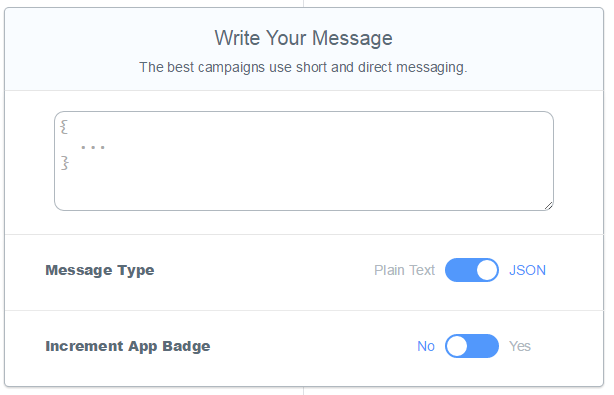
Parseのサイトから実際に上記の文言を送ってみる。※注意:「Message Type」をPlain Text→jsonに切り替えること)
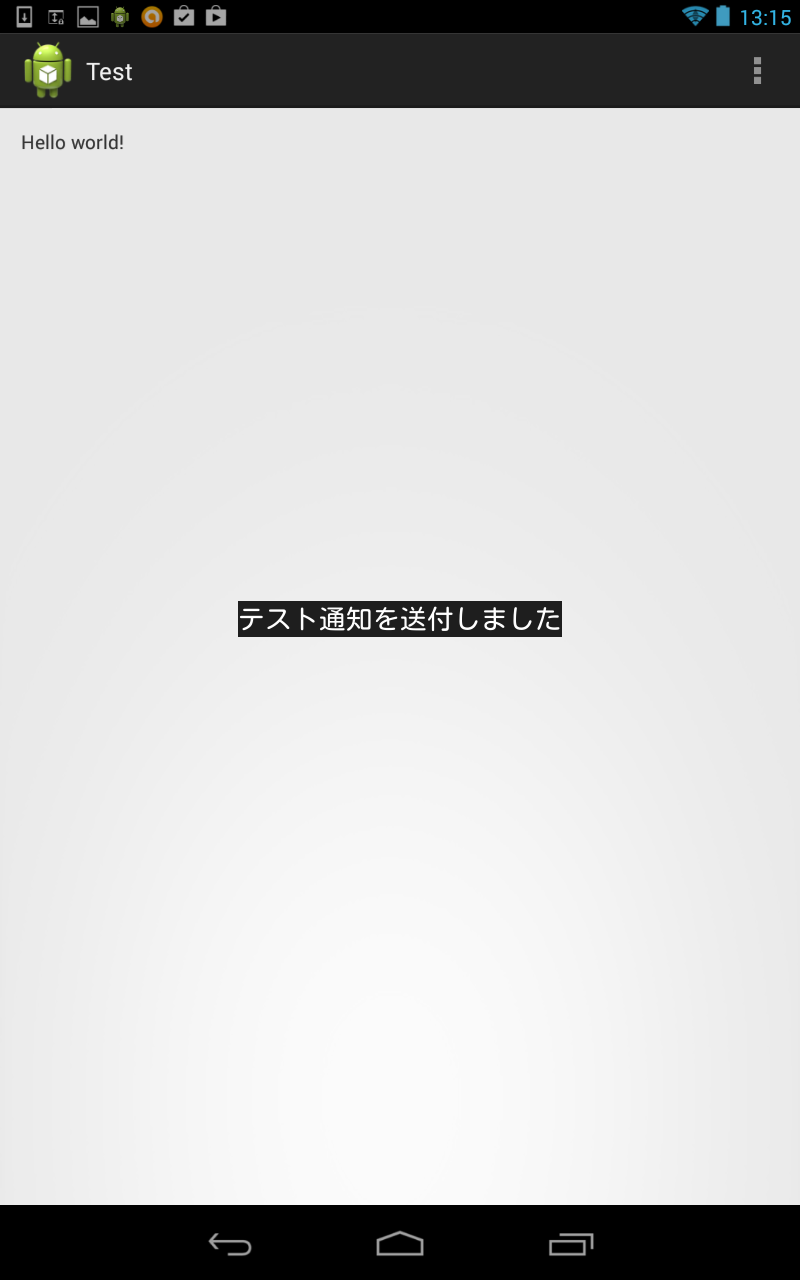
結果、こんな感じで表示された。
以上、参考まで。
【関連】
・AndroidでParse.comからプッシュ通知をする方法(Parse.com作業編)
・AndroidでParse.comからプッシュ通知をする方法(eclipse作業編)
・Parseからプッシュ通知された時のNotification Icon(ノーティフィケーションアイコン)の変更方法