株式会社 日立製作所の茂木です。今回は Keycloak と Spring Security の連携方法を紹介します。
OAuth ではアクセストークンの有効性を確認する方法として、RFC 7662 OAuth 2.0 Token Introspectionがあります。Token Introspection は、アクセストークンの有効性やトークンに紐づくユーザ情報を Authorization Server から取得する方法を定めたものです。一般的にはアクセストークンが Opaque (不透明:ランダムな文字列など)である場合に利用されますが、アクセストークンの状態(ログアウトなど)を即座に反映できるため、高いセキュリティが必要な場合にも有用です。
今回は Spring Security が提供する機能を利用して、Token Introspection を利用する Resource Server を作成してみます。
OAuth 2.0 Resource Server
Spring Security のモジュールである OAuth 2.0 Resource Server は、アクセストークンの検証や認証情報の取得といった機能を提供します。このモジュールを利用すると、OAuth の Resource Server を簡単に作成できるようになります。Spring Security 5.1 の時にはアクセストークンが JWT 形式にしか対応していませんでしたが、5.2 からは Token Introspection も利用できるようになりました (Keycloak はどちらの方法にも対応しています)。
ちなみに Spring Security OAuth というライブラリがありますが、こちらは今回扱うものとは別物です。現在は Deprecated となっており、利用は推奨されていませんので、調べる際は注意が必要です。
動作検証
Spring Security の OAuth 2.0 Resource Server と Keycloak を利用して、Token Introspection によるアクセス検証動作の確認をしてみます。
検証環境
検証に利用した環境は以下の通りです。
- Keycloak 8.0.0
- Spring Boot 2.2.1
- Spring Security 5.2.1.RELEASE
- oauth2-oidc-sdk 6.14 (後述)
Spring Initializr でのプロジェクト作成
まずは Spring Initializr を利用して Spring Boot のプロジェクトを作成します。Dependencies では下記のように、Spring Web と OAuth2 Resource Server を選択してください。
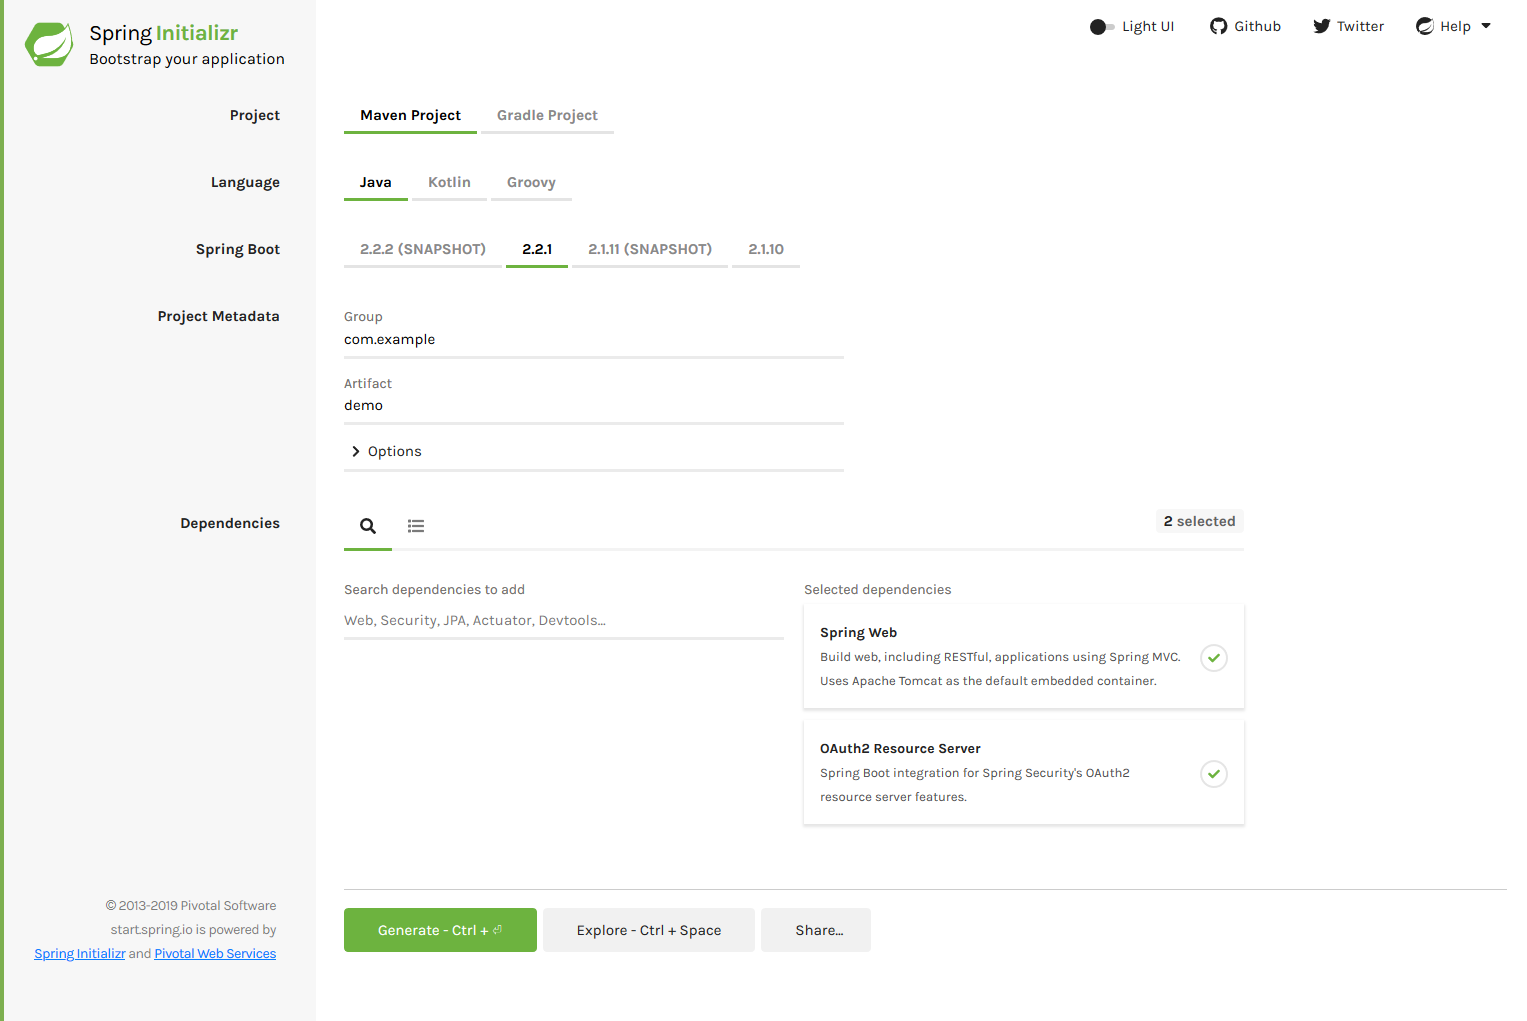
Spring Security の OAuth/OpenID Connect 周りの機能には、oauth2-oidc-sdkというライブラリが利用されています。依存関係が Optional になっているため、依存関係を追加する必要があります。今回は Spring Security のプロジェクトで指定されている6.14を指定しました。
        <dependency>
            <groupId>com.nimbusds</groupId>
            <artifactId>oauth2-oidc-sdk</artifactId>
            <version>6.14</version>
        </dependency>
以上でプロジェクトの作成は完了です。
Spring Boot の設定
次にapplication.yamlに Token Introspection の設定を行っていきます。設定に必要な値は Token Introspection Endpoint の URL と、Token Introspection を実行するために必要なクライアント認証情報(Client ID, Client Secret)です。
Keycloak の Token Introspection Endpoint は /auth/realms/<Realm名>/protocol/openid-connect/token/introspectですので、その値をintrospection-uriに指定します。Client Secret は Keycloak の設定時に生成されるので、後ほどその値を指定します。
server:
  port: 8000
spring:
  security:
    oauth2:
      resourceserver:
        opaquetoken:
          introspection-uri: http://localhost:8080/auth/realms/sample/protocol/openid-connect/token/introspect
          client-id: sample
          client-secret: <client_secretの値>
次にセキュリティの設定を行います。WebSecurityConfigurerAdapterを継承したクラスを作成し、アクセス制御に関する設定を行っていきます。Spring Security 内部では scope の値は SCOPE_という Prefix がついた Authority として保持されるので、これを利用して scope ベースのアクセス制御も行えます。
import org.springframework.security.config.annotation.web.builders.HttpSecurity;
import org.springframework.security.config.annotation.web.configuration.EnableWebSecurity;
import org.springframework.security.config.annotation.web.configuration.WebSecurityConfigurerAdapter;

@EnableWebSecurity
public class SecurityConfig extends WebSecurityConfigurerAdapter{

    @Override
    protected void configure(HttpSecurity http) throws Exception {
        http.authorizeRequests(authorizedRequest -> {
            authorizedRequest
                .antMatchers("/me").hasAuthority("SCOPE_profile")
                .anyRequest().authenticated();
        })
        .oauth2ResourceServer().opaqueToken();
    }
}
最後に適当なRestControllerを作成します。
import org.springframework.security.core.annotation.AuthenticationPrincipal;
import org.springframework.security.oauth2.server.resource.authentication.BearerTokenAuthentication;
import org.springframework.web.bind.annotation.RequestMapping;
import org.springframework.web.bind.annotation.RestController;

@RestController
public class SampleController {

    @RequestMapping("/")
    public String index() {
        return "hello";
    }

    @RequestMapping("/me")
    public Object profile(@AuthenticationPrincipal BearerTokenAuthentication auth) {
        return auth.getTokenAttributes().get("preferred_username");
    }
}
OAuth 2.0 Resource Server は Token Introspection で取得したユーザ情報をBearerTokenAuthenticationに格納します。Controller でトークンに紐づくユーザ情報を利用する場合は、このインスタンスから情報を取得して利用します。
以上の設定でリクエストヘッダに付与されたアクセストークンを、Token Introspection で検証するようになります。
Keycloak の設定
次に Keycloak の設定をしていきます。Token Introspection では、リクエストを実行するために Client ID, Client Secret による認証が必要になるので、下記のように Client 情報を登録します。
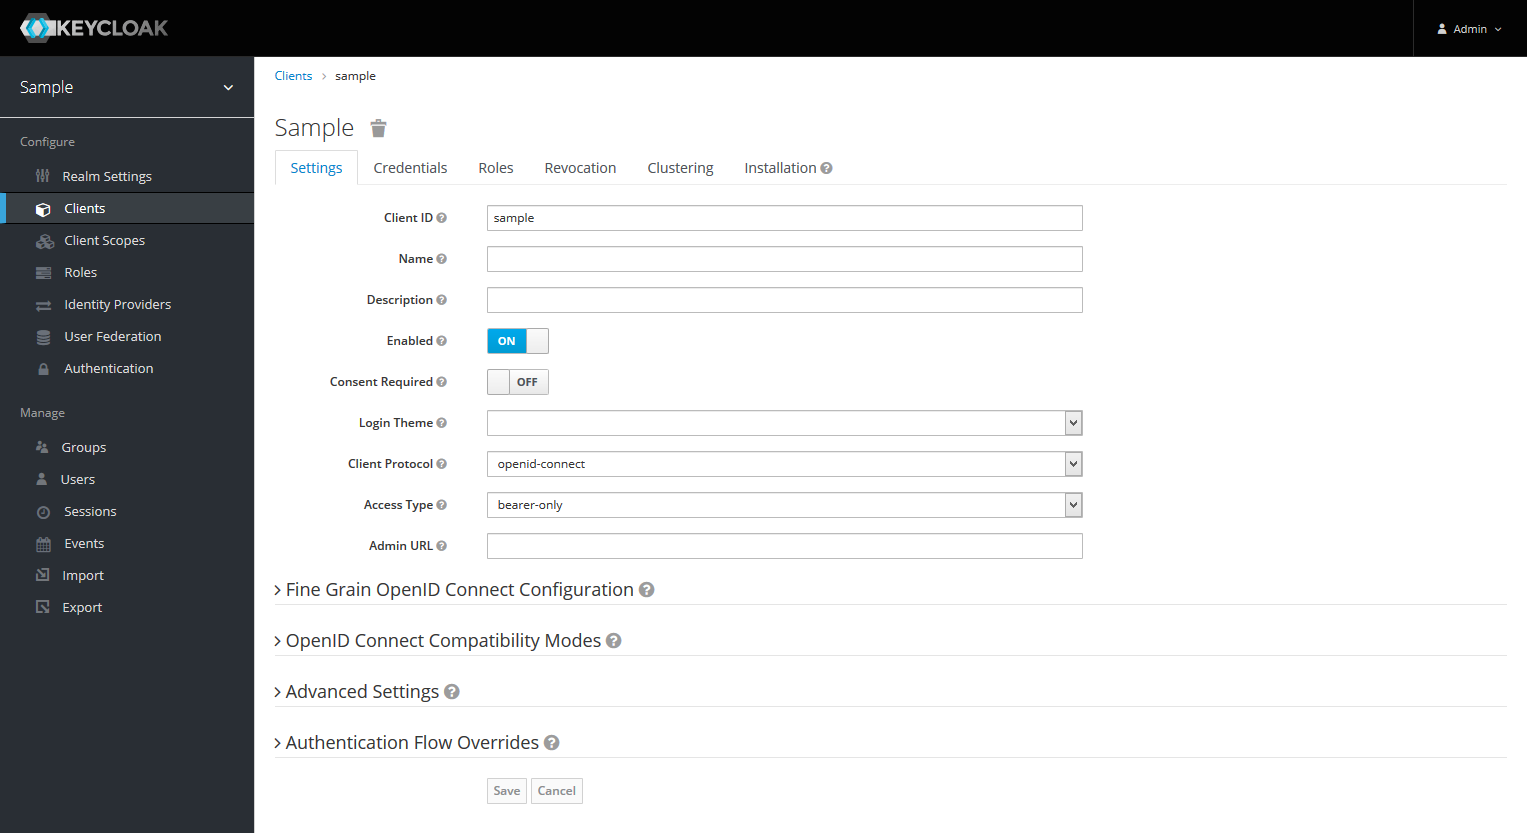
ここで登録した Client ID 及び生成された Client Secret の値を、先ほどのapplication.yamlに指定します。
また、Token Introspection が実行されていることを確認するため、Keycloak の Event Log を ON に設定します。
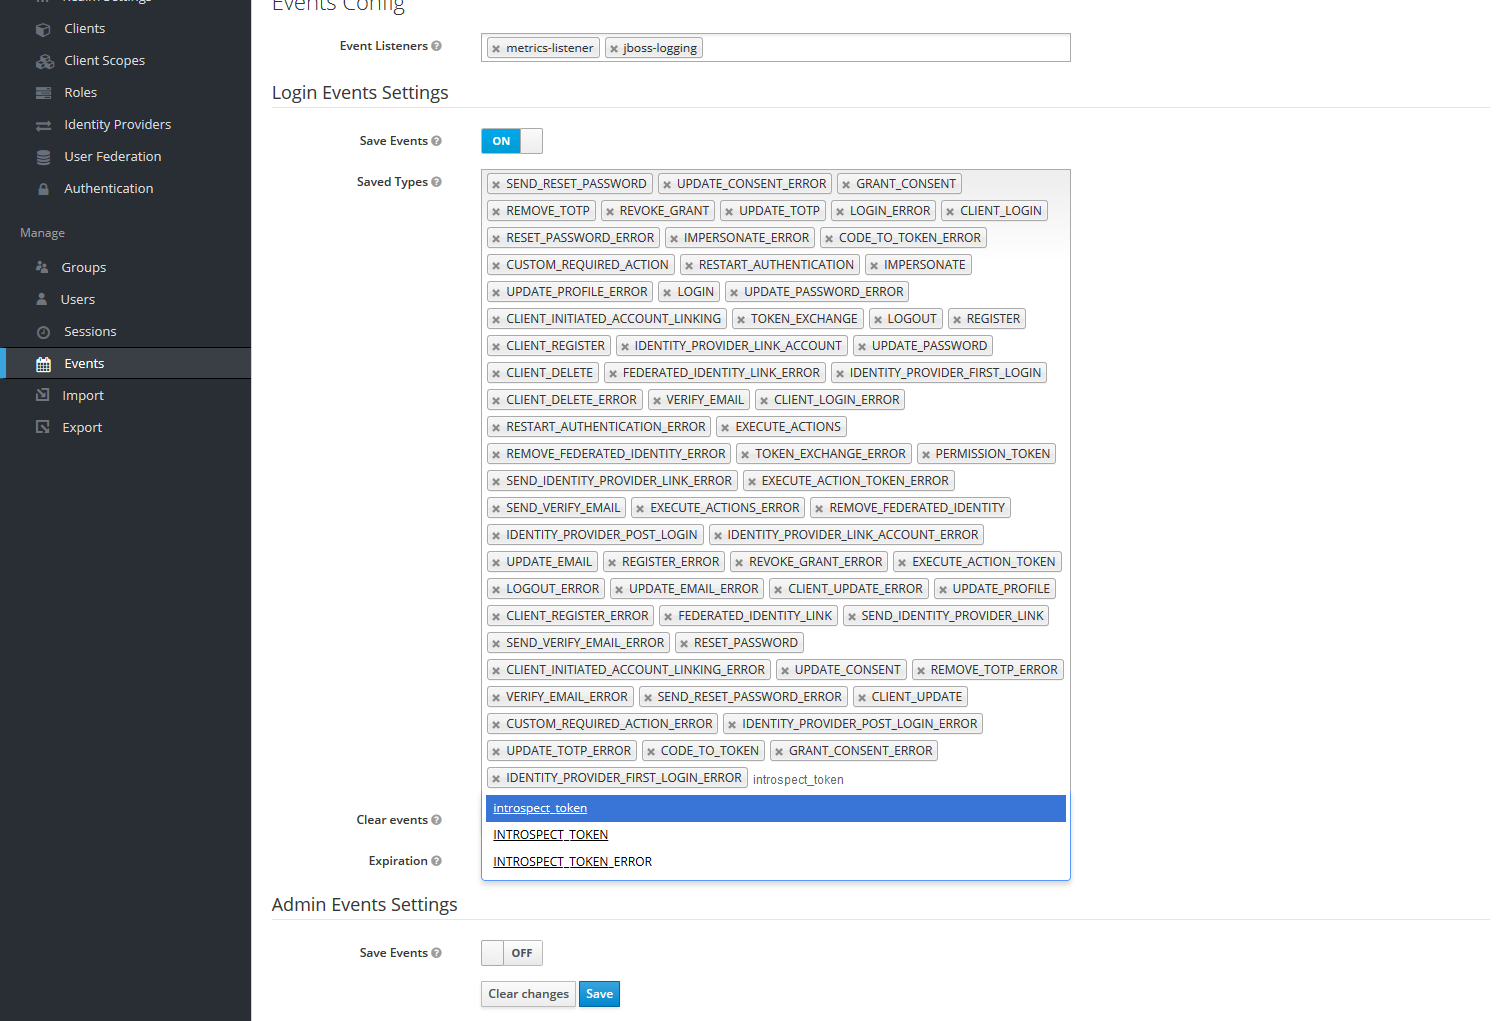
Saved Type にINTROSPECT_TOKENが入っていれば、Token Introspection 実行時にログが残ります。
動作確認
まずは、下記のコマンドを利用して Spring Boot アプリケーションを起動します。
$ mvn spring-boot:run
この際、oauth2-oidc-sdkの依存関係が抜けていると、下記のようなClassNotFoundExceptionが発生して起動に失敗します。エラーが発生した際は依存関係を見直してみてください。
Caused by: java.lang.ClassNotFoundException: com.nimbusds.oauth2.sdk.TokenIntrospectionSuccessResponse
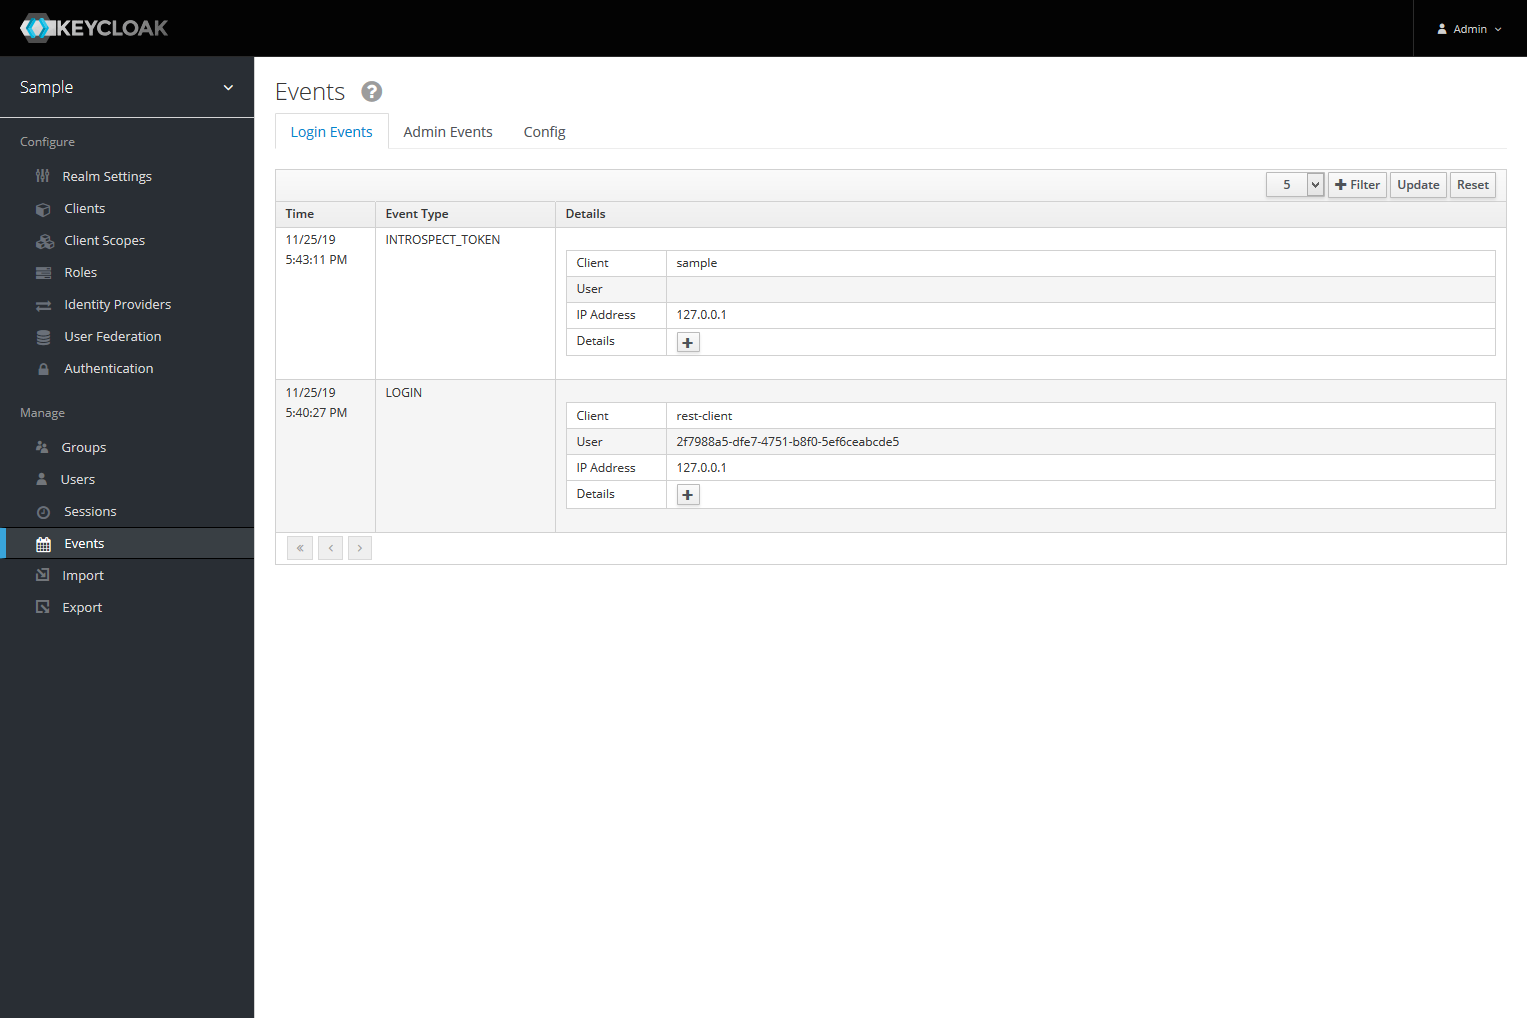
アプリケーションが起動したら、適当な REST クライアントなどを利用して Keycloak からアクセストークンを取得してリクエストを送信します。リクエストが成功した後に Keycloak の Event Log を確認すると、下記のようにINTROSPECT_TOKENイベントが発生していることが確認できます。
また、Scope を減らしたアクセストークンを利用した場合は、403エラーレスポンスとともに下記のWWW-Authenticateヘッダが返ってきて、Scope によるアクセス制御が成功していることも確認できます。
WWW-Authenticate: Bearer error="insufficient_scope", error_description="The request requires higher privileges than provided by the access token.", error_uri="https://tools.ietf.org/html/rfc6750#section-3.1"
最後に
Keycloak は Token Introspection などの OAuth 関連仕様が実装されています。そのため、OAuth ライブラリを利用すれば簡単に Keycloak と連携させることができます。Keycloak を利用してシステムを構築する場合、「Keycloak の使い方」だけでは済まない場合が数多くあるので、こういった他のライブラリとの連携方法に関しても情報を発信していきたいと思っています。