OpenStreetMap は地図の Wikipedia です
OpenStreetMap は、2004年に始まりました。
オープンライセンスの下で誰でも自由に地図を使えるよう、みんなで作る地図です。
まさに現代の伊能忠敬とも言えるプロジェクトですね。
商用・非商用を問わずにデータの自由な利用と再配布可能なオープンデータベースライセンス (ODbL) 1.0 で運営されています。
Web 地図の選択肢
Web サイトで地図情報を提供してくれるサービスは数多くあります。
代表的なものを3つほど比較すると以下のようになります。
| 地図 | 認知度 | 情報量 | 利便性 | ライセンス | 料金 |
|---|---|---|---|---|---|
| Google マップ | ◎ | ◎ | ◎ | △ | △ |
| OpenStreetMap | △ | ◯ | ◯ | ◎ | ◎ |
| 国土地理院 | △ | ◯ | ◯ | ◎ | ◎ |
地図は著作物なので、著作権ライセンスや料金に関してはご自身の利用用途に合わせてご確認頂くのがよいでしょう。例えば Google マップの地図を印刷して配布する場合にもライセンス上の注意事項があります。
印刷物での使用
Google マップと Google Earth には、印刷機能または(Earth Studio への)書き出し機能が備わっています。商用目的でなければコンテンツを印刷し、拡大する(地図に道順を表示するなど)ことができます。コンテンツを含む印刷物を配布する場合は、最初に上記の一般的なガイドラインをお読みになり、特にフェアユースと権利帰属に関する規約にご留意ください。
Google マップ & Google Earth ガイドライン
OpenStreetMap のライセンスに関しては OpenStreetMap Foundation Japan の坂ノ下さんの資料にてわかりやすく書かれているのでご一読ください。
このように Google マップや OpenStreetMap をはじめとした地図サービスにも一長一短があります。ビジネスの場と、公(研究・行政)の場では使い分けることが多いのかと思います。
オープンデータ である OpenStreetMap の活用方法
OpenStreetMap には大きく「使う」と「作る」という2つの活用方法があります。
地図を使いたいときはスマホやパソコンで以下のサイトを訪れてみてください。すぐにでも使い始めることが出来ます。
地図を作るときの様子については、青山学院大学の古橋大地教授の説明動画を見て頂くとわかりやすいかと思います。このような形で世界中のマッパーと言われる有志が日々オープンデータの地図を更新していっています。
OpenStreetMap の活用事例
ポケモンGO や Instagram といった身近なアプリや Tesla のカーナビの地図データにも OpenStreetMap のデータが活用されています。
また、地図というと2次元をイメージしますが、東京都では OpenStreetMap のデータを活用してデジタルツイン実現プロジェクトに取り組み始めています。
このようにオープンなデータであるからこそ様々な領域で活用され、そしてその活用データが再び蓄積されていく。そういった好循環が生まれていくのがオープンな世界なのでしょう。
OpenStreetMap のデータを扱うための API
Overpass API は OpenStreetMap に登録されているデータなら何でも扱うことができる API です。
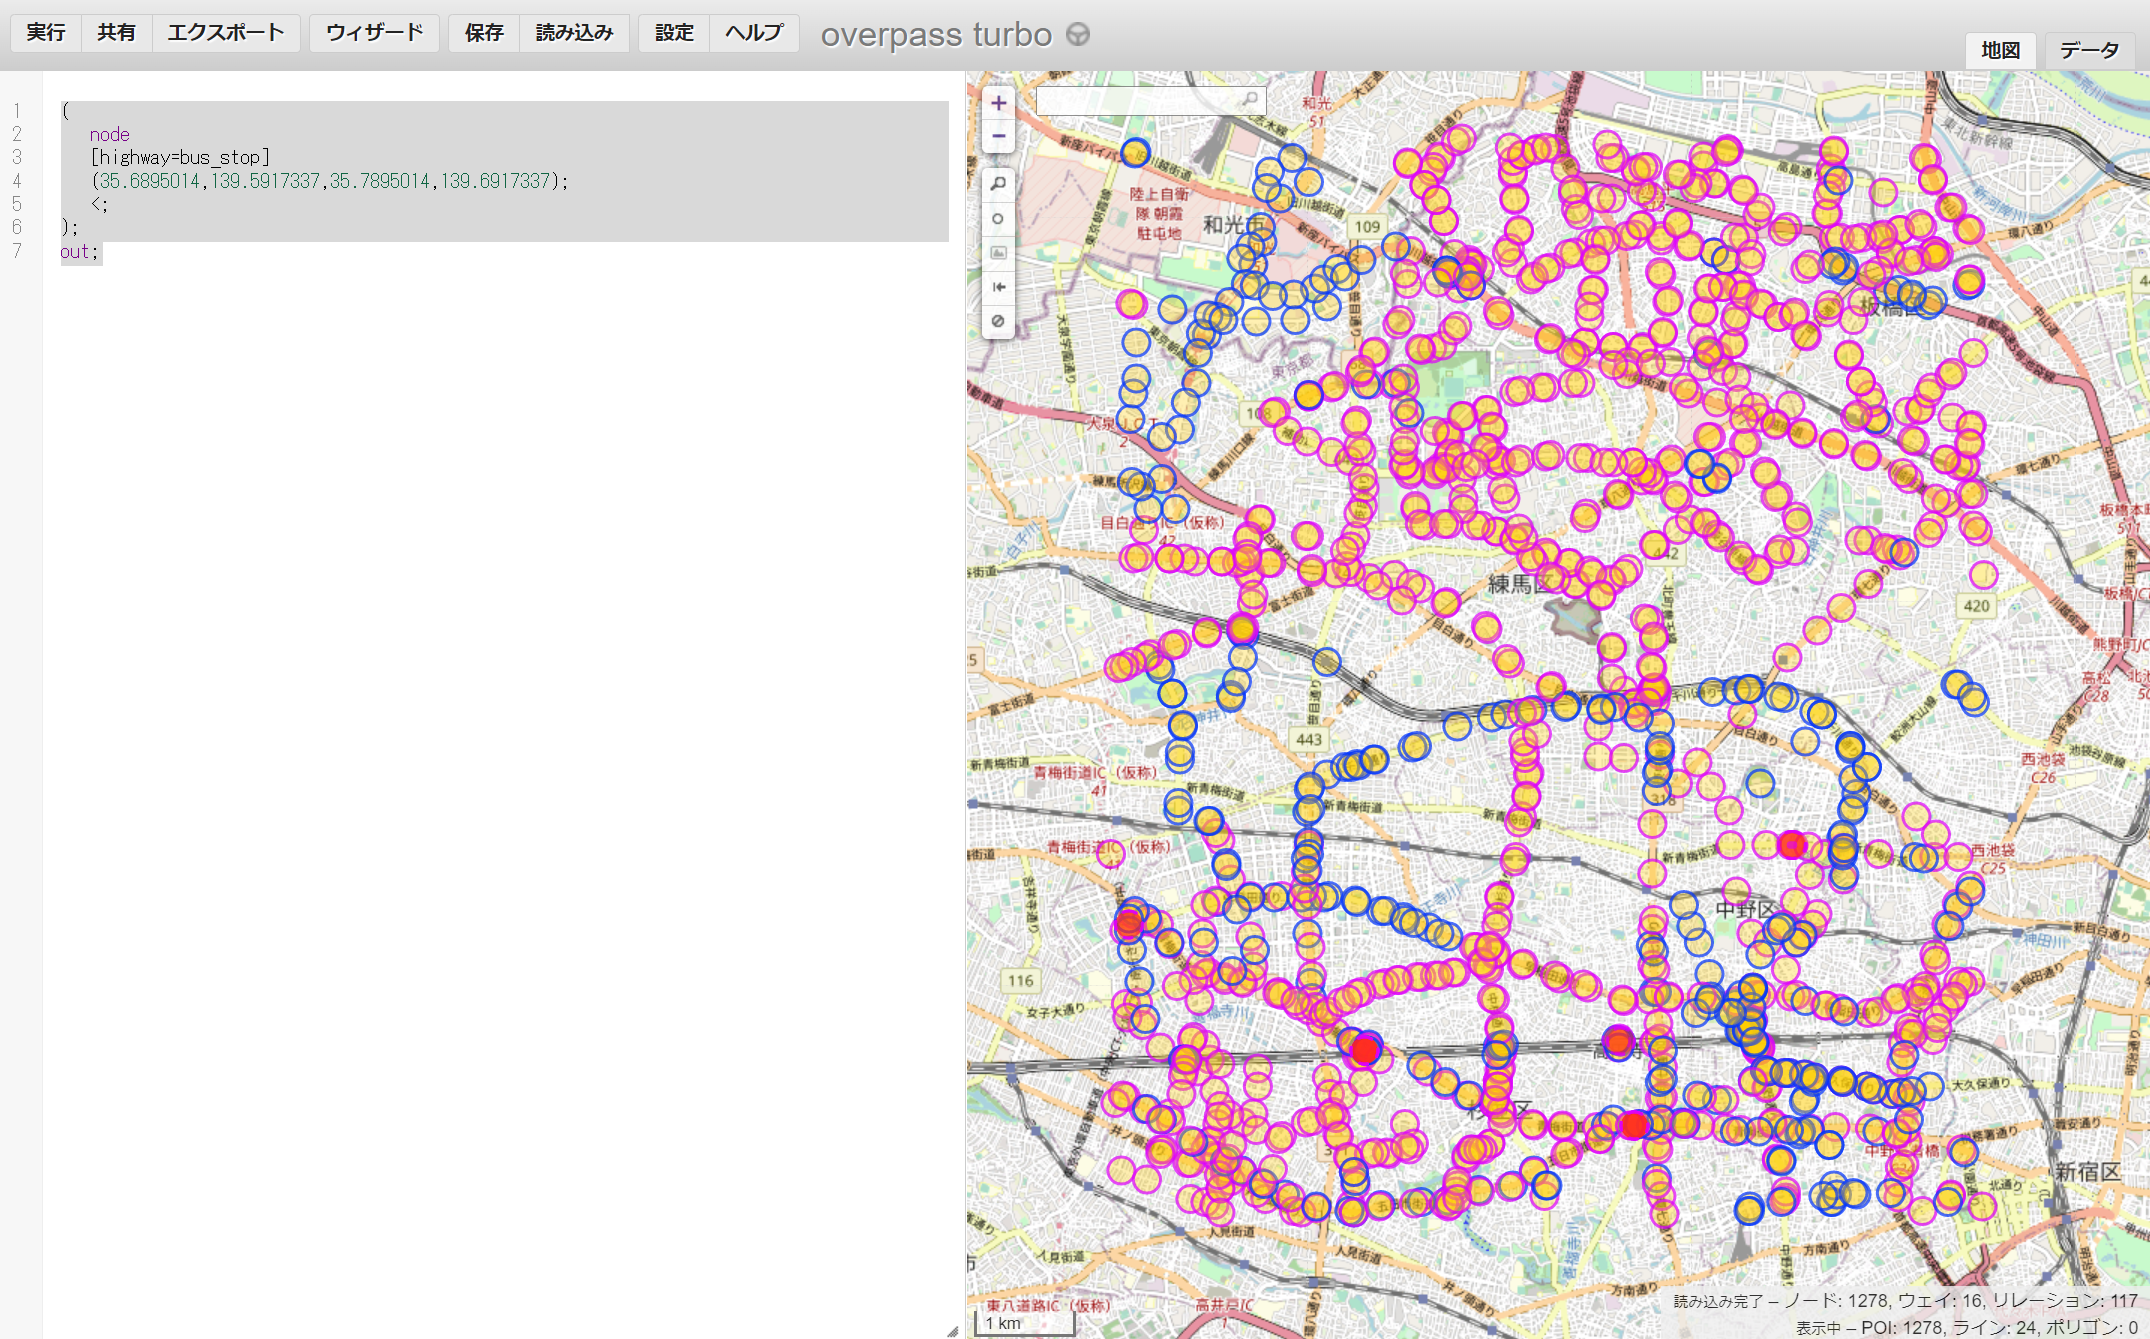
データを得るためには XML やOverpass QL 形式のクエリを投げて結果を取得します。Overpass turbo というサイトでクエリを試すことが出来ます。
例)練馬区周辺のバス停留所を検索するクエリ
・検索条件を指定
・南、西、北、東の順に緯度経度を指定
(
   node
   [highway=bus_stop]
   (35.6895014,139.5917337,35.7895014,139.6917337);
   <;
);
out;
同じクエリを REST API 経由でリクエストしてみます。
import axios from 'axios';

const overpass = 'https://overpass-api.de/api/interpreter';
const query = `
   (
        node
        [highway=bus_stop]
        (35.6895014,139.5917337,35.7895014,139.6917337);
        <;
   );
   out;
`
const url = overpass + '?data=[out:json][timeout:30];' + query;

axios.get(url).then(result =>{
    console.log(result.data)
})
{
  version: 0.6,
  generator: 'Overpass API 0.7.57 93a4d346',
  osm3s: {
    timestamp_osm_base: '2021-11-22T13:58:29Z',
    copyright: 'The data included in this document is from www.openstreetmap.org. The data is made available under ODbL.'
  },
  elements: [
    {
      type: 'node',
      id: 564720798,
      lat: 35.690342,
      lon: 139.6304474,
      tags: [Object]
    },
    {
      type: 'node',
      id: 569073240,
      lat: 35.7042836,
      lon: 139.6199636,
      tags: [Object]
    },
(略)
地図を表示するためのライブラリ Leaflet
Leaflet という Web 地図のための JavaScript ライブラリを利用すると楽に実装出来ます。
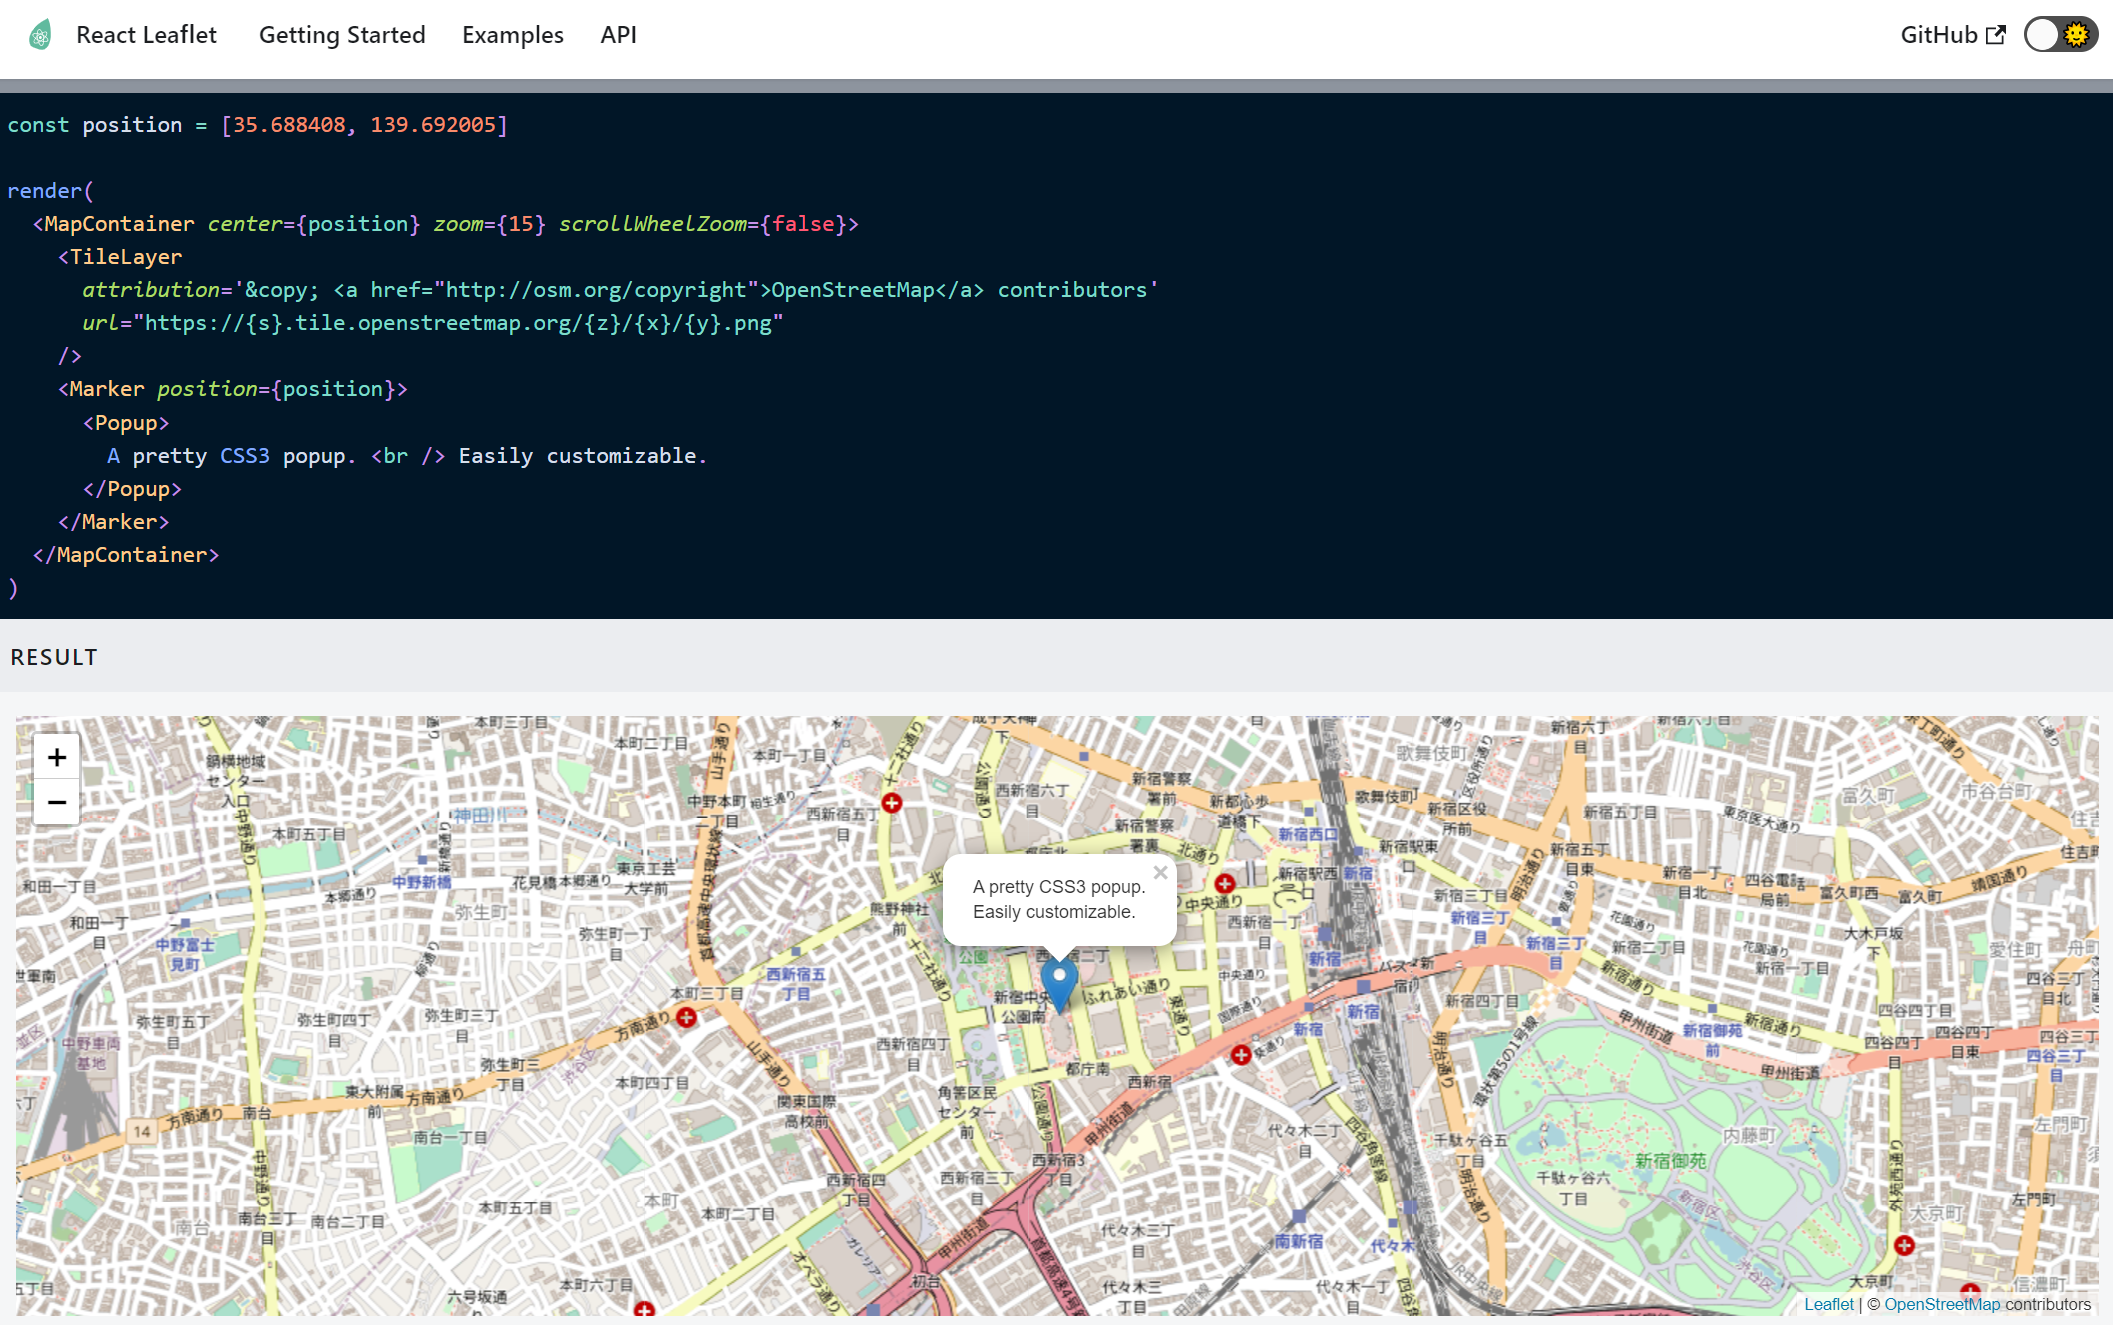
Leaflet + OpenStreetMap の公式チュートリアルを見て頂くのがよいでしょう。Leaflet 自体は地図を表示するためのライブラリ(CSS,JS)で、地図データ自体は OpenStreetMap や Google マップ や国土地理院から呼び出します。
React Leaflet
Leaflet だけでも十分便利なのですが、モダンな Javascript 環境に慣れている人は React で開発がしたいと思います。そんな方は React と Leaflet を繋いでくれる React Leaflet を使うのが良いでしょう。
実装
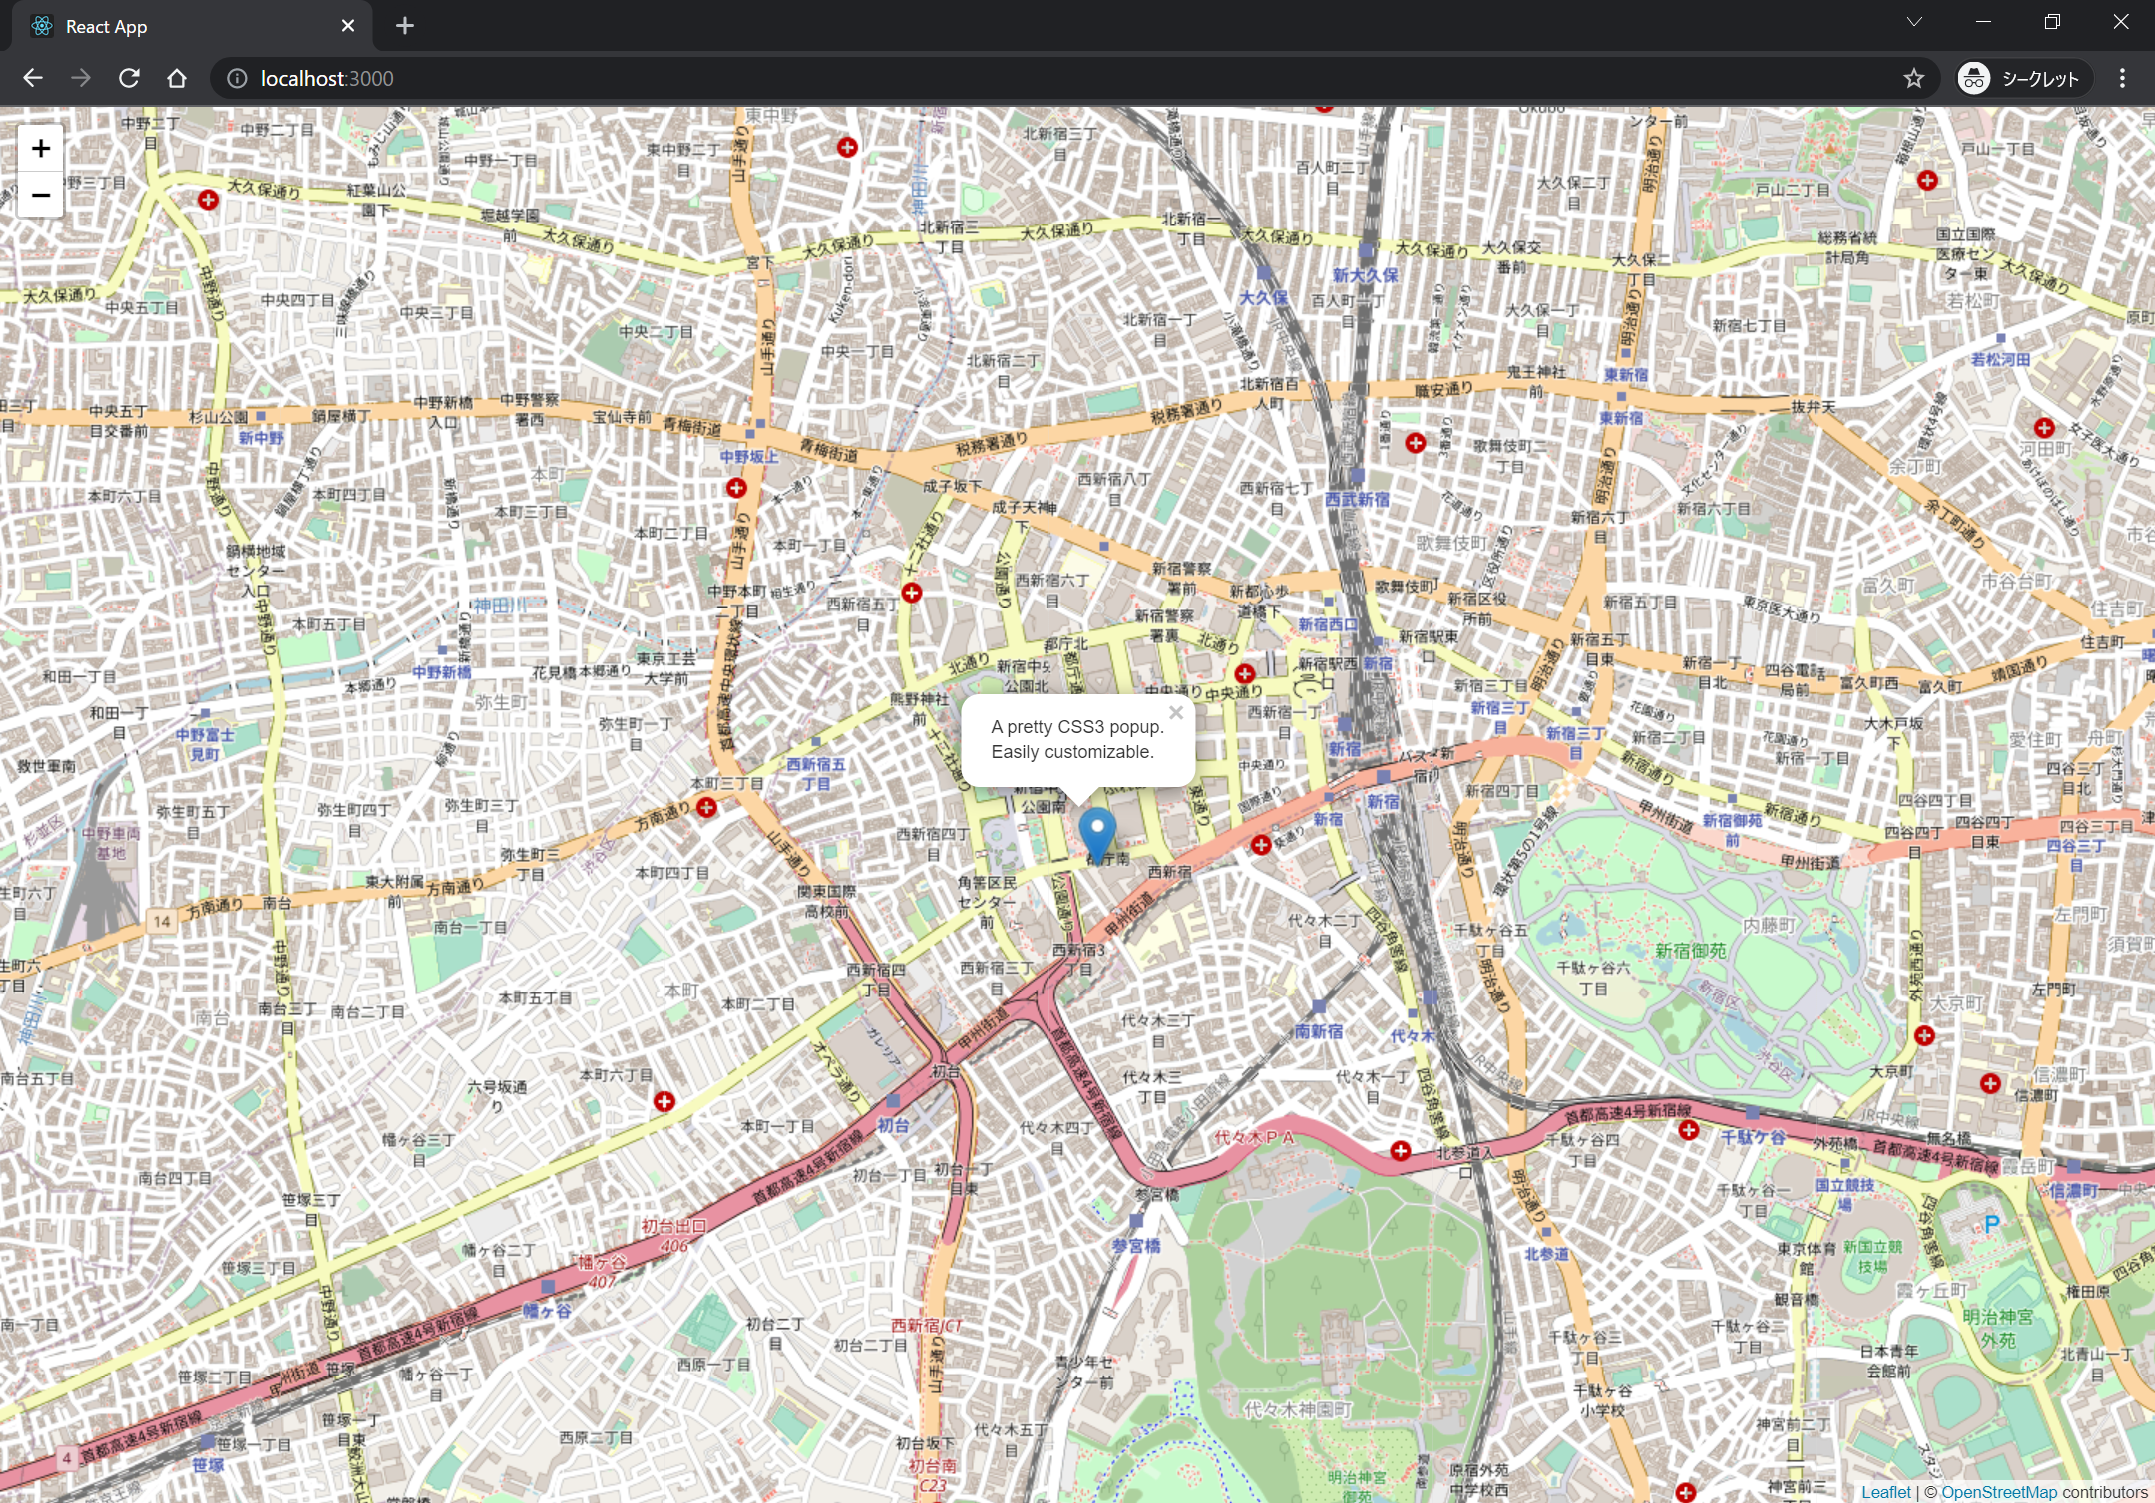
それでは、React + Leaflet + Typescript で OpenStreetMap 地図データを表示するサンプルを実装してみます。
まずは環境を作り、必要なライブラリを入れます。
npx create-react-app react-leaflet-base --template typescript --use-npm
cd react-leaflet-base

npm install leaflet react-leaflet
npm install -D @types/leaflet @types/react-leaflet
アプリを実装します。
import React from 'react';
import { MapContainer, TileLayer,Marker,Popup } from "react-leaflet";
import Leaflet, { LatLng } from "leaflet";
import "leaflet/dist/leaflet.css";
import './App.css';
import icon from "leaflet/dist/images/marker-icon.png";
import iconShadow from "leaflet/dist/images/marker-shadow.png";
function App() {
const position = new LatLng(35.688408, 139.692005)
const DefaultIcon = Leaflet.icon({
iconUrl: icon,
shadowUrl: iconShadow,
});
Leaflet.Marker.prototype.options.icon = DefaultIcon;
return (
<div className="App">
<MapContainer center={position} zoom={15} scrollWheelZoom={false}>
<TileLayer
attribution='© <a href="http://osm.org/copyright">OpenStreetMap</a> contributors'
url="https://{s}.tile.openstreetmap.org/{z}/{x}/{y}.png"
/>
<Marker position={position}>
<Popup>
A pretty CSS3 popup. <br /> Easily customizable.
</Popup>
</Marker>
</MapContainer>
</div>
);
}
export default App;
.App {
  text-align: center;
  height: 100vh;
}

.leaflet-container {
  width: 100vw;
  height: 100vh;
}
{
  "name": "react-leaflet-base",
  "version": "0.1.0",
  "private": true,
  "dependencies": {
    "@testing-library/jest-dom": "^5.11.4",
    "@testing-library/react": "^11.1.0",
    "@testing-library/user-event": "^12.1.10",
    "@types/jest": "^26.0.15",
    "@types/node": "^12.0.0",
    "@types/react": "^17.0.0",
    "@types/react-dom": "^17.0.0",
    "leaflet": "^1.7.1",
    "react": "^17.0.2",
    "react-dom": "^17.0.2",
    "react-leaflet": "^3.2.2",
    "react-scripts": "4.0.3",
    "typescript": "^4.1.2",
    "web-vitals": "^1.0.1"
  },
  "scripts": {
    "start": "react-scripts start",
    "build": "react-scripts build",
    "test": "react-scripts test",
    "eject": "react-scripts eject"
  },
  "eslintConfig": {
    "extends": [
      "react-app",
      "react-app/jest"
    ]
  },
  "browserslist": [
      ">0.2%",
      "not dead",
      "not op_mini all"
  ],
  "devDependencies": {
    "@types/leaflet": "^1.7.6",
    "@types/react-leaflet": "^2.8.2"
  }
}
以下サイトでも言及されていますが、いくつか注意点があります。
- CSS やマーカーアイコンを明示的に読み込みしないと表示されません。
- browserslist を変更し、トランスパイルの対象とするブラウザを変えることでビルドのエラーを回避する必要があります。
このようにして React で OpenStreetMap を表示することが出来ました。
オープンデータを地図上に表示
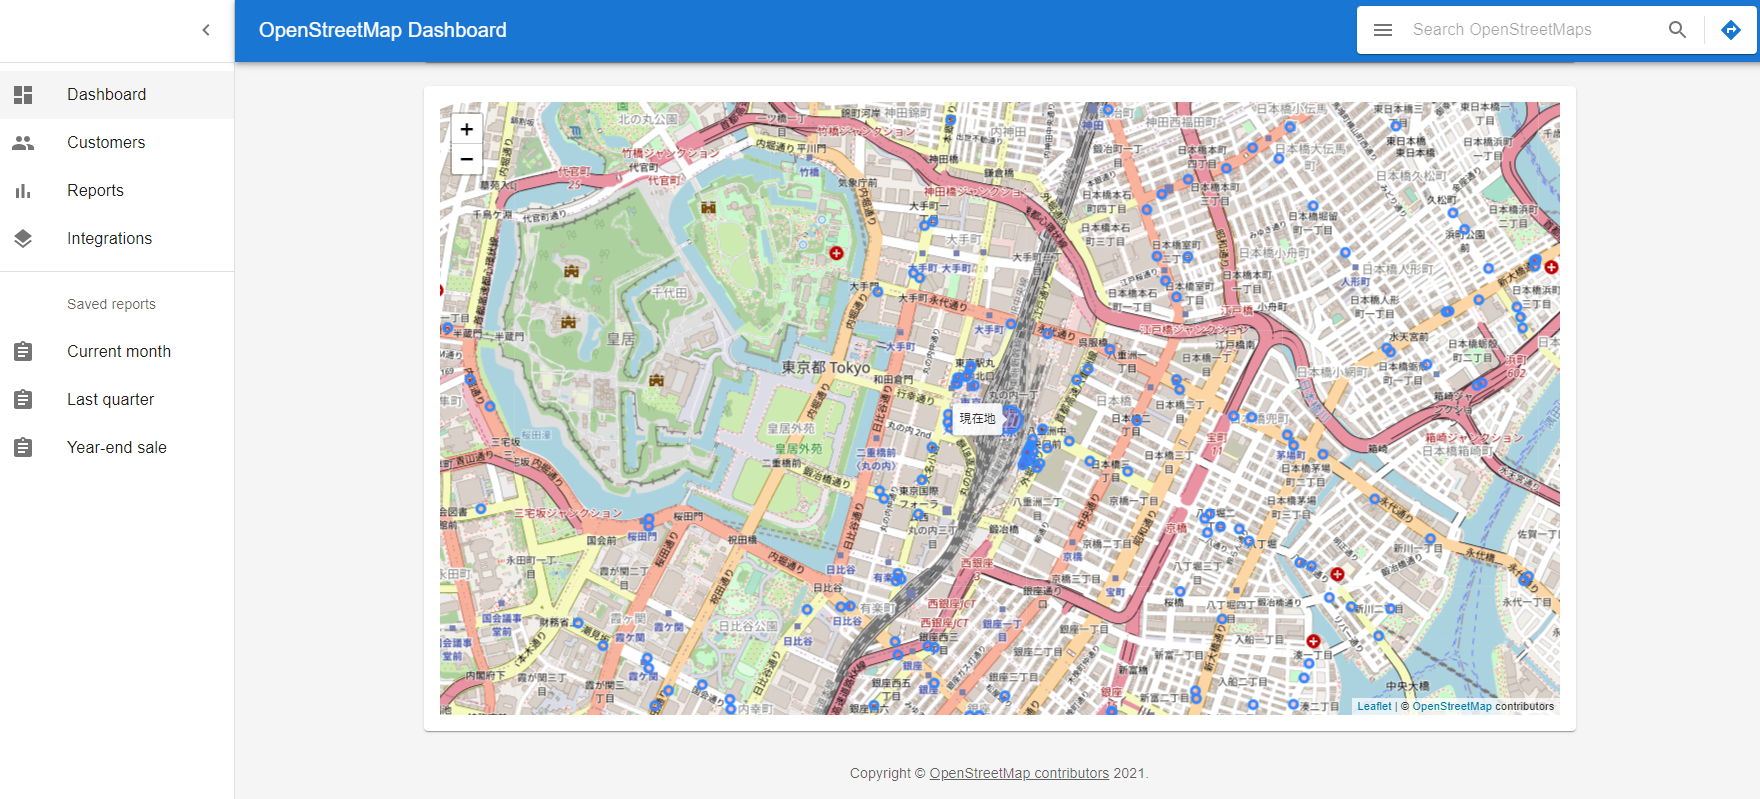
OpenStreetMap に登録されているオープンデータを取得し、地図に表示したいと思います。
具体的な実装手順は以下です。デザインは Material UI のダッシュボードデザインを利用させてもらいました。(Dashboard.tsx)
1.Leaflet で現在地の位置情報を取得(OpenStreetMap.tsx)
2.Overpass API に緯度経度を渡して、現在地周辺のバス停留所データを取得(overpass-api.ts)
3.取得したデータを Leaflet で地図に目印を表示(OpenStreetMap.tsx)
function LocationMarker(props: any) {

  const map = useMapEvents({
    click() {
      map.locate() //★1の処理
    },
    locationfound(e:LocationEvent) {
      setPosition(e.latlng)
      map.flyTo(e.latlng, map.getZoom())

      const asyncSearch = async () => {
        //★2の処理
        await search('bus_stop',new LatLng(e.latlng.lat, e.latlng.lng)).then((response:Response)=>{
            //★3の処理
            setPlaces(response.elements.map(element=>(
              (element.type === 'node'
               ? (
                <Circle key={element.id} center={new LatLng(element.lat,element.lon)} radius={15} >
                  <Popup>
                    {element.tags.name}
                  </Popup>
                </Circle>
               )
               : null
              )
            )))
          }).catch(err=>{
            console.error(err)
          }).finally(()=>{
            // console.log('finally')
        })
      }
      asyncSearch()
    },
  })
  return position === null ? null : (
    <>
      <FeatureGroup pathOptions={fillBlueOptions}>
        <Circle center={position} radius={50} >
          <Tooltip direction="auto" permanent>
            現在地
          </Tooltip>
        </Circle>
      </FeatureGroup>
      <FeatureGroup pathOptions={fillRedOptions}>
        {places} //★3の処理
      </FeatureGroup>
    </>
  )
}
//★2の処理
function search(conditions:String ,location:LatLng): Promise<Response>{
    const overpass = 'https://overpass-api.de/api/interpreter';

    const south: Number = location.lat - 0.025
    const west: Number = location.lng - 0.025
    const north: Number = location.lat + 0.025
    const east: Number = location.lng + 0.025

    const query = `(
            node
            [highway=bus_stop]
            (`+ south +`,`+west+`,`+north+`,`+east+`);
            <;
       );
       out;
    `
    const url = overpass + '?data=[out:json][timeout:30];' + query;

    return new Promise((resolve,reject)=>{
        axios.get(url.replace(/\s+/g, '')).then(result =>{
            const copyright:String = result.data.osm3s.copyright
            const elements = result.data.elements
            const response:Response = {
                status: 'ok',
                copyright,elements
            }
            resolve(response)
        }).catch(err=>{
            console.error(err)
            const copyright:String = ''
            const elements = new Array<Element>()
            const response:Response = {
                status: 'error',
                copyright,elements
            }
            reject(response)
        })
    })
}
このように現在地周辺のバス停留所を地図上にプロットすることができます。
Github にサンプルコードを掲載しています
git clone https://github.com/t-kurasawa/react-leaflet-base.git
npm install
npm run start


