概要#
PAY.JPという決済代行をしてくれるサービスが提供しているWebAPIを使ってクレジットカード決済機能を実装してみました。
このAPIを使うと、入力したカード情報をトークン化してPAY.JPに送り、その送られてきたトークンをもとにPAY.JPが決済代行をしてくれるそうです。
開発環境はJava/Mavenです。
PAY.JPのアカウント作成#
公式サイトにアクセスして「申し込む」をクリックし、アカウントを作成します。

登録後、ログインして左の「API」よりAPIキーを確認します。
pom.xmlに追加#
以下をpom.xmlに追加します。
<dependency>
  <groupId>jp.pay</groupId>
  	<artifactId>payjp-java</artifactId>
 	<version>0.4.4</version>
</dependency>
Viewの作成#
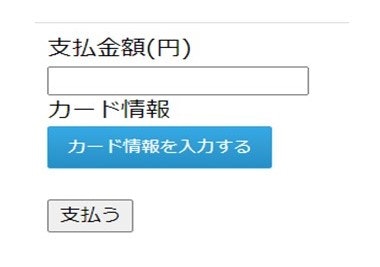
今回は入力した金額をカードで支払う機能を実装します。
<!DOCTYPE html>
<html lang="ja" xmlns:th="http://www.thymeleaf.org">
<head>
<meta charset="UTF-8">
<title>支払い</title>
</head>
<body>
<form th:action="@{/pay}" method="post">
支払金額(円)<br>
<input type="text" name="price"><br>
カード情報<br>
<script
	type="text/javascript"
	src="https://checkout.pay.jp/"
	class="payjp-button"
	data-key="pk_test_xxxxxxx"
	data-partial="true"
	data-token-name="card"
></script>
<br>
<button>支払う</button>
</form>
</body>
</html>
scriptタブを挿入するとカード情報を入力するフォームを作成することができます。
data-keyに先ほど確認したAPIキーの公開鍵を入力します。今回はテストキーを使用しています。本番環境を利用するには申請がいるみたいです。
このscriptタブは<input type="hidden" name="card">と同じ役割をしており、入力されたカード情報はトークン化されて送られます。
また今回は、data-token-name="card"によって、name="card"に変更しています。デフォルトの状態は、name="payjp-token"です。
こちらのガイドに入力フォームの詳しいカスタマイズ方法が載っているので、参考にしてみてください。
Controllerの作成#
基本は公式で公開されているGitHubに載っているコードのコピペです。pay-jp/GitHub
Payjp.apiKeyに秘密鍵をセットし、chargeMapに支払金額、日本円、カード情報をセットしています。
import java.util.HashMap;
import java.util.Map;

import org.springframework.stereotype.Controller;
import org.springframework.web.bind.annotation.RequestMapping;

import jp.pay.Payjp;
import jp.pay.model.Charge;
import jp.pay.net.RequestOptions;

@Controller
@RequestMapping("")
public class testController {

	@RequestMapping("/")
	public String index() {
		return "test";
	}

    /**pay.jpを通じてクレジット決済をするメソッド
	 * @param price 支払金額
	 * @param card トークン化されたカード情報
	 */
	@RequestMapping("/pay")
	public String creditPay(int price, String card) {

		Payjp.apiKey = "sk_test_xxxxxxxxxxxxx";

        Map<String, Object> chargeMap = new HashMap<String, Object>();
        chargeMap.put("amount", price);//支払金額をセット
        chargeMap.put("currency", "jpy");//日本円をセット
        chargeMap.put("card", card);//カード情報をセット
        try {
            Charge charge = Charge.create(chargeMap);
        } catch (Exception e) {
            e.printStackTrace();
        }

        return "complete";//決済完了画面
	}

}
実行#
無事に動かすことができました。
今回はテスト環境のため、カード番号はテスト用の番号です。テスト環境ではカード番号のみ有効性チェックを行っています。
また、先ほどの管理者ページを見てみると売上金が反映されています。

最後までご覧いただきありがとうございました。
初めての投稿ですので、間違いなどあったらご指摘いただけると幸いです!


