Laravel5.7から追加された新機能を使って、下記のようなユーザー登録の確認を促すメールを送信します。
登録したアドレス宛にメールを送信し、その中のリンクをユーザーがクリックすることで登録手続きを完了します。
![]() readouble.com: メール確認
readouble.com: メール確認
親記事
Laravel 5.7で基本的なCRUDを作る - Qiita
Userモデルを修正
 <?php

 namespace App;

 use Illuminate\Notifications\Notifiable;
-use Illuminate\Contracts\Auth\MustVerifyEmail;
+use Illuminate\Contracts\Auth\MustVerifyEmail as MustVerifyEmailContract;
 use Illuminate\Foundation\Auth\User as Authenticatable;
 use App\Notifications\CustomPasswordReset;
+use Illuminate\Auth\MustVerifyEmail;

-class User extends Authenticatable
+class User extends Authenticatable implements MustVerifyEmailContract
 {
-    use Notifiable;
+    use MustVerifyEmail, Notifiable;
DBのテーブルにカラムを追加
usersテーブルにemail_verified_atカラムを追加します。
しかし、Laravel5.7を新規インストールした場合は、マイグレーションのファイルに既に追加されています。
以前の記事をご覧ください。
$table->timestamp('email_verified_at')->nullable();
メール確認の機能を有効にする
認証関連のルートを下記のように修正します。
-Auth::routes();
+Auth::routes(['verify' => true]);
ミドルウェアverifiedを利用する
この段階で本物のメールアドレスを使ってユーザー登録すると、下記のようなメールが届きます。
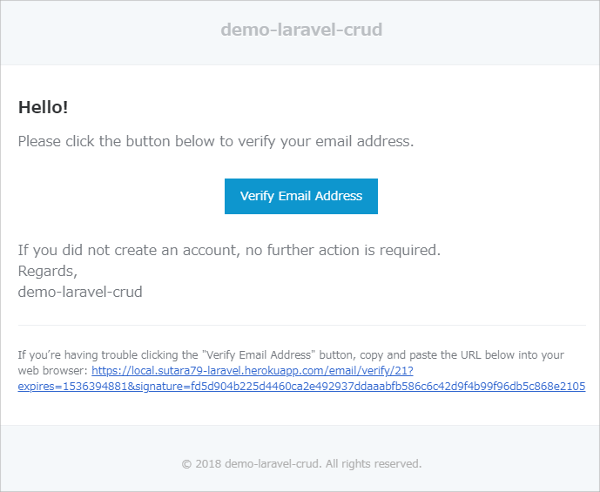
中央の水色のボタンをクリックすれば登録手続き完了となりますが、実は完了しなくても記事を投稿することができてしまいます。
これでは登録確認の意味がありません。
そこで、ミドルウェアverifiedを使います。
以前の記事では、閲覧以外のアクション(投稿、編集、削除)はログイン必須とするためにミドルウェアauthを使っていました。
このauthの代わりにverifiedを使います。
具体的には、UserControllerとPostControllerの__construct()メソッドを下記のように修正します。
authを使った記述も、コメントアウトして残しておきます。
class PostController extends Controller
{
    /**
     * 各アクションの前に実行させるミドルウェア
     */
    public function __construct()
    {
        // $this->middleware('auth')->except(['index', 'show']);
        $this->middleware('verified')->except(['index', 'show']);
    }
class UserController extends Controller
{
    /**
     * 各アクションの前に実行させるミドルウェア
     */
    public function __construct()
    {
        // $this->middleware('auth')->except(['index', 'show']);
        // 登録完了していなくても、退会だけはできるようにする
        $this->middleware('auth')->only('destroy');
        $this->middleware('verified')->except(['index', 'show', 'destroy']);
    }
これで、登録完了していない状態で記事を投稿しようとすると、下記のようにメール確認を促されるようになりました。
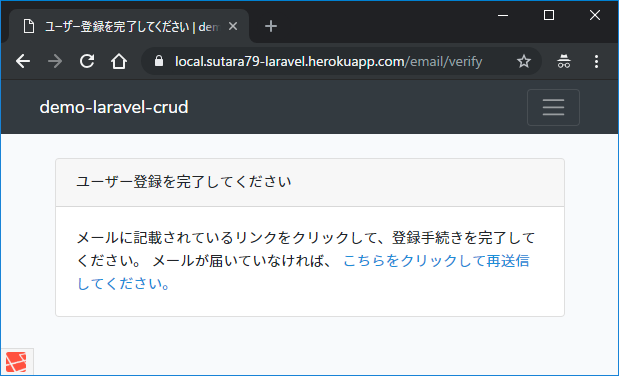
また、メール確認が完了していない段階でも退会だけはできるように、UserControllerではverifiedの除外リストにdestroyを追加しています。
そのかわり、destroyの際にはauthで認証状態を検査するようにしています。
独自のテンプレートで日本語のメールを送る
せっかくなので、以前の記事を応用して日本語のメールを送るようにします。
通知クラスを作る
下記を実行してapp/Notifications/CustomVerifyEmail.phpを生成します。
> php artisan make:notification CustomVerifyEmail
Userモデルでメソッドを上書きする
Userモデルが利用している Illuminate\Auth\MustVerifyEmail トレイトで定義されているsendEmailVerificationNotification()メソッドを上書きします。
// 忘れずにインポートすること
use App\Notifications\CustomVerifyEmail;

class User extends Authenticatable implements MustVerifyEmailContract
{
    (中略)

    /**
     * メール確認通知の送信
     *
     * @return void
     */
    public function sendEmailVerificationNotification()
    {
        $this->notify(new CustomVerifyEmail());
    }
通知クラスを編集する
Illuminate\Auth\Notifications\VerifyEmail クラスを参考にして、下記のように修正します。
// 忘れずにインポートすること
use Illuminate\Auth\Notifications\VerifyEmail;

// 拡張元を Notification ではなく VerifyEmail とする。
// そうしなければ、後述の $this->verificationUrl() を使えない。
// class CustomVerifyEmail extends Notification
class CustomVerifyEmail extends VerifyEmail
{
    (中略)

    // toMail() メソッドの中身を下記のようにする
    public function toMail($notifiable)
    {
        return (new MailMessage)
            ->subject(__('Verify Your Email Address'))
            ->view('emails.verify')
            ->action(__('Verify Email Address'), $this->verificationUrl($notifiable));
    }
メールのビューを作る
上の->view('emails.verify')という記述に合わせて、verify.blade.phpを新規作成します。
{{-- ユーザー登録確認用のメール --}}
<h3>
    <a href="{{ config('app.url') }}">{{ config('app.name') }}</a>
</h3>
<p>
    {{ __('Please click the link below to verify your email address.') }}<br>
    {{ __('If you did not create an account, no further action is required.') }}
</p>
<p>
    <a href="{{ $actionUrl }}">{{ $actionText }}</a>
</p>
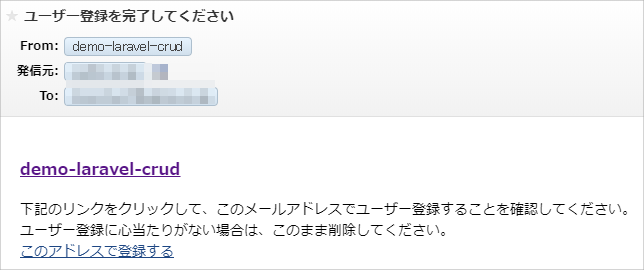
なお、それぞれの文章の翻訳は、すでに resources/lang/ja.json に記載しています。
動作確認
- Laravelアプリの表示言語を日本語に切り替えます。
- 本物のメールアドレスでユーザー登録します。
- 下記のような日本語のメールが届けば成功です。