deep neural networkではlayerが多層になるほど、そのモデルの表現能力が増します。
しかし、多層になるほどoverfittingのリスクも高くなります。
Modelの表現能力を維持したまま、parameterの自由度に制限を与えることでoverfittingのリスクを減らすことが行われます。
その手法の一つがweight decay(重み減衰)です。
weightの更新式は下記のように書かれます。
w \leftarrow w -\eta \frac{\partial C(w)}{\partial w} - \eta \lambda w
上記式は何がしたいのか少しわかりづらいですが、実際はcost functionを下記のようにしたものから来ています。
\tilde C(w) = C(w) + \frac{\lambda}{2}||w||^2
これはつまり、cost functionにL2 regularization項をつけたものです。
この項によりweightの値は小さくなります。
なので、実際に実装するときはL2 regularizationの項をcostに加えることになります。
通常はbiasにはL2 regularizationを適応しません。
これはneuronのweightとbiasの役割の違いから来ています。
weightは入力を選択する役割なので、優先順位さえ変わらなければ値が小さくなっても構いませんが、
biasは閾値の役割のため値が大きくなければならないこともあるためです。
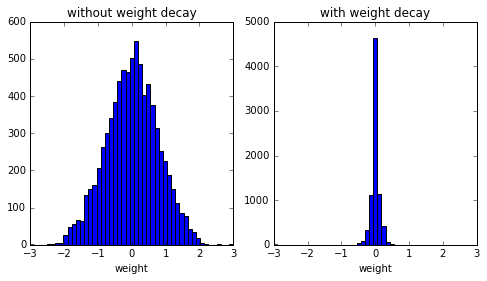
実際にweight decayありとweight decayなしで学習させてweightのヒストグラムを見てみると下図のようになります。
左がweight decayなし、右がweight decayありです。
weightが小さくなっているのがわかると思います。
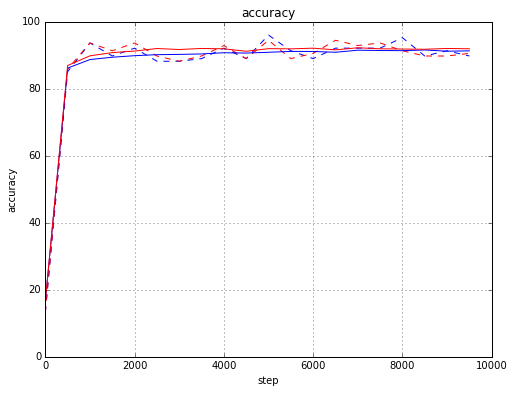
accuracyは下記のようになりました。
青がweight decayなし、赤がweight decayあり、点線がtrainingデータ、実線がvalidationデータの結果です。
import tensorflow as tf
import numpy as np
import scipy as sp
import matplotlib.pyplot as plt
from tensorflow.examples.tutorials.mnist import input_data

mnist = input_data.read_data_sets("./data/mnist/", one_hot=True)

image_size = 28
n_labels = 10
n_batch  = 128
n_train  = 10000
beta = 0.001

def accuracy(y, y_):
    return 100.0 * np.sum(np.argmax(y, 1) == np.argmax(y_, 1)) / y.shape[0]

with tf.variable_scope("slp"):
    x  = tf.placeholder(tf.float32, shape=(n_batch, image_size*image_size))
    y_ = tf.placeholder(tf.float32, shape=(n_batch, n_labels))
    w0 = tf.get_variable("w0", [image_size * image_size, n_labels], initializer=tf.truncated_normal_initializer(seed=0))
    b0 = tf.get_variable("b0", [n_labels], initializer=tf.constant_initializer(0.0))

    w1 = tf.get_variable("w1", [image_size * image_size, n_labels], initializer=tf.truncated_normal_initializer(seed=0))
    b1 = tf.get_variable("b1", [n_labels], initializer=tf.constant_initializer(0.0))

    y0 = tf.matmul( x, w0 ) + b0
    y1 = tf.matmul( x, w1 ) + b1

valid_data = mnist.validation.images
valid_labels = mnist.validation.labels
test_data = mnist.test.images
test_labels = mnist.test.labels
vx = tf.constant(valid_data)
vy_ = tf.constant(valid_labels)
tx = tf.constant(test_data)
ty_ = tf.constant(test_labels)

loss0 = tf.reduce_mean( tf.nn.softmax_cross_entropy_with_logits( y0, y_))
optimizer0 = tf.train.GradientDescentOptimizer(0.5).minimize(loss0)

loss1 = tf.reduce_mean( tf.nn.softmax_cross_entropy_with_logits( y1, y_) + beta * tf.nn.l2_loss(w1))
optimizer1 = tf.train.GradientDescentOptimizer(0.5).minimize(loss1)

train_prediction0 = tf.nn.softmax(y0)
valid_prediction0 = tf.nn.softmax(tf.matmul(vx, w0) + b0)
test_prediction0  = tf.nn.softmax(tf.matmul(tx, w0) + b0)

train_prediction1 = tf.nn.softmax(y1)
valid_prediction1 = tf.nn.softmax(tf.matmul(vx, w1) + b1)
test_prediction1  = tf.nn.softmax(tf.matmul(tx, w1) + b1)

sess = tf.InteractiveSession()
# sess = tf.Session()

init = tf.initialize_all_variables()
sess.run(init)
result_accuracy = []

for step in xrange(n_train):
    bx, by = mnist.train.next_batch(n_batch)
    _, L0, tp0 = sess.run([optimizer0, loss0, train_prediction0], feed_dict={x: bx, y_: by})
    _, L1, tp1 = sess.run([optimizer1, loss1, train_prediction1], feed_dict={x: bx, y_: by})
    if step % 500 == 0:
        ac_wo_decay_train = accuracy(tp0, by)
        ac_wo_decay_valid = accuracy(valid_prediction0.eval(), valid_labels)
        ac_wt_decay_train = accuracy(tp1, by)
        ac_wt_decay_valid = accuracy(valid_prediction1.eval(), valid_labels)
        ac = {'step' : step, 'wo_decay' : {'training' : ac_wo_decay_train, 'validation' : ac_wo_decay_valid}, 'wt_decay' : {'training' : ac_wt_decay_train, 'validation' : ac_wt_decay_valid}}
        result_accuracy.append(ac)
        print "step = %d, train accuracy0: %.2f, validation accuracy0: %.2f, train accuracy1: %.2f, validation accuracy1: %.2f" % (step, ac_wo_decay_train, ac_wo_decay_valid, ac_wt_decay_train, ac_wt_decay_valid)

print "test accuracy0: %.2f" % accuracy(test_prediction0.eval(), test_labels)
print "test accuracy1: %.2f" % accuracy(test_prediction1.eval(), test_labels)

fig,axes = plt.subplots(ncols=2, figsize=(8,4))
axes[0].hist(w0.eval().flatten(), bins=sp.linspace(-3,3,50))
axes[0].set_title('without weight decay')
axes[0].set_xlabel('weight')
axes[1].hist(w1.eval().flatten(), bins=sp.linspace(-3,3,50))
axes[1].set_title('with weight decay')
axes[1].set_xlabel('weight')
fig.show()

tr_step = [ac['step'] for ac in result_accuracy]
ac_training_wo_decay = [ac['wo_decay']['training'] for ac in result_accuracy]
ac_training_wt_decay = [ac['wt_decay']['training'] for ac in result_accuracy]
ac_validation_wo_decay = [ac['wo_decay']['validation'] for ac in result_accuracy]
ac_validation_wt_decay = [ac['wt_decay']['validation'] for ac in result_accuracy]

fig = plt.figure(figsize=(8,6))
ax = fig.add_subplot(1,1,1)

ax.plot(tr_step, ac_training_wo_decay, color='blue', linestyle='dashed')
ax.plot(tr_step, ac_training_wt_decay, color='red', linestyle='dashed')
ax.plot(tr_step, ac_validation_wo_decay, color='blue', linestyle='solid')
ax.plot(tr_step, ac_validation_wt_decay, color='red', linestyle='solid')
ax.set_title('accuracy')
ax.set_xlabel('step')
ax.set_ylabel('accuracy')
ax.grid(True)
ax.set_xlim((0, 10000))
ax.set_ylim((0, 100))
fig.show()