はじめに
Oracle Cloud には、Oracle Cloud Infrastructure (略してOCI) とよばれる IaaS サービスが存在しています。仮想インスタンスを始めとしたさまざまなIaaSサービスを提供しています。
今回は、OCIサービスをCLI上で操作する oci-cli をLinux環境上にインストールする手順を確認します。
前提パッケージ
pip が前提で必要なので、pipをinstallします
sudo apt-get install -y python3-pip
また、oci cli はResponseがJSONとなっているため、JSONをパースして便利に扱うことが出来る jq もinstallします
sudo curl -o /usr/local/bin/jq -L https://github.com/stedolan/jq/releases/download/jq-1.5/jq-linux64
sudo chmod +x /usr/local/bin/jq
Installation
mkdir ~/oci-cli
cd ~/oci-cli
wget https://raw.githubusercontent.com/oracle/oci-cli/master/scripts/install/install.sh
chmod u+x ~/oci-cli/install.sh
bash -c '~/oci-cli/install.sh --accept-all-defaults'
fish を使用している場合の設定(bashの場合は不要)
ociコマンドのpath設定
fish を使用している場合は、oci コマンドの path 設定と、コマンド補完が効かないため、この設定を行います
string trim '
set PATH /home/sugi/bin $PATH
' >> ~/.config/fish/config.fish
ociコマンドのfish用補完設定
こちらを参照し、fish-oci-completions を設定をする
mkdir -p ~/.config/fish/completions
cd ~/.config/fish
git clone https://github.com/Sugi275/fish-oci-completions.git
ln -s ../fish-oci-completions/oci.fish completions/
再度 fish shell を開きなおすと、補完が効くようになる
oci cli の設定
秘密鍵/公開鍵の作成
oci setup keysコマンドを使用して、秘密鍵/公開鍵を作成します。ホームディレクトリは以下の .oci ディレクトリ直下に鍵が作成されます
実行例
> oci setup keys
16.8sEnter a passphrase for your private key (empty for no passphrase):
Public key written to: /home/sugi/.oci/oci_api_key_public.pem
Private key written to: /home/sugi/.oci/oci_api_key.pem
Public key fingerprint: himitu


    If you haven't already uploaded your public key through the console,
    follow the instructions on the page linked below in the section 'How to
    upload the public key':

        https://docs.us-phoenix-1.oraclecloud.com/Content/API/Concepts/apisigningkey.htm#How2
鍵の確認
> ls -la ~/.oci/
total 4
drwx------ 1 sugi sugi  512 Jan 20 23:04 ./
drwxr-xr-x 1 sugi sugi  512 Jan 20 23:04 ../
-rw------- 1 sugi sugi 1675 Jan 20 23:04 oci_api_key.pem
-rw------- 1 sugi sugi  451 Jan 20 23:04 oci_api_key_public.pem
公開鍵の登録
Oracle Cloud Infrastructure へ移動
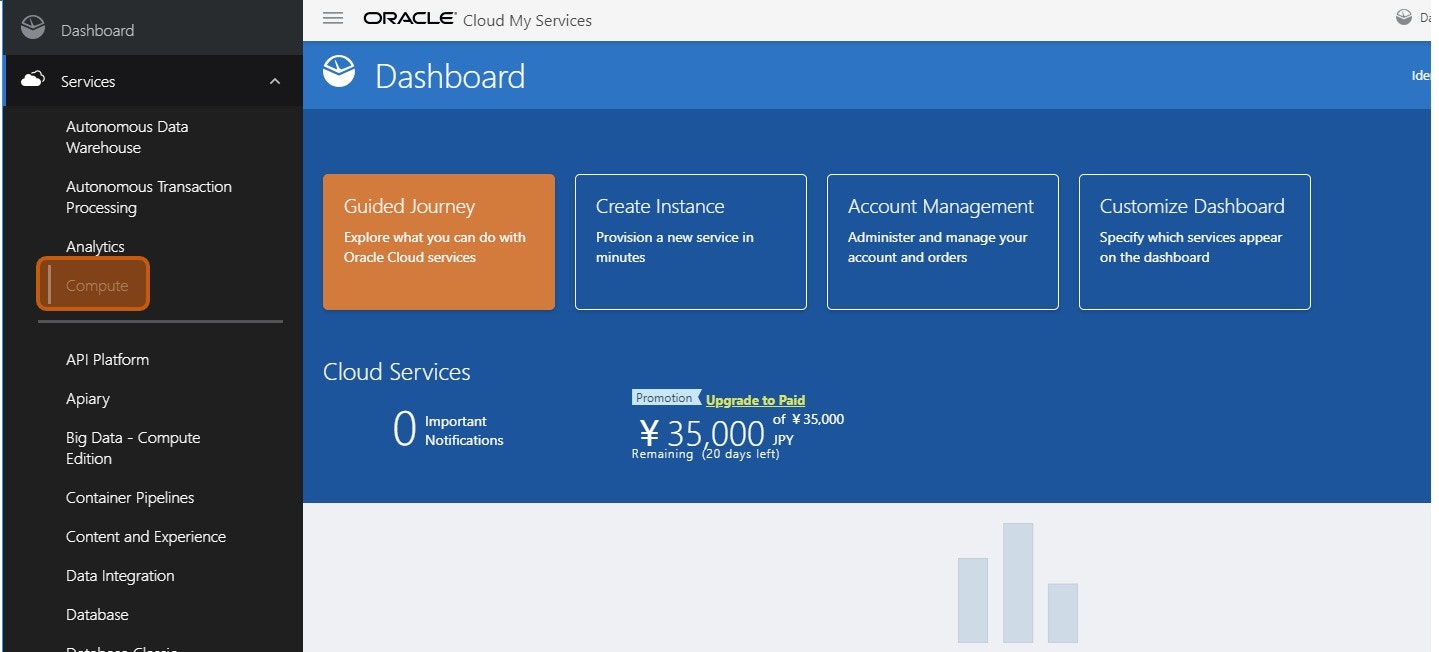
Oracle Cloud の Dashboard でメニューを開いて、Compute を選択
Userへ公開鍵を登録する
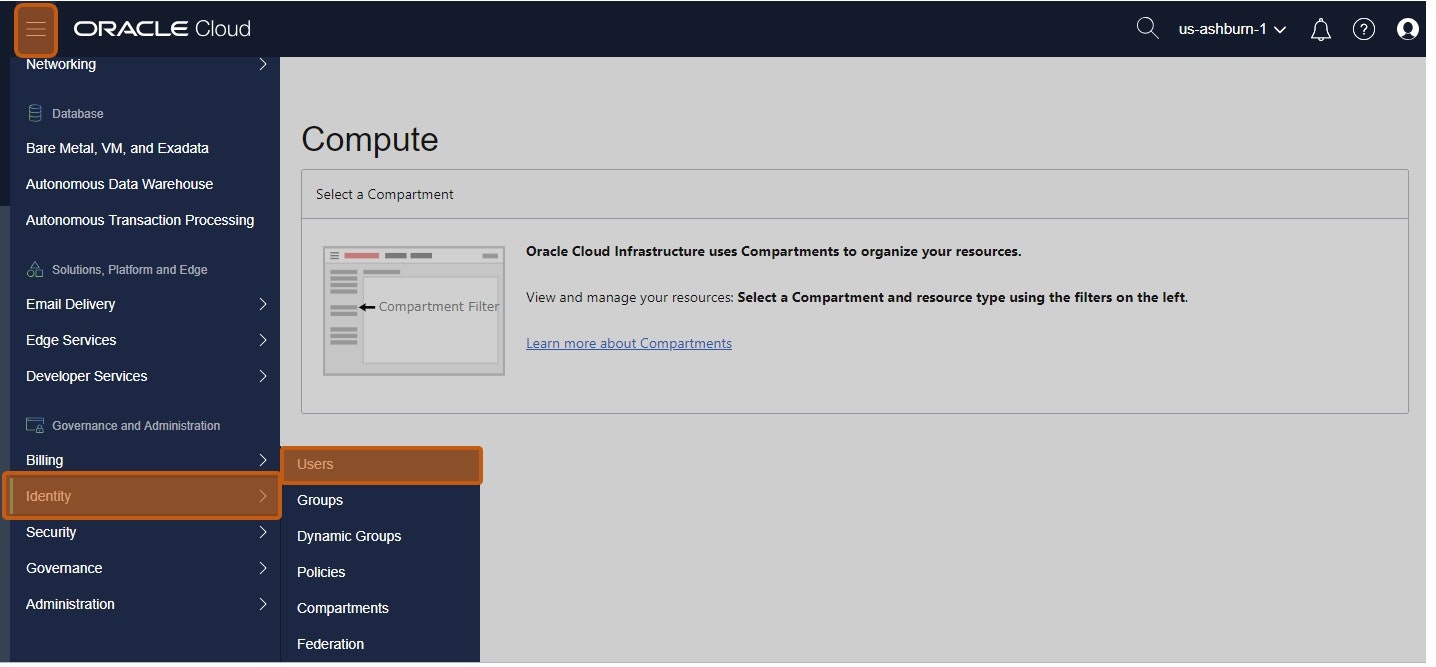
メニューから、Identity → Users を選択します。
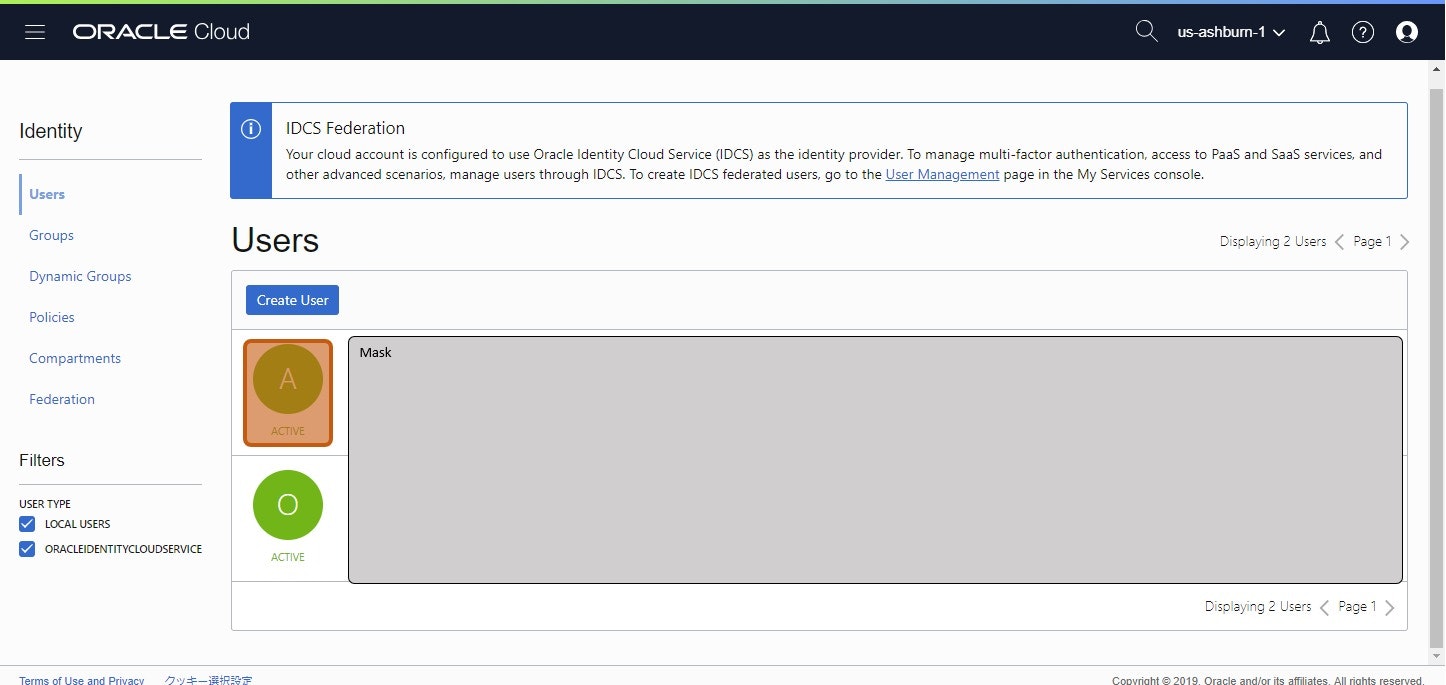
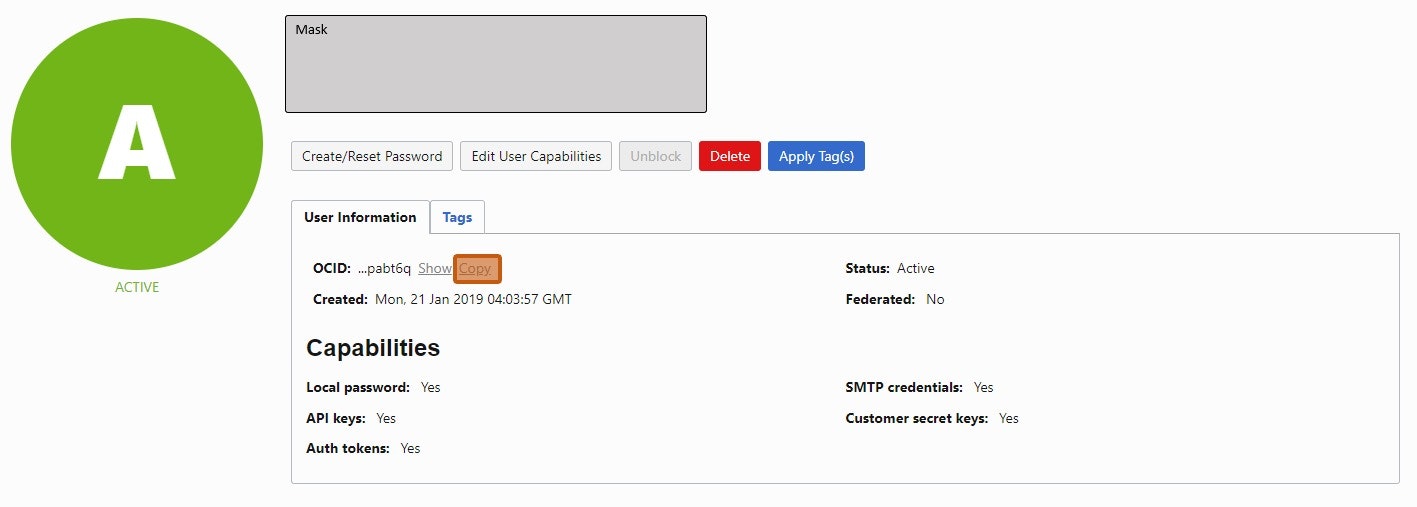
ユーザの詳細画面に移動します。
Add Public Key を選択します
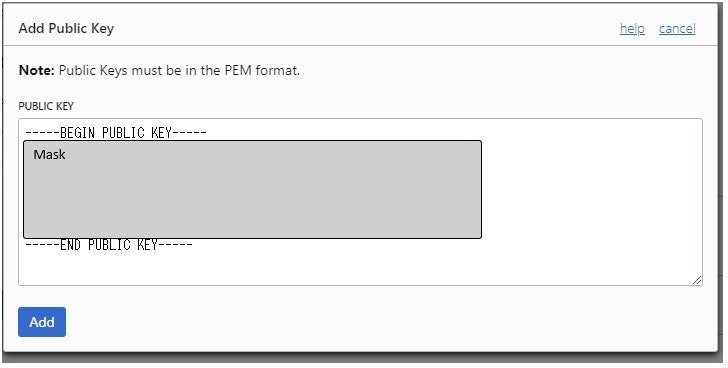
oci cli で作成した公開鍵の中身を確認して、コピーする
> cat .oci/oci_api_key_public.pem
-----BEGIN PUBLIC KEY-----
secret dayo
secret dayo
secret dayo
secret dayo
secret dayo
secret dayo
secret dayo
-----END PUBLIC KEY-----
以下のように入力して、Add ボタンを押します
登録が完了されると、鍵一覧にFingerprint とともに表示されます
設定ファイルの作成
config
oci コマンドを実行するためには、Tenancyの情報、操作するユーザの情報が必要になります。
Oracle Cloud Infrastructure の WebUI から以下の情報を取得して、oci コマンドが実行できるターミナルへ設定ファイルを追加します。
まずは、以下の情報を確認します
- Tenancy の OCID (Oracle Cloud Identifier。AWSでいうとarnみたいな概念)
- Tenancy の Home Region
- User の OCID
Tenancy の情報は、OCIのメニューから Administration - Tenancy Details を選択すると確認できます。
User の情報は、OCIのメニューから、 Administration - Users を選択すると確認できます。
ociコマンドを実行したいターミナル上で、さきほど確認した情報を付与してconfigファイル $HOME/.oci/config を作成します
cat <<'EOF' > $HOME/.oci/config
[DEFAULT]
key_file=~/.oci/oci_api_key.pem
region=us-ashburn-1
tenancy=ocid1.tenancy.oc1..XXXXXXXXXXXXXXXXXXXXXXXXXXXXXXXXXXXXXXXXXXXXXXXXXXXXXXXXXXXX
user=ocid1.user.oc1..XXXXXXXXXXXXXXXXXXXXXXXXXXXXXXXXXXXXXXXXXXXXXXXXXXXXXXXXXXXX
fingerprint=XX:XX:XX:XX:XX:XX:XX:XX:XX:XX:XX:XX:XX:XX:XX:XX
EOF
chmod 600 $HOME/.oci/config
vim $HOME/.oci/config
memo fish で疑似ヒアドキュメント
string trim '
[DEFAULT]
key_file=~/.oci/oci_api_key.pem
region=us-ashburn-1
tenancy=ocid1.tenancy.oc1..XXXXXXXXXXXXXXXXXXXXXXXXXXXXXXXXXXXXXXXXXXXXXXXXXXXXXXXXXXXX
user=ocid1.user.oc1..XXXXXXXXXXXXXXXXXXXXXXXXXXXXXXXXXXXXXXXXXXXXXXXXXXXXXXXXXXXX
fingerprint=XX:XX:XX:XX:XX:XX:XX:XX:XX:XX:XX:XX:XX:XX:XX:XX
' >> ~/.oci/config
作成したファイルのパーミッションを変更します。ociコマンドはセキュリティのため、configファイルのパーミッションは厳しく制限されているようです
chmod 600 ~/.oci/config
コマンドが正常に実行できるか確認するために、oci の IAM 上に存在する User 一覧を取得します
oci iam user list --all
JSONでなんらかの値が返却されていれば、設定が正常に完了できることを確認できます
Profile名を指定してcli実行
oci cli hoge hgoe --profile profilename
oci-cli-rc
Oracle Cloud Infrastructure には、他のPublic Cloud にはあまり見られない、compartment という概念があります。これは、1個のテナントの中でさらに分割する概念になっています。
Default では root compartment が作成されており、何も意識していないとこれを利用していることになっています。oci-cliを使用するときに、compartment の OCID を指定する必要があります。root compartment の OCID を確認しましょう。
OCIのメニューから、Identity - Compartments を選択すると表示されます。
以下のコマンドで、oci cli 用の rcファイルひな形を出力します。 ~/.oci/oci_cli_rc にファイルが出力されます
oci setup oci-cli-rc
~/.oci/oci_cli_rcファイルを編集して、DefaultのCompartment を記載します
vim ~/.oci/oci_cli_rc
以下の文字列を記載します
Tenancy を操作する場合は、Tenancy OCID を入れる
[DEFAULT]
compartment-id = <コンパートメントのOCID>
以下のコマンドを実行して、エラーが出ないことを確認します。「compartment id が指定されていない」
> oci compute instance list
memo OCI CLI のバージョンアップ
cd ~/oci-cli
rm -f install.sh
rm -rf /home/ubuntu/lib/oracle-cli
wget https://raw.githubusercontent.com/oracle/oci-cli/master/scripts/install/install.sh
chmod u+x ~/oci-cli/install.sh
bash -c '~/oci-cli/install.sh --accept-all-defaults'
参考URL
公式Document
GitHub
