以下の続きです。
Polymer > Polymer3 > Polymer element その1 - Qiita
Step 3: プロパティとデータバインディング
この章ではプロパティを追加していきます。
ここも、3つの内ステップから成ってます。
- プロパティの作成
- プロパティとデータバインディング
- HTML属性プロパティの同期
1. プロパティの作成
toggleIconプロパティをtemplateメソッドの下に作成します。
static get properties() {
  return {
    toggleIcon: {
      type: String
    }
  };
}
以下のようになります。
class IconToggle extends PolymerElement {
  static get template() {
    略
  }
  static get properties () {
    return {
      toggleIcon: {
        type: String
      }
    };
  }
  constructor() {
    super();
  }
}
2. プロパティとデータバインディング
<iron-icon >のアイコンを、先程作ったプロパティとバインド(接続)します。
[[ ]] でくくることでプロパティとバインド出来ます。
<iron-icon icon="polymer"></iron-icon>
↓
<iron-icon icon="[[toggleIcon]]"></iron-icon>
ここでリロードしてみます。
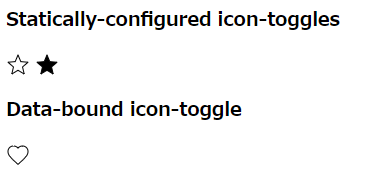
アイコンが☆に変わりましたね。
!?ちょっと待って
☆ってどこで設定したっけ?と不思議に思ったあなた、
demo/demo-element.jsを見てください。
icon-toggleのプロパティtoggle-iconに対して初期値starが指定されてます。
<icon-toggleの toggle-icon="star" pressed></icon-toggle>
同様に下のほうのアイコンには、favoritが指定されてます。
他のアイコンでも試してみてください。例えば、add、やmenu、settingsなどで。
<icon-toggle toggle-icon="add"></icon-toggle>
3. HTML属性プロパティの同期
host([pressed])についてこの章で説明します。
この章では、pressedプロパティを作成します。
pressed プロパティを追加します。
pressed: {
  type: Boolean,
  value: false,
  notify: true,
  reflectToAttribute: true
},
プロパティ追加後は以下のようになります。
class IconToggle extends PolymerElement {
  static get template() {
    ...
  }
  static get properties () {
    return {
      toggleIcon: {
        type: String
      },
      pressed: {
        type: Boolean,
        value: false,
        notify: true,
        reflectToAttribute: true
      }
    };
  }
  constructor() {
    ...
  }
}
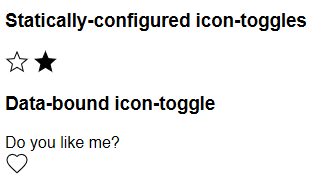
リロードすると以下のようになっていると思います。
pressedプロパティができたことで、demo-element.jsの _messageが反応してDo you like me?が表示されています。
プロパティ説明
- type:プロパティの型
- value:デフォルト値
- notify: 変更通知。trueにすることで変更がPolymerに通知されます。
- reflectToAttribute: 属性を更新するか否か。
Step 4: 入力処理
2つの内ステップから成ってます。
- イベントの登録
- イベントから呼ばれる関数の登録
それでは見ていきます。
1. イベントの登録
以下のようにコンストラクタにaddEventListenerを追加します。
toggle関数を呼びます。
constructor() {
  super();
  this.addEventListener('click', this.toggle.bind(this));
}
これで、custom-elementにと同時にクリックイベントが登録されます。
が、toggle関数がまだ定義されてないのでこれから作成していきます。
2. イベントから呼ばれる関数の登録
toggle関数を、constructorの下位置に作成します。
toggle() {
  this.pressed = !this.pressed;
}
以下のようになります。
class IconToggle extends PolymerElement {
  static get template() {
    ...
  }
  static get properties() {
    ...
  }
  constructor() {
    ...
  }
  toggle() {
    this.pressed = !this.pressed;
  }
注
- イベントリスナを追加するには、
addEventListenerメソッドを使用します。 - コンストラクタは、イベントリスナを追加するのに適しています。
- コールバックのように引数として渡される関数の中から、参照元のデータを参照するときには、scope(範囲)に注意してください。
- 上記のコードでは、this.toggle.bind(this)をバインドしてスコープを処理しましたが、代わりにES6アロー関数を使用して処理できます。
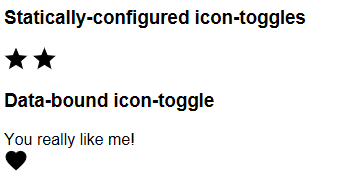
icon-toggle.jsを保存し、デモをリロードしてください。 ボタンを押して、押した状態と押していない状態を切り替えることができるはずです。
もしpolymer-cliが止まっていたら、以下コマンドを実行します。
polymer serve
Step 5: エレメントスタイルとカスタムCSS
- カスタムCSSプロパティを使用してスタイルを作成します.
- カスタムプロパティの値を設定します
1. カスタムCSSプロパティを使用してスタイルを作成します.
icon-toggle.jsの<style>を編集して、fillとstrokeをカスタムプロパティに変更します。
fill: rgba(0,0,0,0);
↓
fill: var(--icon-toggle-color, rgba(0,0,0,0));
stroke: currentcolor;
↓
stroke: var(--icon-toggle-outline-color, currentcolor);
以下のようになります。
<style>
  :host {
    display: inline-block;
  }
  iron-icon {
    fill: var(--icon-toggle-color, rgba(0,0,0,0));
    stroke: var(--icon-toggle-outline-color, currentcolor);
  }
  :host([pressed]) iron-icon {
    fill: var(--icon-toggle-pressed-color, currentcolor);
  }
</style>
注意
- A custom property name must always start with two dashes (--).
- カスタムプロパティの名前は--(2つのダッシュ)で始まる必要があります。
- var()関数でカスタムプロパティの値にアクセスします。
- var()の第2引数にデフォルト値を指定できます。
2. カスタムプロパティの値を設定します
demo/demo-element.jsの<style>:hostに、カスタムプロパティをセットします。
CSSはCSSルールを使用してカスタムプロパティに値を割り当てます。
例えば以下のようにです。
--icon-toggle-color: lightgrey;
CSSをセット後は以下になります。
<style>
  :host {
    font-family: sans-serif;
  }
</style>
  ↓
<style>
  :host {
    font-family: sans-serif;
    --icon-toggle-color: lightgrey;
    --icon-toggle-outline-color: black;
    --icon-toggle-pressed-color: red;
  }
</style>
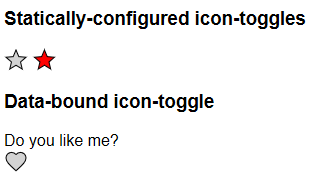
実行すると色がわかりました。
これで、custom-elementのCSS を呼び出し側から制御する事が可能になりました。
ドキュメントレベル(htmlドキュメント)でのカスタムプロパティのセット
ドキュメントレベル(例えばindex.html)でカスタムプロパティをセットすることで、アプリケーション全体のテーマを作成することができます。
これを行う1つの方法は、ポリマーレベルの外部で、ポリマー要素の外にカスタムプロパティを定義することです。
カスタムプロパティはほとんどのブラウザに組み込まれていないため、Polymer要素の外側で使用する場合は、特別なcustom-styleタグを使用する必要があります。
demo / index.htmlの<head>タグの中に次のコードを追加します。
<head>
  ...
  <custom-style>
    <style>
      /* Define a document-wide default */
      html {
        --icon-toggle-outline-color: red;
      }
      /* Override the value specified inside demo/demo-element.js */
      demo-element {
        --icon-toggle-pressed-color: blue;
      }
      /* This rule does not work! */
      body {
        --icon-toggle-color: purple;
      }
    </style>
  </custom-style>
</head>
Key information:
-
htmlセレクタは、demo/index.htmlのルートHTMLドキュメント要素と一致します。demo/index.htmlで定義されたカスタムプロパティ値はデフォルトとして機能し、スコープ内の要素に継承されます。
-
<custom-style>定義したカスタムプロパティはcustom-element内の:hostセレクタよりも優先されます。 この事から、custom- element内で定義されているカスタムプロパティの値を、custom-elementのコードを変更することなく指定できます。 -
カスタムプロパティは、htmlセレクタまたはPolymerカスタム要素と一致するルールセットでのみ定義できます。 これは、カスタムプロパティのPolymer実装の制限です。
-
要素は、
<custom-style>で定義されたセレクタの<custom-style>と同じ文書スコープ内にある必要があります。 別の要素のshadow DOM内の要素は、メイン文書スコープ内にありません。
For example
たとえば、以下の図では、<demo-element>はdemo/index.htmlの<custom-style>と同じスコープにありますが、<iron-icon>と<icon-toggle>は同じではありません。
demo/index.html DOM tree
<html>
  <demo-element>
    #shadow-root
      <icon-toggle>
        #shadow-root
          <iron-icon>
上記のDOMツリーを使用すると、次のコードサンプルのセレクタで一致が見つかります。
demo/index.html
<custom-style>
  <style>
    html { ... }
    demo-element { ... }
  </style>
</custom-style>
<demo-element></demo-element>
ただし、次のコードサンプルのセレクタでは一致が見つかりません。
demo/index.html
<custom-style>
  <style>
    iron-icon { ... }
    icon-toggle { ... }
  </style>
</custom-style>
<demo-element></demo-element>
詳細については、カスタムCSSプロパティに関するドキュメントを参照してください。
build
- Update Polymer CLI (npm install -g polymer-cli@next).
- Create polymer.json in your top-level project folder.
- From your top-level project folder, run polymer build.
Update Polymer CLI
npm install -g polymer-cli@next
polymer.json
add a polymer.json
※IE11でも動作するようにするには、以下の内容にする。
{
  "npm": true,
  "lint": {
    "rules": ["polymer-3"]
  },
  "extraDependencies": [
    "node_modules/@webcomponents/webcomponentsjs/*.js",
    "!node_modules/@webcomponents/webcomponentsjs/gulpfile.js",
    "node_modules/@webcomponents/webcomponentsjs/bundles/*.js"
  ],
  "builds": [
    {
      "name": "default",
      "js": {
        "minify": true,
        "compile": true,
        "transformModulesToAmd": true
      },
      "css": {
        "minify": true
      },
      "html": {
        "minify": false
      },
      "bundle": false,
      "addServiceWorker": false,
      "addPushManifest": false,
      "preset": "es5-bundled"
    }
  ]
}
Build
polymer build
- Polymer 2.0 > IE11 > IE11でPolymer 2.0は動く - Qiita
- Polymer > Polymer3 > Polymer element その1 - Qiita
- Polymer > Polymer3 > Polymer element その2 - Qiita
Next steps
-
Polymer CLIを使用して Element プロジェクトを作成
-
Polymer CLIを使用して アプリケーションプロジェクトを作成して、Polymerライブラリ・アプリケーションを構築。
以上
ソースは以下に保存しました。
sugasaki/polymer-3-first-element-tutorial
よいPolymerライフを!


