iOS
-
Custom Controls in the Xamarin Designer for iOS
https://developer.xamarin.com/guides/ios/user_interface/designer/ios_designable_controls_overview/ -
Walkthrough - Using Custom Controls with the Xamarin Designer for iOS
https://developer.xamarin.com/guides/ios/user_interface/designer/ios_designable_controls_walkthrough/
クラス定義の例
UIButtonを継承して、枠線ありのボタンを作ってみる。
using System;
using System.ComponentModel;
using Foundation;
using UIKit;
using CoreGraphics;

namespace MyApp.iOS
{
	[Register("BorderButton"), DesignTimeVisible(true)]
	public class BorderButton : UIButton
	{
		[Export("BorderRadius"), Browsable(true)]
		public nfloat BorderRadius { get; set; }

		[Export("BorderWidth"), Browsable(true)]
		public nfloat BorderWidth { get; set; }

		[Export("BorderColor"), Browsable(true)]
		public UIColor BorderColor { get; set; }

		public BorderButton() : base() { }
		public BorderButton(IntPtr handle) : base(handle) { }

		public override void Draw(CGRect rect)
		{
			this.Layer.CornerRadius = this.BorderRadius;
			this.Layer.BorderWidth = this.BorderWidth;
			this.Layer.BorderColor = this.BorderColor.CGColor;
			base.Draw(rect);
		}
	}
}
各行の解説
[Register("BorderButton"), DesignTimeVisible(true)]
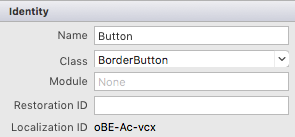
Registerを設定すると、Classにカスタムコントロールのクラスを指定できるようになる。
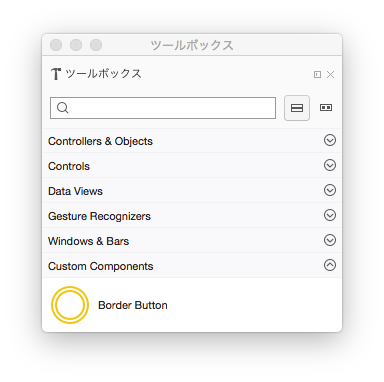
DesignTimeVisibleを設定して、かつコンストラクタを定義すると、ツールボックスに"Custom Components"が出現する。
public BorderButton() : base() { }
public BorderButton(IntPtr handle) : base(handle) { }
Exportを設定すると、カスタムプロパティが出現する。
[Export("BorderRadius"), Browsable(true)]
public nfloat BorderRadius { get; set; }

[Export("BorderWidth"), Browsable(true)]
public nfloat BorderWidth { get; set; }

[Export("BorderColor"), Browsable(true)]
public UIColor BorderColor { get; set; }
drawRectの代わりに、Drawをオーバーライドして領域を描画する。
public override void Draw(CGRect rect)
{
	this.Layer.CornerRadius = this.BorderRadius;
	this.Layer.BorderWidth = this.BorderWidth;
	this.Layer.BorderColor = this.BorderColor.CGColor;
	base.Draw(rect);
}
XamarinではdrawRectの代わりにDrawが呼ばれる模様。
DrawRect never called for custom view:
https://forums.xamarin.com/discussion/60934/drawrect-never-called-for-custom-view
と、ここまでやるとstoryboardでカスタムコントロールを配置可能になる。
こちらを参考にしました。
http://qiita.com/hatapu/items/99e6a8b19f890f0fec9f
Android
まだ。


